
Modern MCUs like the NXP Kinetis have security features which prevent reverse engineering, but can ‘brick’ devices too. Depending on the settings, it prevents read-out from the FLASH or reprogramming the device. While some of the protection is (mostly) not by-passable by design, in many case the devices looks like ‘bricked’ but still can be recovered. In this article I’ll get you some ways for a (hopefully) successful recovery.

The term ‘bricking’ is used, because if a device is really locked, you cannot use it any more, expect to use it as a ‘brick’: not useful for further development or re-programming. Usually it means that you have to take device off the board and solder a new one. Well, that worked prior the current silicon shortage. But with the current MCU and other silicon supply problem, that’s not an easy route any more.
Because Kinetis devices are used a lot in our projects, both student and research ones, we have to take every effort to recover devices.
Debug Probe
First: make sure you have some good and fast debug probes at hand. The ‘free and cheap’ alternatives might work, but in my experience they are far less successful because not fast enough. I know that a good debug probe costs money, but it can be the difference between success and loosing the device. I have had cases where only the P&E Multilink Universal FX or SEGGER J-Link Plus:

These are fast debug probes and might be able to gain access after reset fast enough.
Be careful: do NOT use ‘allow security’
First: As a tip to prevent possibly securing a device: do not use ‘allow security’ for a J-Link device in your project settings:

The reason is: with ‘allow security’ it will write whatever you have set in your binary, and does not ‘fix’ possible security settings. So use ‘allow security’ only if you want to secure your device and you know what you are doing.
The devices I’m aware of need a special pattern written to a given address to secure the device. Usually erasing the flash (0xffff’fffff) prevents read-out of the device, but you still can recover it from this state.
1. Check the usual suspects
If your device is not responding, check the usual suspects like cable or power connection. See Debugging Failure: Check List and Hints for a list of things.
2. Different Debug Probe
Try using a different (faster) debug probe. If the device disables debug pins or does other things cutting off debug after reset, a fast debug probe might catch it before it happens.
3. J-Link ‘unlock’
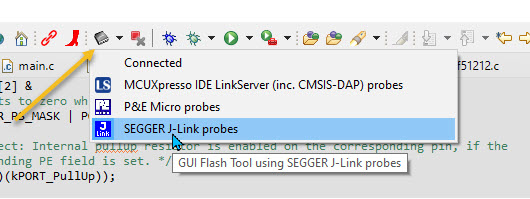
Built into the J-Link commands is a ‘recovery’ command for Kinetis, see Unlocking and Erasing FLASH with Segger J-Link. The same command is easily accessible in the NXP MCUXpresso IDE. Use the ‘Flash Tool’ to select the J-Link:
From there, select ‘Resurrect locked Kinetis device’ and run it:


P&E Emergency Recovery
The P&E Debug Interface provides a similar option: ‘Emergency Kinetis Device Recovery by Full Chip Erase‘:

This will try to do a mass erase first which should be able to recover the device.
Power Glitching
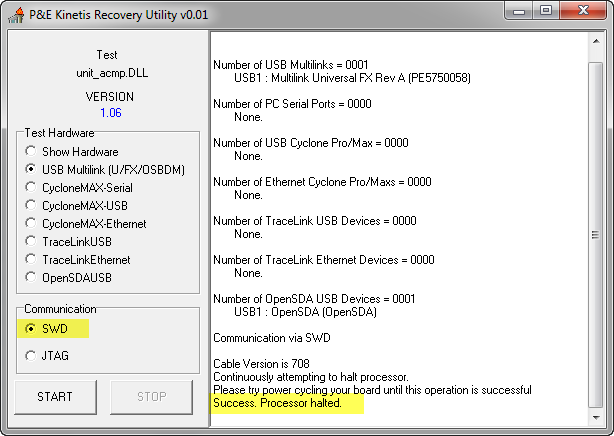
Another way of recovering is power glitching, see Recovering Cortex-M Microcontroller with a Power Glitch. The P&E debug probe includes a tool which talking constantly to the device during POR and can possibly recover a device that way:
Summary
So if your Kinetis device seems to be bricked, I would give it a few tries to recover with the tools I have prevented here. I was able to recover many (but not all) devices, so I hope this is useful information for you.
Links
- Bricking and Recovering OpenSDA Boards in Windows 8 and 10
- Recovering bricked LPC55Sxx EVK Boards
- Bricking and Recovering FRDM-KL25Z Boards: Reset, SWD Clock and Low Power
- Recovering Cortex-M Microcontroller with a Power Glitch
- Unlocking and Erasing FLASH with Segger J-Link
- GDB Client and Server: Unlocking GDB

I have a similar problem with LPC546xx MCUs. After some days of development on two prototype boards, the processor now seems bricked. It works with the last written firmare, but SWD connection appears completely disabled.
I even can enter ISP by pulling down ISP pins, but debug probe isn’t able to connect.
I tested everything, there’s an “unlock” command for these kind of MCUs, but I used it without success.
LikeLiked by 1 person
LPC546xx has enhance code-readout protection, see section 43 of the user manual. It is possible to disable mass erase on these devices, and it is possible therefore that you’ve bricked the device. However, since ISP is active, you should at least be able to find out what is going wrong. It is also possible to disable SWD with the ECRP mechanism. ECRP is controlled by the longword at address 0x20 in the flash memory, then ORed with some values in internal OTP memory. I suspect that you have got something invalid in that flash location. But I don’t understand why you have not been able to mass erase with ISP mode (and you are probably using Flash Magic tool) already.
LikeLiked by 1 person
So you did use the J-Link Unlock command for it, as described in https://community.nxp.com/t5/LPC-Microcontrollers/LPC546xx-MASS-ERASE-ulink2/m-p/1048588 , and that did not help?
LikeLike
Thanks Erich, a timely summary.
With Kinetis devices, I try to read the status register in the MDM-AP with a J-Link probe. There are bit fields that provide valuable information – for example if the Mass Erase disable bit it set; if the device is secured; or if the device is in a low-power mode. Glitching / “Catching” the core before it enters low power mode makes sense if the probe is fast enough, and if that’s the cause of the non-responsive device. But if mass erase is disabled, then that is another board for the “Waste Recycling” bin.
LikeLiked by 1 person
If mass erase is disabled, there is an interesting attack method to still read out the flash memory, as shown in https://blog.zapb.de/stm32f1-exceptional-failure/. I remember seeing a way to power-glitch over the mass erase check in the ROM code, but not sure if it applies to all Kinetis devices. That way I believe you could regain access even if mass-erase is initially disabled, but just skipping that test in the ROM code?
LikeLike