
The Hexiwear docking station would have a nice feature: it has embedded a debug circuit (OpenSDA). That way I would not need an external debug probe to debug the Hexiwear. However, a debug probe is required to reprogram the docking station itself:

Repgrogramming the Mikroelektronika Docking Station
Outline
I have not used the docking station debug circuit so far. It does not work out of the box, I would have to install pyOCD (which never worked well on my machine), and the default OpenOCD is simply not usable (too slow, and seems not to support the KW40 device). Additionally Windows 10 has rendered the default OpenSDA debug firmware useless within seconds (see “Bricking and Recovering OpenSDA Boards in Windows 8 and 10“).
Instead, I have used external debug probes (P&E Multilink and Segger J-Links) successfully, including restoring the original firmware (see “Flashing and Restoring the Hexiwear Firmware“). Still it might come handy if I have a working firmware on the docking station, either the P&E or Segger one. However, to recover and program the OpenSDA bootloader, an external probe is required.
I’m using in this post a Segger J-Link, but any other ARM SWD/JTAG probe would do it too. It shows how to program the OpenSDA (DAPLink) bootloader on the docking station.
NXP Kinetis K20 SWD Header
First I need to find the SWD debug header to reprogram the NXP Kinetis K20 on the board:

Hexiwear Docking Station Schematics
The footprint for that header is located here:

K20 SWD Footprint
💡 No idea why the designers have placed that header under the Hexiwear itself: having it placed outside (with the correct orientation would make more sense in my opinion.
For programming the K20/OpenSDA, make sure the OSDA switch is in the ON position:
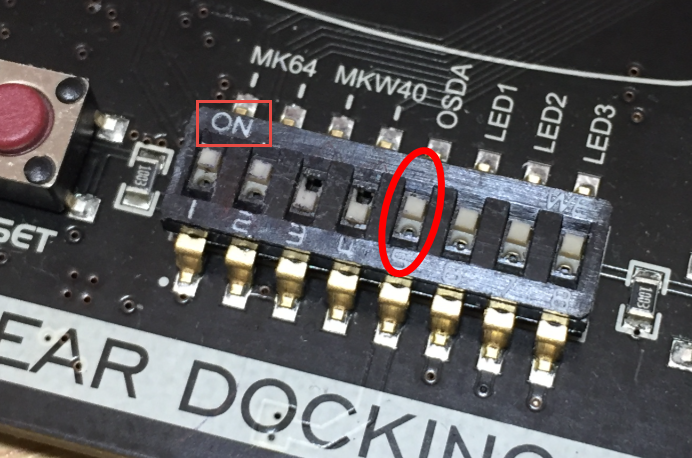
OSDA in ON Position
Connecting Debug Cable
Because that connector is not populated, a standard ARM 10 pin debug header is needed:

ARM 2×5 SWD/JTAG Header
However, I’m *not* going to solder that header in (not needed). Instead, I put the header into the debug connector cable:
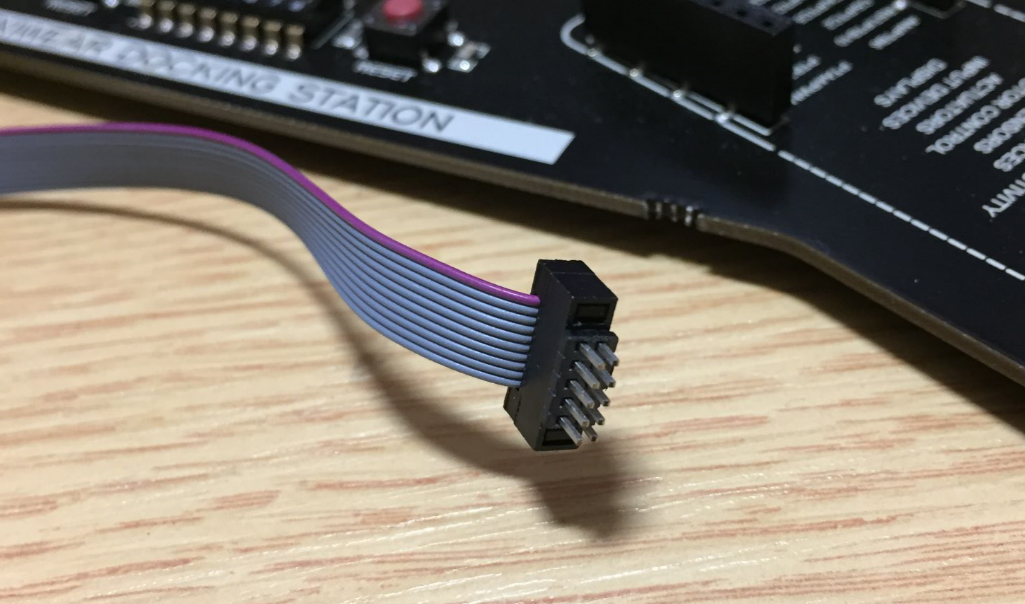
Debug Header on Debug Cable
Then use the header to make connection with the board on the *bottom* side. Pay attention to the white dot marking pin 1:
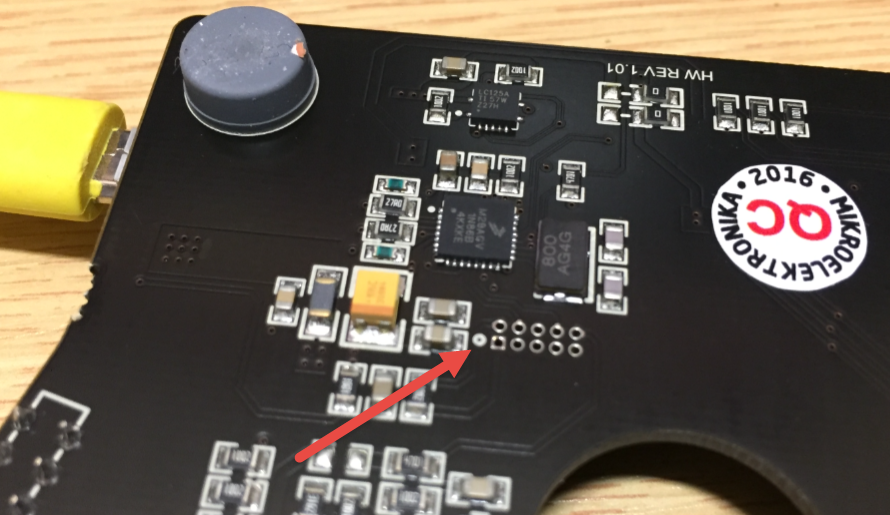
Debug Header Footprint on Bottom Side
Put in the header with the cable. The header should fit nicely and make contact, otherwise pull on the cable to make a good contact. Make sure your properly align the red wire to pin 1:

Inserted Debug Cable
Programming the DAPLink Bootloader
I used the approach outlined in “Bricking and Recovering OpenSDA Boards in Windows 8 and 10” to program the OpenSDA/DAPLink bootloader:
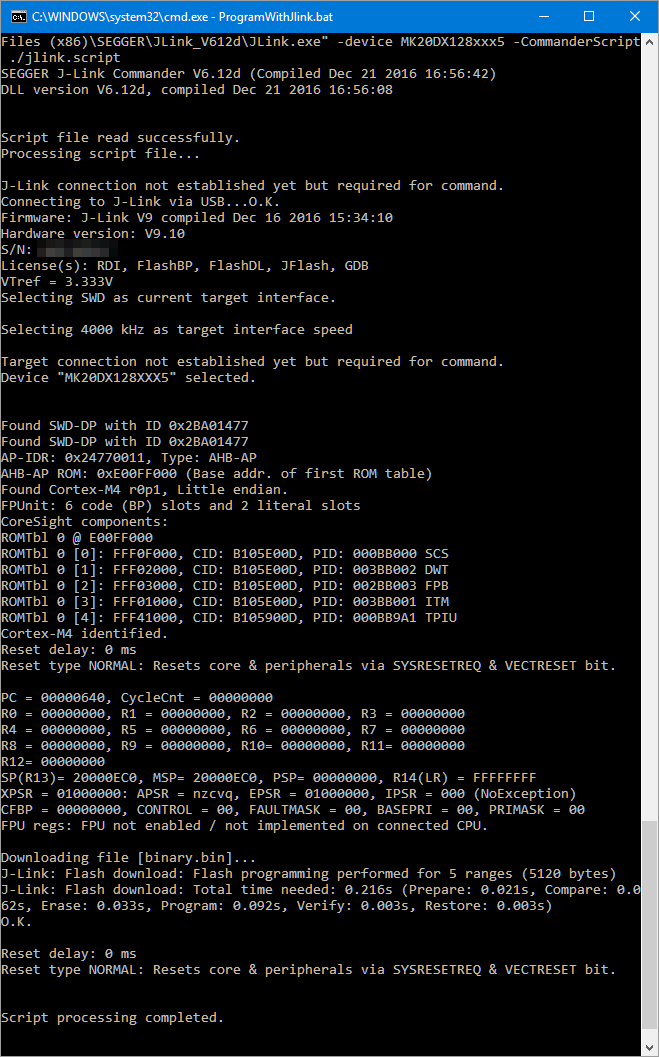
Running Script to program the bootloader
After successfully programming the bootloader, it shows up as DAPLINK:
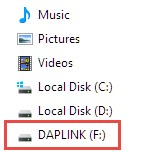
daplink
Now it is ready to be programmed with any OpenSDA (P&E, Segger) firmware :-).
Summary
The default bootloader on the Hexiwear docking station can be reprogrammed so it can be used with Windows 10 either as a P&E or Segger OpenSDA probe. I still prefer to use the external debug probe, but to have an extra debug interface on the docking station comes handy :-). In any case, I recommend always to have a commercial debug probe at hand, as the ‘free’ ones from the silicon vendors are good to start with, but cannot solve the hard problems, or you might end up with a pile of bricked boards on your desk.
Happy Dockstationing 🙂

Maybe you could try the openOCD on a raspberry pi for your JTAG development. There are some Youtube videos that Adadfruit has done but they have the ST Micro flavors. The GPIO pins can be configured as JTAG pins and you can Telnet to the openOCD on the pi. I don’t recall whether your device was supported.
LikeLike
Hi Dan,
thanks, good point, I might have to try this out.
LikeLike
Hi,
Can we program the hexiwear with the raspberry pi?
LikeLike
No, you need a real SWD/JTAG debug probe. You only could use the Raspberry Pi if you have already a bootloader on the Hexiwear which is able to communicate with the Raspberry Pi.
LikeLike