
In “Blinky LED with openHAB on Raspberry Pi” I have used openHAB on a Raspberry Pi to control an LED attached to the Pi, and in “Controlling NXP Freedom Board RGB LED with openHAB and Raspberry Pi” I have explored how to connect a NXP Freedom Board over USB CDC to the Raspberry Pi. In this article I’m going to combine both: to control the LED on a NXP Freedom board remotely with openHAB on the Raspberry Pi.

ColorPicker with openHAB and FRDM-KL25Z
Outline
In this article I show how to control the RGB LED on a NXP Freedom board (like FRDM-KL25Z) which is connected to a Raspberry Pi over USB CDC. The FRDM board uses USB CDC and a command line interface. Through that interface I can send commands and receive status from the board. That way the attached board can act as a gateway or do hard realtime tasks. To keep things simple, I’m using openHAB to control the RGB LED present on the board.
💡 I’m using openHAB 1.7 in this article, and 1.8 just came out. I had not the time yet to update to 1.8, but I assume all the steps here apply to the version 1.8 too.
NXP Freedom Board RGB LED
On the FRDM-KL25Z there is an RGB LED. In “Tutorial: Enlightning the Freedom KL25Z Board” I showed how to control the LEDs. On the board I have an application running which accepts command line commands to control each color of the RGB LED. I can set the PWM duty of each LED with a value from 0x0 to 0xFFFF. For example with
LED1 duty 0
the RED RGB LED is turned off, and with
LED1 duty 0x7FFF
the red color is put to half of its maximum brightness (which would be 0xffff)
USB CDC with the Raspberry Pi
The FRDM-KL25Z board gets attached to the Raspberry Pi USB port.
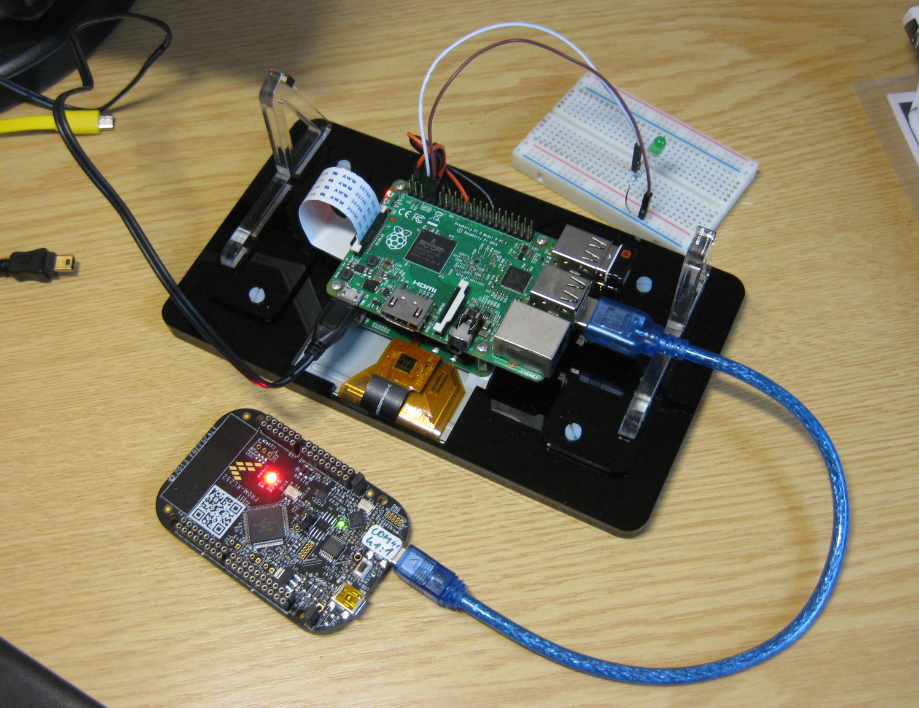
FRDM-KL25Z connected to Raspberry Pi with openHAB
With
dmesg
I can see that the USB CDC gets registered on ttyACM0:
[ 3201.817242] usb 1-1.3: new full-speed USB device number 6 using dwc_otg
[ 3201.923400] usb 1-1.3: New USB device found, idVendor=1366, idProduct=1015
[ 3201.923426] usb 1-1.3: New USB device strings: Mfr=1, Product=2, SerialNumber=3
[ 3201.923443] usb 1-1.3: Product: J-Link
[ 3201.923460] usb 1-1.3: Manufacturer: SEGGER
[ 3201.923476] usb 1-1.3: SerialNumber: 000621000000
[ 3201.928346] usb-storage 1-1.3:1.3: USB Mass Storage device detected
[ 3201.928834] scsi host0: usb-storage 1-1.3:1.3
[ 3201.963087] cdc_acm 1-1.3:1.0: ttyACM0: USB ACM device
[ 3201.964341] usbcore: registered new interface driver cdc_acm
[ 3201.964361] cdc_acm: USB Abstract Control Model driver for USB modems and ISDN adapters
[ 3202.928229] scsi 0:0:0:0: Direct-Access     SEGGER   MSD Volume       1.00 PQ: 0 ANSI: 4
[ 3202.930463] sd 0:0:0:0: [sda] 21829 512-byte logical blocks: (11.1 MB/10.6 MiB)
[ 3202.931064] sd 0:0:0:0: [sda] Write Protect is off
[ 3202.931084] sd 0:0:0:0: [sda] Mode Sense: 0b 00 00 08
[ 3202.931734] sd 0:0:0:0: [sda] No Caching mode page found
[ 3202.931754] sd 0:0:0:0: [sda] Assuming drive cache: write through
[ 3202.949483]  sda:
[ 3202.952797] sd 0:0:0:0: [sda] Attached SCSI removable disk
[ 3202.956449] sd 0:0:0:0: Attached scsi generic sg0 type 0
With
minicom -D /dev/ttyACM0 -b 38400
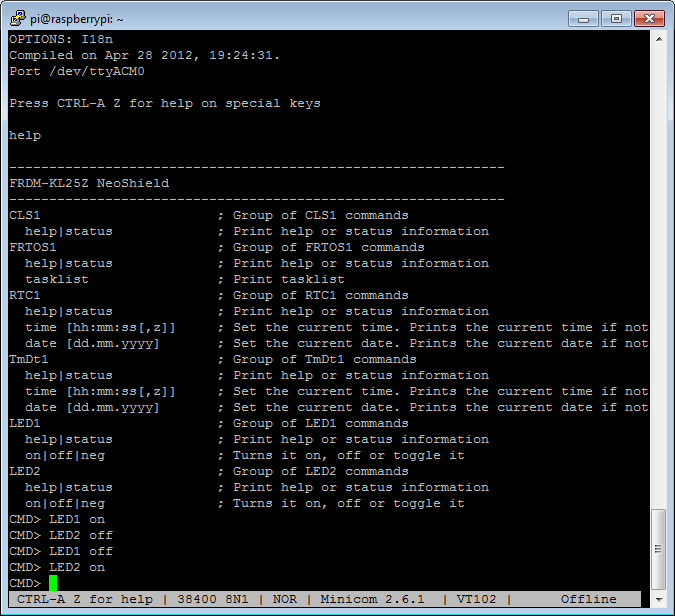
Testing LED with terminal program
I can test the LED commands of the board. Because the tty port might change every time, I need to lock it down to a known port name (see “USB CDC with the Raspberry Pi“).
I have added the following to the /etc/udev/rules.d/99-usb-serial.rules:
# Segger J-Link OpenSDA V1 on FRDM-KL25Z
SUBSYSTEM=="tty", ATTRS{idVendor}=="1366", ATTRS{product}=="J-Link", ATTRS{idProduct}=="1015", ATTRS{serial}=="000621000000", SYMLINK+="ttyUSB52"
That way I have can use ttyUSB52 as a fixed USB port for the board:

Fixed USB Port
Interface for openHAB
It is necessary to specify the ports in the autostart file of openHAB. The autostart file is located in /etc/init.d/openhab (see “Autostarting openHAB on Raspberry Pi“). To add two serial ports (USB50 and USB51) command line with java needs to be extended with the following:
-Dgnu.io.rxtx.SerialPorts=/dev/ttyUSB50:/dev/ttyUSB51

openHAB Autostart File
Then use
sudo /etc/init.d/openhab stop
to stop the current service, followed by
sudo /etc/init.d/openhab start
to restart openHAB. Or simply reboot the Raspberry Pi.
Serial Binding
openHAB is using so called ‘bindigs’ to talk to the hardware. For serial/UART/USB CDC it needs the org.openhab.binding.serial-*.jar binding. The openHAB installation comes with a full sets of bindings, but having only the needed bindings in the ‘addons’ folder avoids a slow openHAB startup. The following screenshot shows my bindings installed:

openHAB Serial Binding
Copy the binding file
org.openhab.binding.serial-*.jar
into
/opt/openhab/addons
Items, Rules and SiteMap
In openHAB pretty much everything is defined with items, rules and the site map:
- Items: collection of things to interact with: switches, strings, color, …
- Rules: defines what shall happen e.g. if I turn on a switch
- SiteMap: defines the graphical outline and GUI of all the items
openHAB Designer
These are all text files, so I can use a normal text editor to edit them. There is as well the Eclipse based openHAB Designer:
openHAB Designer
The openHAB Designer is available on the openHAB downloads page: http://www.openhab.org/getting-started/downloads.html
Somehow it is not possible to create a new configuration. But it is possible to open an existing one (which anyway exists in each openHAB installation). To open a configuration, point to the ‘configurations’ folder inside openHAB:
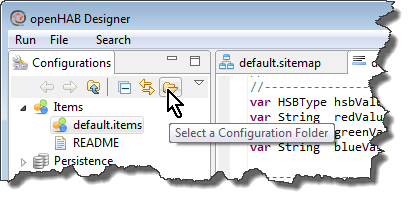
Open openHAB Configuration
Items File
In my default.items file I have the following:
//------------------------------------------------------------------------
//    Raspberry Pi
//    GPIO
//------------------------------------------------------------------------
Switch RaspiLED{ gpio="pin:4" }

//------------------------------------------------------------------------
//    FRDM Board
//    UART:   38400 8N1
//------------------------------------------------------------------------
Switch FRDM_LED_RED   "Red"
Switch FRDM_LED_GREEN "Green"
Switch FRDM_LED_BLUE  "Blue"
Color  FRDM_LED_RGB "RGB LED"
String FRDM_UART "UART [%s]" {serial="/dev/ttyUSB52@38400"}
The first item is for my Raspberry Pi GPIO LED (see “Blinky LED with openHAB on Raspberry Pi“). With
Switch FRDM_LED_RED "Red"
I define an On/Off item labeled “Red” with symbol name FRDM_LED_RED. This one will be used to turn on/off the red part of the RGB LED on the board:

Red LED Widget
With
Color FRDM_LED_RGB "RGB LED"
I have a RGB color picker:

RGB Color Picker
With
String FRDM_UART "UART [%s]" {serial="/dev/ttyUSB52@38400"}
I have a UART item I can talk with. Note that I’m using the fixed ttyUSB port I have configured before. The 38400 defines the baud rate to be used. The “UART [%s]” is for displaying a one line response string from the tty port which I’m not using in this article.
Site Map
With the default.sitemap file I define the layout of the items:
sitemap default label="My Home"
{
    //------------------------------------------------------------------------
    //    Raspberry Pi
    //    GPIO
    //------------------------------------------------------------------------
    Frame label="Rasperry Pi GPIO"
    {
        Switch item=RaspiLED
    }
    //------------------------------------------------------------------------
    //    FRDM Board
    //    RGB LED
    //------------------------------------------------------------------------
    Frame label="FRDM LEDs"
    {
        Switch item=FRDM_LED_RED
        Switch item=FRDM_LED_GREEN
        Switch item=FRDM_LED_BLUE
        Colorpicker item=FRDM_LED_RGB
    }
}
With ‘Frame’ I have a group and inside the group I have the items listed. This gives me the following GUI:

openHAB Freedom Board Site Map
With the color widget I can pick a color and its brightness:
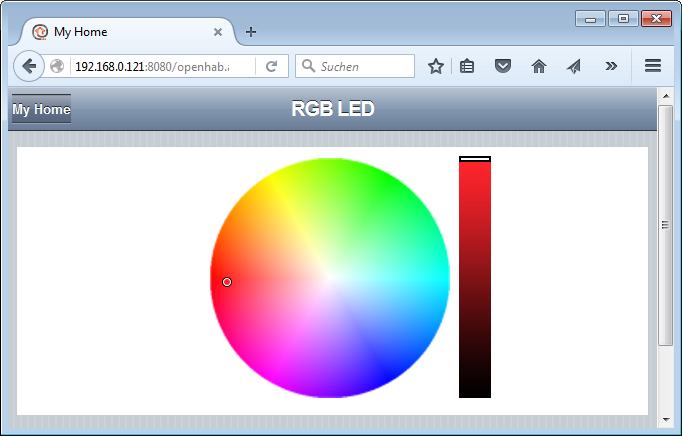
openHAB ColorPicker Widget
Rules File
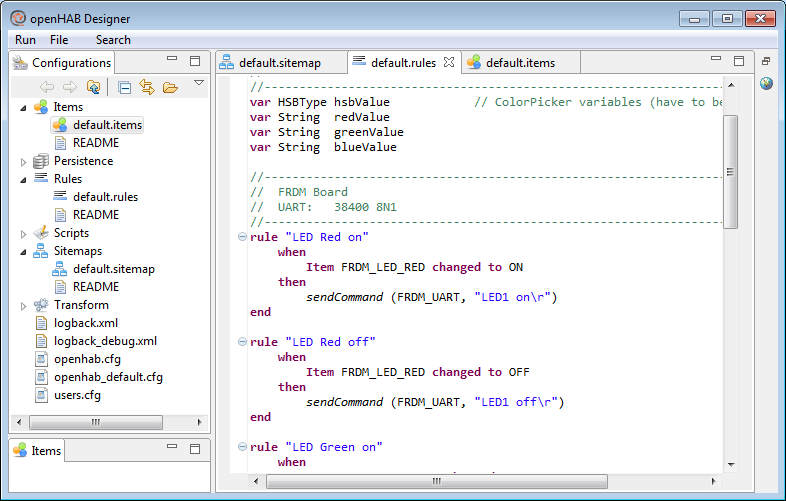
The default.rules file has the following content:
import org.openhab.core.library.types.*
import org.openhab.model.script.actions.*

//------------------------------------------------------------------------
//    Global variables
//------------------------------------------------------------------------
var HSBType hsbValue            // ColorPicker variables (have to be global)
var String  redValue
var String  greenValue
var String  blueValue

//------------------------------------------------------------------------
//    FRDM Board
//    UART:   38400 8N1
//------------------------------------------------------------------------
rule "LED Red on"
    when
        Item FRDM_LED_RED changed to ON
    then
        sendCommand (FRDM_UART, "LED1 on\r")
end

rule "LED Red off"
    when
        Item FRDM_LED_RED changed to OFF
    then
        sendCommand (FRDM_UART, "LED1 off\r")
end

rule "LED Green on"
    when
        Item FRDM_LED_GREEN changed to ON
    then
        sendCommand (FRDM_UART, "LED2 on\r")
end

rule "LED Green off"
    when
        Item FRDM_LED_GREEN changed to OFF
    then
        sendCommand (FRDM_UART, "LED2 off\r")
end

rule "LED Blue on"
    when
        Item FRDM_LED_BLUE changed to ON
    then
        sendCommand (FRDM_UART, "LED3 on\r")
end

rule "LED Blue off"
    when
        Item FRDM_LED_BLUE changed to OFF
    then
        sendCommand (FRDM_UART, "LED3 off\r")
end

rule "Set RGB value"
    when
        Item FRDM_LED_RGB changed
    then
        hsbValue = FRDM_LED_RGB.state as HSBType
        // each int value is from 0 to 100 (%)
        var int redInt = hsbValue.red.intValue
        var int greenInt = hsbValue.green.intValue
        var int blueInt = hsbValue.blue.intValue

        // transform 0..100 to 0x0..0xffff
        redInt = (redInt*0xffff)/100
        greenInt = (greenInt*0xffff)/100
        blueInt = (blueInt*0xffff)/100

        // convert to strings
        redValue   = (redInt).toString
        greenValue   = (greenInt).toString
        blueValue   = (blueInt).toString

        sendCommand (FRDM_UART, "LED1 duty " + redValue + "\r")
        sendCommand (FRDM_UART, "LED2 duty " + greenValue + "\r")
        sendCommand (FRDM_UART, "LED3 duty " + blueValue + "\r")
end
The most simple rule is like this one:
rule "LED Red on"
    when
        Item FRDM_LED_RED changed to ON
    then
        sendCommand (FRDM_UART, "LED1 on\r")
end
The rule named “LED Red on” is that if the widget FRDM_LED_RED changes to the ON state, I’m sending the “LED1 on” command to the USB CDC/UART port. As simple as that :-).
The rule for the RGB widget is a bit more complicated as I need to transform the HSB (Hue, Saturation, Brightness) values into RGB values. But after all, it is pretty straight forward. Checking the events log with
tail /opt/openhab/logs/events.log
shows the commands sent to the board:
2016-01-24 07:58:46 - FRDM_UART received command LED1 duty 60292
2016-01-24 07:58:47 - FRDM_UART received command LED2 duty 7864
2016-01-24 07:58:47 - FRDM_UART received command LED3 duty 9830
Demo
I can use both a web browser which connects to the Raspberry Pi or a mobile phone to turn on/off the LEDs and to change the RGB color. The phone (or tablet) either connects with the web browser to the Raspi openHAB web server. Or it can use the openHAB app (iPhone: https://itunes.apple.com/en/app/openhab/id492054521?mt=8).

openHAB with FRDM-KL25Z
Below is a short video with using a web browser on the Raspberry Pi and using a mobile phone with the color widget:
Summary
It does not take much to hook up the Freescale (now NXP) Freedom board to a Raspberry Pi and communicate with it. Basically it is about combining and extending my earlier tutorials (see links below). So now I have a way to change the color of the LED. What about to make a home automation lamp with that project? It is just yet another small step, but that will be subject of a next post. So stay tuned 🙂
Happy Raspberring 🙂
Links
- Installing openHAB: Installing openHAB Home Automation on Raspberry Pi
- Autostarting openHAB: Autostarting openHAB on Raspberry Pi
- Blinking a LED: Blinky LED with openHAB on Raspberry Pi

Hi Ritschi,
Interesting post! I prefer to use “screen” terminal multiplexer (e.g. screen /dev/ttyACM0 38400) to access a serial device from a bash shell since it does not require an additional installation on most of the Linux distributions. I don’t know about Raspian? Overall I prefer to use “tmux” over “screen” for terminal multiplexing but unfortunately “tmux” cannot access a serial device 😦
Btw, if you want to enhance your bash shell experience check out my vim- and dotfiles on github:
https://github.com/schulerjoe/vim
https://github.com/schulerjoe/dotfiles
Gr Joe
LikeLike
Hi Joe,
many thanks for the hints and links, appreciated! About Raspian: it is a Debian based distribution for Raspberry Pi: https://www.raspbian.org/
Vieli Grüess i Norde!
LikeLike
Hi Ritschi,
Yeah I know that it’s a debian based distribution optimizef for thw Raspberry Pi board. But is the screen command available with the default Raspian installation? Well I should maybe check this distribution out on a VM since I do not own a Pi 😉
Gruess Joe
LikeLike
Pingback: openHAB RGB LED Light Cube with WS2812B and NXP Kinetis | MCU on Eclipse
Pingback: Hexiwear with Raspberry Pi and OpenHAB Home Automation | MCU on Eclipse