
If a Cortex microcontroller is unresponsive to a debug connection for various reasons, then this trick might help to recover that device for you. All you need is a debug probe from PEMICRO and a utility.

Many NXP Kinetis and other ARM Cortex-M devices and microcontroller have the possibility to disable access to the device (see How (not) to Secure my Microcontroller). But it can happen as well that if you do not pay close attention to the flash protection security bits: you might lock you out from accessing the device. In addition to that it is possible to re-assign or disable the reset pin and functionality (see Using the Reset Button on the Freedom Board as User Button) or playing with the NMI pin (Disabling NMI (Non Maskable Interrupt) Pin). Even worse: you can disable or re-mux the debug pins (maybe because you did not know what you are doing, or you wanted preventing unauthorized access, or you just needed these pins for something).

This all can result in a device not responsive any more to a debug connection, because out of reset you basically have cut the bridges for the debugger to access the device.
So there is a good chance to reclaim access to the device using a debug probe and a utility from P&E:
- Attach the P&E debug probe to the debug header (SWD/JTAG connector)
- Got to https://www.pemicro.com and download the Kinetis Recovery Tool (you need to have a user login):

- Unpack the zip file and start the Kinetis_Recovery_Utility.exe
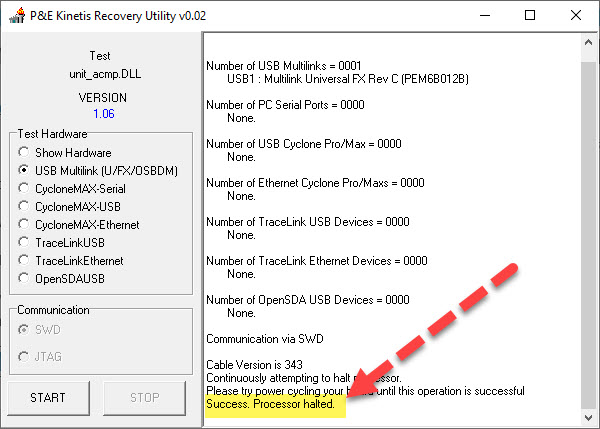
- Specify the debug probe attached and press START:

- The utility now constantly tries to halt the processor. Constantly power cycle the microcontroller.
- It might take several attempts, but luckily after a few the processor is halted:
- With with the processor halted I can do a start a debug session (e.g. program a ‘good’ binary or read out the memory 🙂 ).
Summary
You can run into the that ‘bricked’ situation easily if programming a wrong binary to the microcontroller or if you otherwise mess it up.
With that approach I have been able to recover and re-gain many microcontrollers which otherwise would be considered as ‘lost’ or ‘not accessible any more’.
I hope you find this article useful.
Happy glitching 🙂

Good article – I should point out that the only time I screwed up a processor on a Freedom board due to a power glitch it was the OpenSDA programmer chip.
This technique did recover the chip.
LikeLiked by 1 person
My experience is that chances are higher if you have a class of 30-50 students and they are working with different boards and cores the same time. I can happen that you flash the wrong image with a different memory map to the wrong board, affecting the flash protection areas. Most of the time I can recover it with a J-Link or P&E Multilink, it usually fails recovering it with LinkServer. For the ‘harder to recover’ cases I’m using P&E with that utility.
LikeLiked by 1 person
Great tip. I had a similar issue sometime ago when changing the TCM ITCM/DTCM allocation. I wanted (or thought I wanted) 32k ITCM and the rest DTCM, but with only 32K ITCM I could no longer connect my Segger as it needed 64K (or some similar reason). I managed to recover it by halting and erasing the flash using MCUXpresso. But this technique sounds very useful also.
LikeLiked by 1 person
Hi John,
as long as the debug probe still can use the reset line and the SWD pins, chances are good that with an erase from the MCUXpresso IDE you can recover it. But if the device immediately goes into a low power mode with SWD disabled, or reset and SWD pins badly configured then I have successfully used the PEMicro probe with the approach presented in this article. On a side note: this is why I have debug probes from different vendors on my desk, because if one probe cannot do something, another one probably can be a (microcontroller) life safer.
LikeLiked by 1 person
Voltage fault injection attacks are always a good idea to reverse engineer other boards hehe 😉
LikeLiked by 2 people
Hello Mr. Styger, Thank you for your article. Last year I managed to brick 2 boards (FRDM K82F and MSP432 Launchpad). It had never happened to me before and I’ve been doing this job for a very long time. Is there any chance to use this technique with J-Link or any other JTAG probe? I’m asking because the aforementioned FRDM board cost around $100 and the PE micro probe ~$700 ouch 😉
LikeLiked by 1 person
I have not seen a similar utility from other vendors. But you don’t need the P&E Multilink FX I have used in the pictures (this was just the one I had at hand). I do have as well the ‘normal’ P&E Multilink Universal which is around $199 afik. Still money, but I always prefer to have a multiple (P&E and J-Link) probes around because that way it allows me to solve such problems. The good thing is that you are not restricted to the on-board circuit which has its limitations.
LikeLike
Thank you!
LikeLiked by 1 person