
3.5″ Diskette Drives are not widely used any more: CDs, DVDs, memory/thumb drives and downloads from the web are the usual distribution method these days for software. Back a few years ago, software was distributed on one or many 3.5″ diskettes, and even before that time on 5 1/4″ floppy disk drives. So what to do with all these not-used-anymore hardware? Play music with it 🙂
Floppy Music
Outline
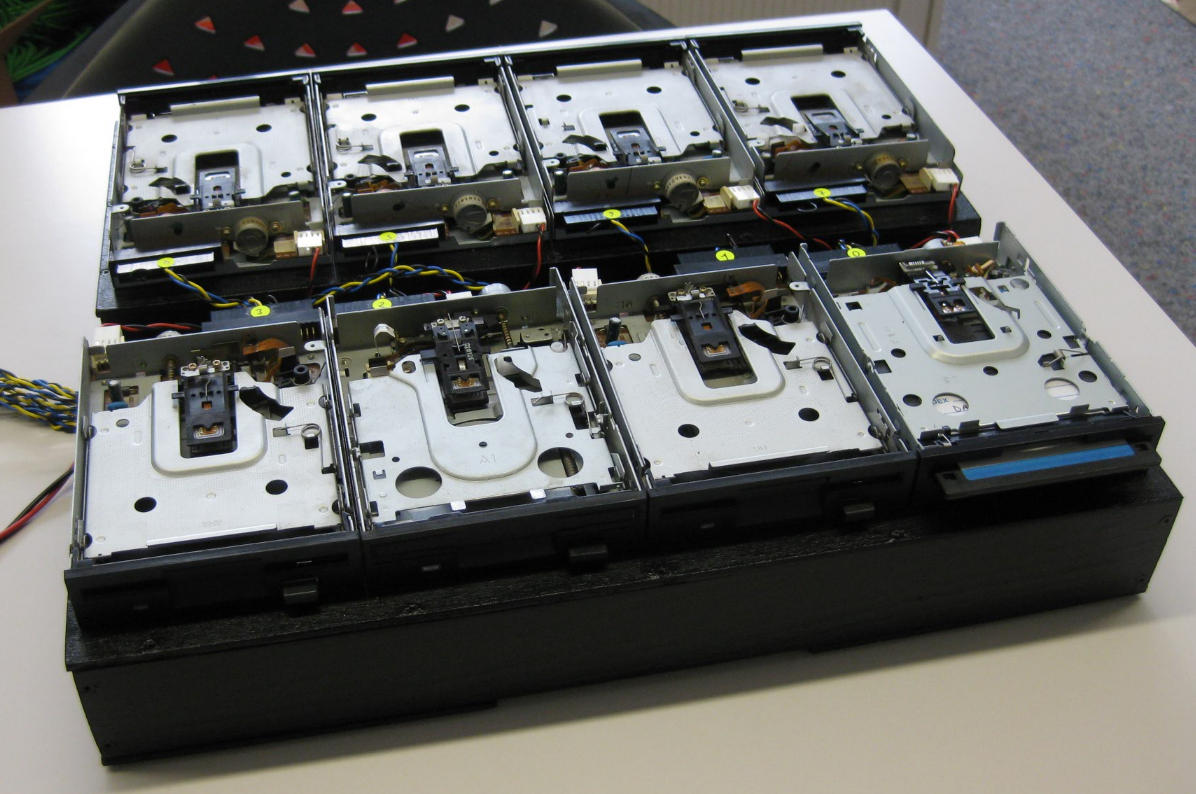
This article describes how multiple 3.5″ diskette drives are used to play midi songs. The microcontroller on a NXP FRDM-K64F board drives the signals to 8 stepper motors in normal diskette drives with changing frequencies to play the midi songs.
Principle
The principle to let a diskette drive is rather simple: each drive has a stepper motor to move the read/write head forward and backward.
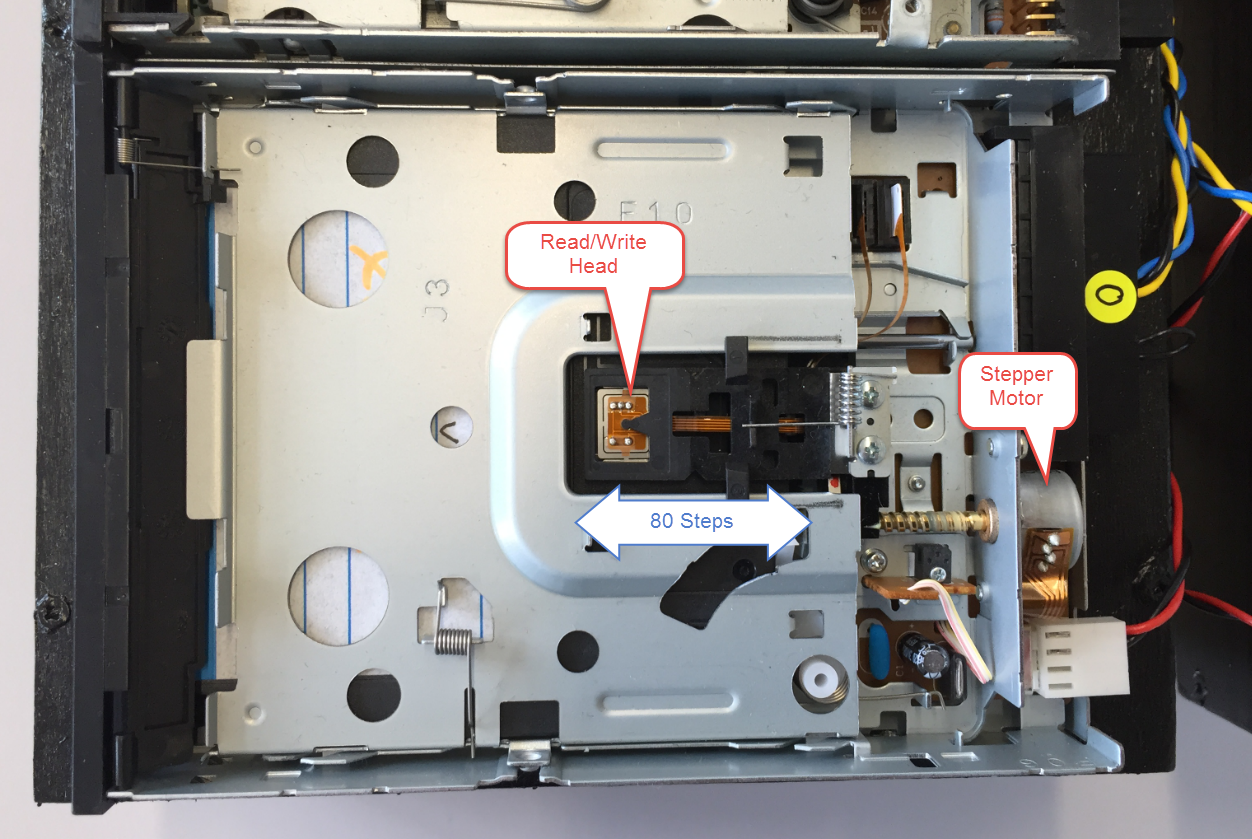
Internals of a Diskette Drive
There are 80 tracks on a diskette, therefore the head can make up to 80 steps into one direction.
💡 For better sound and to see the head moving I have removed the drive top cover. Depending on the brand, that might be a bit tricky.
The following pictures shows the direction (top) and the step (bottom) signals of a drive head moving 80 steps forward and then back again.
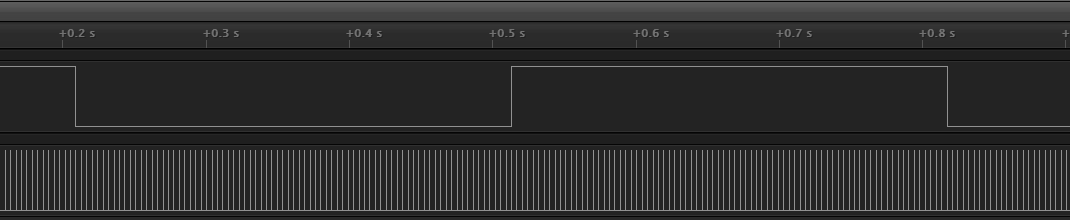
Floppy Signals
The frequency of the step signal produces an audible noise. There is the limitation that the maximum stepping frequency around 400 Hz.
Material
I used the following material:
- 8 Floppy Disk Drives (FDD). If possible, get them all from the same type/manufacturer, as different drives sounds different. I have ordered several drives from Microspot for about $5 each.
- FRDM-K64F board (or any other suitable board with at least 16 external pins). Lots of RAM, FLASH and SD card socket is a plus.
- A 5V DC 5A Power supply with DC Power adapter (e.g. https://www.adafruit.com/products/368)
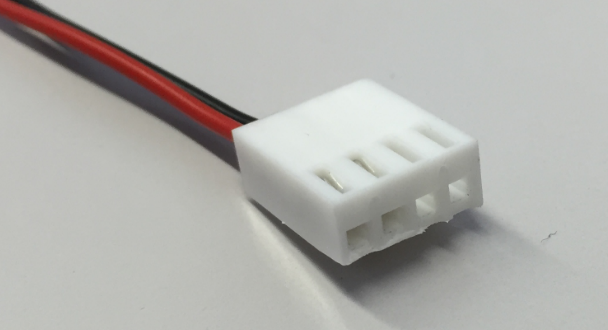
- Cables and connectors. As connectors I used the following:
- Molex Crimp Housing: Distrelec Part Number 11 84 46
- Molex Crimp Socket Contacts: Distrelec Part Number 11 84 78
- Diskette Drive Power Connector: AMP 171822
- Construction material (wood or card box).
- Optional: jumper cables and a breadboard.
There is a lot of flexibility: if you don’t have the connectors, you might directly solder the wires to the drive header (kind of ugly, but low-cost).
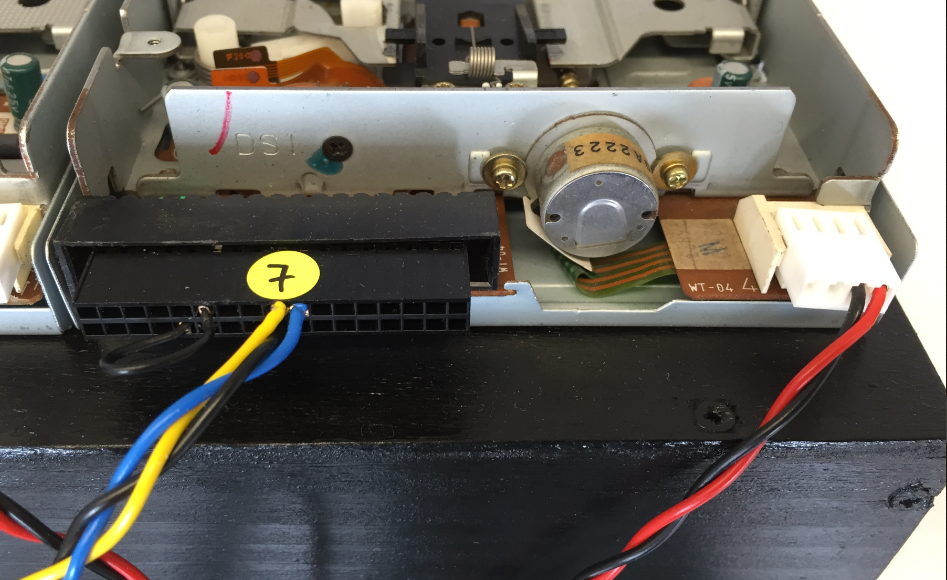
Power
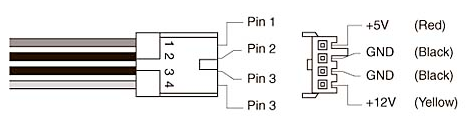
Power to the drives is provided with a 4-pin connector:
Diskette Drive Power Connector (Source: http://www.informit.com/articles/article.aspx?p=31105&seqNum=5)
Only GND and 5V need are required:
Diskette Drive Power Connector Detail
Each drive needs around 400 mA, so a good power supply is needed. I’m using a 5V 5A one with a barrel connector to the combined power supply lines for all drives:

5V Power Supply
Data
The diskette drives use a 2×17 connector for the data signals.
I’m using yellow wires for direction, blue wires for stepping the motor, black for GND and red for 5V DC:
Data and Power Connector
See http://www.interfacebus.com/PC_Floppy_Drive_PinOut.html for the pinout. Pin 12 (drive select, LOW active) is connected to GND:

Floppy Drive Data Pins
The used signals are (with the cable color I have used):
- Pin 12, SEL1, Drive/Motor select, low active, connected to GND (Pin 9)
- Pin 17: GND connection
- Pin 18: DIR, Direction, yellow cable
- Pin 20: STEP, stepper motor step, blue cable
- The pins on the lower pin rows (odd numbers) are all GND, but not all pins are connected.
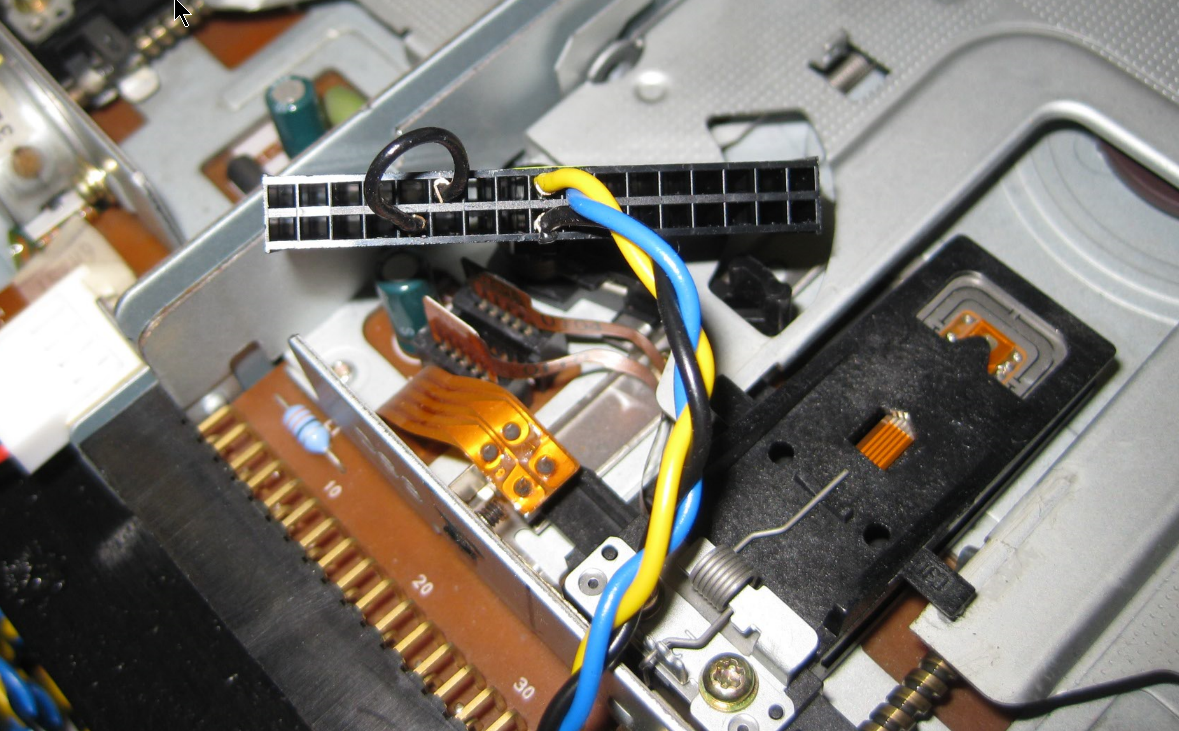
Diskette Drive Connector
Housing
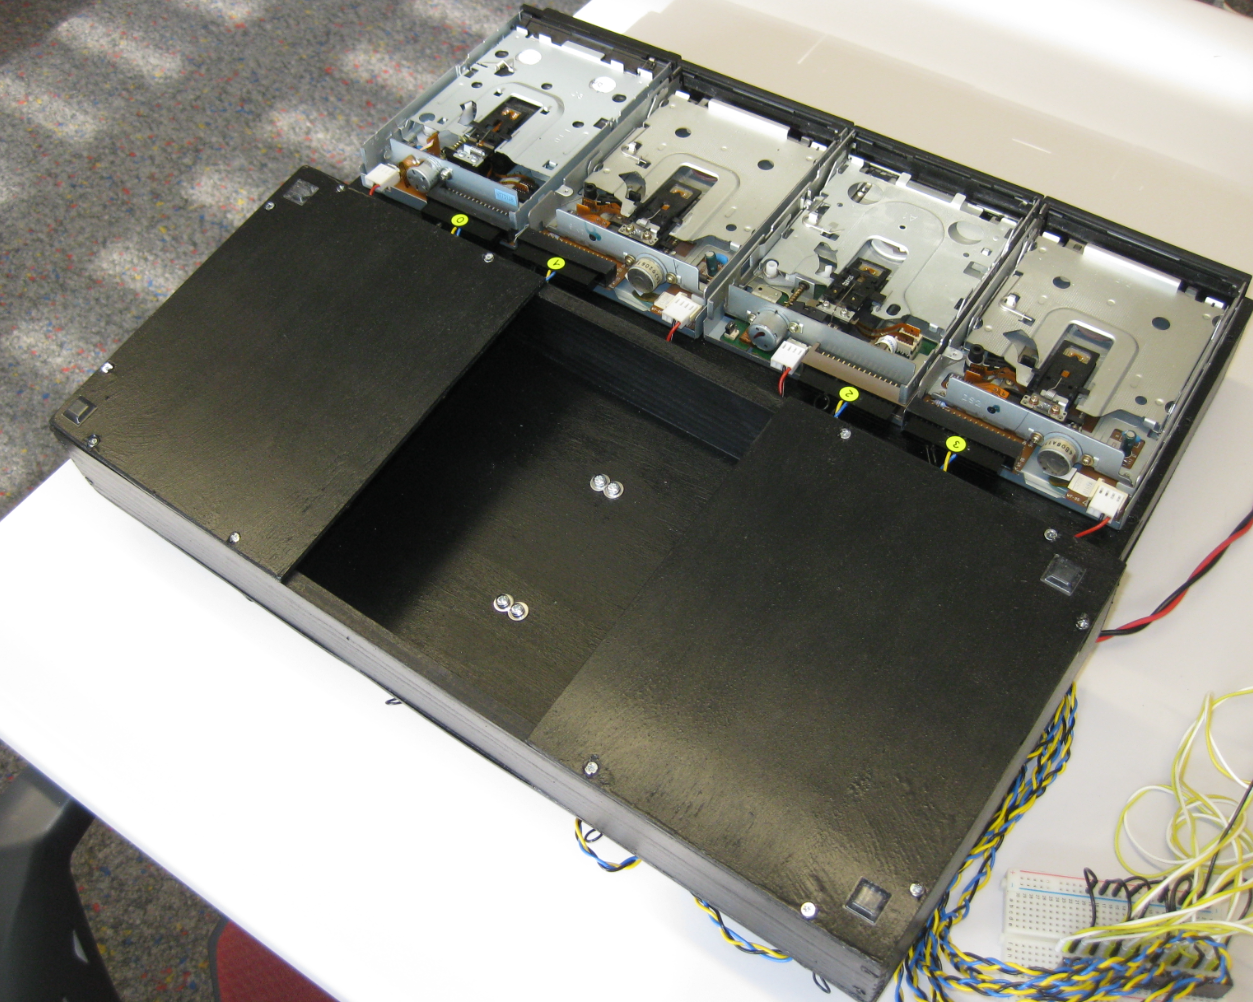
To mount the drives, I constructed two wooden boxes painted in black. The bottom of the box is open for a better sound:
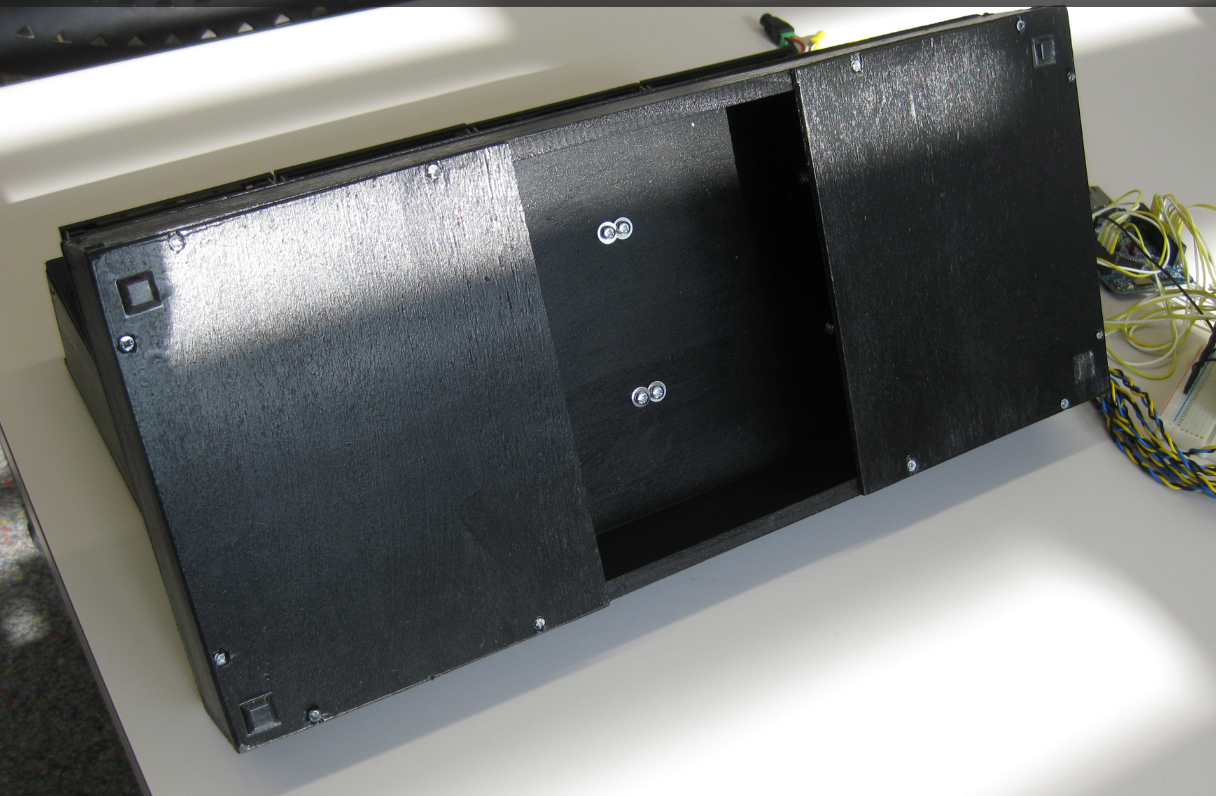
Bottom of Box
Top and Bottom Side
Having two boxes makes it easier to carry around, plus the cables can be put inside the boxes.
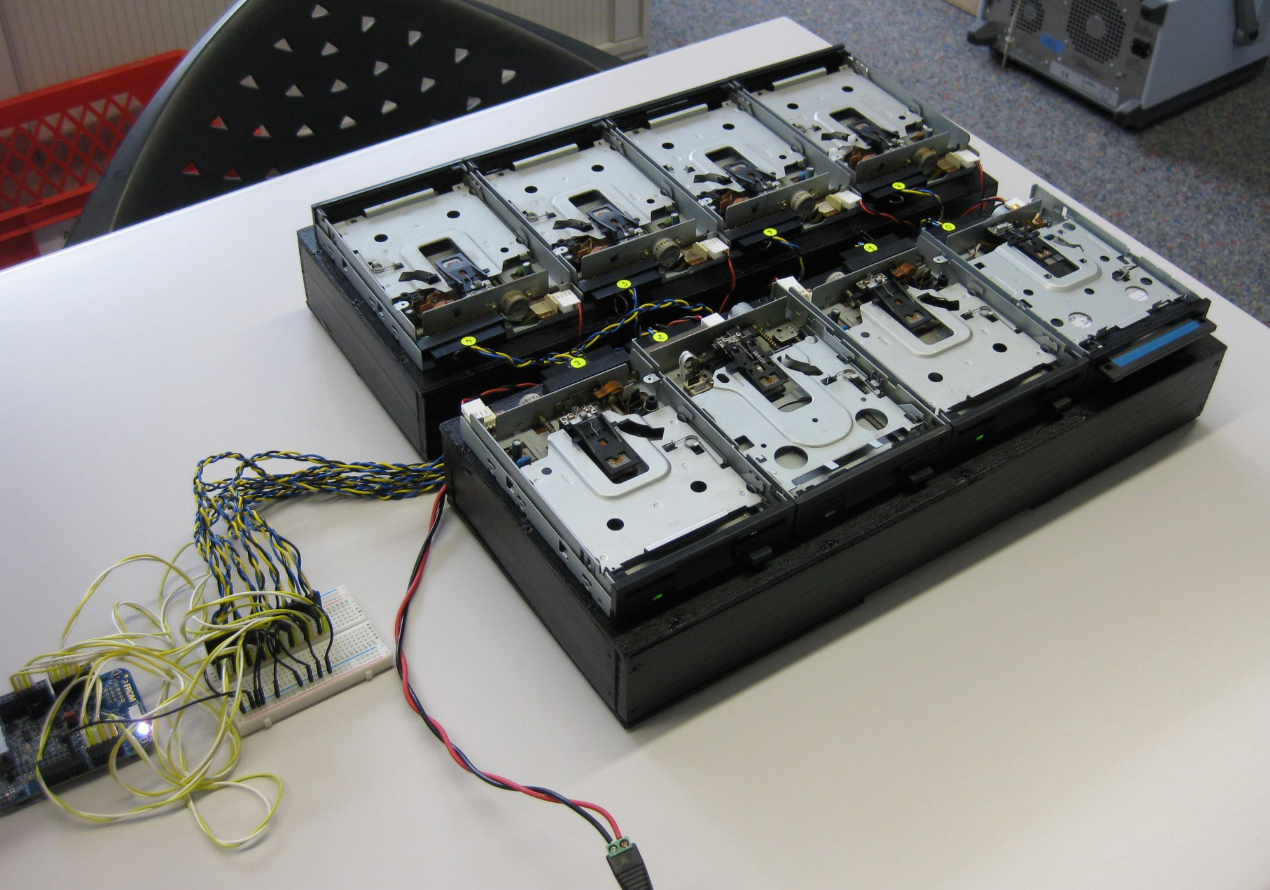
Diskette Drive Boxes
Wiring
I have used the FRDM-K64F board mainly because it offers many pins on the headers. But basically any other board could be used. For each diskette drive two wires are needed: one for the direction (DIR) and one for the motor (STEP) which makes 16 pins.
Because of the low signal frequency, the wires don’t have to be that short, I have them about 50 cm long. For flexible wiring I’m using jumper wires and a breadboard.
Picture below shows the wires (white: DIR, yellow: STEP) on the FRDM-K64F board:

Wires to the FRDM Board
On the breadboard, GND is distributed to every disk drive:
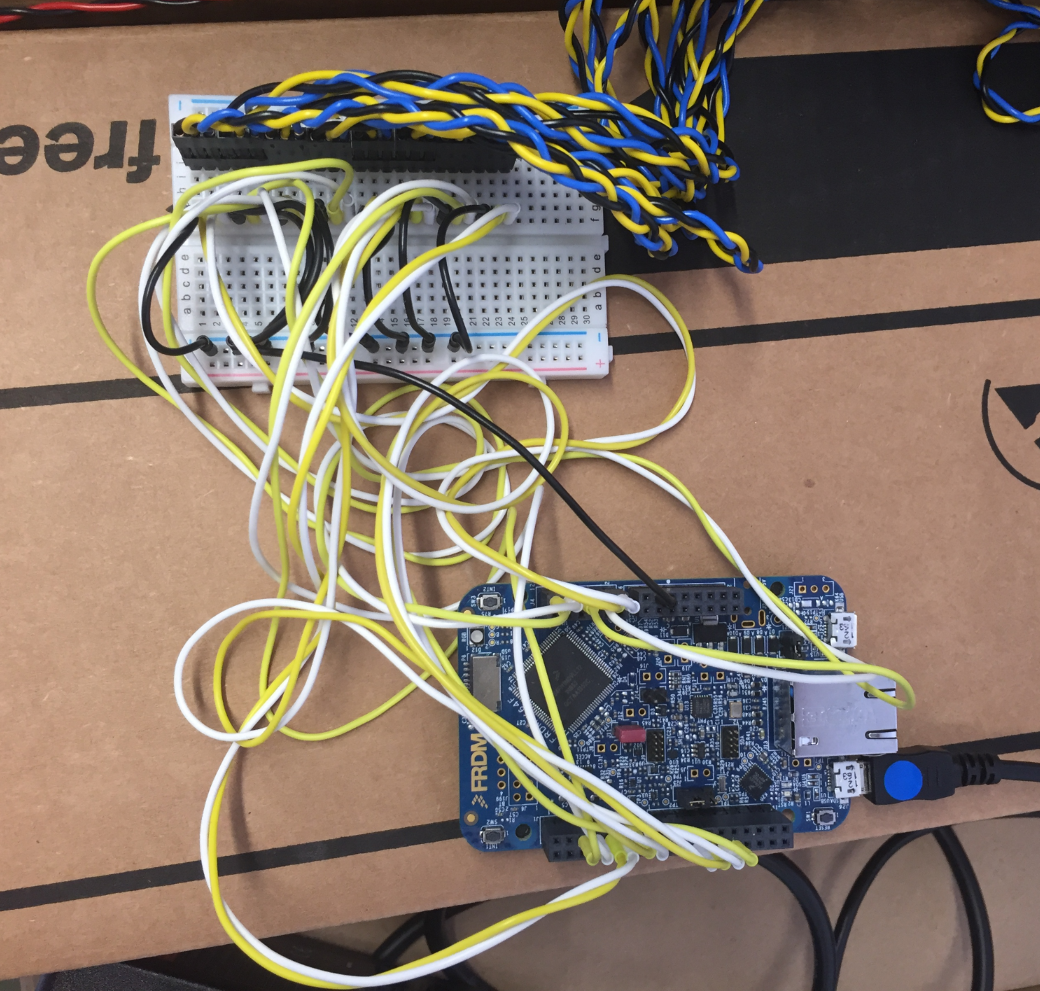
Floppy Disk Connector Wiring
The following table maps the signals on the connector, with the Ethernet plug on top:
--------------- Ethernet   ---------------------
                          1  (SCL)
                          2  (SDA)
                          3  (AREF)
                          4  GND
                          5  PTD1 2 yellow dir
                          6  PTD3 2 white step
                          7  PTD2 3 yellow dir
                          8  PTD0 3 white step
                          9  PTC4
                          10 PTA0

1 PTB2  4 white step       1  PTC5 5 white step
2 PTB3  4 yellow dir       2  PTC7 5 yellow dir
3 PTB10 0 white step       3  PTC0 6 white step
4 PTB11 0 yellow dir       4  PTC9 6 yellow dir
5 PTC10 1 white step       5  PTC8 7 white step
6 PTC11 1 yellow dir       6  PTC1 7 yellow dir
From the 5V Power adapter I distribute GND and 5V to each drive:

Power Distribution
Software
For each of the drives, a DirX and StepX Processor Expert BitIO component is used. The 50 μs timer (TU1, TimerInt) is used to generate the step signal for the motors.
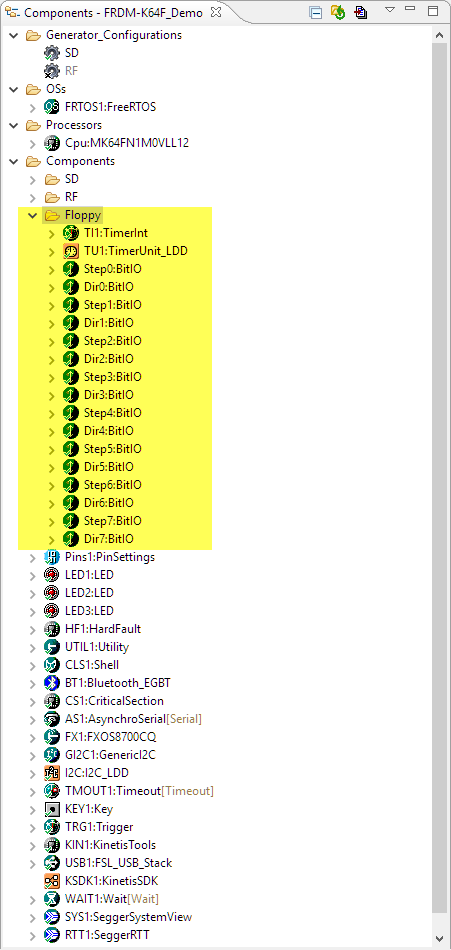
Processor Expert components
Diskette Drive Waveform Generation
Each disk drive has a device descriptor:
typedef struct {
  bool forward; /* current direction */
  int8_t pos; /* current position, valid 0..FLOPPY_MAX_STEPS */
  uint32_t currentPeriod; /* current period in timer interrupt events. Zero if disabled */
  uint32_t currentTick; /* current tick value */
  void(*Dir)(bool forward); /* direction pin */
  void(*StepSetVal)(void); /* setting step pin HIGH */
  void(*StepClearVal)(void); /* setting step pin LOW */
} FLOPPY_Drive;
That device descriptor maintains the current period and timer ticks to generate the frequency. Every 50 μs the following gets checked to generate the waveform:
void FLOPPY_OnInterrupt(void) {
  int i;

  for(i=0;i<FLOPPY_NOF_DRIVES;i++) {     if (FLOPPY_Drives[i].currentPeriod>0) { /* not disabled */
      FLOPPY_Drives[i].currentTick++; /* increment tick */
      if (FLOPPY_Drives[i].currentTick>=FLOPPY_Drives[i].currentPeriod) { /* check if expired */
        FLOPPY_Drives[i].StepSetVal(); /* toggle pin ==> High */
        FLOPPY_Drives[i].currentTick = 0; /* reset tick counter */
        /* change direction if end has been reached */
        if (FLOPPY_Drives[i].pos==FLOPPY_MAX_STEPS) {
          FLOPPY_SetDirection(&FLOPPY_Drives[i], FALSE); /* go backward */
        } else if (FLOPPY_Drives[i].pos==0) {
          FLOPPY_SetDirection(&FLOPPY_Drives[i], TRUE); /* go forward */
        }
        if (FLOPPY_Drives[i].forward) {
          FLOPPY_Drives[i].pos++;
        } else {
          FLOPPY_Drives[i].pos--;
        }
        WAIT1_Waitus(1);
        FLOPPY_Drives[i].StepClearVal(); /* toggle pin ==> Low */
      }
    }
  }
}
The function updates the counters and toggles the pins. Basically it implements a kind of software timer with a modulo counter. That way it generates something like the following:
Floppy Signals
Converting MIDI Files
There are plenty of sources for MIDI files on the internet. Probably the best for Floppy drives is https://github.com/coon42/Floppy-Music–midis-/tree/master/midi/finished/MrSolidSnake745.
While one approach would be to read in MIDI files e.g. from the SD card, another convenient way is to convert it to CSV and store it as constant table in the code.
I have organized each MIDI song in a separate file:
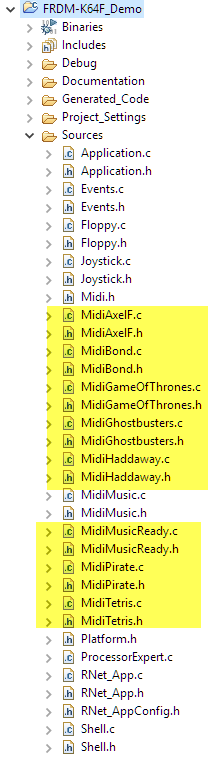
MIDI Song Files
I’m using the MIDICSV command line program to convert MIDI files into text files with:
midicsv.exe <midi file> <csv file>
This creates a .csv file like this (Ghostbusters title theme):
0, 0, Header, 1, 12, 96
1, 0, Start_track
1, 0, Time_signature, 4, 2, 24, 8
1, 0, End_track
2, 0, Start_track
2, 0, Tempo, 500000
2, 0, Tempo, 500000
2, 0, Tempo, 500000
2, 0, End_track
3, 0, Start_track
3, 0, Title_t, "MIDI out"
3, 0, Control_c, 0, 10, 32
3, 0, Control_c, 0, 7, 100
3, 0, Pitch_bend_c, 0, 8192
3, 0, Control_c, 0, 101, 0
3, 0, Control_c, 0, 100, 0
3, 0, Control_c, 0, 6, 12
3, 0, Control_c, 0, 10, 32
3, 0, Control_c, 0, 7, 100
3, 0, Pitch_bend_c, 0, 8192
3, 0, Program_c, 0, 0
3, 0, Control_c, 0, 101, 0
3, 0, Control_c, 0, 100, 0
3, 0, Control_c, 0, 6, 12
3, 0, Control_c, 0, 10, 32
3, 0, Control_c, 0, 7, 100
3, 0, Pitch_bend_c, 0, 8192
3, 0, Program_c, 0, 0
3, 0, Control_c, 0, 10, 32
3, 0, Control_c, 0, 7, 100
3, 0, Pitch_bend_c, 0, 8192
3, 0, Program_c, 0, 0
3, 0, Control_c, 0, 101, 0
3, 0, Control_c, 0, 100, 0
3, 0, Control_c, 0, 6, 12
3, 0, Control_c, 0, 10, 32
3, 0, Control_c, 0, 7, 100
3, 0, Pitch_bend_c, 0, 8192
3, 0, Program_c, 0, 0
3, 0, Control_c, 0, 10, 32
3, 0, Control_c, 0, 7, 100
3, 0, Pitch_bend_c, 0, 8192
3, 0, Program_c, 0, 0
3, 0, Note_on_c, 0, 33, 110
3, 42, Note_off_c, 0, 33, 0
3, 48, Note_on_c, 0, 34, 110
3, 90, Note_off_c, 0, 34, 0
3, 96, Note_on_c, 0, 33, 110
3, 138, Note_off_c, 0, 33, 0
Ticks per Quarter Note
A lot of the header information can be stripped out. Important is the first line:
0, 0, Header, 1, 12, 96
The last number gives the ‘number of ticks per quarter note’ (see http://www.ccarh.org/courses/253/assignment/midifile/).
This gets stored in the sources as
#define NOF_TICKS_PER_QUARTER_NOTE (96)
Tempo
The other important speed information is the tempo. This is present as
2, 0, Tempo, 500000
Which means a tempo of 500’000 μs. The tempo is returned by the file with
uint32_t MGhostbusters_GetTempoUS(void) {
 return 500000;
}
Note on/off
The on and off of a note is encoded as:
3, 48, Note_on_c, 0, 34, 110
3, 90, Note_off_c, 0, 34, 0
which is in the format
beat, tick, midiCmd, track, note, value
Note_on_c means that a note starts. The value is the ‘velocity’ (think about pressing a key on a piano).
💡 Be aware that a Note_on_c with a value/force of zero means as well to end the note.
The MIDI data is stored in constant arrays like this with up to 8 channels, showing track/channel/drive 0 below:
static const MID
I_MusicLine track0[] =
{
/* beat,ticks, event, note, value */
 {0, 0, MIDI_BANK, 0, 0},
 {0, 0, MIDI_PATCH, MIDI_INSTR_Default, 0},
 {0, 0, MIDI_PAN, 64, 0},
 {0, 0, MIDI_VOLUME, 127, 0},

 { 0, 0, MIDI_NOTE_ON, 33, 110 },
 { 0, 42, MIDI_NOTE_OFF, 33, 0 },
 { 0, 48, MIDI_NOTE_ON, 34, 110 },
 { 0, 90, MIDI_NOTE_OFF, 34, 0 },
 { 0, 96, MIDI_NOTE_ON, 33, 110 },
 { 0, 138, MIDI_NOTE_OFF, 33, 0 },
 { 0, 144, MIDI_NOTE_ON, 34, 110 },
...
The lines
 { 0, 96, MIDI_NOTE_ON, 33, 110 },
 { 0, 138, MIDI_NOTE_OFF, 33, 0 },
mean that when (0,96) (based on tempo and ticks per quarter note) the note 33 shall be turned on with velocity 110, and turned off at the time (0,138) that note 33 shall be turned off.
MIDI Notes
I used the information on http://www.sengpielaudio.com/calculator-notenames.htm to transform MIDI note numbers as below:
/*
Octave # MIDI Note Numbers
 C C# D D# E F F# G G# A A# B
-1 0 1 2 3 4 5 6 7 8 9 10 11
0 12 13 14 15 16 17 18 19 20 21 22 23
1 24 25 26 27 28 29 30 31 32 33 34 35
2 36 37 38 39 40 41 42 43 44 45 46 47
3 48 49 50 51 52 53 54 55 56 57 58 59
4 60 61 62 63 64 65 66 67 68 69 70 71
5 72 73 74 75 76 77 78 79 80 81 82 83
6 84 85 86 87 88 89 90 91 92 93 94 95
7 96 97 98 99 100 101 102 103 104 105 106 107
8 108 109 110 111 112 113 114 115 116 117 118 119
9 120 121 122 123 124 125 126 127
*/
Finally, the MIDI note frequencies need to be translated into timer ticks/frequency, based on the 50 μs timer mentioned above. For this I’m using a table like this:
#define FLOPPY_NOF_NOTES 128
#define FLOPPY_HIGHES_NOTE 48 /* highest note/tone we can play */
static const uint16_t FLOPPY_NoteTicks[FLOPPY_NOF_NOTES] = {
 727, // 0
 727, // 1
 686, // 2
 648, // 3
 612, // 4
 577, // 5
 545, // 6
 514, // 7
 485, // 8
 458, // 9
 432, // 10
 408, // 11
 385, // 12
 364, // 13
 343, // 14
 324, // 15
 306, // 16
 289, // 17
 272, // 18
 257, // 19
 243, // 20
 229, // 21
 216, // 22
 204, // 23
 193, // 24
 182, // 25
 172, // 26
 162, // 27
 153, // 28
 144, // 29
 136, // 30
 129, // 31
 121, // 32
 115, // 33
 108, // 34
 102, // 35
 96, // 36
 91, // 37
 86, // 38
 81, // 39
 76, // 40
 72, // 41
 68, // 42
 64, // 43
 61, // 44
 57, // 45
 54, // 46
 51, // 47
 48, // 48 (that's the highest note we can play (FLOPPY_HIGHES_NOTE)!)
 48, // 49
...
The frequency of each note is listed in the table on http://www.sengpielaudio.com/calculator-notenames.htm.
Because the maximum frequency the stepper motor can work with is around 440 Hz, I can play up to about MIDI note 48.
Playing MIDI Tracks
Playing the MIDI tracks is implemented in MidiMusic.c:
static bool PlayTrackItem(MIDI_MusicTrack *track, uint32_t currTimeMs, uint8_t channel, uint32_t tempoUS) {
 uint32_t beatsPerSecond;
 uint32_t currentMillis;
 uint32_t ppqn; /* ticks per beat/quarter note */
 uint8_t event;
 uint32_t itemNo;

 beatsPerSecond = 1000000/tempoUS; /* (1'000'000*(1/tmpoUS)*60)/60) */
 ppqn = track->nofTicksPerQuarterNote;
 for(;;) { /* breaks */
 itemNo = track->currLine;
 if (itemNo>=track->nofLines) { /* out of list */
 return FALSE; /* do not continue any more */
 }
 currentMillis = ((uint32_t)track->lines[itemNo].beat*1000UL)/beatsPerSecond;
 currentMillis += ((uint32_t)track->lines[itemNo].tick*(tempoUS/1000))/ppqn;
 if (currentMillis>currTimeMs) {
 return TRUE; /* continue */
 }
 event = track->lines[itemNo].event;
 switch(event) {
 case MIDI_BANK:
 FLOPPY_MIDI_SetBank(channel, track->lines[itemNo].val1);
 break;
 case MIDI_NOTE_ON:
 if (track->lines[itemNo].val2==0) { /* note on with velocity zero is a note off */
 FLOPPY_MIDI_NoteOff(channel, track->lines[itemNo].val1, 0);
 } else {
 FLOPPY_MIDI_NoteOn(channel, track->lines[itemNo].val1, track->lines[itemNo].val2);
 }
 break;
 case MIDI_NOTE_OFF:
 FLOPPY_MIDI_NoteOff(channel, track->lines[itemNo].val1, track->lines[itemNo].val2);
 break;
 case MIDI_PATCH:
 FLOPPY_MIDI_SetInstrument(channel, track->lines[itemNo].val1);
 break;
 case MIDI_VOLUME:
 FLOPPY_MIDI_SetVolume(channel, track->lines[itemNo].val1);
 break;
 case MIDI_PAN:
 FLOPPY_MIDI_SetPan(channel, track->lines[itemNo].val1);
 break;
 case MIDI_END_OF_TRACK:
 FLOPPY_MIDI_AllSoundOff(channel);
 break;
 }
 track->currLine++;
 } /* for */
 return TRUE;
}

static void Play(MIDI_MusicTrack *tracks, unsigned int nofTracks, uint32_t tempoUS) {
 int itemNo;
 uint8_t channel;
 uint32_t currTimeMs;
 TickType_t startTicks;
 unsigned int nofFinished;
 uint32_t flags;

 /* init defaults */
 for(channel=0;channel<nofTracks;channel++) {
 FLOPPY_MIDI_SetBank(channel, 0);
 FLOPPY_MIDI_SetInstrument(channel, 0);
 FLOPPY_MIDI_SetVolume(channel, 127);
 }
 startTicks = FRTOS1_xTaskGetTickCount();
 itemNo = 0;
 for(;;) { /* breaks */
 (void)xTaskNotifyWait(0UL, MIDI_SONG_STOP, &flags, 0); /* check flags */
 if (flags&MIDI_SONG_STOP) {
 CLS1_SendStr((uint8_t*)"Stopping song!\r\n", CLS1_GetStdio()->stdOut);
 for(channel=0;channel<nofTracks;channel++) {
 FLOPPY_MIDI_AllSoundOff(channel);
 }
 break;
 }
 currTimeMs = (FRTOS1_xTaskGetTickCount()-startTicks)/portTICK_RATE_MS;
 nofFinished = 0;
 for(channel=0;channel<nofTracks;channel++) {
 if (!PlayTrackItem(&tracks[channel], currTimeMs, channel, tempoUS)) {
 nofFinished++;
 }
 }
 if (nofFinished==nofTracks) { /* all finished */
 break;
 }
 FRTOS1_vTaskDelay(1/portTICK_RATE_MS);
 itemNo++;
 }
}
Application
What remains is the usual application code with FreeRTOS: push button handing, command line shell and so on. I have covered such parts in other tutorials, so I think I do not need to repeat things here again. I recommend that you have a look at the sources (link at the end of this article) on GitHub.
Videos
Finally, the result of that fun project: Videos of the midi songs played, with links to ‘original’ music on YouTube. Enjoy!
Ray Parker Jr. – Ghostbusters:
Pirates of Caribean – He’s a Pirate:
Harold Faltermeyer – ‘Axel F’:
Summary
I enjoyed very much this project. I learned a lot about MIDI files and Floppy Diskette Drives. Playing music with stepper motors is a fascinating technology, and you will be able to find many more videos on YouTube. Special thanks to MrSolidSnake745 for his very valuable contributions!
The sources used for this project are available on GitHub.
Happy Playing 🙂
Links
- Project on GitHub: https://github.com/ErichStyger/mcuoneclipse/tree/master/Examples/KDS/FRDM-K64F120M/FRDM-K64F_Demo
- Parsing MIDI files: http://www.ccarh.org/courses/253/assignment/midifile/
- Floppy Music Songs: http://www.makeuseof.com/tag/8-floppy-disk-drive-music-videos/
- Mr. SolidDnake Midi Files: https://github.com/coon42/Floppy-Music–midis-/tree/master/midi/finished/MrSolidSnake745
- MIDI to CSV converter: http://www.fourmilab.ch/webtools/midicsv/
- MIDI Note translation: http://www.sengpielaudio.com/calculator-notenames.htm

Tears dropping down! Amazing!!! I have seen this kind of project before. But with K64F have a special feeling. Many Thanks!
LikeLike
Just brilliant!
LikeLike
Amazing !
LikeLike
In the early eighties, I worked for Shugart (the founder later started Seagate). We manufactured 8″, 5 1/4″ & 3 1/2″ floppy disk drives. Wow, talk about VINTAGE! How creative!
LikeLike
Hi Duane,
my first floppy disk drive was a 8″ one 🙂
Erich
LikeLike
Here on Sampleso we would like to thank you so much for this amazing article, It was so helpful for our project!
We dont know that we could do without you for our FloppyTron Project!
Check out Sampleso Floppy Disk Synth for Kontakt (sampleso dot com, floppytron)
LikeLike
Really intersting! I did not think that it would be possible to make a product out of it 🙂
LikeLike