
Unlike other boards from Freescale, the FRDM-KL25Z has no potentiometer or analog components on it. But in many applications an ADC conversion is needed, so here we go with a tutorial reading in an external potentiometer with Eclipse, CodeWarrior and Processor Expert. For this tutorial I have a 10k Ohm linear potentiometer connected to the Freedom board:
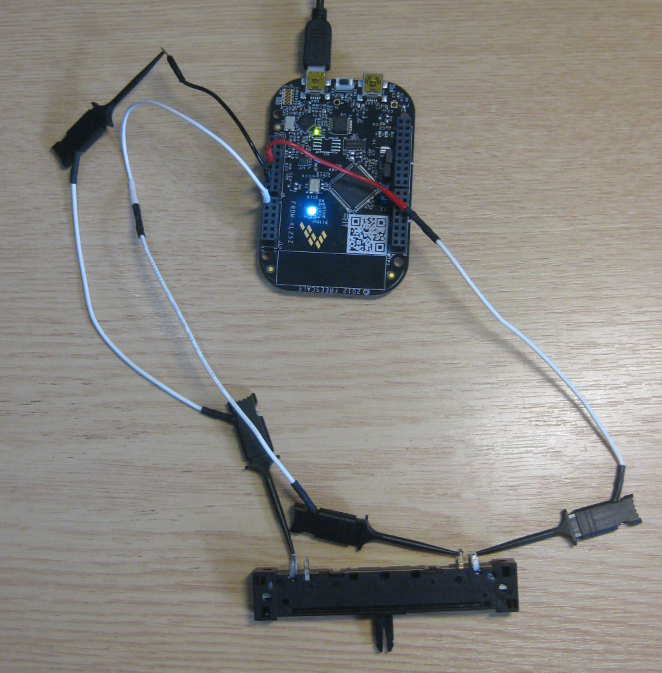
Linear potentiometer with the FRDM-KL25Z
💡 While this tutorial is for the Freedom KL25Z project, things are generic for any microcontroller supported by Processor Expert. Only the port/pins might be different.
The black (GND) and red (3.3V) wires are connected to the ‘full range’ connectors for the potentiometer, while the white wire is connected to the current position pin. The white wire is connected to the ‘Arduino’ A0 pin of the Freedom board:

Schematic with 10k Ohm Potentiometer
Creating the Project
With CodeWarrior for MCU10.3, I create a project with the ‘New Project Wizard’ (menu File > New > Bareboard Project). I give a project name, select my microcontroller (KL25Z), connection (OpenSDA), Toolchain (gcc) and Rapid Application Development (Processor Expert).
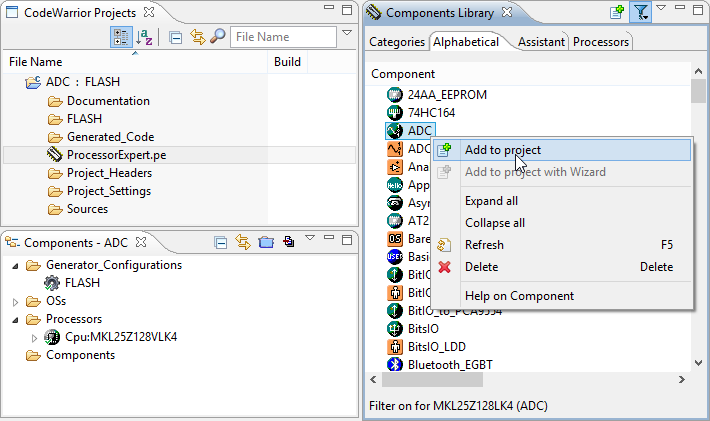
Adding ADC Component
From the Components Library I add the ADC component to the project:
Adding ADC Component
💡 If the Component Library view is not open, use the menu Processor Expert > Show Views.
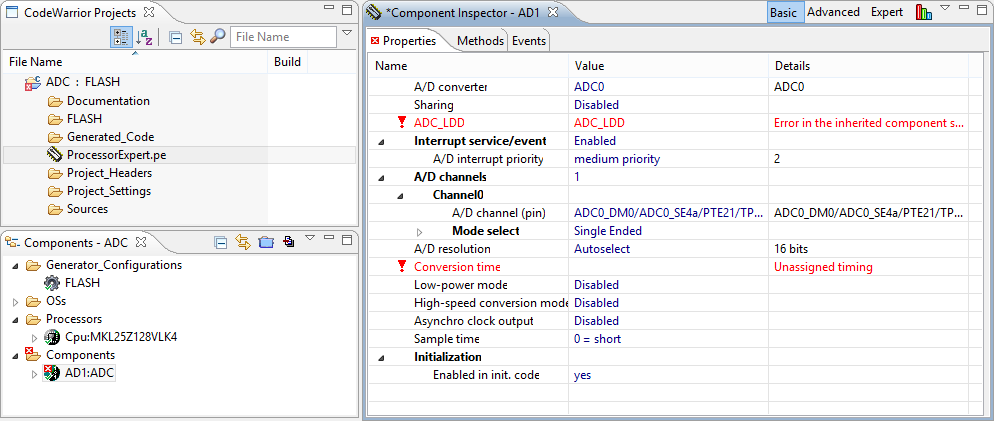
Configuring ADC Component
With the component added, it shows with an error marker as I need to configure it first:
Added ADC Component
First, to configure the pin to be used. According to the schematics, the A0 pin is connected to ADC0_SE8/PTB0:
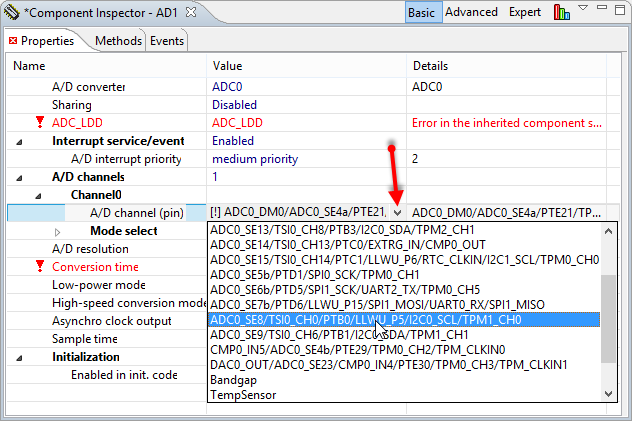
Selecting ADC Pin
Next to configure the conversion time. For this I click the ‘…’ button:
❗ I need to click *into* the field to show the ‘…’ button.
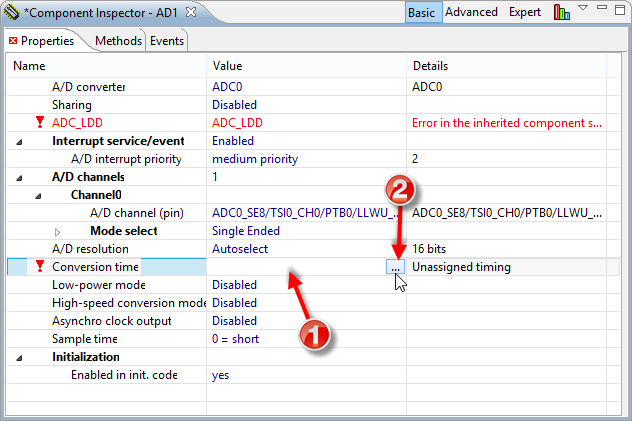
Conversion Time Setup
This opens a dialog where I can specify the conversion time. I select one of the available values from the right side (e.g. double clicking on it):
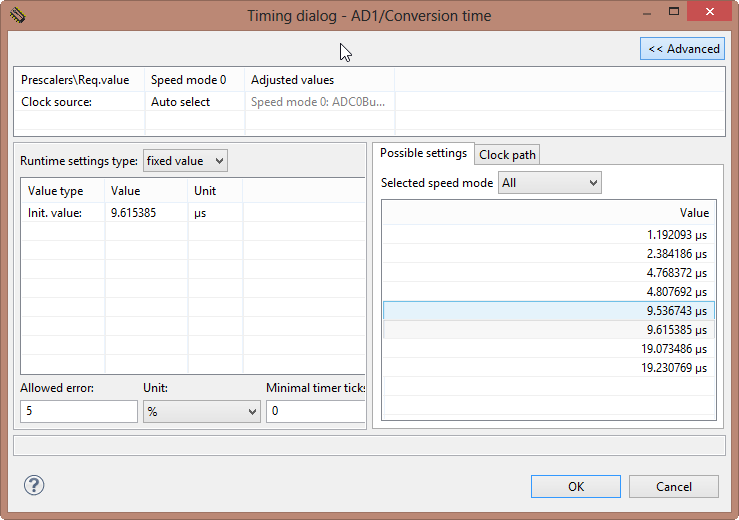
Conversion Time Selection
💡 The Conversion Time specifies how fast the AD conversion shall be performed. This has of course an impact on the timing and quality of the conversion. For this tutorial, we simply select a timing.
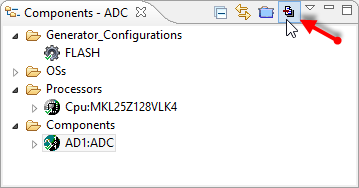
Generating Code
With everything configured, I use the ‘Generate Code’ button:
Code Generation
The generated code ends up in the Generated_Code folder of the project:
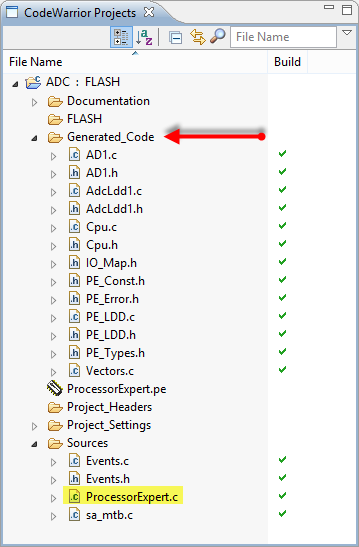
Generated Code Folder
In the next step, I’m going to use it in the main() inside the file ProcessorExpert.c.
Doing the Conversion
Instead of typing the code, I can drag&drop the method names to my source:
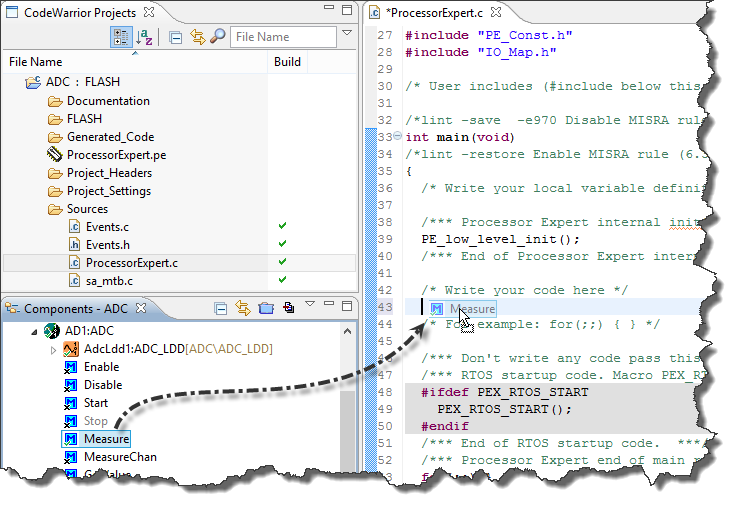
Drag and Drop of Method
The method Measure() needs an extra boolean argument if it shall wait for the finish of the conversion (yes, I want to wait). And I’m not interested in the error return code, so I cast it to void:
  /* Write your code here */
(void)AD1_Measure(TRUE);
/* For example: for(;;) { } */
To get the conversion value, the method GetValue16() is used which returns the 16bit result. For the result I define a 16bit global variable:
static uint16_t value;
And do the AD conversion in an endless loop:
for(;;) {
  (void)AD1_Measure(TRUE); /* do conversion and wait for the result */
  (void)AD1_GetValue16(&value); /* get the result into value variable */
}
With this, it could look like this:
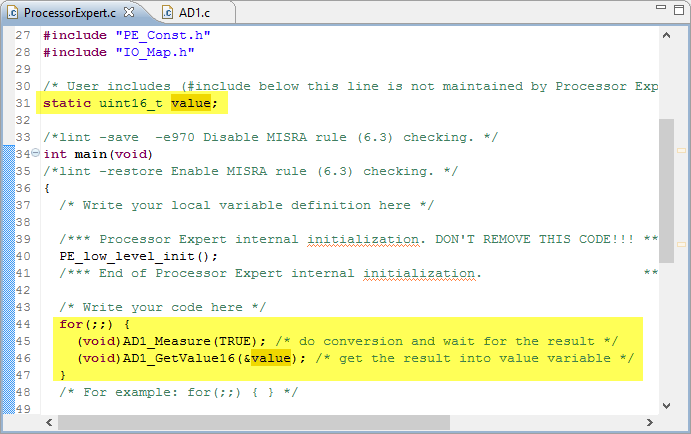
ProcessorExpert.c
Build and Debug
With the menu Project > Build Project I compile my project. I press the ‘Debug’ button I download the program to the board and let it run.
💡 To watch the variable changing in the debugger while it is running, see Live View for Variables and Memory.
In the Variables View, I can see how the value changes:

Value in Variables View
Using Interrupts
So far I was waiting for the conversion to be finished with the TRUE parameter to the Measure() method. By default, the ADC component already has interrupts enabled:
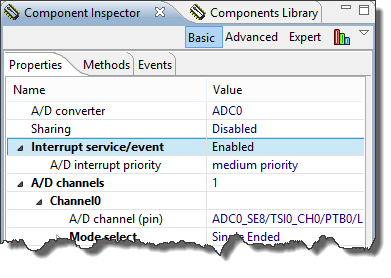
Interrupts Enabled
If I use interrupts and do not wait for the conversion to be finished, I get notified by the OnEnd() event:
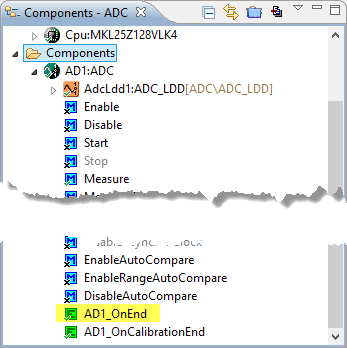
OnEnd Event
Double-Clicking on the OnEnd() method gets me to the Events.c file, where I can fill in the code:
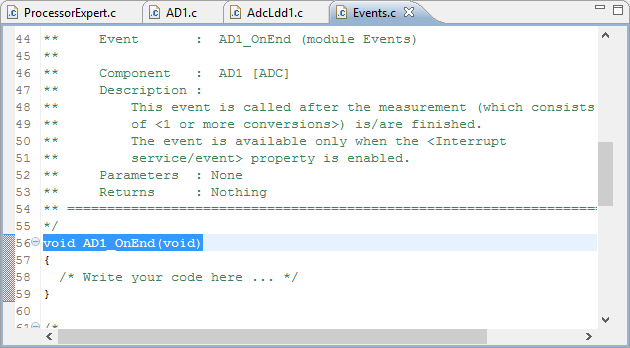
AD1_OnEnd Hook
To keep things simple, I set a boolean flag:
void AD1_OnEnd(void)
{
  extern volatile bool AD_finished;
  AD_finished = TRUE;
}
💡 I have marked this variable with volatile as the variable is changed in an interrupt service routine, and used the same time from the main program. The volatile prevents the compiler to keep that variable in a register.
I add this boolean variable to my global variables in Processor Expert.c:
static uint16_t value;
volatile bool AD_finished;
💡 Once things are working, consider to put that AD_finished variable declaration into a header file.
Then I change my loop to start the conversion without waiting, so I can do something else while the conversion is going on:
for(;;) {
  AD_finished = FALSE; /* reset flag */
(void)AD1_Measure(FALSE); /* AD_finished will be set to TRUE once */
while(!AD_finished) {
/* do something else here... */
}
/* AD_finished set to TRUE by the interrupt to indicate the result is ready */
(void)AD1_GetValue16(&value); /* get the result into value variable */
}
Multiple Channels
So far I was using a single AD value. But the component (and hardware) can be configured to convert multiple channels. To read in as well the A1 pin which is mapped to PTB1 I use the ‘+’ icon to add another channel:
💡 I need to click into the field to have the ‘+’ and ‘-‘ icons.
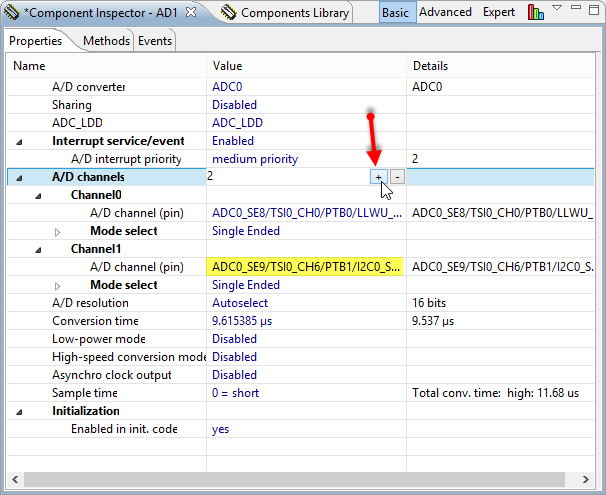
Added another channel
I can use the same methods as above (Measure() and GetValue16(), but as GetValue16() is using a pointer to an array of values, I need to make sure I pass the right number of items to it:
byte AD1_GetValue16(word *Values)
The component has created a #define for the number of channels for me (CHANNEL_COUNT) which I can use for my value variable:
static uint16_t value[AD1_CHANNEL_COUNT];
volatile bool AD_finished;
To the GetValue16() method, I pass the address of the first item:
(void)AD1_GetValue16(&value[0]);
With this, my code works with multiple channels.
Summary
With Processor Expert, it is not very difficult to use ADC conversion. Once familiar with the concept, it is easy to add multiple channels and to use interrupt synchronization. I do not cover here advanced features like using DMA (as not supported out oft the box with Processor Expert yet), or using different conversion modes. I think this is enough for now to get you started :razz:.
Happy ADCing 🙂

Thank you for the guidance, Erich. I have been trying to figure out this ADC thing for a week or more. I finally got the basics a couple hours before you made this post, but your way is easier.
In my project, I am reading the analog value with 8 bit precision and then sending the value (along with a number of input pin states from the KL25Z) to an Android tablet through the USB.
I had a problem with the analog value from the KL25Z going from -128 to 127 because Android could only read it as a signed int. I resolved it in my Android/Java program by adding 256 to any negative analog value coming from the FRDM board. Perhaps that snippet of info will save someone else the time I spent trying to get a useful analog output from the FRDM bd.
Also, in the course of my troubleshooting, I used your printf tutorial to try to print the analog input value to a terminal before sending it out the USB. Although I was able to see changing characters on the terminal corresponding to my pot position, I never figured out how to print intelligible values to the terminal. (I was using Termite.)
Do you have any suggestions about how one might combine your ADC tutorial with your printf tutorial and see the analog value on a terminal?
Just a thought,
Thanks.
LikeLike
Hello, as you only need 8bit, instead of adding 256, you better shift/divide the 16bit result to get an 8bit result. Or you can configure the A/D resolution in the component to use 8bit instead of 16bit. And you can use the GetValue8() method to get the 8bit value. As for printing out the values, you could use printf(“value: %d\r\n”, val) or something similar.
LikeLike
Thanks Erich,
I just tried your printf suggestion and it worked exactly like I couldn’t make it work yesterday. 😉
I am already using the 8 bit precision on the component and GetValue8() to read it. My best guess is that I wasn’t reading it correctly in Java/Android. I gather that certain C types like unsigned char don’t translate directly into Java. But I am not a “professional” programmer, so I don’t know the details. 😉
Thank you for the solution … again.
LikeLike
Pingback: DAC Example with the Freedom Board | MCU on Eclipse
Hello Erich,
I was trying to trigger the ADC conversion via some external pin. For this I used this example and searched for some Trigger option in the AD1:ADC component. All I could see is “Internal Trigger”. I enabled it and noticed that in the AdcLdd1:ADC_LDD component I can enable “Trigger”, select “Trigger Input” as PTB8/EXTRIG_IN, then…what next?
I should not use AD1_Measure() any more but some other method involving the Trigger … Can you indicate some steps from here?
Thanx
Cristian
LikeLike
Let me answer too:
-Add AD1_EnableExtChanTrigger(); in the for{;;} loop
-remove (void)AD1_Measure(FALSE);
Now I can see that toggling PTB8 triggers and returns A/D values.
…application still under construction…
LikeLike
I am having issues with the Kinetis ADC on the KL05Z freedom board (which is virtually the same as the KL25Z board as far as the ADC goes.
My sampling times shown on an oscilloscope do not come close to what processor expert’s sampling times show. here’s my configuration:
Internal Reference Clock set to 32.268 KHz.
Multiplier at 1464
Core at 47.972352 MHz
Bus at 23.986176 MHz
ADC Internal Interrupt Enabled
AD resolution set to 8 Bit (same issue up for 12 bit as well)
Conversion Time 1.584246 us
High-Speed Conversion Mode enabled
Sample Time = 0 (Short)
Number of Conversions = 1
On the scope, it is taking 11.6 us to complete a single ADC sample on 1 channel. Shouldn’t it be only about 2.2 us as stated in processor expert under the sample time (Total Conv. Time: High: 2.2 us)
What am I doing wrong? How do I get my sample times down to less than 2 us? I need to do about 8 channels every 16 us with time to spare for other operations.
LikeLike
I have not measured the sampliing time, but this might be a question for the Freescale forum too?
LikeLike
I believe going around processor expert fixed my timing issues. Simply writing to the necessary registers and storing the results into a variable, I was able to bring the pulse width on the Pin1 to about 2 us long for the sampling time. I believe the extra code generation that processor expert adds in a lot of clock cycles that I don’t really need in my project. This might be a good topic for discussion: “To Processor Expert or Not To Processor Expert”
LikeLike
Hi, I’m going to start experimenting with the FRDM-KL25Z, follow the steps in this tutorial but when I press the button DEGUG a window appears with the following error: An application file was not specified in the launch configuration.
Why?
Thanks
LikeLike
Hi Alets,
that message indicates that either the application file is not present (not compiled yet), or the debug launch configuration has a different name. Have you done a Project > Build Project? Then you should have an .elf file in your FLASH output folder. And this file should be specifed in the Debug configuration (main tab, as application file).
I hope this helps.
LikeLike
Erich,
Thanks a lot for the great tutorial. I see that you are calling the functions AD1_Measure() and AD1_GetValue16() in your main loop. Where do these functions actually come from and where are they documented?
Thanks,
Anguel
LikeLike
Oh, I’m sorry, now I see that they are generated by processor expert, it only puts the AD1_ prefix in front of the method 🙂
LikeLike
Erich
You rock.
LikeLike
Erich, great collection of tutorials! For the KL25Z’s ADC, I’m trying to acquire a couple 16-bit single-ended readings as fast as possible. In Processor Expert, I have set the clock and conversion speed as fast as it’ll allow me without throwing errors (conversion time is 1.287us, coming from the bus clock at a 1:1 ratio). However, when I simply run the following loop in my main,
while (1)
{
GPIO1_SetFieldBits(NULL, ADCFLG, 1);
(void)AD1_Measure(TRUE);
(void)AD1_GetValue16(&adcvalue[0]);
GPIO1_ClearFieldBits(NULL, ADCFLG, 1);
}
And use an oscilloscope to look at the physical pin attached to my “ADCFLG” (field name of a GPIO_LDD), the whole sequence takes almost 5ms! What gives? I want to poll as fast as possible and retrieve values as fast as possible.
Thanks, Aiden
LikeLike
Hi Aiden,
I have not tried your example, but I think you see the overhead for the bit toggling. I would change it to
while (1) {
GPIO1_SetFieldBits(NULL, ADCFLG, 1);
for(i=0;i<256;i++) {
(void)AD1_Measure(TRUE);
(void)AD1_GetValue16(&adcvalue[0]);
}
GPIO1_ClearFieldBits(NULL, ADCFLG, 1);
}
so you measure the time of multiple conversions. That should give you a better picture.
LikeLike
Hi,
I am using the above code with my TWR-K20D72M with Mqx . The Program compiled ok and its running But when I change the potentiometer, Nothing changes(value remains the same).I am pasting my code for the task function below.
static uint16_t value=0;
volatile bool AD_finished;
void Analog_task
(
uint_32 initial_data
)
{
puts(“\nInitializing Analog device…..”);
for(;;) {
(void)AD2_Measure(TRUE); /* AD_finished will be set to TRUE once */
/* AD_finished set to TRUE by the interrupt to indicate the result is ready */
(void)AD2_GetValue16(&value); /* get the result into value variable */
printf(“\n – value = %d “, (value));
}
}
Please can you suggest what can be the problem.
LikeLike
Hello,
not sure. Just to check:
– are you using the correct pins?
– have you the component configured properly?
Hope this helps.
LikeLike
Hi,
I am using the above code with uvion4,not the CodeWarrior. However, I do not know how to set up a new project with uvison4.I have seen the tutoriol about uvison3,but it is too complex for me to understand .Would you mind telling me how to get start with uvison4 about ADC with KL25Z?
Looking forward to your suggestion!
LikeLike
Hi,
you can use the same code with Keil too. See https://mcuoneclipse.com/2013/06/28/using-keil-%C2%B5vision-arm-mdk-with-processor-expert-driver-suite/ how to create a project with Keil and Processor Expert Driver Suite.
I hope this helps.
LikeLike
Hi,
sorry to trouble you again. I have seen the tutotial that you suggested.Using the code that you provided, I set up a project in Processor Expert. However,when I open the project in Keil,it suggested error after I build the project. It said ‘Undefined symbol…(referred from StartupMkL25Z4.o)’.I do not know what is wrong with it.Could you please help me?
Thank you very much!
LikeLike
You missed to provide the most important informatin: which symbol is missing? It means that the linker cannot find that symbol. Check where that symbol (variable/function) is defined, and make sure you link it.
LikeLike
Hello Erich,
There is something inaccurate with what I said above. The first error is “.\UV4Build\AD2.sct(7): error: L6236E: No section matches selector – no section to be FIRST/LAST.”. I tried to find answer to the question on the web. Somebody said it is because of startup_MKL25z4.s. However,there is not this file in the project.
This is the way I create my project:
a.I launch the eclipse,and follow your instruction in the tutorial.
b.After generationg the Processor Expert code, I add the measure() and GetValue16(),just like what you suggest in this tutorial.
c.Double click *.uvproj, and press F7, then, the error shows.
Looking forward to your reply.
LikeLike
Hello,
this looks like a linker error. Not sure why you are having this problem, but maybe you can contact Keil support forum on this?
LikeLike
Hello,
I follow the tips in the tutorial.After I press debug,a window pop up.It said ‘an error occured while connecting to the interface hardware or target specified in the launch configuration dialog.’ I have choosen the OpenSDA-USB Port.I do not why…… I need your help, Erich.
Looking forward to your reply!
LikeLike
Hi,
what debug firmware have you loaded on the FRDM board? CMSIS-DAP? https://mcuoneclipse.com/2013/05/17/cmsis-dap-with-iar-and-the-kl25z-freedom-board/ Or are you using a Segger J-Link? You need a debug connection which is supported by uVision.
LikeLike
Hi Erich,
This time I use CodeWarrior,instead of uvison. I just only install the PEDriver on my computer,and do the project step by step according to your tutorial. Do I need other drivers to get the codewarrior work well?
LikeLike
Yes, you need to load the Debug-App firmware first on the board in order to debug it. See https://mcuoneclipse.com/2012/09/20/opensda-on-the-freedom-kl25z-board/
LikeLike
What is the difference between the single endend and differential ADC’s channel mode?, I have already read the ref. manual but its explanation its not very beginners friendly
LikeLike
Hi Leonardo,
in differentical mode the ADC will measure the voltage between the two pins (the plus and minus pin). So it measures (or digitizes) the voltage difference between two pins. In single ended mode it measures the voltage between the pin and ground.
LikeLike
Hi,
How can I use single ended and differential pairs channels together in a same application using Processor Expert?
Thank you.
LikeLike
Hello,
I believe so, but I have used it only in single ended mode.
LikeLike
Hi Erich,
I already used it in differential mode only. But when I configured the ADC with differential channels and single channels together, the processor expert reported me an error: “All channels have to be in the same mode!”.
Could you suggest me any way to do this?
Thank you.
LikeLike
I suggest you post that to the Processor Expert forum in freescale community
LikeLike
Posted in freescale community.
bye.
LikeLike
The Processor Expert Suport Team answer me:
With Kinetis we have to use ADC_LDD component instead of ADC. The ADC is a component from a “high level” component set member that comes from older architectures (HCS08, HCS12) and it has the limitation that differential and single ended channels cannot be used together. On Kinetis the ADC component methods are using ADC_LDD anyway so if you use ADC_LDD directly, you will get a little bit more effective code.
Bye.
LikeLike
Intesting, I would not have thought about this. Thanks for posting!
LikeLike
Hello Erich,
Thanks for the tutorial! I got it working on my FRDM-KL46Z.
What’s the meaning of “continuous sampling” as used in the KL46Z reference manual? I though continuous sampling meant that the analog signal would be periodically sampled according to the AD clock (ADCK). But apparently that’s not the case or at least it is not explained explicitly enough in the manual for me to feel confident about this assumption. The reference manual says that one of the features of the ADC is: “Single or continuous conversion, that is, automatic return to idle after single conversion”. (pg 471)
Particularly, it confuses me to read that the “continuous” sampling mode only works if we enable hardware averaging (pg 487). Is it not possible then to use the ADCK to periodically sample a signal with the hardware averaging disabled?
Maybe the only way to periodically (and precisely) trigger the sampling is to use the hardware trigger mode along with either the Timer/PWM or the Low Power Timer. What’s your opinion?
In any case, my goal is to use interrupts to periodically sample a signal at about 16 kHz and send it to a host computer through USB CDC. Currently I’m able to sample at a lower frequency using the software trigger and then polling the “AD1_finished” flag. So at least I know that my ADC works and that I can properly send the data through USB.
Thanks!
LikeLike
Hi Carlos,
I appologize for my late response (flooded with too many things). I have not checked the data sheet in details, but I would have expected that continuous would be as you would expect it: that it continously would sample the channels. Maybe that continous is related to DMA transfers (I vagely remember a thread about this)? The other option you could look at: if the ADC_LDD component would offer what you need? I have realized that sometimes the non-LDD components expose less of the functionality than the LDD variants 😦
LikeLike
Hello Erich,
No worries I’ve also been too busy to look into the USB Rx interrupt but it’s still on my bucket list.
To everyone curious about using the ADC with hardware trigger interrupts! I figured it out and I’m happy to share it back. I will write back with some detailed and simple instructions about it during the weekend.
By the way, “continuous” does not mean that the ADC will be periodically sampling the analog signal at a predetermined frequency. This is unfortunately a confusing use of this term. You really have to use hardware triggers to achieve periodic sampling. By that I mean to be able set the ADC’s sampling rate. Hint: it’s not done through the ADC component by itself 😉
Thanks again Erich! I will post again here when I have the instructions with screen shots.
LikeLike
Hi Erich,
Are your example code files and Processor Expert components covered under a permissive software license such as the Apache Software License 2.0?
Your example code for your tutorials only states: “Author: Erich Styger”. I want to post my solutions for using the ADC with interrupts and I want to post some other useful info about configuring Processor Expert components and how to use them in the code (how to call their methods, etc.). Some info might make use of your USB CDC examples. This will depend on which license your code has been released under. I’d like to post my example code under the Apache Software License 2.0. This allows everybody to benefit from the code: students, public projects, commercial projects, … It would also save me time because I wouldn’t have to respond to every single comment or email about people asking for permission to use the code.
Your tutorials also cover the basic building blocks for most projects that one could develop using the Freedom boards: how to read GPIO, using timers, UART, I2C, and USB. The info in your tutorials is also covered (to an extent) under Freescale’s application notes (often in the form of pseudo-code or with explanations targeted at advanced developers). The bottom line is that providing these tutorials is for the mutual benefit of developer community and Freescale. Freescale products will only become popular if they are easy to use and if example code is available to help get developers started. Similarly developers would benefit from the possibility of using your and Freescale’s tutorials because Freescale’s MCUs have a competitive advantage, especially in regards to energy efficiency.
Therefore, it seems that at least your tutorials would nicely fit into a permissive license such as the ASL 2.0. What’s your opinion on this?
As always, thanks for sharing with the community!
LikeLike
Hi Carlos,
I’m a fan of the permissible MIT license (http://opensource.org/licenses/mit-license.html). So this is what I had in mind for my own stuff. But I admit that I have not put this into every header as I was too lacy. I should have put the proper licensing terms into all the Processor Expert components I have created. However, some components have Freescale copyright, and the USB CDC is on if it. The component itself is open source, but it wraps the Freescale USB stack which is NOT open source. I know that this is not ideal, and I wish there would be a true open source USB stack for Freescale parts. The header of the components should be clear about this.
LikeLike
Thanks for your reply and for pointing out Freescale’s copyright. I really want to do this right so everybody’s rights are respected.
The reason I like the ASL v2 license is because it provides us with the benefits of the MIT license with the additional benefits of the patents grant clause and the patent law suit protection. The patent clause would be very nice to have if anybody starts deriving any of our online example code we post into a richer and more valuable library for the community. Particularly, it makes it easy for patent owners to donate their patented algorithms into our libraries.
The “Grant of Patent License” clause says that if patent owners submit their patented code into our repository then we (the community) are automatically granted with the right to use the patented code and to modify and redistribute the additional code “perpetually” (aka, forever). We can enjoy this right as long as we explicitly include a statement that says which portion of the library was based on a patent and who donated the patent. Another nice thing about the patent clause is that neither us or the patent donators have to file any paperwork to include the patented algorithms in the library. It would be as easy as merging their branch into our repositories.
The patent lawsuit protection is also nice to have. The shortest/simplest way to explain it is with this example:
John Smith finds a cool algorithm he wants to contribute to our repositories. We merge the algorithm. Company XYZ, Inc. thinks our library is cool and starts using it in their project and they start making money out it. All of a sudden an XYZ employee finds that somebody (John Smith) has submitted one of XYZ’s patented algorithms into the library. In this situation it is unlikely that XYZ will want to sue us (the community). That’s because the patent clause says that XYZ will immediately loose the rights to use our library the moment they file a lawsuit. So it’s not in their best interest to sue the community. Then it’s really more a matter of having a dialog with XYZ and either take the patented code out of our library or have XYZ donate it into the library. It’s a win-win solution either way. Basically, it’s an anti-bullying clause.
You can find the Apache Software License 2.0 here:
http://www.apache.org/licenses/LICENSE-2.0
I’d love to hear what you think about this and I’m looking forward to posting some example code for everyone to benefit.
Thanks Erich!
DISCLAIMER: For anybody reading this! –I’m not a lawyer, so I encourage you to read the ASL v2 license and consult a proper lawyer. My comment in this blog does not constitute professional legal advise. I’m not responsible for any damages resulting from mine or your misinterpretations of the ASL v2.
LikeLike
Hi Carlos, I think there is nothing against the Apache Software License 2.0, except that it is much more complicated compared to the MIT one. Yes, I agree that it covers that patent thing, but I’m wondering if it is necessary? I’m probably naive?
LikeLike
Hi Erich,
Thanks for your reply! Yeah, this licensing stuff hurts my head sometimes. In any case, you are free to use whichever license you feel is best for the purposes of your tutorials.
I admit that I’m thinking far ahead in time with the patent clause because I do hope that some of these tutorials will grow into bigger projects 🙂
In any case, I’m glad we had a chance to talk about the licensing for your Processor Expert components. It’s always better to ask first and have everything clear.
Thanks Erich!
LikeLike
Hello, I want to use the LDD component for adc sampling, but I do not know
what’s suitable method should be used for?
LikeLike
I recommend to use the non-LDD version, as much easier to use.
Otherwise see
on a description of usage and methods.
LikeLike
Also, remember that you will need to use the ADC component in combination with one of the timer modules to achieve periodical sampling (aka sampling at 1000 Hz or any other frequency). You can then set your sampling rate by adjusting the timer’s restart condition.
I have been writing a detailed tutorial about this, but here’s the basic idea:
1) Bring an ADC component into your project and enable interrupts.
2) Expand the ADC component in the components pane so you can access the ADC_LDD component.
3) Enable triggering and select, for example, TPM0_Overflow as your trigger source.
4) The ADC_LDD component will ask you to add a timer component to your project. I would recommend you go for the TimerUnit_LDD as its very easy to configure.
5) Configure your TimerUnit_LDD to adjust how often the counter restarts (this will determine your sampling frequency).
6) Generate the Processor Expert code.
7) On the Events.c source file you will see the AD1_OnEnd() event handler. It will be called every time the ADC module finishes an AD conversion. Use this to save each sample, send samples to a computer using the USB CDC component or do whatever your application requires.
As a side note, the ADC module allows for a feature called continuous sampling. It’s under the ADC_LDD component’s “Discontinuous mode” setting. This feature actually enables ADC hardware averaging not “periodical sampling”.
I hope this helps.
Carlos
LikeLike
Hello, i have a problem with triggering ADC via timer module. I’m using Carlos Mendoza’s post as a direction. I did everything right (using PIT timer instead of TPM0, trigger input is PIT_trigger_0) but still, ADC does not respond and measurement complete interrupt does not even occur. Could I ask for your advice please?
LikeLike
Are you sure your interrupts are not disabled?
LikeLike
Yes, both for PIT and ADC are enabled. I Really don’t know where could the problem be. I don’t have much experiences with freedom board, but I’m pretty sure I did everything right. Isn’t there something missing in that instructions?
LikeLike
It is really hard to say what could be wrong. Maybe you can post that code in the Freescale Forum?
LikeLike
Basically, i dont have any code. I just configured specific components in processor expert and tried to run the project. Well i’ll try to find solution by myself, or post that configuration on forum. Thanks anyway.
LikeLike
Hi Zdeněk,
You probably need to enable the ADC’s internal channel trigger by calling “AD1_EnableIntChanTrigger()” in your main application’s setup code. This could be somewhere in your ProcessorExpert.c file or in your Application.c file.
Remember that you would first have to create the Application.c source file and the Application.h header file under the “Sources” folder in your project. I’m using a function called APP_Run() to contain all my application code. The first few lines within APP_Run() call all my initialization methods. After the initialization code I have my “super loop”. The super loop can be an infinite “for” or “while” loop.
APP_Run() is declared under Application.h, defined within Application.c and then called within ProcessorExpert.c (remember to include Application.h in your ProcessorExpert.c file). Having an Application.c or similar file is a good convention to follow because it allows you to keep your application code separate from the Processor Expert generated code.
Other than that, you shouldn’t need any other ADC related code within your super loop to achieve any basic ADC functionality. Just place your sample reading code within the AD1_OnEnd() event handler. For example, my AD1_OnEnd() checks if the USB port has been enumerated and then it sends the acquired AD samples to a terminal on my PC. To acquire the AD samples I call AD1_GetValue16(). Then I convert them to an ASCII string using UTIL1_Num16uToStr() (you need to add the UTIL component to your project to call this method). Afterwards, I call CDC1_SendString() to forward the AD sample to my PC.
Let me know if this helps!
LikeLike
I’m using this with the KL04 and getting the error:
AD1.h:97:13: warning: ‘AD1_MainMeasure’ declared ‘static’ but never defined [-Wunused-function]
It looks like in AD1.h there is:
static void AD1_MainMeasure(void);
and in AD1.c there is:
static void AD1_MainMeasure(void)
{
…
}
And it’s only invoked in one place, further down in the file, AFAICT.
It looks like the declaration in the .h file should be deleted.
LikeLike
Yes, that would need a fix in Processor Expert.
LikeLike
I tried it with my MCU10.5 and Processor Expert update 1, and I don’t see that problem. I remember that I had such a thing reported last year, so it looks it is fixed now?
LikeLike
Erich,
I am trying to use all 16 ADC channels on the KL25Z Freedom board.
but I am not able to get PE to work. It gives an error about pin-muxed.
I get
“This setting causes a conflict in the ADC0_CFG2[MUXSEL]-pins muxed by the same bit field(s) must be set identically”
I get no settings to change the ADC0_CFG2 bit fields.
Any Ideas?
LikeLike
Erich,
It is strange but I got it to work with 14 Channels but can not make it work
once I add the following ADC channels on PINS:
1) PTE21
2) PTE23
So when I select ADC0_DM0/ADC0_SE4a/PTE21 as the Analog Pin it gives me the above error.
same goes with ADC0_DM3/ADC0_SE7a/PTE23
Any ideas as to what is happening???
LikeLike
I believe this is a bug in Processor Expert. I suggest you report it in the Freescale Forums too, so Freescale support could confirm?
LikeLike
Erich,
OK.
Thank you for your response.
One more thing,
I downloaded your Freedom_Shell project and imported to CW 10.5 and it does not work. Shell component can’t find the Serial_LDD component and if I delete it to to added again it never works. May be another bug too.
Thanks.
LikeLike
I just tried the Freedom_Shell project, but it does not have any reverence to the Serial_LDD component for me? I’m using 10.5 too. The Shell references the Asynchroserial (which has underneath the Serial_LDD). Maybe it helps if you add first the Asynchroserial component?
LikeLike
Erich,
I figured out the Shell problem, for some reason the PEupd’s from your GitHub account
when I downloaded them and imported them to my CW 10.5 for some reason the RingBufferUint8 was not imported, so when the PE try to re generate code from the Shell Project it failed because the Shell component was looking for the RingBufferUint8. I did find a RingBuffer but not the RingBufferUint8. So I got it from this page and imported it into CW 10.5 and then it work just find.
Go figure. I think it is a bug in CW 10.5.
Because there are time when PE has a hard time with components.
Now regarding the issue with using all Analog Inputs on the KL25Z Freedom board,
I found from Freescale forums that some one else has similar issue with ADC and PE.
They apparently have no fix for it yet, here is whey Freescale had to say about that:
“I think you have to control the muxing in run-time as for example below:
/* ADC1_CFG2: MUXSEL=1 */
ADC1_CFG2 |= (uint32_t)0x10UL;
/* PORTC_PCR8: ISF=0,MUX=0 */
PORTC_PCR8 &= (uint32_t)~0x01000700UL;
AD1_SelectSampleGroup(…,10);
In channel 10 select a e.g. TempSensor.
best regards
Vojtech Filip
Processor Expert Support Team”
you find that quote on this page:
LikeLike
I have replaced all references to RingBufferUInt8 with the new RingBuffer component (which supports different buffer sizes). It looks like you still had an old component installed (sorry for the troubles 😦 )
LikeLike
i cant get this to work, id really love if somebody could give me a hand..
here is the situation , when i debug the app the ‘value’ gets values from 0 to 65555 aproximately, which i know is the size of a integer value, but i thought ‘value’ will hold the voltage across the middle pin of the potentiometer, whats going on ?, thanks i hope you help me out.
LikeLike
You do not get a value which is the voltage: you get a value between 0 and 65555 for the full range. For example 0 is 0V and 65555 is full range (3.3V). The values in between are scaled accordingly.
LikeLike
Hi Erich
a customer wants to be assured about the real resolution and accuracy of the KL25Z processor.
He needs just few tenths of measurements /s.
I did some measurements related on the VREFH-VREFL range only,without considering any absolute reference as the 1V internal bandgap).A 50K multiturns trimmer with few mm leads was soldered in parallel to the C9 capacitor connected between VREFH-VREFL, no auto averages, longest sample time, conversion times in the range of 3-30us.I used PTD1 as input,the resistor R11 was removed ,so that PTD1 is not connected to other signals.A 100nf capacitor was placed between PTD1 and GND(i should even try without it)
The readings are sampled in a 64 elements circular array,then i consider the biggest differences among sampled values.In the worst case(Vin 3V,close to VREFH)i have differences=60 points meaning 6 varying bits(correct?).Probably this is due to non-ideal measurements conditions or noise on the board,working in debug mode and connected to PC.
In your experience wich useful resolution should i obtain?
Thanks and have an happy Easter
LikeLike
Hi Diego,
I’m affraid that I’m probably not much of help here. It could be indeed something with not so stable VREF voltage: I have seen some issues with the on board regulator which drops the voltage depending on the current.
Happy Easter to you to!
LikeLike
Thanks for your help,Erich!
LikeLike
Hi Erich,
This great tutorial worked for me with various pins.
But I can’t get it to work with PTD5 pin.
I need to use this particular one with my linescan sensor but I only get random values around 20000 even with a potentiometer or with a 100 Ohms resistor.
I’m sure I did not fry the pin because the freescale demo code works perferctly,
I wonder if it has something to do with Processor Expert generated code.
The problemes appears to be the same with PTD6 pin, used by the spare linescan connector.
I would like to know if someone here could give me some hints on what’s going on here.
Thanks everyone
And special thanks for Erich, your blog is very helpful.
LikeLike
Not sure what board you are using. Can you check if you have electrically nothing else on that PTD5 pin? And if this is a KL25Z device: I have fried several boards now (some pins not working any more), and it seems to me that the current Kinetis L devices are rather sensitive to ESD (I never had this kind of problems with S08 devices). So you might consider just to try with a different/new board to see if the problem is board related.
LikeLike
Thank you for your answer, yes it is the KL25Z from the Freescale Cup Kit with the TFC shield.
The problem is the same with or without the shield.
They should not be anything on that pin as the sample from Freescale works with it.
And the processor view of Processor Expert tells me that the pin is available.
I edited their sample to display the output in a terminal. I do get my black line.
That’s why I didn’t think the pin was dead.
LikeLike
Hello again,
I tried with another board and the problem is the same.
I have to use another pin. Also, I realised that adjusting the second potentiometer of the shield was rising the random values I get.
Any Idea ?
Thanks everyone.
LikeLike
I do not have that shield, so cannot help much. Can you measure the voltage of that pin with a multi-meter?
LikeLike
I read 0V with a multimeter on the PTD5 pin
LikeLike
always? So you must have a hardware/wiring problem maybe?
LikeLike
No only when i read values with the ADC whith the linescan disconnected. When I configure the pin to be a BitIO I measure 0V or 3 V when I toggle it.
LikeLike
That makes sense if you bit toggle it. But if you read it with the ADC, then this is an *input* pin, so ‘something’ needs to provide a 0-3.3V voltage. If you disconnect the board, then the input is floating.
LikeLike
I do knwow that, and when I use a potentiometer to adjust the tension I read something between 0 et 3.3V with the multimeter, and random decimal values around 12000-20000 with the ADC. But everything works fine with the same wiring and demo code.
Also when I configure the board to use another pin to read my analg values, this works perfectly fine. The demo code hasn’t been done with Processor Expert, so I’m having a hard time finding why my configuration and my code can achieve conversion on any pin except the PTD5 and PTD6 ones.
LikeLike
Hi Erich,
May I know, if i can use internal 1v bandgap reference as voltage reference to the adc??
LikeLike
Hello,
I’m sorry, I don’t know 😦
LikeLike
thanks Erich, I am really confused, in the datasheet they tell the alternate voltage reference for ADC can be internal voltage references depending on MCU configuration, but unfortunately I could’n find any such configuration favouring the query.If any time u get know abt it, plz put it over here….
LikeLike
Hello Erich, thanks for the much appreciated tutorial.
Is there a specification sheet from Freescale, telling the *practical* resolution we may obtain from the KL25 ADC in function of the sampling frequency, in differential 13-bit mode?
Would be nice to get a 10-bit *practical* resolution when sampling two audio channels at 128 kHz for delivering two audio channels sampled at 64 kHz each. Because of the two audio channels I can’t use the hardware averager. Relying on a software FIR lowpass filter used as high quality 8 x decimator (eating 80% of the available processing power), the audio application could approach a 12-bit resolution at 8 kHz sampling frequency. I know this is only valid if there is some gaussian uncorrelated noise surimposed on the audio input, which is the case when grabbing the audio from an electret mike having a noisy FET inside.
I may use a KL16 instead of a KL25. This would make a *one dollar* zero latency 12-bit stereo audio ADC @ 8 kHz. A zero latency ADC is essential in some adaptive signal processing like self-learning filters like LMS etc. Compare with a TLC2574 12-bit ADC costing about *10 dollars*, used in one-shot mode.
Cheers.
LikeLike
I do not remember having seen this in a data sheet, but this might be a question on the Freescale forum instead?
LikeLike
Hi Erich, is that possible to set ADC clock perscaler value in component setting? I couldn’t find any option for it. The reason is I want to set low ADC clock speed for low power mode.
LikeLike
The prescaler value is set indirectly with the selection of the conversion time (see ‘possible settings’) in https://mcuoneclipse.files.wordpress.com/2013/02/conversion-time-selection.png.
You can see this in the Clock Path of that same dialog: using another value will select a different prescaler.
LikeLike
Hi Erich, I’m trying to set up two different ADC (e.g ADC0 and ADC1) each having different channels. However, in A/D converter option i only can see ADC0, any suggestions on how to solve this problem ..thanks
LikeLike
As the KL25Z only has one ADC bock, there can be only one ADC component. You need to use the channels of the ADC0 component you have (click on the ‘+’ to increase the number of channels), and then use the channels.
LikeLike
Very helpful to have a tutorial. Thanks.
FYI in KDS1.1 I couldn’t find a way for the ADC_LDD to step through multiple physicals channels.
There are lots of hints and flexibility of group settings – so maybe I’m missing something, but this is what I did it
The Component Help only has an example of one phy ADC source being used.
My setting KDS1.1,0 ADC_LDD on a FRDM-K20DX50 (one physical ADC renamed to ADCPHY1) and code to ADCPHY1.c/.h
In the component expert I could define the 4 physical channels –
Temperature/ADC_DM3, Light/ADC0-DM0, ChipTemperature, BandGapV resulted in a table in
ADCPHY1.c:
static const uint8_t ChannelToPin[] = { /* Channel to pin conversion table */
0x15U, /* Status and control register value */
0x13U, /* Status and control register value */
0x1AU, /* Status and control register value */
0x1BU /* Status and control register value */
};
This is an essential mapping tool of logical channel to physical MUX, and I could only find one reference using ChannelToPin[] – which persuaded me it needed to be called each time to set up the hardware mux and then iniate an ADC
However I found I needed to loop through each ADC channel and force a HW MUX as followi
AdcTask.c:
/* the following is abbrievated code loop – not checked for compile errors */
#define AD_CHMUX_USED 4
#define AD_CH_TEMPERATURE 0
#define AD_CH_LIGHT 1
#define AD_CH_TEMP_INT 2
#define AD_CH_VREF_BGP 3
uint16_t AdCh_raw[ AD_CHMUX_USED];
#define AD_HW_NUM 1 //For MK20DX..50 there is only 1 ADC
ADCPHY1_TResultData ADCPHY1_rawAdc[AD_HW_NUM];
LDD_ADC_TSample ADCPHY1Group[AD_HW_NUM];
Adc_Sample() { //Called to initializae and collect 4 phy sources of ADC
uint16_t adcCh_num;
uint16 lpOnAdcComplete;
for (adcCh_num=0; adcCh_num< AD_CHMUX_USED;adcCh_num++){
ADCPHY1Group[0].ChannelIdx = adcCh_num;
ADCPHY1_CreateSampleGroup(ADCPHY1_DeviceData, (LDD_ADC_TSample *)ADCPHY1Group, AD_HW_NUM))) //uses ChannelToPin[ adcCh_num]
ADCPHY1_StartSingleMeasurement(ADCPHY1_DeviceData))) // Start ADC
lpOnAdcComplete=10000;//lp Error Counter
while (lpOnAdcComplete–) {
if (ADCPHY1_GetMeasurementCompleteStatus(ADCPHY1_DeviceData)) {
if (ERR_OK == ADCPHY1_GetMeasuredValues(ADCPHY1_DeviceData, (LDD_TData *)ADCPHY1_rawAdc))) { // Read measured values
AdCh_raw[adcCh_num]=ADCPHY1_rawAdc[0]; //Capture Output
}
break;//out while
}
}// while
// if 0==lpOnAdcComplete TODO error
}
}
LikeLike
Hi neilh20,
I always have avoided to do dynamic muxing at runtime of the application, so I’m affraid that I might not help you out here, sorry!
Erich
LikeLike
Hey appreciate the tutorials you do. Runtime muxing is a reality – and a great feature of ARM hardware matrix being able to assign pins to different functions. The LDD_Analog component setup does the leg work – and then there are just these unexplained “group settings” and hints of something more, Anyway thought I would share what I did for other readers looking to do it.
I’ll eventually post it on (github.com/neilh10) when I complete the full prototype of my code running on a FRDM-K20 before switching to my custom board.
LikeLike
Hi Erich Styger
I am trying to develop an application requiring uart0 tx/rx with DMA. The main goal is to send ADC data to the computer (using matlab). I tried this tutorial, the ADC is working quite well, and then I tried to send my data through open SDA using printf command. However I am not receiving the data properly because I need to send lots of data, so I guess I need to use DMA right?
I am new in codewarrior+Processor expert and I am using KL26z.
Do you have any example of this kind of application?
Thank you in advance!
LikeLike
Hello,
no, I don’t have an example for exactly this case. But using printf() is a very bad choice, as the overhead with it is huge. Better use some direct routines.
And yes, if you need to send data fast without involvement of the processor, DMA is probably the approach.
I hope this helps,
Erich
LikeLike
Hi Erich,
Thank you for your reply! I am using a low power time to schedule ADC conversions to receive data in the microcontroller and I am using UART0 with DMA to send my data to the computer. It is working, however I need a faster transmission. I configured the UART clock as MCGPLLCLK (48MHz/2) and the BAUDRATE =115200 and even this way I can’t get a sampling frequency good enough to receive a 1kHz sine wave. Is it possible get at least a 20kHz sampling frequency using UART0 through OpenSDA?
Thank you in advance!
LikeLike
I believe you would need to use DMA to get such a sample rate.
LikeLike
Hi,
coming back on that blog.
I just realized (again 😦 ) that there must be a problem with the ADC Component in CW10.4 and at least the K60 implementation regarding internal trigger.
It is possible to set a FTM as an internal trigger but I simply could not make it work. It does not do the ADC conversion on a periodic base. It converts once and do not proceed further.
Any idea?
Markus
LikeLike
Hi Markus,
I have not used the ADC that way, so I’m probably not much of help here. But I know that at least for DMA with ADC and DMA with PWM I had decided to use PDD Processor Expert macros instead. Not sure if this is related to what you report here?
Erich
LikeLike
Hi Erich,
I guess there are some limitations in the ADC Component regarding the internal trigger. I will have a closer look tomorrow. What currently makes me suspicious is that the linked FTM modul starts counting at the beginning and then suddenly stops. So the problem might be somewhere else.
Markus
LikeLike
If it stops counting, maybe somehow the FTM is disabled? I remember there some ‘stop after trigger’ function, maybe this is your problem?
LikeLike
I’m using kl46z and kinetis design studio to measure two adc channels but it’s not working. I just added 2 channels on the processor expert.
I’m using the code below.
static uint8_t value[AD1_CHANNEL_COUNT];
for(;;){
(void)AD1_Measure(TRUE);
AD1_GetValue8(&value[0]);
AD1_GetValue8(&value[1]);
}
Can someone help me? Thanks.
LikeLike
I’m not seeing anything wrong with your code. Are you sure you are using the correct pins?
LikeLike
Thank you for your help. The code does not work that way. I don’t know why, but this way works. \/
AD1_GetValue8((uint8_t *)value);
variable1=value[0];
variable2=value[1];
LikeLike
Ah! Now I see it. You have multiple channels, and they are all sampled the same time. With GetValue8() you pass a pointer to the value buffer.
LikeLike
Hello Erich,
I was sucessfully running the ADC conversions with ADC PE component. Suddenly something started going wrong because it seems that my application does not go into event AD1_OnEnd() procedure although, every function I call returns ERR_OK. The same happens on the other ADC0 and ADC1 pins. I’ve put counter inside the AD1_OnEnd and it’s not being incremented. I’m wondering what could have happened… One time it occured to me to put 5V on the ADC pin using internal voltage as a reference. Do you think that it could blow the whole MCU’s ADC module? The other interrupts are working fine (e.g. TimerInt). I tried to use bare LDD_ADC component but it’s the same situation. I’m using KDS and FRDM-K64f board.
The pice of code using ADC component:
main.c:
volatile bool conv_done;
int main()
{
conv_done = 0;
while(AD1_Measure(0));
while(!conv_done);
AD1_GetValue(&value);
}
Events.c
void AD1_OnEnd(void)
{
conv_done = TRUE;
}
Code for LDD_ADC component:
main.c:
LDD_TDeviceData* adc_device_data_ptr;
LDD_TError adc_error;
int main()
{
adc_device_data_ptr = AD1_Init((LDD_TUserData*)NULL);
adc_error = AD1_Enable(adc_device_data_ptr);
adc_error = //AD1_SetEventMask(adc_device_data_ptr,LDD_ADC_ON_MEASUREMENT_COMPLETE);
while(1)
{
adc_error = AD1_StartSingleMeasurement(adc_device_data_ptr);
}
}
Events.c:
void AD1_OnMeasurementComplete(LDD_TUserData *UserDataPtr)
{
AD1_GetMeasuredValues(adc_device_data_ptr, (LDD_TData*)adc_value);
adc_counter++;
}
I’ll be extremely grateful if you give me some tips.
Regards,
Marcin
LikeLike
Hi Marcin,
are interrupts still enabled/firing? And yes, 5V could have blown up the ADC module. Can you try with a different board?
LikeLike
Erich, interrupts in general are fine in my opinion, because the Timer Ints (10ms) fire and counter gets incremented inside the routine. I tried the Kwikstik board on CodeWarrior, which also had been working fine as far as ADC is concerned, and it’s the same as for FRDM-K64F! So assuming, the AD1_OnEnd is not firing both on the different boards and IDEs. Maybe there’s something wrong with PE? When I have two Eclipse based IDEs on my computer the PE is being shared on both of them? Or maybe I’m even not supposed to have KDS and CW installed simultaneously?
Best regards
LikeLike
Hi Marcin,
I have multiple IDE (multiple versions of KDS, CW, others, …) installed on my machine, so this is not a problem (as long they are installed into separate directories, of course 🙂 ).
LikeLike
Ok, Erich, it seems to work as for now. I’m not even sure what I’ve changed. really don’t know the reason… maybe I just defined my variables incorrectly back then.
anyway, sorry for bothering you:)
LikeLike
Hi Marcin,
Not sure if you are using a version control system (like Git): this would allow you to see/diff what you have changed. The other ‘magic bullet’ I have to offer: if things are going strange, sometimes it is a subtle stack overflow. You can get an estimate of your stack usage (see https://mcuoneclipse.com/2015/08/21/gnu-static-stack-usage-analysis/) or simply increase the stack to see if that has a positive impact.
LikeLike
Hi Erich,
I am stuck with a weird problem. I had a system earlier as mentioned.
3 ADC channels on 3 pins. I was using ADC0 to sample all of these three. I had one task which was periodic with period 20 msec. In ADC0_ONEND routing in event.c file, I was writing the values to a buffer. Everything was working perfectly fine.
I added lot of modules. After this, I am facing weird problems.
1. The breakpoint set in task1(task for enabling ADC0_Measure(0)), gets hit every 20msec as expected.
2. The task in ADC0_OnEnd function gets hit once every 60msecond.
I thought that the task is not getting time because of other tasks that came in. To test that, I disabled all the tasks. I have only one task in my system. But I still see the same problem. Why every 60second? Any idea from your previous experience? What can be the reason for this?
This task has the highest priority of 5 in the system.
LikeLike
I don’t have the complete picture, but let me try to give some suggestions:
– are you sure you are triggering the ADC conversion every 20 msec? I had students who had accidentially started multiple tasks. So are you sure your task calling ADC0_Measure() is only running in one instance?
– ADC0_OnEnd() is called in an interrupt context. How long does your ‘buffer’ handling from this event take? Are you sure that you are not calling any RTOS functions from your event routine (or whatever you do in your buffer handling)? Because you are not allowed to call any RTOS functions except the ones with ‘fromISR()’ in the name.
– have you configured the interrupt priorities properly? For example you are not allowed to call *any* RTOS calls (even the one with fromISR() in it if your maxLIBRARY level is higher?
I hope this helps,
Erich
LikeLike
Hi Erich,
Yes I had only one task. Also even if multiple tasks were running, it shouldnt matter as FreeRTOS should take care of scheduling the task properly.
* Task1 – enables measure of AD conversion. this task has max priority.
* interrupt for ADC is 48. Other peripherals have priority >= 64.
* I am not calling any such functions inside ISR. I am calling FRTOS1_xTaskNotifyFromISR which is meant for from ISR>
* regarding buffer handling, i have 2 buffers. 1 is filled in ISR. once the buffer is completely written, ISR sends notification to a task which is responsible to read from it. At the same time ISR starts writing to other buffer.
* what is maxLIBRARY ? Can you please elaborate on it ?
LikeLike
Hi Vishal,
it is about configMAX_SYSCALL_INTERRUPT_PRIORITY and configKERNEL_INTERRUPT_PRIORITY (sorry, I used the wrong name). See http://www.freertos.org/RTOS-Cortex-M3-M4.html
So in your system configMAX_SYSCALL_INTERRUPT_PRIORITY should be 48, and no interrupt with numerical lower value should use RTOS functions. And your SysTick interrupt should run with configKERNEL_INTERRUPT_PRIORITY using the lowest (numerical highest) interrupt priority.
LikeLike
Hi Erich,
I do not think there was problem with interrupt priorities.
I deleted the PE beans and added them again and configured in the same way. This time, it worked perfectly. there is no difference in the two projects that I have. But they both behave different. In one, ADC interrupts do not happen properly and in other, interrupts occur properly.
LikeLike
When I enable all the events, The breakpoint inside ADC0_OnEnd gets triggered randomly once in many many milliseconds. Can you please suggest something?
LikeLike
When I enable all the tasks*
Minor correction in the previous question.
LikeLike
Hi Erich,
I digged down problem a bit more. On ADC0, I had 3 channels. If I change it to 1 channel, everything works perfectly. If I change it to 3 channels, the breakpoint gets hit once in 20*3=60 msec which is exactly multiple of number of channels. Still do not understand what is the connection.
LikeLike
Ignore the previous update. I am still stuck with the problem where breakpoint is hit at random time periods. I have no clue what is happening.
LikeLike
Also I had one more doubt.
I have following components in my project.
1. ADC with sampling period of 20ms. This should be the highest priority.
2. HW SPI for SD Card. I write the Sampled data to SD Card.
3. AS1 – DebugTerminal to output logs to terminal.
4. AS2 – Serial comm to wifi module. This should have higher priority than AS1 as I send lot of data to my backend server via wifi module.
By default, in PE components, medium priority will be assigned to all the components. Can you please suggest me how should I prioritize these interrupts in my code. I was planning as below.
1. ADC – 48
2. SPI – 96
3. AS1 – 112
4. AS2 – 64
Your suggestions are most welcome.
LikeLike
Hi Vishal,
I’m confused by your interrupt priority numbers. The K64F has 4 bits, so the priorites are from 0 (highest) to 15 (lowest).
Here is how I would set the priorities:
hardware:
configLIBRARY_MAX_SYSCALL_INTERRUPT_PRIORITY: 2
ADC interrupt: 3
SPI interrupt: 4
AS2 interrupt: 5
AS1 interrupt: 6
(SysTick, PendSVC) configLIBRARY_LOWEST_INTERRUPT_PRIORITY: 15
Now with this, keep in mind that up configLIBRARY_MAX_SYSCALL_INTERRUPT_PRIORITY the RTOS will mask interrupts.
LikeLike
Hi Erich,
Doubts again. Sorry to bother you so much.
How do I configure these interrupts?
In processor expert components, I get the range of values from 0 to 240. And by default, it is set as 112. But you are talking of range from 0 to 15. I am getting confused.
LikeLike
Which Processor Expert are you using? I’m using Processor Expert for Kinetis V3.0.1 in KDS V3.0.0. And here I can configure interrupts from 0 to 15 for K64F (as it has 4 bits of interrupt level).
LikeLike
Hi Erich,
I am using K22F processor. I downloaded PE.upd files from you github and imported the files to my KDS. I am using KDSV3.0.0.
Also all the components have LDD components. So I am pretty sure that this is for Kinetis series.
LikeLike
Well, this is really strange, and I cannot explain why you see these interrupt level numbers?
LikeLike
Hi Erich,
I am using TWR-K20D50M and it works. However, I have problems when using a MK20DX32VLF5, in a PCB designed by myself. I have tried it with different pins and all of them give me 0. I have checked all pins. Any clue before replacing the microcontroller?
Thanks.
LikeLike
Hi Roger,
are you using a proper reference voltage/reference voltage pin?
Erich
LikeLike
Hi Erich,
Vrefh and Vrefl pins are not connected.
Document K20P48M50SF0RM, section 31.2.3: In some packages, VREFH is connected in the package to VDDA and VREFL to VSSA.
I have checked section 6.6.3 of document K20P48M50SF0, and it says nothing about being internally bypassed.
So I suppose I will have to connect Vrefh and Vrefl to 3.3V and 0V respectively, and add a capacitor between pins.
Am I right?
Thank you.
LikeLike
Hi Roger,
You can either set the reference voltage for your ADC/DAC as VDDA/VSSA or VREFH and VREFL. If you have not connected VREFH and VREFL pins, then better configure your ADC/DAC to use VDDA/VSSA as reference voltages. ProcessorExpert component has these settings.
LikeLike
Hi Roger,
what did you had on your previous board? For sure you need some reference voltage: either connect the VREFH and VREFL pins. I think there is as well an internal reference voltage you can use too (so you do not need to change the hardware).
LikeLike
Hi Erich,
I connected Vrefh and Vrefl to 3.3V and 0V respectively and now it works. I wasn’t able to find the way to do it with processor expert.
Thanks!
LikeLike
Hi Erich,
We’re trying to read from multiple ADC channels using the KL46Z and interrupts (generated by the low-power timer module). Reading one channel works fine (ADC0_SE0 or PTE20). However, adding pin ADC0_SE3 or PTE22 as a second channel ruins the data read from the first pin and it also doesn’t deliver the expected values for the second pin. We tried to follow your example above for multi-channel readings. It seems to be straight forward. We have added an additional ADC channel using the ADC Processor Expert component and we’re passing an array of size “2” to the Get_Value method with the address of the first array element [0].
We saw on the Freescale forums a comment about Processor Expert having trouble with had channel multiplexing for multiple channel readings. But as you don’t mention this on your tutorial then we had assumed that perhaps this problem had been solved. Here’s a link to the post:
freescale community docs/DOC-96507
We also tried to manually choose the ADC channel by editing the register that multiplexes the desired pin to the ADC input. But we still get wrong values using this procedure.
We have confirmed that the sampling frequency is as required and as mentioned before, we can get this to work for a single channel. So perhaps there’s a mistake on our behalf when reading the values. Another detail worth mentioning is that when we try to read from multiple channels. The resulting input signal is constant. One would expect to see slightly changing values at least due to thermal noise as we see when we get this working on the single channel. So we suspect that no conversions are taking place.
Do you have any suggestions? We’ve already looked on Freescale’s forums but nobody seems to be complaining about this.
Thanks in advance!
LikeLike
Hi Carlos,
I did not use ADC in multi-channel mode in my design, so I cannot confirm that I had the same issue (and use case). I have seen at least one case where not the proper amount of buffer was passed to the function, but you indicate that this is indeed the case. Is your buffer in global memory (and not on the stack)? Can you make sure that you have enough stack space available for your program/trheads to eliminate a possible stack overflow? If this does not help: setting a watchpoint on the corrupted memory location might help to find out who is corrupting your data.
I hope this helps,
Erich
LikeLike
I have done it on the KL26Z – basically followed the above.
The Freescale method seems designed for multiple channels to be read consecutively – but it takes digging into the details and the example doesn’t show how.
One area that has stumped me is why are there ‘a’ and ‘b’ channel -and the instructions do define them as different – I had some inputs as standard, and also some ‘a’ but couldn’t get it to switch to a ‘b’ channel. Goodluck
LikeLike
Hi, Im using multiple channels but there seems to be a problem. I am getting the same values from both channels. I am using two sensors: a water sensor and a soil moisture sensor. The water sensor should read an analog value =”0″ while the soil moisture sensor should read a reading of 255 ADC value. I have verified this data by testing each sensor individually.
Here is my code:
static uint8_t value[AD_CHANNEL_COUNT];
/*lint -save -e970 Disable MISRA rule (6.3) checking. */
int main(void)
/*lint -restore Enable MISRA rule (6.3) checking. */
{
/* Write your local variable definition here */
/*** Processor Expert internal initialization. DON’T REMOVE THIS CODE!!! ***/
PE_low_level_init();
/*** End of Processor Expert internal initialization. ***/
/* Write your code here */
for(;;)
{
(void)AD_Measure(TRUE);
(void)AD_GetValue8(value[0]);
Term1_SendStr(“VALUE0: “);
Term1_SendFloatNum(value[0]);
Term1_SendChar(‘ ‘);
WAIT1_Waitms(1000);
(void)AD_GetValue8(value[1]);
Term1_SendStr(“VALUE1: “);
Term1_SendFloatNum(value[1]);
Term1_SendChar(‘ ‘);
Term1_SendStr(“\r\n”);
}
LikeLike
Hi Josef,
carefully check the API of AD_GetValue8(): it is
byte AD_GetValue(byte *ptr);
which means you have to pass the *pointer* to the array, not the value. You probably have simply ignored the compiler warning?
Call it with
(void)AD_GetValue8(value);
or
(void)AD_GetValue8(&value[0]);
Additionally, AD_GetValue() will return all channel values.
Check out the help of the component, see https://mcuoneclipse.com/2012/11/12/getting-help-on-processor-expert-components/
I hope this helps?
Erich
LikeLike
erich hello, could you help me apologetically as using multiple channels. esque do not understand that part AD1_GetValue16 add byte (word * Values) … if it is a varieble for ProcessesorExpert or so? Might put a more explained how to use two adc tutorial and read 10 times the values obtained.
LikeLike
Hi Miguel,
‘word *Values’ is a pointer to an array of words, and there needs to be as many words in this array as you have channels. You need to supply that array, it is part of your application (not Processor Expert).
LikeLike
I have a problem with my ADC and multiples ports
when a prints the value of one of them ADC0 or ADC1
the board prints the same value ADC0=ADC1 and I don’t know why
any idea?? Thanks
LikeLike
Hi Leonardo,
hard to tell. Are you sure your two pins are not connected somehow?
Erich
LikeLike
Hi Erich,
First of all thank you very much for all your tutorials, they are very helpful for new Kinetis users like me.
I have an issue when trying to use interrupts with this ADC component, actually I got two errors at compilation when I don’t disable interrupt in the component properties :
conflicting types for ‘AD1_Calibrate’
conflicting types for ‘AD1_Measure’
in AD1.c
Do you have an idea about where it could come from ?
Regards,
Martin
LikeLike
Hi Martin,
that message usually means that the declaration in the header file is different than the implemenation in the .c file. Are you sure that both the declaration for AD1_Calibrate and AD1_Measure are the same? I have seen issues with different orders of header file includes, e.g. because of ‘bool’ type usage.
Where you are using these two functions: have you included the AD1.h header file in a proper way?
I hope this helps,
Erich
LikeLike
Erich,
Both declarations are the same and the header is included where I use AD1_Measure. I never use AD1_Calibrate. I think that I am going to stay without interrupts for the moment. I guess the issue comes from some kind of a bug in my processor expert generated code when I enable interrupts for this component.
Martin,
LikeLike
I need read my AD inputs only in a specific part of a internal pwm signal. My pwm has a period of 1 ms and initial polarity=low. I know that’s possible to synchronize the AD conversion with a internal signal, I want to measure just in the high level from pwm but I don’t know how to execute the measure only in a specific part of the signal. can you help me?
LikeLike
I don’t have done something like this. But could you not start the conversion on the raising edge of the signal? You certainly could set an interrupt on the rising edge and start the conversion that way?
LikeLike
I thought to do that but I think that my pmw output pin doesn’t support rising and falling edge because there aren’t this methods in my PWM component on processor expert. And a don’t know other way to do that.
LikeLike
I think there won’t be an easy solution for this. You might look into ways if you can do things the way you want it with using DMA?
LikeLike
Hi Erich,
I have a list of questions and suggestions to ask you.
1. I am using two different ADC channels simultaneously on my FRDMKE02Z board with KDS and PE components. I tried implementing this tutorial but I am able to read the conversion value from only one channel at a time (conversion result was read using the Embsys Registers in the Debug Perspective. At any one particular point of time I see that the ADC_SC!_ADCH field is set to 4 (I am using Channel 4 & 5) and ADC_R the result register has the corresponding digital value. I would like to know how to use both Channel 4 and Channel 5. I have only 1 ADC.
2. The ultimate aim is to check if the subtracted value after ADC conversion from Channel 4 & Channel 5 is beyond a particular limit. If so, I would send an appropriate LED_Drive voltage value to my LED making it switch on /switch off. I will be using ACMP/DAC for setting the LED Drive voltage value as well.
3. I like the way you set your own userdefined_dataptr and instead of autoinitailsing the ADC. And would like to do the same here too. Would you recommend doing that here ?
4. I have used a PIT for generating a PWM with 20kHz 50% Duty cycle and was thinking of sampling my input to ADC at the centre of the PWM pulse. Meaning not at the rising or falling edge but at the level. Is there a way to do this? The eason I do this is to eliminate errors in sampling when the signal is in transition. Any thoughts?
P.S. I could get the bit banging I2C (well, a “unidirectional’ I2C like protocol ) and Tachometer speed measurement (loosely based on ultrasonic sensor tutorial) done with extensive help from your tutorials! Thanks a ton!
LikeLike
Hi Erich,
Just figured out how to use two different channels almost in synchronization. Thanks. Now I have to convert the result to an analog value and use the analog comparator. Will keep you posted. Thanks!
LikeLike
Ah, great! And yes, keep us all updated on your progress, thank you!
LikeLike
Hi Erich! Thanks for all your posts, I’ve learned a lot with them. Unfortunatelly there are really few tutorials on Internet for the freedom boards like yours.
Just two questions:
1) Why don’t you use the AD1_GetValue16(&value) method in the interruption(AD1_OnEnd(void))?
2) I have to do the following project and I need your advise:
I have to use the ADC module and set up from PC through Serial how many samples I want (It’s somethhing between 150-200 samples). The problem is that the time between samples should be 90 sec. If it’s possible I want to unplug the PC, and plug it once there are no more samples to get all the values from the ADC.
I saw your Data Logger tutorial, but my kl46z doesn’t support SD cards. So, Is it possible to create a file like in your Data Logger tutorial and send it to the PC?, or I should store everything in strings or arrays with the values and then send them through the serial port?
Finally I could also use an USB interface, but I’m more familiarizaed with serial. Which interface do you think it would be better for this case?
Thank you in Advance!
LikeLike
Hi Javier,
you are welcome :-).
1) Because I’m using AD1_Measure(TRUE) with TRUE parameter, and it will block/wait until the convervsion is finished. It is for simplicity only, and because the blocking is for a short time only. If using interrupt notification, then AD1_OnEnd() would be the way to go.
2) You certainly can add a SD card (SPI mode) to any microcontroller. See https://mcuoneclipse.com/2016/07/09/fatfs-with-adafruit-microsd-breakout-board-and-nxp-frdm-kl25z/
If you want to create a ‘file’, you need a file system (like FAT). There are many ways to implement a file system, the easiest one is like using FatFS.
The other way is that you could use semihosting (you find several articles on my blob about semihosting) and using fopen() to open a file on the host from the target. But this requries an active debug connection.
Or you could e.g. use Segger RTT to tranfer data/file to the host. Or use a serial connection: you simply need something on the host to record and store it on the file system.
I hope this helps,
Erich
LikeLike
Hi Erich,
Have you run into any issues with PE generated code implementing ADC channels the switch between ADxxa and ADxxb, for example..
void init_adc_pins(uint32_t instance)
/* Affects PORTB_PCR11 register */
PORT_HAL_SetMuxMode(PORTB,11UL,kPortPinDisabled);
/* ADC1_CFG2: MUXSEL=1 */
ADC1_CFG2 |= ADC_CFG2_MUXSEL_MASK;
/* Affects PORTC_PCR8 register */
PORT_HAL_SetMuxMode(PORTC,8UL,kPortPinDisabled);
I’m getting a hard fault when it hits ADC1_CFG2 |= ADC_CFG2_MUXSEL_MASK; because the ADC1_CFG2 register hasn’t been initialized at this point. I should also mention that I’m using the FreeRTOS available through PE.
Thank you for your help,
Grant
LikeLike
Hi Grant,
no, have not encountered something in exact that way. But I have seen hard faults in that area if the peripheral (ADC in this case) is not clocked yet. So is your peripheral (port B, C and ADC) muxed at that point?
Erich
LikeLike
No it’s not. I think I’ve solved the issue by swapping the two following functions in the PE_low_level_init.c file:
/* Components initialization, when RTOS is active this method is called in rtos_main_task() (from MainTask component) */
#ifdef PEX_COMPONENTS_INIT
PEX_components_init();
#endif
/* Global routing function and crystal values initialization */
#if CPU_HARDWARE_INIT
hardware_init();
#endif /* CPU_HARDWARE_INIT */
PE generates code calls hardware_init() before it calls PEX_components_init().
LikeLike
Good day erich, I have a problem. I declare my variables as well
Static uint16_t potnivel [ADC_CHANNEL_COUNT]
Static uint16_t sensorlm35 [ADC_CHANNEL_COUNT];
And I use them like that
ADC_Measure (TRUE);
ADC_GetValue16 (& potential [0]);
Level = ((90/65535) * pot level [0]) + 10;
This does not send me error but it does not work, what am I doing wrong? 😦
LikeLike
Hi Juan,
I don’t see anything wrong with your code. You say it does not send you any error, but I don’t see any error handling in your code (you are not checking the return error codes?).
But what means ‘does not work’? Your are always getting zero back from GetValue16()? And if you measure the voltage with a multimeter, what do you get?
The other thing is: 90/65535 will be zero, dos that does not make any sense?
I hope this helps,
Erich
LikeLike
Hello,
I am using bandgap voltage as a reference for my a2d channels and measuring the temperature.Some hoe in repeated measurements I see the ADCreading of my bandgap voltage to be half of what is expected.
As in,
ADC Resolution / System Voltage = ADCreading BandGap/ BandGap voltage
//4095/5(VoltsAnalog) = ADCreading BandGap/1.16(VoltsAnalog)
//ADCreading BandGap = 950 (approx)
What I am looking at the ADCResult register is around 350 to 500 value in decimal.
I would like to know what steps should be taken to debug this. Thanks.
I am using a 5 Volt system MKE02Z-FRDM (MKE02Z64VQH4) device with Channel 0 as bandgap and Channel 1 as internal temperature sensor. Processor Expert is being used to setup the software for this.
LikeLike
I’m affraid that I don’t have a MKE02, so won’t be able to help out here. The KE devices are so very different from the other Kinetis devices, so I have avoided that extra complexity in my designs and using the usual Kinetis and LPC devices instead.
LikeLike
Hi Priya,
I’m also trying to to configure KE02 ADC, I’m bit new to ADCs, infact 1st experience. Can you please provide me some help, how should I get started.
Taimur
LikeLike
Great tutorial, exactly what I was looking for.
Although I ran into an issue: I can’t seem to get the multiple channel read working. I got the single channel read going. But when I switch to more than one channel the generated code doesn’t seem to change.
I have tried to generate the code multiple times with slightly different settings. I tried generating different functions to call the channels specifically but that doesn’t work either – when I do try and read multiple channels it just reads the same adc channel over and over again.
Has anyone else experiences this issue? Does anyone have any direction they lend me?
thanks
LikeLike
Which call are you using to read the multiple channels? Make sure you pass a pointer to a buffer large enough for all the channels.
LikeLike
I have tried numerous different calls to get multiple ADC values.
Here is the code that is generated to retrieve multiple values with a pointer – to me it doesn’t appear to be correct.
byte AD1_GetValue16(word *Values)
{
if (!OutFlg) { /* Is measured value(s) available? */
return ERR_NOTAVAIL; /* If no then error */
}
*Values = (word)(RVL[0] << 0x04U); /* Store conversion data to user buffer */
return ERR_OK; /* OK */
} //Can someone confirm this is what should be generated when for retrieving multiple values?
And yes, I created an array large enough to hold all the values.
The call looks like this:
static uint16_t theAdcVals[2];
…
AD1_GetValue1((uint16_t*)theAdcVals);
Also tried:
AD1_GetValue1(&theAdcVals[0]);
thanks for the help.
LikeLike
Hi John,
I appologize for my late reply (did not see your comment somehow).
Anyway, you should use something like this:
AD1_GetValue16(&value[0]);
Basically passing a pointer to the array with AD1_CHANNEL_COUNT number of 16bit values.
(see end of https://mcuoneclipse.com/2013/02/10/tutorial-adc-with-the-freedom-board/)
I hope this helps.
LikeLike
Hi Enrich,
Have you used KE02 ADC???
I’m trying to configure it for a couple of days now for my application without success, and there is not much information regarding KE02 ADC on web.
LikeLike
I quickly tried it with Kinetis Design Studio (KDS) for a KE02 and added the ADC Processor Expert component, and that worked fine. So this might be a good starting point for you too?
LikeLike
Hi Erich,
Thanks for your reply. Yeah I’m using code warriors. I already added ADC_LDD component, currently i’m trying to configure ADC for single channel, but I’m not able to call the functions properly to get the measured valued.
I tried the steps you mentioned in this tutorial, but without success. Can you please provide the source code you used to get the measured values?
LikeLike
The source code is the same as in this article. But I’m using Kinetis Design Studio, but this should not matter?
LikeLiked by 1 person
Hi Erich,
Unfortunately still I’m stuck. I’m getting nothing,the buffer variable isn’t updating. I want to measure a voltage level from a GPIO. I have to measure four channels, but initially i’m trying to get measurment for a single channel. I hv no idea what I’m doing wrong.
LikeLike
Hello Erich,
thanks for your helpful tutorial. I face an issue with the measure function generated by processor expert
if (WaitForResult) { /* Is WaitForResult TRUE? */
while (ModeFlg == MEASURE) {}
because of this while i enter an infinite loop and have no idea what argument i should use to get out of it
thank you for your time
LikeLike
It means that your ADC is still measuring and not finished it yet. Are you sure you have followed the tutorial?
LikeLike
Yes i have and twice because my first version didn’t work (without using interrupt) and neither my second attempt (with interrupt) i have set the right pin and the same conversion time as the one you used in this tutorial (9.6µs)
in order to try and see the value returned i just put (version without interrupt)
void ADC1(){
value = 20;
(void)AD1_Measure(TRUE);
(void)AD1_GetValue16(&value);
}
in a while(1) loop in main.c
Even with my breakpoint, value didn’t change while the program was stuck in the loop.
thanks again for answering me
LikeLike
I have pushed a new example showing both use cases with the ADC and KDS:
https://github.com/ErichStyger/mcuoneclipse/tree/master/Examples/KDS/FRDM-KL25Z
Please have a look.
LikeLike
Thank you a lot i will try that this afternoon
LikeLike
Just used this today, almost 9 years later since you wrote it, to configure the ADC for a multichannel voltage logger.
Very useful, still actual, and crystal clear.
Thank you and a Happy New 2022 Year!
:o)
LikeLiked by 1 person
Thanks for the feedback, glad to hear it is still a useful article. Happy New New 2022 Year too!
LikeLike