As I have received multiple questions about that Darth Vader Santa Claus/Christmas robot in the Mini-Sumo competition last week, here are the details in case you want to build your own :-)…
As you might see from the rankings (here and here), “Darth Vader” was not the most successful robot. No surprise to me, as that robot was more about fun and less about the competition :-). And it has some technical details which might be interesting for a ‘normal’ Sumo robot too.
Sumo Board: Added 200 uF to 5V DC-DC Input
The new Sumo robot boards did very well, with one exception: the 5V DC-DC converter input voltage is missing some buffering capacitance. With the battery voltage dropping too much, it could be that the 5V supply voltage drops too much. The effect is that or example the Bluetooth module loses the connection. An extra 220 μF helped 🙂
Front Reflectance Sensor
The front reflectance sensor array (Pololu http://www.pololu.com/product/1419) is using a custom extension using stackable Arduino headers (Pololu http://www.pololu.com/product/1035).
Using that extensions, the sensors are only about 1 mm away from the ground:
The headers are glued to the Pololu robot chassis (Pololu http://www.pololu.com/product/1418). Additionally, the blade inner side is coated with black tape to reduce any ambient light and to minimize reflections:
Lasers!
Two laser sensors on the front are able to locate objects:
The laser sensors are from Adafruit (https://www.adafruit.com/product/2122). They do not measure the distance, they simply tell with a logic signal if the laser beam is reflected or not. This is all what the robot needs to know :-).
The lasers are glued behind the front blade:
❗ Just before the sumo combat last week, one of the lasers died, not sure why. For the video below I have replaced the bad sensor with a new one.
Adafruit Music Maker Shield
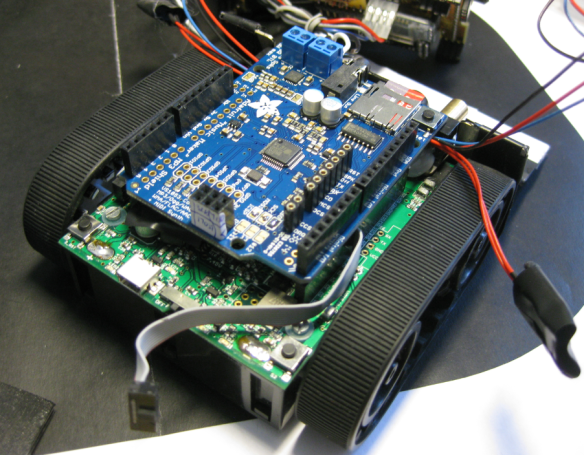
To play sound effects, the Adafruit Music maker shield is used. The pin assignment on the Arduino-compatible headers of the robot required to route some pins of the shield:
The shield gets stacked on the robot, with the MP3 sound effects stored on a micro-SD card, running FatFS.
The re-routing of the pins was necessary, as I have three different devices on the same SPI bus:
- SD card which stores the music files
- VS1053 Encoder to play music
- nRF24L01+ transceiver
The Music Shield gets covered which is the base for the upper housing:
On top of the Music Shield there is the Sensor Shield (see “Sumo Robot Sensor Shield“). It provides connectors for the two laser sensors (including the needed two pull-up resistors), a connector for the ultrasonic sensor, the nRF24L01+ transceiver and a bluetooth module:
The HC-SR04 Ultrasonic sensor and the two Adafruit loudspeakers (Adafruit https://www.adafruit.com/products/1669) are glued into the upper housing:
The housing is then put on top of the robot:
Black electrical tape is used to keep the upper housing in place.
Front and Drop-Blade
The robot has its normal front blade (Pololu http://www.pololu.com/product/1410) only modified to fit the lasers, plus a drop-down blade to pull the other robot off the ground.Because that drop-front-blade would exceed the allowed 10×10 cm ground surface, the blade is in an upright position before the start:
After the 5 seconds delay, the robot can drop the blade which will uncover the ultrasonic distance sensors in the eyes:
Extra weights have been added to the front aluminium blade so it drops better to the ground. The front area has an infrared light reflective area to confuse the opponents sensor:
To drop the front blade, the robot accelerates and then stops for a short time: this will drop the blade:
Sound Effects
At power-up, the robot plays the imperial march :-):
The robot plays different sounds depending on the internal state machine (5-second delay, breathing sound while ‘walking’ around, laser sound while attacking target, …):
And check out the videos in this post: Sumo with GoPro, and other Sumo Videos
Summary
Building, programming and running a Sumo robot is a lot of fun. This robot is not optimized for winning sumo battles, but it is built to have a lot of fun. And this is what counts in life :-).
Happy Vadering 🙂


Pingback: McuOnEclipse Components: 27-Dec-2014 Release | MCU on Eclipse