
Sometime I’m pretty sure I wrote about a topic I can find or refer to, and I was pretty sure I did write about ‘attaching to a running target’ using MCUXpresso IDE in an article, but Google does not find it? The only rational outcome is that I can blame Google and I have to come up with a potential duplicate ;-).
Anyway: attaching to a running target is such an essential life saver it deserves a dedicated article.

Why ‘attaching’ is such an important feature? Because it allows you to run the target for a very long time, and if it fails or if you want to inspect it you can re-attach the debug cable or connection, halt it and see what is going on without changing it or re-programming it
It basically works that way: the debug session is establishing a connection, but does not issue a reset or starts downloading the binary as it usually does. As a user I can then just halt the target as I would do normally in a debug session.
For example I can have multiple boards running some tests, and in case of test failure I would like to inspect I can turn on a LED and then wait in an infinite loop for the debugger to be attached. If one of the boards shows a failure, I can attach the debug cable, do an ‘attach’ action and then I can halt the target and inspect it’s state. For example if the target has halted on an assert like this:

How you can do it depends a bit on the IDE and debug connection as this is not something provided out of the box with Eclipse. The Eclipse Embedded CDT has it included and this is what I have used in my article using the Kinetis Design Studio.
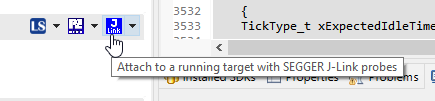
In the MCUXpresso IDE this exists too with even more actions, but is probably a bit hidden to find it. The functionality is behind the ‘probe icons’ in the IDE Quickstart Panel:
Each of the icons has a small drop-down with actions: From there I can use ‘attach’

This is supported for all debug probes (LinkServer/CMSIS-DAP, PEMicro and Segger).
Note that there are other very useful actions to do like programming the flash or erase it.
If using ‘attach’ it will launch a debug session and the target will show up running:

To halt the target, use the Suspend action:

This halts the target and it is ready to be inspected:

Note that the probe icon has now the last action stored:
And the Launch Config has a dedicated Icon decorator to indicate the mode:
If doing a ‘debug’ session using the main toolbar ‘blue debug icon’ it should revert back to normal ‘debug’:

But just in case it does not: make sure you you revert it back to the operation you want:

With this, I hope you find and can use that very useful feature.
Happy attaching 🙂

Hi Erich
> Sometime I’m pretty sure I wrote about a topic I can find or refer to, and I was pretty sure I did write about ‘attaching to a running target’ using MCUXpresso IDE in an article, but Google does not find it? The only rational outcome is that I can blame Google and I have to come up with a potential duplicate ;-).
Are you thinking of this one? (I found it with a Google search for site:mcuoneclipse attach to running target MCUXpresso :-))
I presume not this one since it doesn’t mention MCUXpresso?
Regards
Tommy
LikeLike
Hi Tommy,
yes, the second link is for Kinetis Design Studio so does not apply to MCUXpresso IDE. I missed the first link with the bootloader but this is somewhat aiming at a different topic. Anyway I’m glad you have found them 🙂
LikeLike
> a Google search for site:mcuoneclipse attach to running target MCUXpresso
a Google search for site:mcuoneclipse.COM attach to running target MCUXpresso
LikeLike
Strange – my first comment did not appear (awaiting moderation) but my follow up to that did!
LikeLike
Yes, strange, it was indeed hold up for moderation.
LikeLike