Philips Hue Smart LED stripes are great, but they have a disadvantage: the LED density is rather low: one LED cluster (WW, RGB, CW) every 55 mm. This leads to the problem that individual dots might be visible if the LED stripe is directly visible. Even if the LED stripe is used for indirect ambient light it means that individual dots might still be visible on the wall or ceiling. The solution is to create a ‘high density’ Hue smart LED stripe:
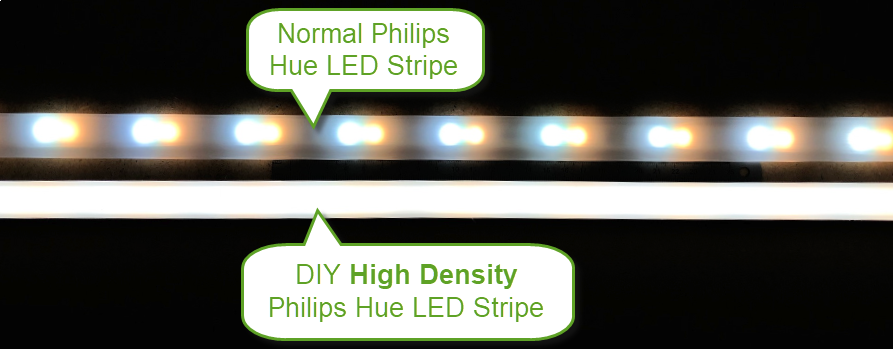
Normal vs High Density Philips Hue LED Stripe
It started when I wanted to ‘upgrade’ a 20 year old bathroom mirror cabinet with LED lights. Using LED stripes was a natural choice as they are energy efficient and can be mounted on or around the cabinet. And potentially upgrade the rest of the room lights with that too. I was undecided for a long time if I should make the build based on the WS2812B LEDs which I have used in many projects or should use a ‘commercial’ product. After a while it was clear that it should be based on the Philips Hue system. Yes, Hue is not the least expensive solution. But it very easy to use (killer feature for the rest of my family) and the color/light quality is just outstanding in my view.

Philips Hue LED Stripe 2m Kit
So the decision was to use the Philips Hue system and LED stripes. But they have a problem: their LED stripes have a rather low LED density of 55 mm. There is a LED ‘triple’ every 55 mm with 3 LEDs (two different white colors and and RGB LED:

Philips Hue LED Stripe Density
The issue with that is that individual LEDs are visible:

Philips Hue without diffuser
With a diffuser it gets better, but dots are still clearly visible:

Original Stripe with Diffuser
One option would have been to build a custom LED PCB or stripe. But it would be crucial to use the same LEDs for color accuracy. I did not find a source or part numbers for just the LEDs. Taking parts off the stripe and build a custom one? Too much work in my view. So my solution was to combine 3 stripes into one: this gives three times the power and if the LEDs are having an offset, the ‘dot’ effect should disappear.
The LED profile is able to host three strips and is designed in FreeCAD and then 3D printed.

FreeCAD Model
To have the combination as small as possible, the rubber coating of the original stripe gets removed.

removing protection cover
Three stripes then get inserted into the 3D printed profile:

Profile Detail

Inserted Stripes
The diffuser protects the stripes and snaps on top of the profile:

Diffuser
The stripes on the left and right are blending together with the one on the bottom, making a nearly 100% uniform LED stripe.

Without Diffuser
Below a few pictures to show the difference between the ‘normal’ and the ‘high-density’ one, both stripes covered with the diffuser:

stripes 1

Stripes green
I had a concern about the 3D printed material (PLA) getting too warm. But this was not the case at all even if having the LEDs turned on with full power. I would have used ABS instead, but that seems not necessary. I still have the option to use a standard 12×12 mm aluminum profile instead.
The two side stripes can be easily connected together:

End Connection
For the other end the side needs to connect to the base. The good thing is that each stripe has a cut area near the connector (as shown on the left of above image). With cutting and soldering wires the connection can be made:

Cut off and connected side
I’m very happy with the results. With this I have a LED stripe which looks uniform even if visible. If using it for indirect ambient light I don’t have color differences or ‘dots’ on the wall or ceiling. Plus I get more lumen per meter too, making it ideal my illumination project.
Happy Hueing 🙂
Links
- Philips Hue Smart Lighting: https://www.philips-hue.com
- Paulmann LED Profiles and diffuser: https://ch.paulmann.com
- FreeCAD: https://www.freecadweb.org/

Looks great! What do you think about trying a profile with a trapezoid rather than square shape to house the leds? would they still look uniform or be too spread apart? Just thinking about the directed nature of leds and that pointing them 90 from their intended target might be wasting lumens.
LikeLiked by 1 person
Hi Dan,
yes, I tried that, but it was not looking as good and the LEDs were looking more apart, so it was not ideal. Additionally I don’t have much space where I’m going to use it (bathroom mirror cabinet), so I had to get them into limited space too.
LikeLiked by 1 person
Pingback: 3D Printed Mounting Bridge for Feller Smart Light Control for Philips Hue | MCU on Eclipse