Eclipse with its CDT managed Make system makes it easy to build projects, because it can handle a lot of the background tasks and settings between the project and the build setting. It can get a bit difficult if I want to include a library or other sub-source project for which I have to add extra compiler #define or add extra includes path settings.
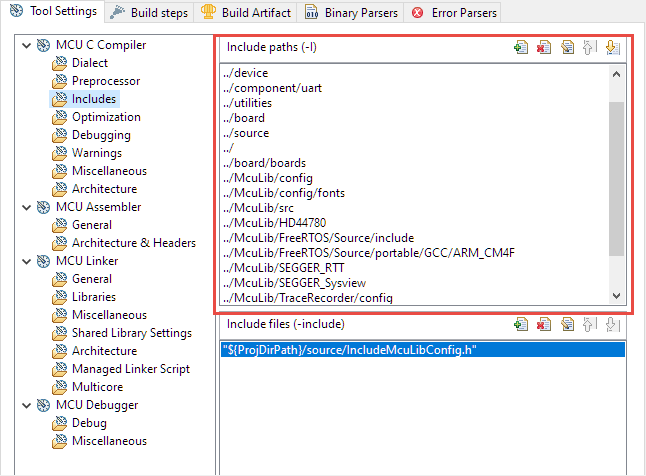
Eclipse project settings for include paths
This article show the different ways I have found to make such imports (and exports) easier.
Project Settings
The first thing is to access the project settings. The usual ‘Eclipse way’ is to
- Make sure the project root/name is selected in the Project Explorer view
- Press <ALT>+<ENTER> (shortcut)
or: use the context menu and use ‘Properties’
or: use the main Menu Project > Properties - Then navigate to C/C++ Build > Settings > Tool Settings > Compiler > Includes
- Finally make your changes

Project Settings
Of course the exact location depends on the target/compiler/Eclipse distribution. That should work for most Eclipse CDT build integration I have used, including the GNU MCI Eclipse one.
An easier way to access the settings is in NXP MCUXpresso IDE using the Quick Start Panel:

Quickstart Panel Edit Project Settings
This gets you there in just one click 🙂
💡 That quickstart panel is NXP specific and not part of Eclipse CDT
Include Path Settings
In a similar way, that Quickstart panel has an option to update different things in a project, for example the include or library path:

Quickstart Panel: Library Search Path

Include Paths
Inside the project settings I can select multiple lines and for example delete them with one click.

project include path settings
What might not be so obvious is that I can copy the selection with the standard host ‘copy’ shortcut (<CTRL>+<C> on windows which will place it on the clipboard as lines of text:
../board/boards
../McuLib/src
../McuLib/HD44780
../McuLib/FreeRTOS/Source/include
../McuLib/TraceRecorder/config
The really cool thing is that that paste (<CTRL>+<V>) works the same way too: copy a set of include paths from another project or from a text file and past it into the target project, done :-).
Defined and Undefined Symbols
The same thing works for the #define and #undef settings too. In the NXP MCUXpresso IDE there are quick settings for the defines too:
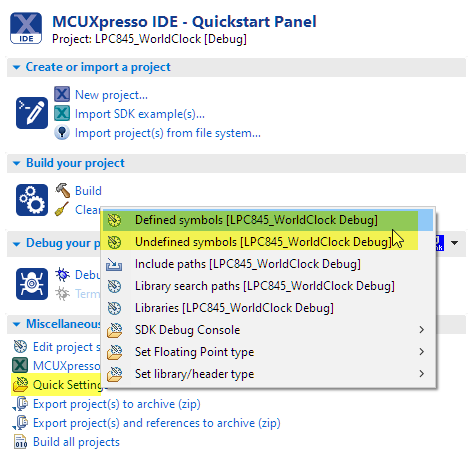
Quick Settings for defines

Defined Symbols
The same way I can select, delete, add, insert/paste multiple lines too:

Define Settings
Import/Export
There is yet another way. Instead doing things in separate steps, I can export and import the settings.
I can use the File > Export menu which gives me the option to export the C/C++ Project Settings:

Export C and C++ settings
I can select the project and the build configuration to export, plus I can specify the include path settings and/or symbols (define and undefine):
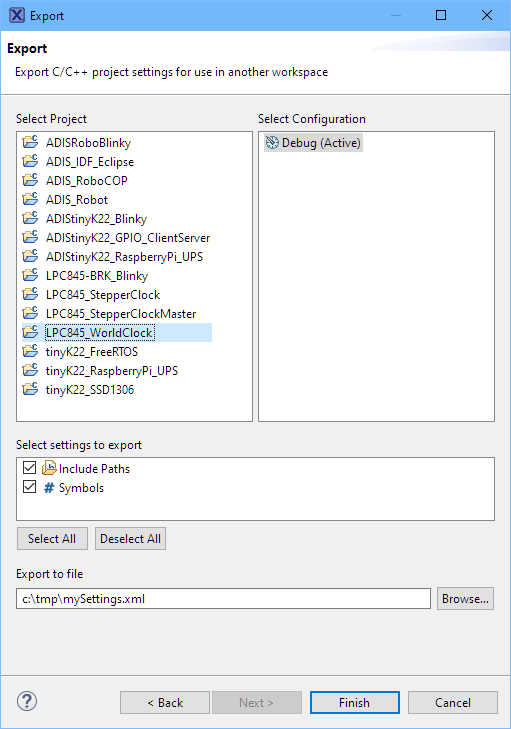
Exporting Settings
The data is stored in XML format which I can re-import or tweak with an editor:

Exported XML Data
Importing is just the other way:

importing project settings
Summary
I can update/copy-paste project settings or use the Quickstart panel to get a quick access to the settings. Or I can export and import the settings as XML files. This makes applying complicated settings from one project to another just a matter of a few clicks.
Happy Setting 🙂
