I noticed on Mouser.com that there is a new i.MX RT1050 board: the EVKB one. I have used the EVK (the one without the ‘B’) for several weeks (see “MCUXpresso IDE V10.1.0 with i.MX RT1052 Crossover Processor” and “Adding a Rocktech Capacitive Touch LCD to the NXP i.MX RT1052 EVK“). I needed anyway a second board, so I ordered that EVKB from Mouser, and after some delay and waiting it arrived on my desk. So far this boards seems to be a better one:
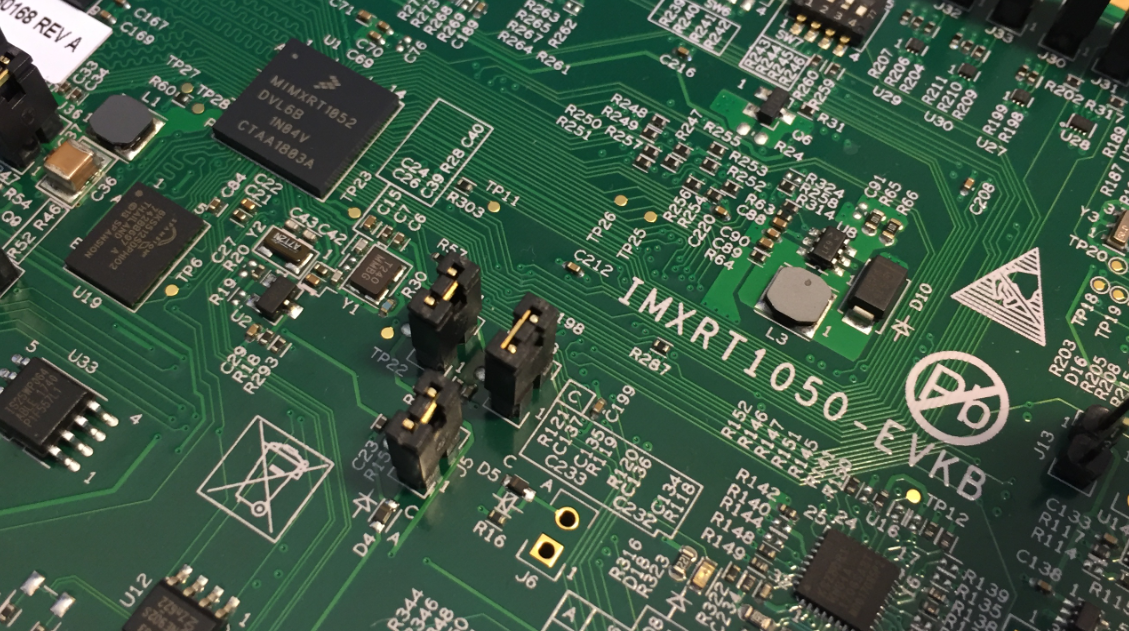
i.MX RT1050 EVKB Board
The biggest difference is that the new EVKB is using a different silicon. Reading the errata confirms some strange power issues I had observed with the EVK board: during development or startup the board did not respond any more, and I solved this with a) power on with the external power supply and then b) power the debug probe.
💡 NXP refers now the original EVK board as ‘EVKA’ to differentiate between EVK and EVKB. I’m continue to use EVK and EVKB as this is what is used in many places, so I hope you don’t get confused by this.
I recommend to have a read at the documents in https://community.nxp.com/community/mcuxpresso/mcuxpresso-ide/blog/2017/12/07/overview-of-using-the-mimxrt1050-evk-with-mcuxpresso-ide which gets frequently updated.
MCUXpresso SDK
There are two different SDKs available from https://mcuxpresso.nxp.com:

MCUXpresso SDK
I faced some strange debug protocol issues with the EVK, and interestingly they (mostly) went away with using the EVKB SDK even for the EVK board. So I now use the EVKB SDK for the EVK board too:

EVK and EVKB SDKs
Board
The picture shows the differences between the EVKB (top) and the EVK (bottom):

i.MX RT1050 EVK vs. EVKB (click to enlarge)
- EVKB Board has the 4 Arduino headers populated
- A1 silicon on EVKB
- EVKB has no header for J15 and J13 not set
- EVKB has extra (unpopulated) header J38.
J38 is used to disconnect the signal to the SPDIF (COAX) output. J15 is the same for the Coax input. Anyway both the coax connectors and circuit for it are not populated on both boards. J13 is used to power the SPDIF circuit. So these all are not really relevant to me.
Having the Arduino headers populated is nice. But more important is the CPU silicon change.
CPU
The probably biggest change is that the EVKB has the A1 silicon on it (DVL6B):

i.MX RT1050 EVKB with A1 silicon (DVL6B)
While the EVK has the A0 silicon on it (DVL6A):
💡 See https://www.nxp.com/docs/en/nxp/application-notes/AN12146.pdf for part numbers and decoder.

i.MX RT1050 EVK with A0 silicon (DVL6A)
The differences between A0 and A1 silicon are described in https://www.nxp.com/docs/en/nxp/application-notes/AN12146.pdf.
OpenSDA
The on-board OpenSDA debug circuit on the EVKB board still shows up as ‘EVK’:

EVKB OpenSDA
The DAPLink firmware has been updated to the 244 version, so I don’t have to update that on the EVKB board:
# DAPLink Firmware - see https://mbed.com/daplink
Unique ID: 0227000040214e4500131018c89200469e11000097969900
HIC ID: 97969900
Auto Reset: 0
Automation allowed: 0
Overflow detection: 0
Daplink Mode: Interface
Interface Version: 0244
Bootloader Version: 0242
Git SHA: 853df431d81359e822f49363891f877f17d31efb
Local Mods: 0
USB Interfaces: MSD, CDC, HID
Bootloader CRC: 0x73707d49
Interface CRC: 0x565000e7
Remount count: 0
Summary
Connecting the LCD is still a very challenge for the EVKB board. Having the Arduino headers populated is a nice addition, so I can start using my many Arduino shields right away. The most important change is the new silicon A1 revision which seems to solve some instabilities I have seen with the EVK board. I’ll keep my development running with both boards, but now in case of problems I can compare the EVKB with the EVK revision. And using the EVKB SDK even with the EVK board seems to be a good move too, as this somehow improved stability too.
In any case, if you want to start using developing with i.MX RT1050, you should go for the EVKB board. And if you already have the EVK, it is probably the best if you get an EVKB too.
And yes: I have now an open source GUI library working on that display:

Open Source GUI on i.MX RT1050 EVKB
Happy B’ing 🙂
PS: I had ordered the i.MX RT1020 EVK board and it arrived this week too, so yet again something to play with this weekend 🙂
Links
- Detailed steps about usinig the i.MX RT1050 EVK(B): https://community.nxp.com/community/mcuxpresso/mcuxpresso-ide/blog/2017/12/07/overview-of-using-the-mimxrt1050-evk-with-mcuxpresso-ide
- Difference A0 and A1 silicon: https://www.nxp.com/docs/en/nxp/application-notes/AN12146.pdf
- i.MX RT1050 EVK(A) guide: https://www.nxp.com/docs/en/user-guide/MIMXRT1050EVKHUG.pdf
- i.MX RT1050 EVKB guide: https://www.nxp.com/docs/en/user-guide/IMXRT1050EVKBHUG.pdf
- MCUXpresso IDE V10.1.0 with i.MX RT1052 Crossover Processor
- Adding a Rocktech Capacitive Touch LCD to the NXP i.MX RT1052 EVK
- NXP i.MX RT Web Page: https://www.nxp.com/products/processors-and-microcontrollers/applications-processors/i.mx-applications-processors/i.mx-rt-series:IMX-RT-SERIES
- MCUXpresso IDE: http://www.nxp.com/mcuxpresso/ide
- MCUXpresso SDK: http://mcuxpresso.nxp.com/

Hi Erich,
This open source GUI is maybe LittlevGL ?
Luca
LikeLiked by 1 person
Hi Luca,
yes, it is https://littlevgl.com/
Erich
LikeLike
Pingback: First Steps with the NXP i.MX RT1020 EVK Board | MCU on Eclipse
Pingback: Tutorial: First Steps with Embedded Artists NXP i.MX RT1052 OEM Module | MCU on Eclipse
Pingback: Tutorial: Booting the NXP i.MX RT from Micro SD Card | MCU on Eclipse
Pingback: Getting Started with Microsoft Azure RTOS (aka ThreadX) | MCU on Eclipse