Ok, you are probably new to Eclipse, and want to do the fun part: Creating an Eclipse Processor Expert project in CodeWarrior for MCU10.2. Cool! Here are some steps and tips to make it smooth from the beginning…
First, download and install CodeWarrior from here. Yep, that’s a big file to download and install. So better plan to do some other work in parallel…. Well, you could continue reading so you will be ready.
The first time you launch the IDE, it asks you to select a workspace:
Go with the default or select a new folder. Press OK.
This launches the Eclipse IDE. Once loaded, it shows the Welcome View. Select ‘Go to Workbench’:
Now it is time to create a new Processor Expert Project with the Wizard. Use the menu File > New > Bareboard Project:
In the wizard, give a project name and select the device you want to use. If you don’t care, simply select the MCF51JM128.
Tip: Use filtering, e.g. *mcf51jm
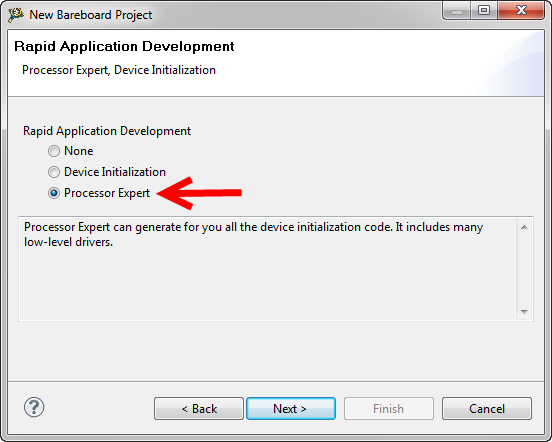
Specify what method for debugging you want to use (depending on what you have). Go through the wizard with the default settings, except for this one:
Here select the Processor Expert option, and press Next. Depending on the microcontroller selected you will be offered a dialog asking for the pin variant and configuration: select what fits best for you.
Press Finish, and the project will be created for you. If this is the first time you use Processor Expert, this might now take a little bit longer. Once you project has been created, it should you see something like this:
You can show/hide the Processor Expert views using this menu:
Time to inspect the Processor Expert Components in the project. Go to the Project Panel View and unfold the ProcessorExpert.pe group (this is actually an XML file in the root of your project):
Let’s add a component to toggle a LED or an I/O pin. For this go to the Components Library view and select the Alphabetical tab:
To add a component to a project, check first that the right project is active. You can see this on the bottom of the Components Library view. Otherwise first select the project. Then select the component to add and press the ‘add’ icon in the Components Library Toolbar.
Select the newly added component and choose the Inspector from the context menu:
This opens the Component Inspector View. Specify a Pin for your I/O:
Tip: Notice the little star (*) in the Component Inspector. This means that things are not save yet. Select the Tab and Press CTRL-S to save the settings, and the * goes away.
Unfold the BitIO you have added. It will show all the methods. Notice that some methods are disabled and marked with an X. Enable the NegVal() method with the context menu:
To use the Processor Expert method, simply drag&drop the Method into your source. To learn more about drag&drop with Processor Expert, see this post.
This gives you now the code in the main():
Tip: Notice again little star (*) in view. This means that things are not save yet. Use CTRL-S to save the file.
To generate Processor Expert code, select the project folder and press the Generate Processor Expert Code button:
After code has been generated, we need to build it. Here again, eclipse is using the ‘current project’ approach. Select the project folder and use the ‘hammer’ button:
The Problems View should show no error:
Tip: An case you get a “mingw32-make: *** No rule to make target” error: Use the menu Project > Clean… to recreate the make files.
And the Console View should just show what the compiler and linker had to say:
Same ‘have a project selected’ theme for debugging: make sure you have a project selected and press the ‘debug’ button:
This then (hopefully) downloads the binary to the target board. Eclipse might ask you if you want to switch to the Debug Perspective. Say Yes. The Debug Perspective is for debugging (ah, that was obvious!):
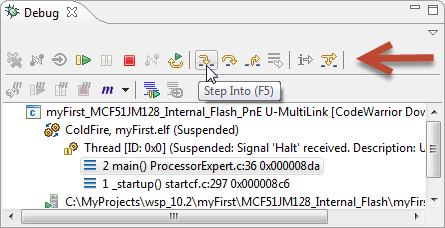
In the Debug View you have toolbar icons to resume, stop, disconnect and stepping. Hoover over the toolbar buttons to find out more:
Use the Terminate button in the Debug View Toolbar to terminate the debugging session:
To switch back to the C/C++ Perspective use the C/C++ button. In case the button is not visible, simply use your mouse to enlarge the button area:
Now you are back to your project, and ready to start coding….
Happy Experting 🙂


Pingback: USB or not: CDC with Processor Expert | MCU on Eclipse
Pingback: Tutorial: FreeRTOS on DEMOJM | MCU on Eclipse
Pingback: Code Warrior, Eclipse, and Freedom boards | Raspberry Alpha Omega
Thanks for that. I’m looking for useful informations about these boards for hours now. CW 10.6 is installed and it looks different than the version used here. I can’t import any demo code, I’m starting to wonder whether these MCUs are meant to be programmed at all. Support by freescale for these boards is really bad.
Anyway, I’m stuck at adding the IO pin. ProcessorExpert.pde is an empty folder. Nothing was added. I get some warnings at the bottom “This setting is useless for target cpu.” lol Screenshot: http://foto.arcor-online.net/palb/alben/29/1907129/6161316662613563.jpg
Enjoy the weekend,
Stephan
LikeLike
Hi Stefan,
the warning is easy: it asks you to set the ‘safe mode’ setting to ‘no’ in the properties of the pins, as they do not make sense. I think you can double click on the warning and it will open the settings (you might have to enable the ‘Advanced’ button in the component inspector view.
Which demo code do you want to import?
And what is this ProcessorExpert.pde? Or you mean ProcessorExpert.pe?
I hope this helps,
Erich
LikeLike
OK, got that finally but I can’t flash. Thingy is not recognized by CW. Moving applications to the board does not work. Plug-off and -on again and the files are gone…
LikeLike
Have you loaded the debug firmware? Boards get shipped with MSD bootloader, but not with the debug application. There is a newer firmware (see https://mcuoneclipse.com/2013/12/14/new-pe-opensda-firmware-v114/) from P&E which has bootloader and debug application combined.
LikeLike
Hi Erich,
democode I found at freescale in some quickstart package. I would like to know how to program these MCUs. There is no useful info found at freescale. Anyway, as the debug brigde ain’t working, there’s no point anymore. I’m just a hobbyist with some experience with MSP430 and Stellaris/Tiva and wanted to try something different. Epic fail, I get back to TI chips. They provide good documentation and working tools.
Almost a full saturday wasted…
Stephan
LikeLike
Hi Stephan,
Not sure what is causing this on your side. I never understood why Freescale ships their FRDM boards with the mass storage bootloader by default. It is nice to download a S19 file, but developers want to develop, not to program S19 files produced by someone else. What Windows version are you using? I know that the boards shipping have an issue with Windows 8.1 because Windows seems to do weird things with USB.
LikeLike
Yeah I tried but the files don’t stick at (whatever) storage of the board. I tried 2 times using Explorer and once via console and copy command. No worky, prolly needs some kind of special bithammer to slam them in…
LikeLike
What operating system are you using? Windows 7? Windows 8? Windows 8.0 or Windows 8.1?
LikeLike
HA – silly me. It’s blinking ! I had to plug the board without holding down reset. So this SDA thingy is working now. Now I need some manuals…
Thanks,
Stephan
(my full nick is OppaErich 🙂
LikeLike
Hello,
I am using processor expert and configured and generated code. The problem is i have changed one file which is generated by PE. Now when ever i change some settings in PE and generate again my changes in that file are changed but i want to keep those changes in that file. How can i do it.
Thanks,
LikeLike
You can disable code generation to preserve your changes, see https://mcuoneclipse.com/2012/03/23/disable-my-code-generation/
I hope this helps,
Erich
LikeLike