VS Code is managing its extensions (see VS Code: MCUXpresso Extension). But to make it usable for embedded development, you need more tools: compiler, linker, debugger, libraries, build system, debug probe support, …
For the experts, this is not a big deal: you know where to get them, and you install them, as shown with another tutorial. But for a class full of students or newcomers to VS Code, this can be a a time consuming and daunting task.
To make the installation easier, NXP has released a ‘dependency checker and installer’ along with their VS Code extension, which makes the setup much easier and simpler.

Outline
The ‘MCUXpresso Installer’ checks if typical tools needed for embedded development are installed: Python, git, ninja, cmake, GNU ARM toolchain plus debug probe software for NXP LinkServer, P&E and SEGGER J-Link. If not, it offers to install them and later on updating them if newer version are available.
This installer comes with the NXP extensions, targeting MCUXpresso SDK or Zephyr projects. There is a documentation Wiki on Github.
Installation
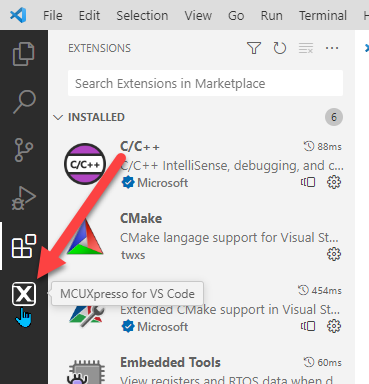
Clock on the ‘X’ to open the view for the tools:
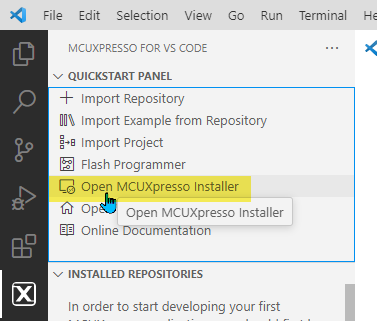
Clock on ‘Open MCUXpresso Installer’:
In the installer, I can hover over an item to show what it will install:

The blue ribbon on the left marks things to be installed. At least select the SDK environment (MCUXpresso SDK or Zephyr) plus the used debug probes. You can add installation items later on if needed.
Then press ‘Install’:
This downloads and installs the packages, internet connection required. Just in case: I can create an offline installation image too, if needed, see the Wiki for details:

The installation process is shown on the bottom of the installer:

That log is stored in a folder:

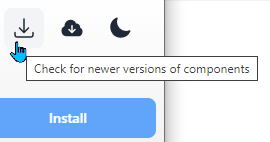
The installer has a ‘check for updates’ button:
You might noticed: there is no way to tell where things get installed. You can check the log file or use the ‘where’ command on Windows to check where it finds something, for example
where cmake
The debug probe files are installed into their default installation folder, as you would download and install them manually. Most tools get installed here:
%UserFolder%\.mcuxpressotools

The installer has added the location of these tools into the PATH environment variable.
Summary
That installer is useful to get up and running quickly, so don’t have to get and install different tools first. It makes a lab setup or an initial setup with VS Code easier to start with NXP targets and the NXP extension.
💡 with this installer and installation method, one can get up and running quickly. For a real development environment, where you need tight control over every component of the system, I advise you to use a package manager. I plan to cover this in a later article.
In the next article I’m going to install the SDK repository.
Happy installing 🙂
Links
- NXP community forum: https://community.nxp.com/t5/MCUXpresso-for-VSCode/bd-p/mcuxpresso-vscode
- NXP ‘Dependency’ Installer: https://github.com/nxp-mcuxpresso/vscode-for-mcux/wiki/Dependency-Installation
- NXP extension on VS Code marketplace: https://marketplace.visualstudio.com/items?itemName=NXPSemiconductors.mcuxpresso
- NXP extension for Visual Studio Code: https://www.nxp.com/design/software/development-software/mcuxpresso-software-and-tools-/mcuxpresso-for-visual-studio-code:MCUXPRESSO-VSC
- Dependency Installation Wiki (GitHub): https://github.com/nxp-mcuxpresso/vscode-for-mcux/wiki/Dependency-Installation
