
Some silicon vendors provide their Eclipse example and SDK projects using linked files and folders. For example a bootloader demo application is provided in the context of an SDK or library. That’s fine until the time I want to transform such an example into a real project or if I want to have it without the hundreds of files for all the other devices I don’t need or use. I cannot take the project and put it into a version control system as the linked files won’t be in my VCS. I cannot move the project to another place as the links are pointing to many places. What I need is a ‘standalone’ project: a project which has all the needed files in it and is self-containing.
Eclipse Project with Linked Files and virtual groups
Outline
Don’t take me wrong: Linked files/folders and virtual groups are a great feature in Eclipse (see “Link to Files and Folders in Eclipse“). But as with any great feature, it can be misused or overused. I understand it is easier for the vendor to provide linked files and folder. But to use such a linked files/folder and virtual groups project makes it really hard to start my application and design.
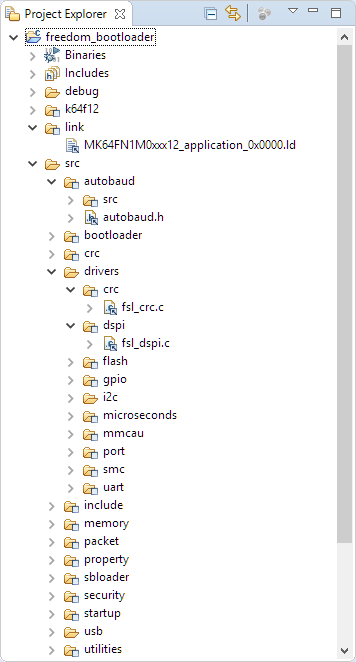
Linked Files and Folders
Linked Files/Folders do not place the files physically into the project. Instead it uses ‘pointers’ to the real files and folders. That’s great if I want to share files between projects and keep a single copy. This is indeed the case for SDK or library files provided by a vendor: the GPIO driver can be shared between multiple derivatives/devices, so the project can link to it:

Linked File
As with the example above, the fsl_gpio.c is a linked file, and it is using a project relative location:
PROJECT_LOC\..\..\..\..\src\drivers\gpio\fsl_gpio.c
The problem with that is that as soon the project location gets changed, all the links are broken :-(.
So while for the SDK it makes sense to share the GPIO driver, for any other usage of the project it creates a dependency which is hard to keep up. I rather want to have that GPIO driver inside my project folder structure.
Transforming a Linked Project
Unfortunately there is no magic button to transform a linked project into a normal standalone project. One obvious way is to create a new project and then copy over the needed files. Obviously that is a very time-consuming process.
But what I have found is a process which makes it easier to transform a linked project into a standalone project. What I’m using is to ‘export’ and then ‘import’ the project again.
Export as Archive File
In Eclipse, use the menu File > Export, then use General > Archive File:

Export Archive File
In the next dialog, select the projects/files and folders to be exported. Have the following options enabled:
- Resolve and export linked resources
- Create directory structure for files
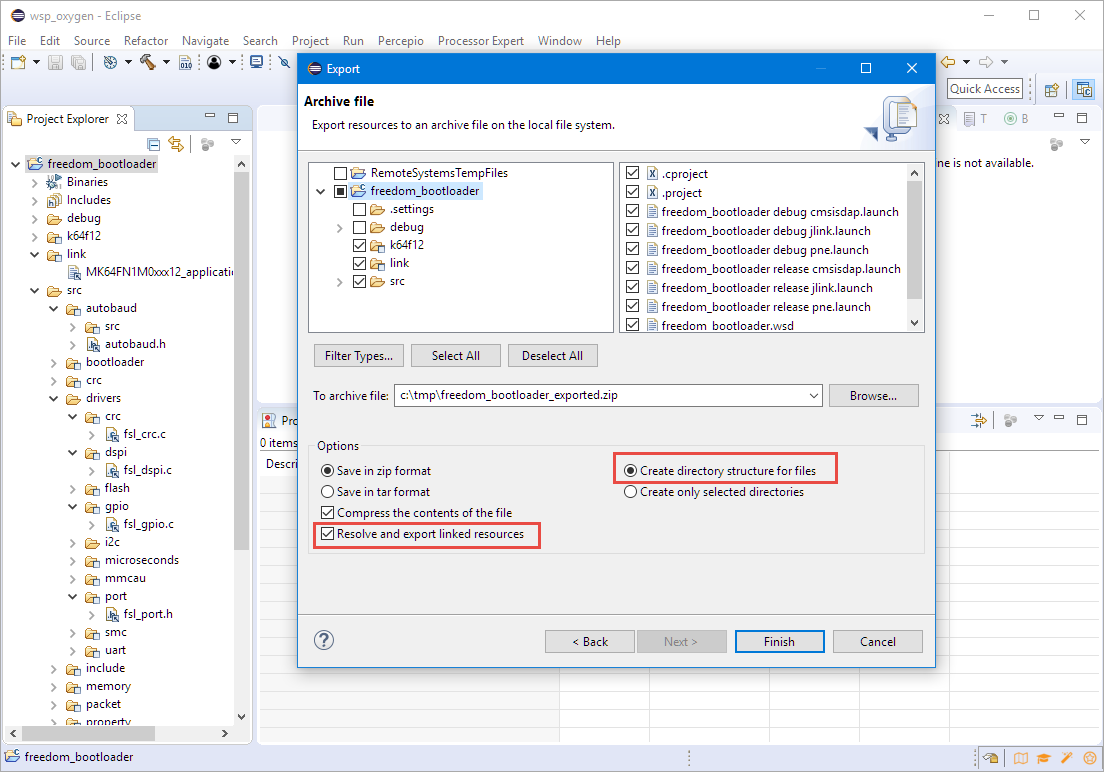
Exporting as Archive File
💡 That checkbox ‘Resolve and export linked ressources’ is present in Eclipse Neon or later. Earlier versions of Eclipse do resolve the linked ressources during export automatically and it cannot be disabled.
This creates an archive (zip) file with folders for the groups and resolved links:

Archive File with resolved Links
Import Archive File as Existing Project into Workspace
The next step is to import the project again.
💡 Since it is not possible to have the same project name twice in a workspace, either remove the previous project or rename the project, or have it open in a temporary workspace.
Use the menu File > Import and select the Existing Projects into Workspace option:

Importing Existing Project Into Workspace
Select the file we have exported in the previous step and import it:

Importing project
And now we have a project with all the linked files and folders resolved:

Imported Project
Settings and Missing Files
While we have a great start, probably the project does not fully compile yet. For example the toolchain include/header paths are still pointing to the folders outside the project. You have to fix the settings:

Fixed Include Path
The other missing thing might be header files. The export does only export the folders and header files which are present as links in the project. So there might be headers or include folders which are missing. Copy the missing files and folders into your new project.
💡 It is a good idea to have the ‘linked’ project open in a separate workspace/Eclipse instance. So it is easier to find out where the missing files are located on the disk.
Summary
Linked files and folders are a pain if such a project needs to be moved or changed. It is better and easier to have the files standalone and not linked. To transform a linked project into a standalone one, I use the trick to export it as an archive and then import it as ‘existing project’ from that archive. With a few more tweaks, I have a standalone project which is transparent with all the files and which easily can be moved around, passed to a co-worker or put into a version control system. And the presented approach makes it easier to take a project out from of a complex and linked directory structure, and I can use the project in standalone mode, with only the needed files.
Happy Unlinking 🙂

Great stuff (as always)! One tiny edit: You mention that “[since] it is not possible to have the same project name twice in a workspace, either remove the previous project or open up a new workspace.” I’d amend that to “either remove _or rename_ the previous project, or open up a new workspace”. (I personally find that’s easier than proliferating workspaces…)
LikeLike
Hi Robert,
thanks! And yes, I meant to open it up in a temporary workspace. As you, I don’t want too many workspaces created, but I always have a temporary/scratch one. I have updated that comment. Thanks for your input!
LikeLike
Hi Erich – I notice you used the Kinetis bootloader as an example. That code has quite a few problems; contact me if you want a collection of fixes. Here I had to update it to remove HID and use MSD only, then add serial over Bluetooth, then add application entry for bootloader (when you don’t have a button). Also routed diagnostics to virtual MSD file for debugging. Never did succeed in getting the security stuff to work, and the Freescale SB-builder utilities are quite buggy…
LikeLike
Hi Dave,
thanks! I’m definitely interested and contact you.
Erich
LikeLike
Hi Eric,
Thanks for sharing this article. It is useful.
As a note MCUXpresso IDE automatically builds the project as standalone, copying all the required files. However I don’t find useful that it automatically generates the linker scripts (if the option for “managed linker scripts” is checked).
I am also looking at building a bootloader based on KBOOT for the KL82. As a side note, the KBOOT (v1.5.1) comes in the ROM of the KL82. But I don’t see the point of it. Looks like they (NXP/Freescale) were envisioning another host that would flash the FW, via the ROM to onboard flash or QSPI. This doesn’t make much sense to me as this would add in complexity (another MCU potentially). It’s much more flexible to have the custom bootloader resident in flash.
Radu
LikeLike
Hi Radu,
Good timing, I’m working intensively with the KBOOT these days too (FRDM-KL03Z). Actually I think that bootloader is very useful. Yes, there is some kind of host needed (say a PC) in the default case: bringing the board into bootloader mode, then connecting to the board say with the USB plug, then use the blhost command line utility (there is a GUI version too) to transfer the files. So you don’t need another MCU for that.
There is another cool feature with the BusPal where another MCU can do that update. That is a good option in case my board has multiple microcontrollers on it, and one has USB (to a host): that way the ‘main’ MCU can update all the other MCUs on the board using I2C, UART, SPI, etc too.
Erich
LikeLike
Hi Erich,
Very useful post, i like that you used kinetis bootloader as an example because i’m currently working with porting KBOOT to custom made board. MCU that i’m using is MK66FX1M0xxx18. However i got a one problem now, i made a standalone project as you described in this post. Added all header files and includes and after compilation i don’t have any errors, the problem is that the linker could not link properly due to some overlap in linker script section. I get this:
d:/programi/freescale/kds_v3/toolchain/bin/../lib/gcc/arm-none-eabi/4.8.4/../../../../arm-none-eabi/bin/ld.exe: kinetis_bootloader.elf section `.interrupts’ will not fit in region `m_interrupts’
d:/programi/freescale/kds_v3/toolchain/bin/../lib/gcc/arm-none-eabi/4.8.4/../../../../arm-none-eabi/bin/ld.exe: kinetis_bootloader.elf section `.flash_config’ will not fit in region `m_flash_config’
d:/programi/freescale/kds_v3/toolchain/bin/../lib/gcc/arm-none-eabi/4.8.4/../../../../arm-none-eabi/bin/ld.exe: section .flash_config loaded at [00000400,0000042f] overlaps section .interrupts loaded at [00000000,00000bff]
d:/programi/freescale/kds_v3/toolchain/bin/../lib/gcc/arm-none-eabi/4.8.4/../../../../arm-none-eabi/bin/ld.exe: section .text loaded at [00000410,00001cbf] overlaps section .flash_config loaded at [00000400,0000042f]
d:/programi/freescale/kds_v3/toolchain/bin/../lib/gcc/arm-none-eabi/4.8.4/../../../../arm-none-eabi/bin/ld.exe: region `m_interrupts’ overflowed by 2048 bytes
d:/programi/freescale/kds_v3/toolchain/bin/../lib/gcc/arm-none-eabi/4.8.4/../../../../arm-none-eabi/bin/ld.exe: region `m_flash_config’ overflowed by 32 bytes
By the way i’m using default linker script that NXP KBOOT has made, didn’t changed anything.
I would be really grateful if you can give me your opinion or solution to this problem.
Best regards,
Filip
LikeLike
Hi Filip,
I might need a copy of your port/project. But this very much sounds like you are linking the interrupt vectors or the startup code twice. That’s why it reports that the interrupt region overflows.
Search for ‘m_interrupts’ in all your files of the project, and I guess you have something in there tice?
I hope this helps,
Erich
LikeLike
Hi Erich,
I solved the problem. You are right i had multiple startup code in my project. When i removed lt everything linked fine. Thanks for your reply.
Keep up the good work,
Filip
LikeLike
Pingback: Tutorial: Porting BLE+NRF Kinetis Design Studio Project to MCUXpresso IDE | MCU on Eclipse