
In a previous article I have imported an example project. Now I want to compile and build it.
Traditionally, the build action inside VS Code is somewhat hidden. There is a keyboard shortcut, but recent additions to VS Code making the build action more accessible.

To build a project, you have multiple options.
CTRL+SHIFT+B
One standard way in VS Code is to use the CTRL+SHIFT+B:

This gives the actions to build or clean the project.
The output is shown for example in the Terminal:

Another place is the Output area for CMake/Build:

Toolbar Icon
Yet another way is to use the build icon in the bottom toolbar:
The same icon is present to build the selected project:

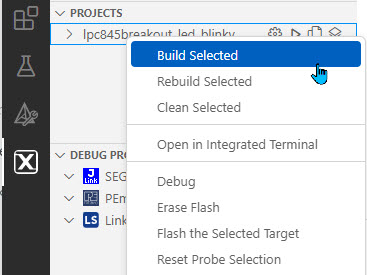
Context menu
The context menu on the project offers the same action, among others:
Build errors
Should the build fail with an error, then this is indicated in different places in VS Code. Check the ‘Problems’ in the bottom area, where you can double-click on the message to jump to the source location:

Command Line
As the project is CMake based, I can easily build project from the command line. In the output view I can see what command is used:

I can open the project folder with the integrated terminal:

and using the commands to build it:
cmake --build armgcc/debug --config debug --target all

or to clean the project:
cmake --build armgcc/debug --config debug --target clean
Summary
With this, I can compile and build projects. If you are looking for a more advanced way, check out the usage of build tasks. Next step is to debug the project.
Happy making 🙂
Links
- VS Code: Installation
- VS Code: Getting Started, literally
- VS Code: MCUXpresso Extension
- VS Code: MCUXpresso Installer
- VS Code: Import Example from MCUXpresso Repository
- NXP extension for Visual Studio Code: https://www.nxp.com/design/software/development-software/mcuxpresso-software-and-tools-/mcuxpresso-for-visual-studio-code:MCUXPRESSO-VSC
- Visual Studio Code for C/C++ with ARM Cortex-M: Part 3 – Build
