
Eclipse is a good IDE. At a first glance, it does the job. Good enough. At least for myself, I was not that much excited when I used it the first time. I came from the Microsoft Visual Studio world, and have used many other proprietary IDE’s. So Eclipse was just ‘yet another one’. But what Eclipse makes really great is the incredible wealth of functionality which is not visible right away. Yes, this is the same for any other software tool: it takes time to explore, and once you know things well, you do not want to switch or even consider something different. Same for me.
The other thing is: after some time, I get used to things, and I do not appreciate it that much any more. Only until someone reminds me that maybe things are not that well-known? This is what happened to me two days ago: I did some editing in Eclipse, while a colleague was watching me doing this. Then he said something like this
“Hey, what did you do? What was that?!? How did you do that?”
I do not remember his exact words, as I was surprised as well. I did not do anything special? Kinda standard Eclipse thing. Well, maybe not.
❗ Warning: Using this Eclipse feature here might be highly addictive :-).
The For Loop
What I did was something like this: I started writing a function like this:

writing a function
Then I added a ‘for’:
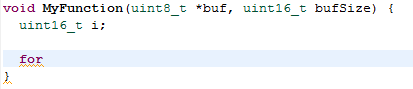
adding a for
And now the magic: I pressed Ctrl+Space to open the Content Assist:

Content Assist
💡 Pressing Ctrl+Space reduces the list of items to template proposals only.
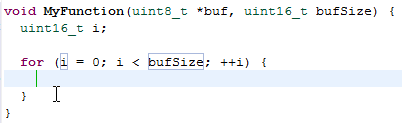
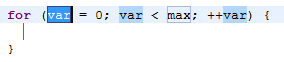
I selected the ‘for – for loop‘ item and hit enter. This adds the code for the loop:
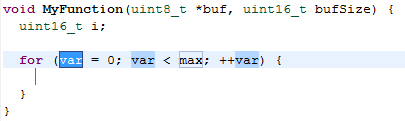
Added for loop
Notice the blue boxes. My cursor stays on ‘var’, and I can simply type my variable I want to use, and it changes all loop variable instances automatically (!!!):
changed loop variable
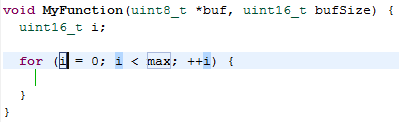
Next I press Tab which moves me to the ‘max’ variable:
on max variable
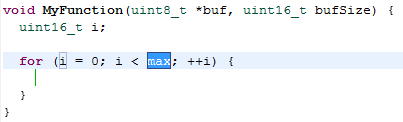
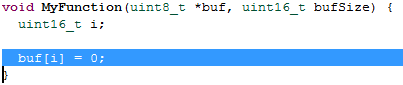
I type in my loop max variable and press Tab again: this moves me to the body of the loop:
entered max variable
Now I enter my loop body:
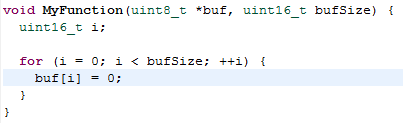
Entered loop body
So here again:
for – Ctrl+Space – Enter – i – Tab – bufSize – Tab – buf[i] = 0;
is all what I needed :-). A cool standard Eclipse editor feature: Editor Templates.
Template on Selection
It is possible to apply a template on a selection. For example I can select one or more source lines:
Selected text
Then I press Ctrl+Space and select the for-loop template. This wraps a for() loop around it:
For loop around selection
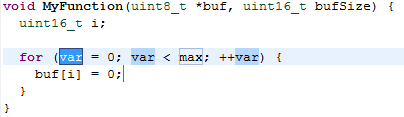
Template Positions
Let’s have a look at the stage when I pressed Ctrl+Space and selected that template:
Template Positions
The blue boxes indicate positions where I will jump to if I press Tab. The green line in the for() body indicates the place I will jump to if I press Enter.
Template Preferences
The Eclipse Editor Templates are configured using the menu Window > Preferences > C/C++ > Editor > Templates. The template example I was using above looks like this:
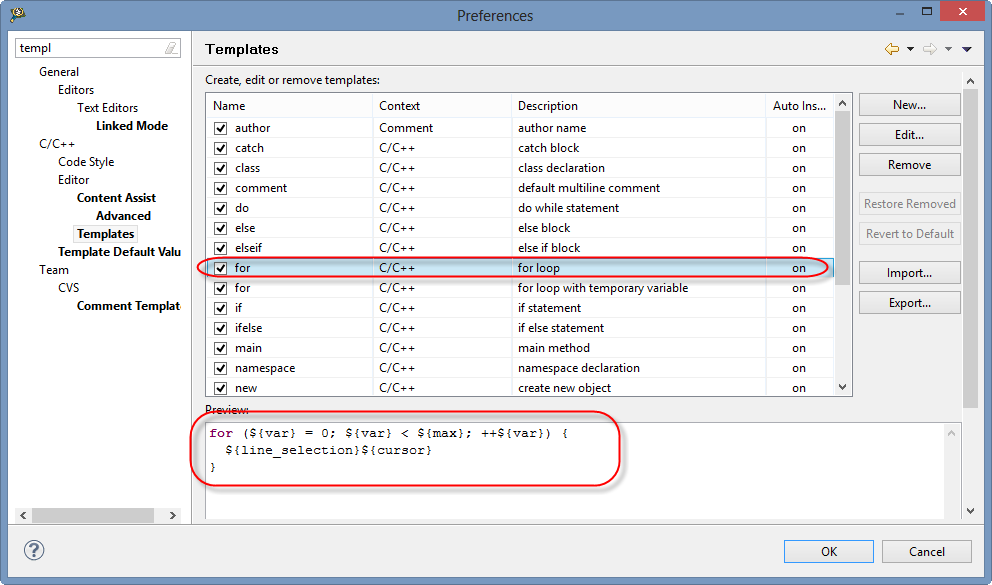
For-Loop Editor Template
If I do not like a template, I can create a new one or edit an existing one:
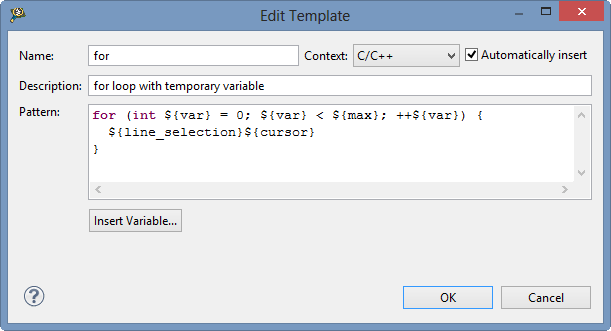
Editing a Template
Variables are of the form:
${variableName}
Pressing the ‘Insert Variable…’ button offers a set o built-in variables:

Built-In Variables
💡 Use Ctrl+Space while editing the template to get a list of built-in variables.
Anything not a built-in variable is a custom variable (e.g. ${var}). Using the variable name multiple times references the same variable content.
💡 It is possible to use an ’empty’ variable as well with ${}. That way I can have things which are not replaced with anything if I want to have it that way.
Custom Editor Templates
Adding new templates is really easy. For example I have a template ‘taskcreate’ to create the source code to create a FreeRTOS task:
if (FRTOS1_xTaskCreate(${name}, (signed portCHAR *)"${name}", configMINIMAL_STACK_SIZE+${size}, NULL, tskIDLE_PRIORITY+${prio}, NULL) != pdPASS) {
  for(;;){} /* error! Out of heap? */
}
${cursor}
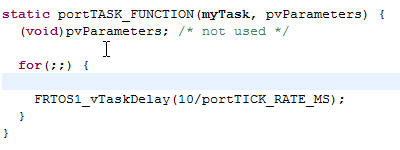
Or another template to implement the framework for a task function:
static portTASK_FUNCTION(${taskname}, pvParameters) {
  (void)pvParameters; /* not used */

  for(;;) {
    ${cursor}
    FRTOS1_vTaskDelay(${delayMs}/portTICK_RATE_MS);
  }
}
That way I’m really fast adding a new tasks. I simply type the word ‘task’ followed by Ctrl+Space:
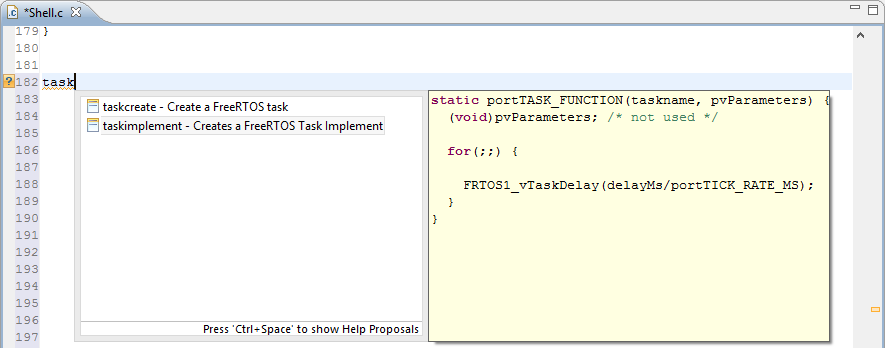
Task Templates
And within seconds I have created the framework for a new task:
Created Task
Comment Templates
Another way to use templates is for comments. For example I can define a comment like this:
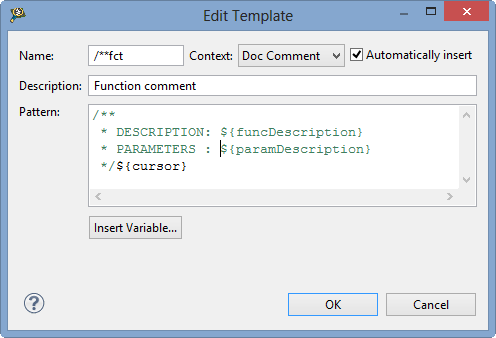
Comment Template
Then I type
/**fct
and press Ctrl+Space, and it will replace it with my template :-).
💡 Eclox for Doxygen comes with other built-in comment templates.
Exporting/Importing
To share templates, I use the Import and Export buttons:
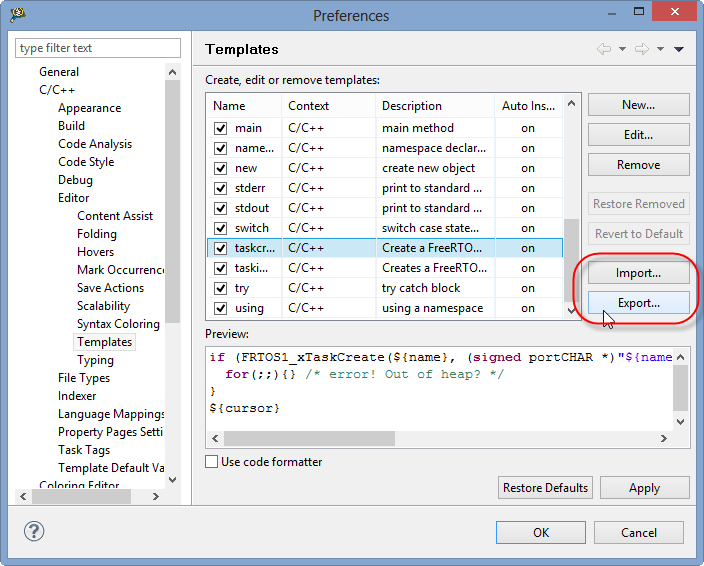
Import and Export of Editor Templates
Summary
Editor templates are a powerful way to extend the Eclipse editor and to improve productivity. This is one of the greatest Eclipse features in my view.
Happy Templating 🙂

Hi Erich
Thanks very much for this article. It answered my question to you from last week. Very useful.
Best regards
David
LikeLike
Great post Erich, thank you!
LikeLike
Thanks for this – I was wondering how to get this functionality. I’m used to editors that fill C statements in ‘automagically’ when you hit the spacebar but CNTL-Spacebar I can probably remember.
LikeLike
Hi Erich
In section ‘Comment Templates’ you refer to CTRL-TAB, I guess you mean CTRL-SPACE?
Strangely, CTRL-SPACE inserts existing templates for me (e.g.’for’) but does not work for new ones (e.g.’/**fct’).
BR
David
LikeLike
Hi Erich
Actually, it does work for me. But I think CTRL-TAB is still a typo.
BR
David
LikeLike
Hi David,
yes, this is a typo, it should be Ctrl+Space (fixed now). Thanks for catching this!
LikeLike
Pingback: Custom C/C++ Headers with Eclipse | MCU on Eclipse