
I spend a lot of my time writing software to run on manufacturers’ evaluation (or development) boards. Here on Erich’s site, my blogs have been based on Cortex M33, using NXP’s LPC55S69-EVK and LPC55S16-EVK. Development boards are great – firstly you know that the suppliers’ software should run without issues, and secondly: many of the pin functions are brought out to headers, transceivers, codecs, switches and LEDs. So, whilst it is easy to get started, by definition the boards can be large physically, power hungry, and expensive.
What do you do if you need to embed a high performance microcontroller into your prototype or small production run and don’t have time (or the inclination) to spin out a PCB?
The answer is the OKdo E1 board, based on NXP’s LPC55S69 Cortex-M33 microcontroller.
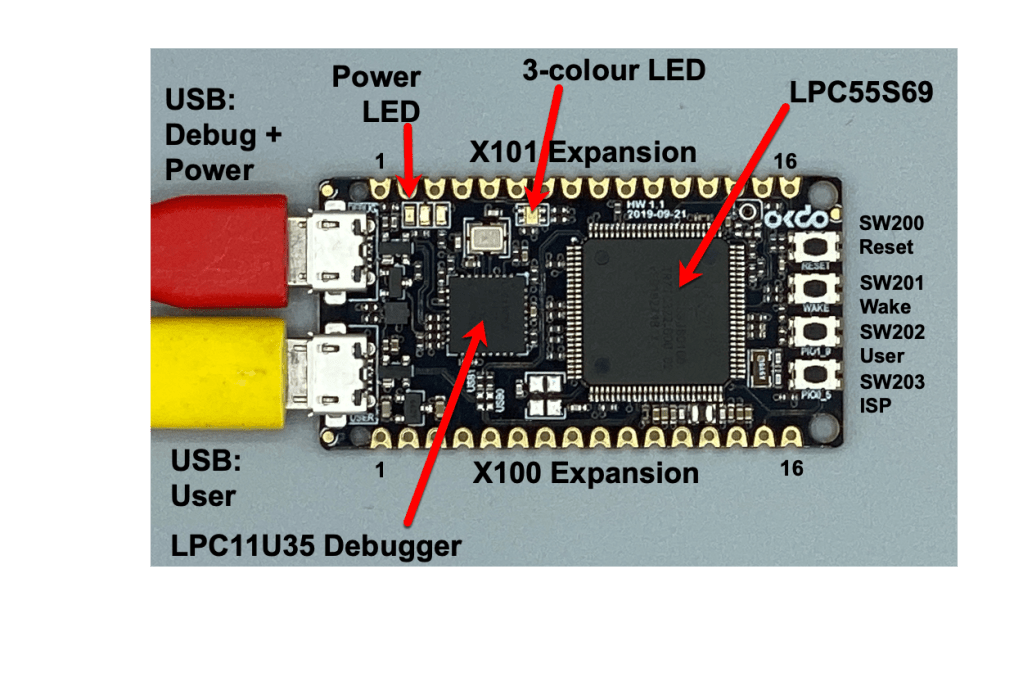
I cannot get over how “usefully small” is this tiny little board. That’s a 100-pin LQFP package on the right-hand side of the board, and you can also get an impression of the size by considering that the board is about the width of 2 USB micro connectors. In my vlog unboxing and introducing the board, I show it compared to a €1 coin: it is about the same width. To be technical for a moment, the board is 50mm long and 25mm wide. If you are ‘old school’ and think in inches – take a look at the expansion sockets – these are 0.1″ pitch, and each has 1×16 positions. So the board is a little over 1.6″ long, and 2″ long overall to make space for the mounting holes.
The first thing that I did was to solder two 1×16 way pin headers to the board and plug it into my prototyping system. But a lot of thought has gone into this board: since there are no components on the underside, and those gold-flashed expansion pads are brought out to castellations at the side of the board, it is easy to surface-mount the E1 module to a carrier PCB. That’s a wonderful feature; well done OKdo.
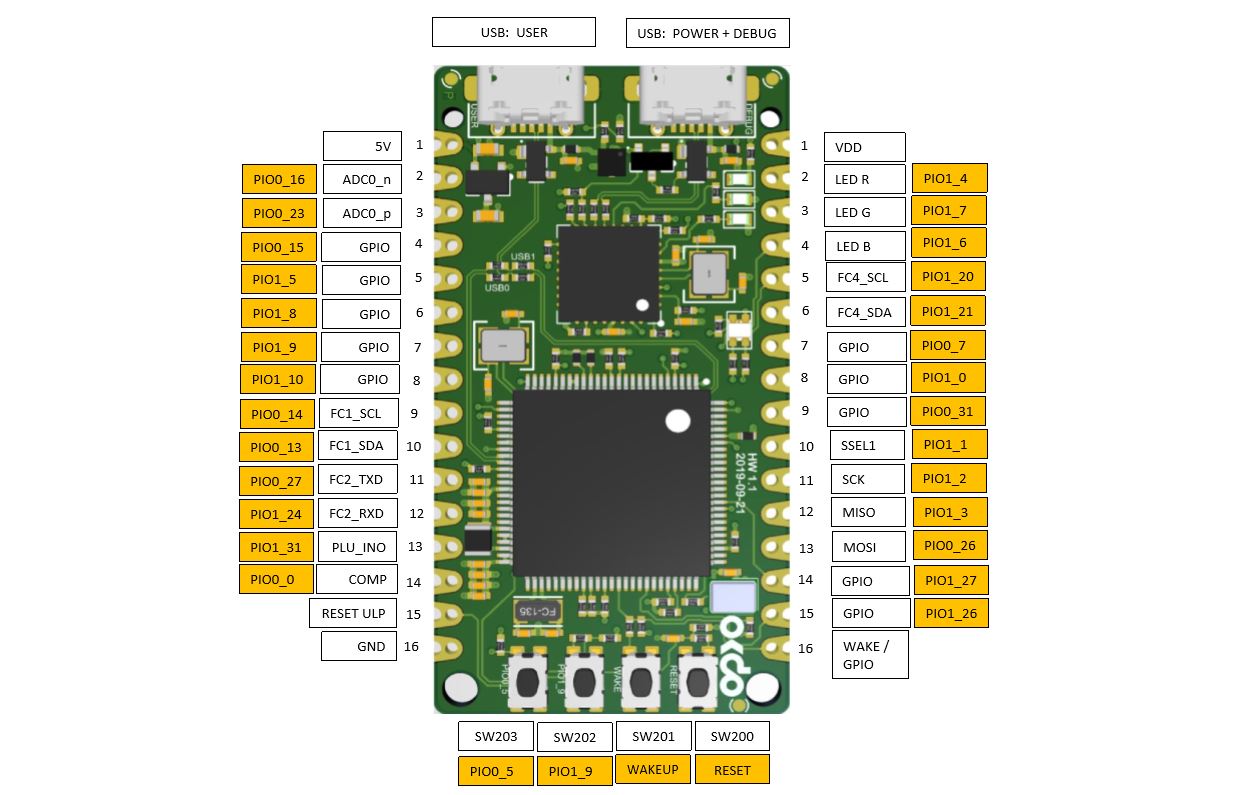
Those expansion headers carry all the usual GPIO and power, including 5v, 3.3v and GND. Access is provided to GPIO, PWM, I2C, SPI (actually, high-speed SPI) and a range of timers and ADCs. See the pinout here https://www.okdo.com/wp-content/uploads/2020/04/PinMap-E1.jpg
It’s easy to expand the E1, as OKdo have an adaptor board to interface with Arduino-style shield boards. I’ve not yet used this adaptor, but you can start to imagine the versatility of this little E1 board.

Easy of use? Well The E1 board is designed to replicate the NXP LPC55S69-EVK. This means that all the production code from MCUXpresso SDK for LPC55S69-EVK (so that is lpcxpresso55s69 SDK, currently v2.7.0) will run on the E1 board. I tried the Getting Started guide from OKdo, and then was able to run the hello_world, USB Full-speed Mouse (device), High-Speed SPI, PowerQuad and In-System Programming examples and features without any effort. [Actually, there is one item to be aware of… the E1 board does not have the 16 MHz crystal fitted, and some SDK examples require a simple work-around… more in my next video].
Let’s not forget that this tiny, easy-to-use E1 board features dual, 150 MHz Cortex M33 cores, 640kbytes of flash, cryptography and DSP Accelerators (CASPER and PowerQuad) and all of the features that I’ve blogged about previously. NXP have recently launched the LPC55S1x sub-family and there is practically 100% compatibility between these devices. If you are planning to use the LPC55S16 (and don’t need CAN or CAN-FD) then the E1 board would be a great prototyping platform for your design.
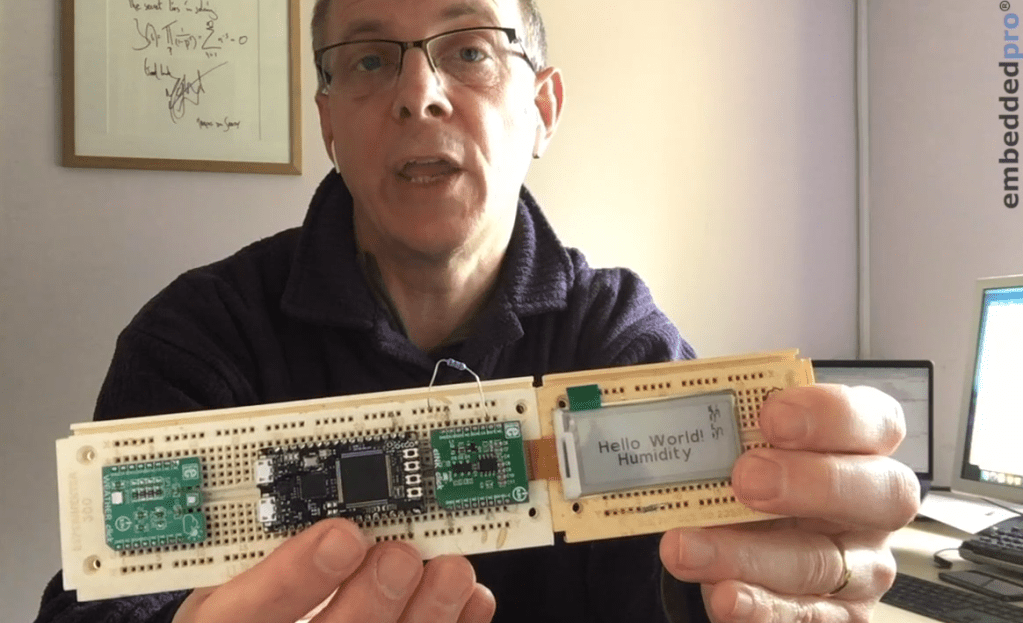
I’ll definitely use it for the basis of my weather station. I started hacking this together over the weekend. With the high performance and very low power consumption, the LPC55S16/LPC55S69 is a great fit to monitor temperature, pressure and humidity, and show the results on a zero-current, eInk display. I’ve given a quick preview in the video:
I do the full embeddedpro unboxing in the video. It’s embedded here and available with my other videos on the embeddedpro YouTube channel.
Over the next 6 weeks, I’ll show you how I’m using the E1 board, beginning next week with getting started, and then I’ll cover using the MCUXpresso Pins and Clock tools, and SDK Drivers as we gradually bring the Weather Station to life.
I’ll see you next time. In the meantime – take a look at this glossy, black box!

Great introduction to the E1 board.
However, I’m a bit biased so looking forward what others think as well.
LikeLike