
Creating a new project with Eclipse for a microcontroller these days is fairly easy, and I have the choice if I want to start the project with C or C++:

Choice of C and C++ for a new project
Still the embedded microcontroller world is dominated by C and not C++. So while it is easy to start with a C++ project, most vendor provided example or tutorial project are C projects. So how can I transform such project to C++?
Outline
To have C++ support in an Eclipse CDT project, I need basically two things:
- The project needs the C++ ‘nature’: with this I get the C++ compiler/build options
- The startup code needs to call the global C++ constructors
- Change the library settings
With this, I can add my C++ files to a former C project. The steps described here should be applicable to any Eclipse CDT project. Things might be different in details depending on your Eclipse distribution or SDK. I’m showing here screenshots using the NXP MCUXpresso IDE V11.1.1 using an SDK project provided as C language project (frdmk22f_led_blinky).
C++ Nature
If a project has been created as C project, then usually it only shows the options for the C compiler:

Only C Compiler Options
To enable the project for C++, the following nature has to be added to the .project file.
<nature>org.eclipse.cdt.core.ccnature</nature>
One way is to use the File > New menu and then select ‘Convert to a C/C++ Project (Adds C/C++ Nature):

Convert to C++
Another way to to this is using a text editor, either inside or outside Eclipse:
💡 Be careful with using Eclipse built-in Editor. Close the project and re-open it afterwards.

Added ccnature
Alternatively the Eclipse built-in XML editor can be used to add the nature:

Added ccnature
With latest CDT it is possible to add/remove a nature in the project properties too (although it is confusing as the C++ (CC) nature is shown as ‘C Nature’) (thanks to Jld00 for his comment!):

Adding C++ Nature in Project Properties
With this the settings include the C++ compiler options (close and re-open the project if the change has been made inside Eclipse):

C++ Compiler Options
With this I can set compiler options for the C++ files in the project.
C++ Startup Code
Locate the C startup code in the project:
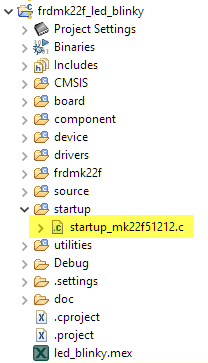
C startup code
The easiest approach is to rename it to a C++ file with .cpp extension:
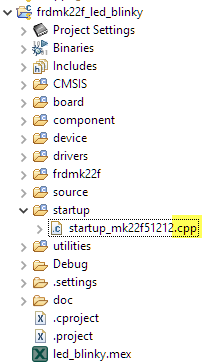
renamed startup code
With this the startup code gets compiled in C++ mode. This assumes that the startup code is prepared in written in a way that it actually can be compiled in C++ mode and that it uses the appropriate ‘__cplusplus’ macros). The important thing is that in C+ mode it calls the global constructors. With the NewLib/Newlib-Nano libraries this is a call to the __libc_init_array() function before calling main():

Constructor Call
The __libc_init_array() basically is a list of functions prepared by the linker with global initializers to initialize the library and call all the global constructors.
💡 to verify that the constructors get called, have a global object defined and set a breakpoint in the constructor code.

Constructor Call during startup
With this the proper library initialization is done and constructors for global objects are called.
Library
The last thing is to make sure that the correct library is used. Reduced libraries like the ‘RedLib’ in MCUXpresso does not support C++ and cannot be used. NewLib-nano is optimized for size and does support C++ applications, but does not include exception handling by default (see links at the end of the article).
Check the library used: newlib-nano is fine if not using exceptions, otherwise switch to newlib (but be prepared for a code size increase):

Library Usage
Another way to select/switch the library is in the linker settings:

Library Selection
With this the library can be used with C++.
Summary
It requires a few steps to turn a normal C project into a C++ enabled one: make sure the C++ nature is selected, the startup code is calling the global constructors and a C++ capable library is used.
Happy C++ing 🙂

Erich:
Using the technique you describe above, can you compare the size of a project compiled under C against thethe identical project compiled under C++? I’d be very curious to know how much it grows (or shrinks)!
LikeLike
Just enabling it like shown here adds 80 bytes of code. This is because the call to __libc_init_array() and the code of it.
And this is expected. Same for a normal C project compiled with C++ (but not using any C++ features): this won’t increase the code size (except of this call/function).
This actually is one of the benefits of C++ (not using it, but using its stronger language checking for better code).
LikeLike
It would be interresting to know how you changed your mind about usung C++ in embedded projects.
LikeLike
Did I? Not sure what should have changed?
LikeLike
Since CDT 9.11.0 it has been possible to add or remove the C++ nature easily via the Project Natures page of the project properties dialog. It is not necessary to edit the .project file directly.
In fact, it is also possible to use this technique on earlier versions of CDT, but, confusingly, the C++ nature is presented as “C Nature” (with no icon) in the table of project natures.
LikeLike
I saw that ability, but when I saw it I was thinking that it would be for the C (and not C++) nature. Indeed, you are right: this is confusing, and indeed that way the CC (C++) nature can be added, thanks for the hint!
LikeLike
Yes but…. While C++ isn’t bad for a lot of things (and a step forward in most things), certain things C++ natively assumes are really bad for embedded projects: anything that generates dynamic memory references is right out in MISRA for sure and really should be anyway. So, the “new” keyword? Nope. Exceptions? Nope (of course those should be turned off anyway; structured GOTO code is all that is and has to be one of the worst ideas ever). Besides the memory leaks dynamic memory use usually generates, you can’t be having random uncontrolled garbage collection going on when you’re attempting real time control of things.
LikeLiked by 1 person
Yes, exception handling is one of the most expensive/costly things, indeed. The question is always: is a language feature really needed or not? I feel that most programmers have no feeling about the impact of their coding style or impact of what they are using. In some industries this might be less relevant, but in the embedded world indeed *is* relevant. I mean it is a completely different thing to run C++ on a powerful host system and there exception handling is something you can pay for. But probably not on small embedded devices. But there are always trade-offs to make. As a programmer I like languages where you pay for what you are using, but not more. I really liked the EC++ (Embedded C++) approach which removed/banned things which are probably too expensive for most projects (you still could switch to full C++ if needed). There are good ways to use C++ without code bloat, from things like just using the extra language checks (compiling C code in C++ mode) or just using static classes. But exception handling, virtual function tables or dynamic memory allocation are a no-go for hard realtime or otherwise constraint systems.
LikeLike
Pingback: Eclipse Gems, Tips & Tricks: Project Filter | MCU on Eclipse
Tried to use the lwip http server sample as a basis for switching to c++, all the include file paths for C are left with the C profile and have to be manually moved to the c++ settings, and once done 300+ include based errors, vs code and platformio makes this easy, its a shame nxp can’t switch to that for an ide at least even if they stick with own libraries
LikeLike
I had a very similar experience: as long as drivers/libraries/SDKs have not been used in C++ projects, there will be always such things to fix.
LikeLike
Thanks for the article – it was helpful.
But I found I had to do additional things to build successfully.
Perhaps you omitted them because you considered them common knowledge, but here they are:
1) rename main.c to main.cpp
2) duplicate the include path for the the C compiler in the C++ section
3) duplicate the preprocessor symbols for the C compiler in the C++ section
4) I also had to now explicitly include “task.h” where I had not previously had to do that.
LikeLiked by 1 person
Hi John,
thanks for the extra points. Yes, I somehow assumed that these steps are kind of natural, e.g. if you want to have the main in C++ too (does not have to be the case in all cases). Point 4 is new to me, maybe an oddity of the version of FreeRTOS used by you?
Or you have missed to include it on the C side of the world, where an implicit parameter declaration (missing include) is only a a warning.
LikeLike