Friday this week NXP has released a new version of their flagship IDE: the MCUXpresso IDE V10.3.0. The version number indicates an incremental update from the earlier V10.2.1, but there are many exciting features and new features which make me switch my lecture material to this new IDE for the next semester.

MCUXpresso IDE V10.3.0
Installation
The setup files for Mac, Linux and Windows are available from http://www.nxp.com/mcuxpresso/ide. The new IDE can be used side-by-side with the earlier versions, so no uninstallation is necessary and I can continue to use my projects with the earlier version(s). I recommend to use a dedicated workspace for each Eclipse, so you should not use a new/different Eclipse with an already existing workspace: open a new one as it is proposed by the IDE and then import existing projects as needed. The version I’m using in this article is the V10.3.0 build 2200.
MCUXpresso IDE 10.3.0 build 2200
The IDE is Eclipse Oxygen based, free-of-charge and unlike other commercial IDEs there are no limitations. Documentation is available here: https://www.nxp.com/mcuxpresso/ide/documentation
I was able to load and use all my MCUXpresso IDE 10.x projects without any issues in 10.3.0.
I recommend to check out the release notes and documentation. In the next sections I explore things which are worthwhile in my view:
- GNU ARM Embedded Toolchain
- New ‘Faults’ View to make ARM faults debugging easier
- New and updated ARM Core registers view
- SWO (Single Wire Output) for P&E and SEGGER in addition to the NXP LPC-Link2
- Updated FreeRTOS plugins
- Updated support for the NXP MCUXpresso SDK
- Improved IDE experience with project highlighting, easier project settings and library API hovers
- Updated MCUXpresso Configuration tools
GNU ARM Embedded Toolchain 7-2018-q2-update
The GNU toolchain has been upgraded to GCC7 2018q2-update. That release comes with several bug fixes and support for ARM Cortex-M33. I have recompiled several of my existing projects, and the code size was the same plus/minus a few bytes, and all applications worked fine the same way.
New ‘Faults’ View
If you have read my articles about ARM Faults then you know that debugging ARM Cortex Faults is not easy. The new ‘Faults’ view makes it now really easy to spot the location causing the fault. The view filters/shows all the fault bits with a description, the fault status registers, stacked register values with links I can jump to the place in my code:
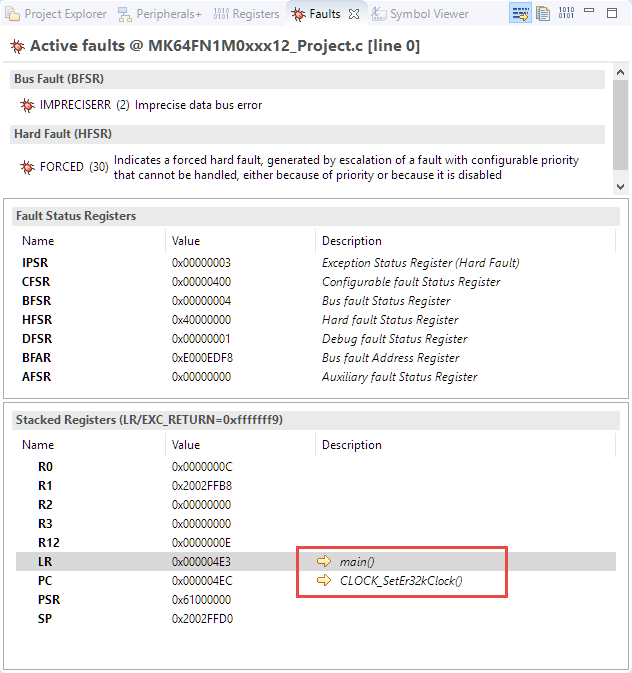
Faults View
Using the LinkServer (e.g. LPC-Link2) debug connection will halt the code inside the HardFault_Handler() as the probe automatically detects the fault handler running. For P&E and Segger it might be needed to pause the application, or what I’m doing is to have this in the hard fault handler to tell the debugger:
__asm( "BKPT 255");
💡 Without a debugger attached the BKPT instruction will cause a hard fault. If this is not what you want, then use something like ‘for(;;){}’ instead.
The ‘Faults’ view decodes the Cortex fault registers and stack back-trace, and with this it is easier than ever to find the cause of a hard fault.
SWO (Single Wire Output)
The ARM SWO (Single Wire Output) data is now available with the SEGGER and PEMICRO (P&E) debug probes (it was already supported with the LPC-Link2 debug probes).
For the SWO feature, see for example
- https://mcuoneclipse.com/2016/10/17/tutorial-using-single-wire-output-swo-with-arm-cortex-m-and-eclipse/
- https://mcuoneclipse.com/2017/06/01/mcuxpresso-ide-swo-performance-counters/
- https://mcuoneclipse.com/2018/05/20/overview-of-mcuxpresso-ide-v10-2-0/
SWO is an ARM Cortex specific debug protocol and requires a pin routed to the debug header: this is available on several NXP boards, but *not* supported by the OpenSDA circuit/firmware. So you need a SWO capable debug probe (SEGGER J-Link, a recent P&E Multilink (see this article) or a LPC-Link2 or LPC-Link2 embedded on the board).

LPC-Link2 with SWO
The release notes mention a LPC-Link2 performance improvements in the 10-20% range (debug, flash programming). I did not measure it by numbers, but indeed I noticed snappier operations with the LPC-Link2.
One functionality of SWO is the ability to print messages (‘printf style’) over SWO to the host. For the standard SDK projects the printf() functionality can be routed to ITM with an option during project creation:
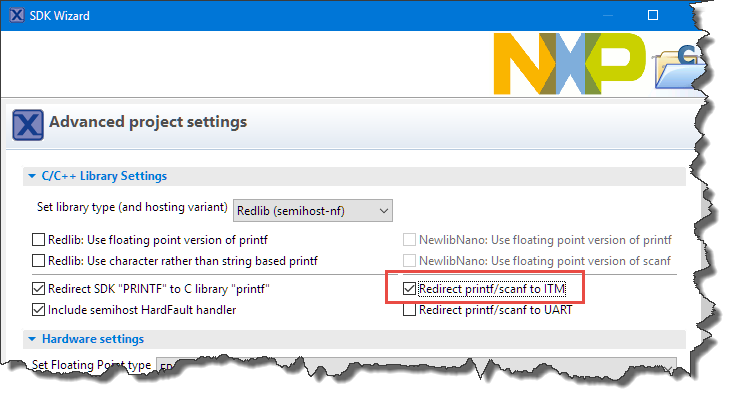
redirect printf and scanf to ITM
The other way which I prefer is to have a dedicated ITM putchar() function. I have uploaded an example project on GitHub for the TWR-K64F board: https://github.com/ErichStyger/mcuoneclipse/tree/master/Examples/MCUXpresso/TWR-K64F/TWR-K64F_SWO
The SWO/ITM Console and other SWO features now work with the P&E and SEGGER debug probes, in addition to the LinkServer/LPC-Link2 which had this already supported in V10.2.
Using the P&E connection, I can display the SWO output in ‘SWO Printf’ view in which I have to ‘Start Trace’ first:

P&E SWO Printf View
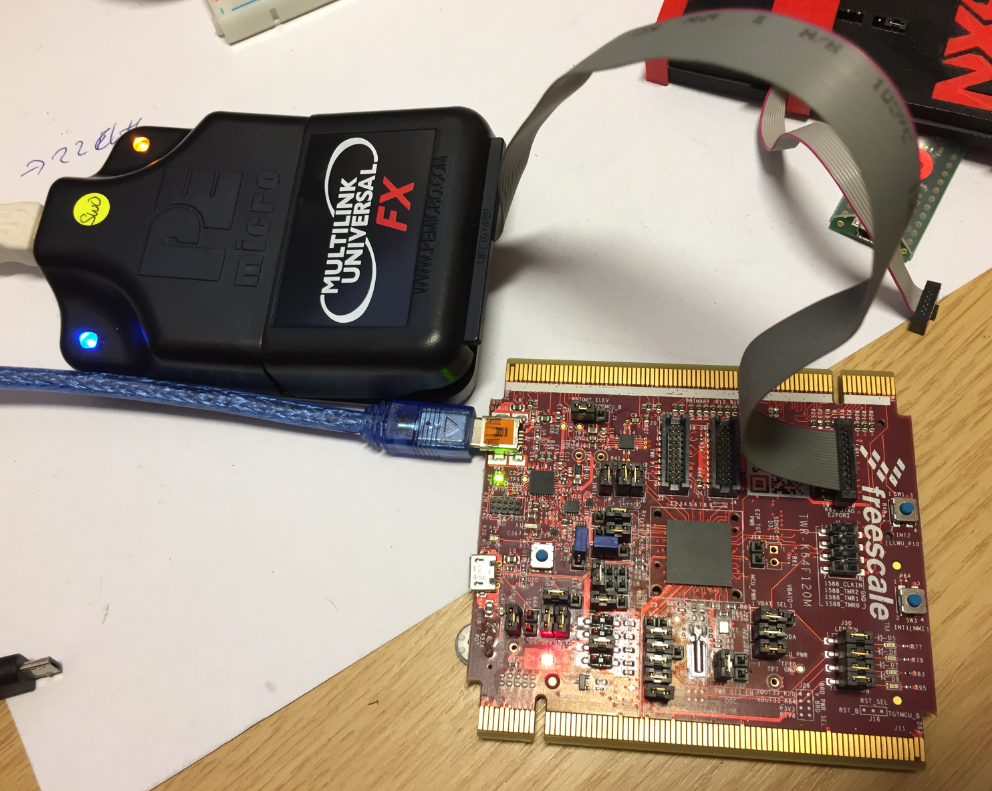
SWO Trace with P&E Multilink Universal FX
The other way is to use the MCUXpresso IDE SWO Trace Config view and to add an ITM console:
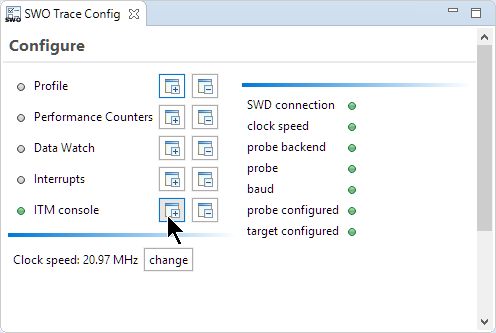
Adding ITM Console
That way the messages are printed to the ITM console:
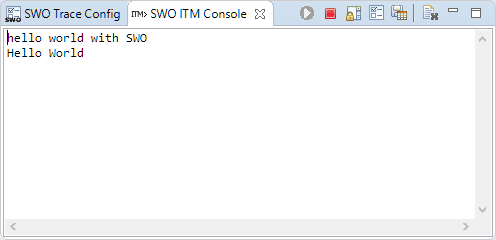
SWO ITM Console
The same feature is supported for the J-Link connections too:
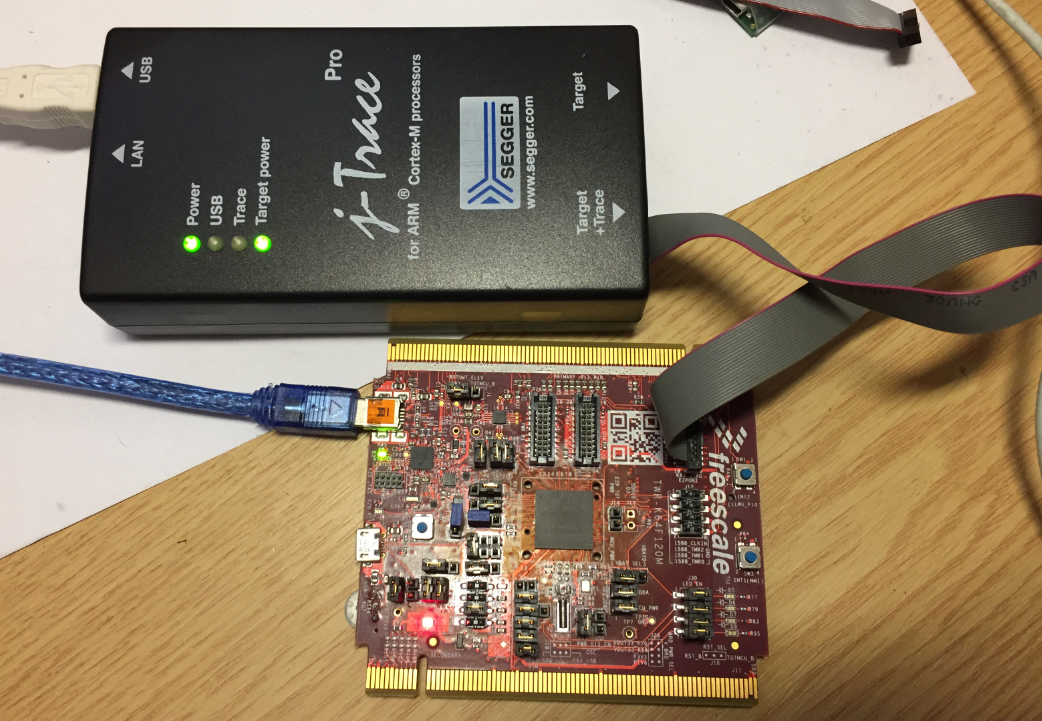
J-Link SWO Trace
All the cool SWO features available for these other probes beside of the NXP LPCLink2 probably deserve a blob post on its own.
FreeRTOS Views
One feature I especially love in MCUXpresso IDE is its ability to debug FreeRTOS applications. I can switch between the FreeRTOS threads in the Debug view plus I have extra views available for tasks, timer, queues (includes semaphore and mutex) and heap. The V10.3.0 comes with the version 1.0.8 of the FreeRTOS TAD views which has been updated to support FreeRTOS V10.1.1. The FreeRTOS heap view supports now as well the ‘new-lib reentrant’ scheme 6:
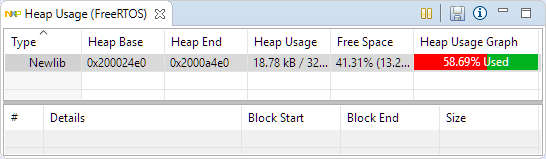
FreeRTOS NewLib Heap View
With this it is possible to use the plugin with the standard newlib heap malloc()/free() in a reentrant way (see https://mcuoneclipse.com/2017/07/02/using-freertos-with-newlib-and-newlib-nano/).
MCUXpresso SDK
The IDE adds support for the MCUXpresso SDK V2.5 which is now rolled out. I like the way that I can drag&drop SDK zip files in to the IDE. The V10.3.0 has re-organized the various SDK settings and I can change the drag&drop location to a user defined folder or use the workspace for it:
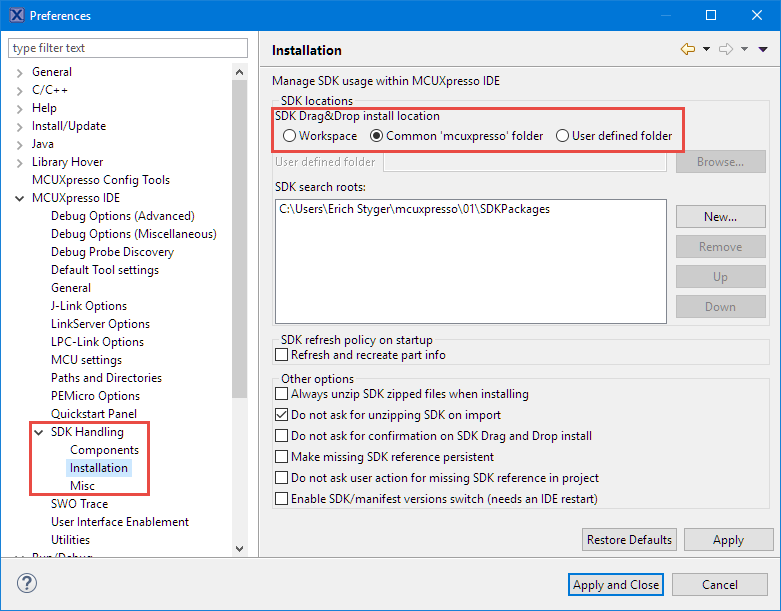
SDK Drag and Drop Settings
This is useful to separate the SDKs in case multiple IDE’s are used. The install location is shown in the Installed SDKs view too:
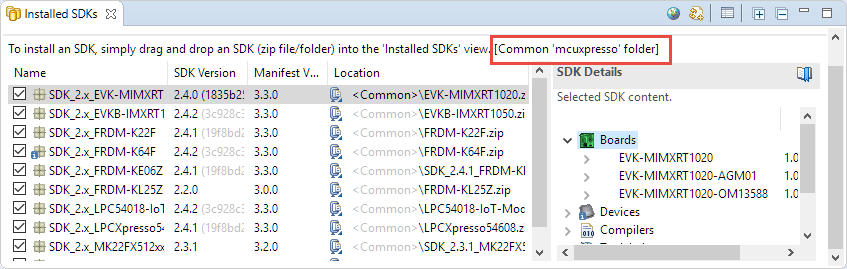
Drag&Drop Installation Location
The MCU package/pinout settings are now accessible directly in the Project Explorer View. Previously I had to change it in the project settings (compiler defines).
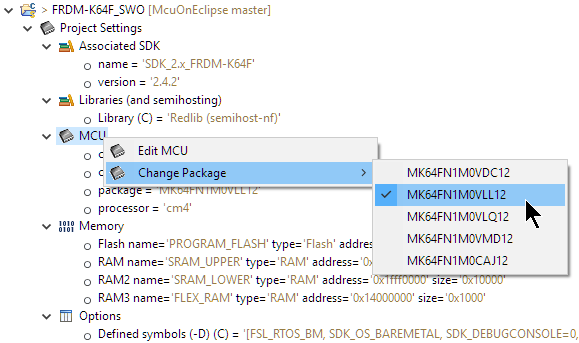
Changing CPU Package Option
Another nice extension is that now I can select multiple projects and then change the settings for all of them using the ‘Quick Settings’:
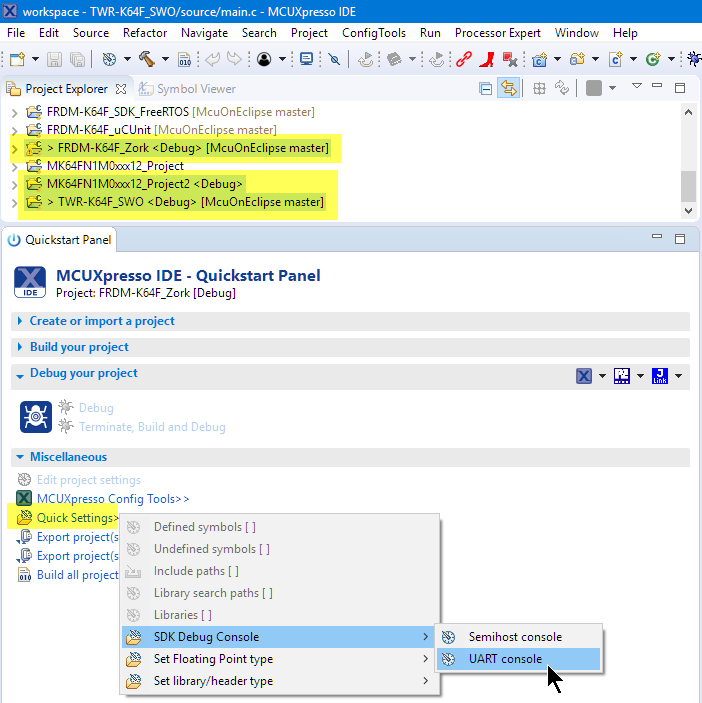
Quick Settings for multiple projects
Current Eclipse Project Highlighting
One thing which might not be clear for Eclipse newbies: Many actions in Eclipse need a ‘current project’, e.g. launching a debug session. Yet that ‘current project’ is not clearly visible in the Eclipse IDE. The MCUXpresso IDE has added an extension which combines ‘link to current source and project’ and highlights the currently active project, making that releationship clear:
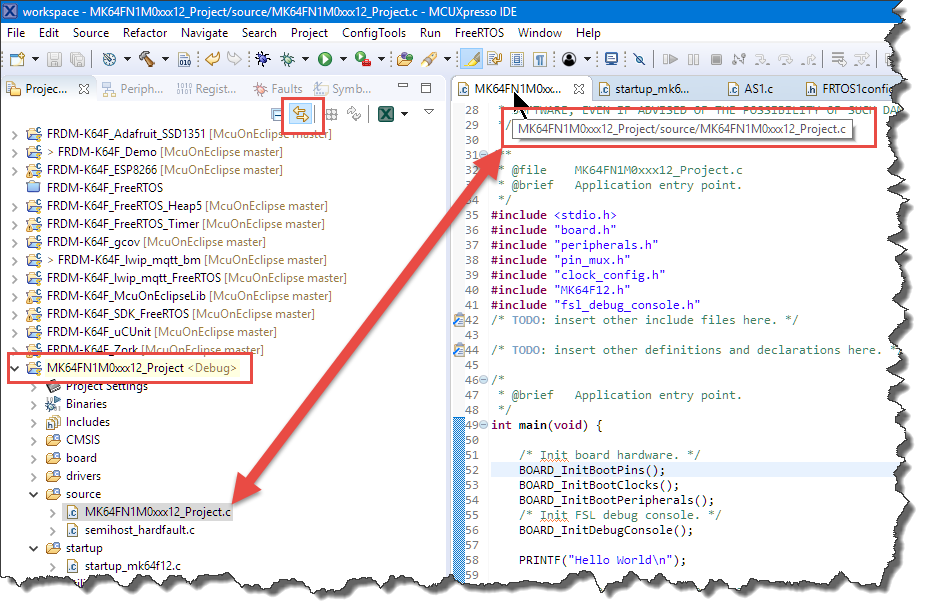
Highlighted Current Project and Source
Additionally the currently active build configuration is shown in the project name:
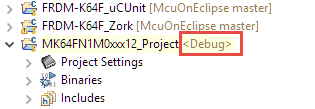
Project with active build configuration
The current project decorator can be turn on/off here:
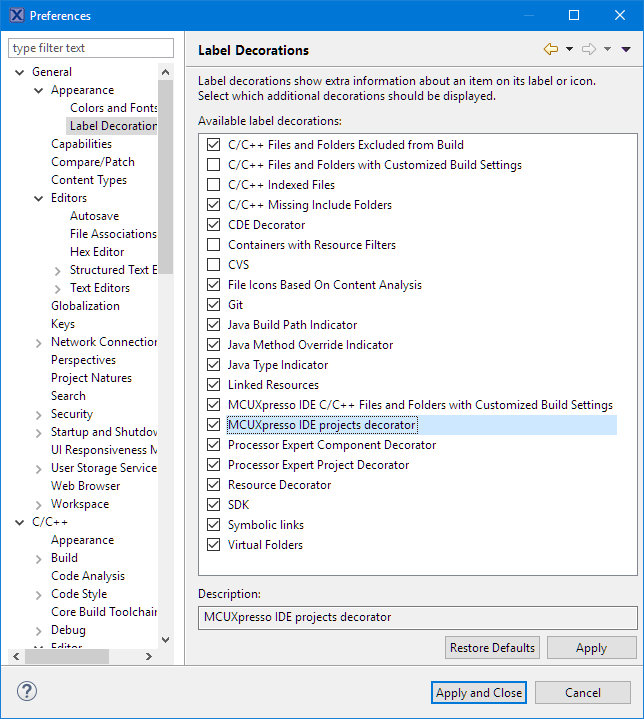
MCUXpresso IDE projects decorator
Memory Configuration
The memory configuration settings are greatly simplified: I can edit the settings without opening another dialog now:
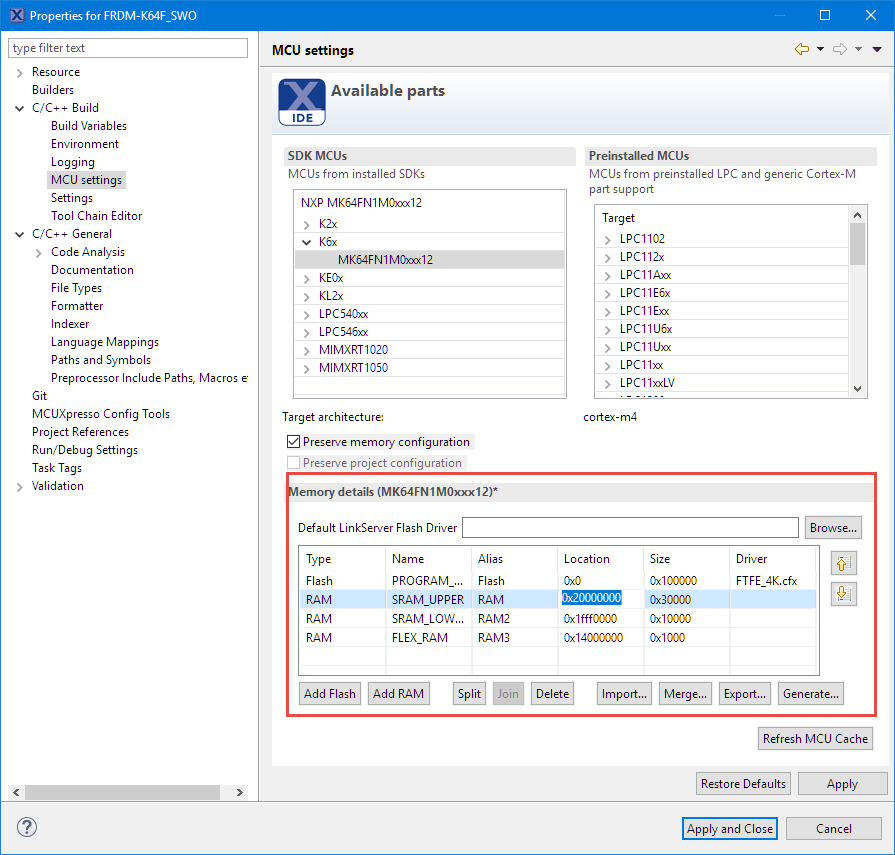
Memory Configuration
Core Registers View
The ‘Registers’ view has been updated and now look the same for all supported probe connections. The registers are now categorized (GPR, FPU, Status, …) and include a description text. Additionally individual bits are decoded and shown in the view:
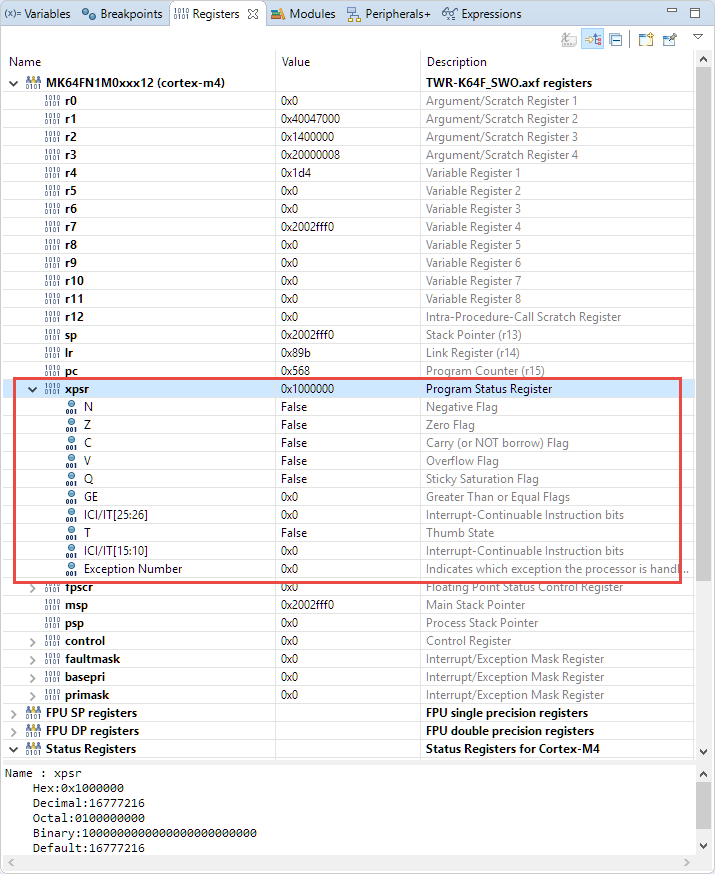
ARM Core Registers View
Libhover
The IDE includes now includes the feature to show standard library API help text using the Libhover plugin:
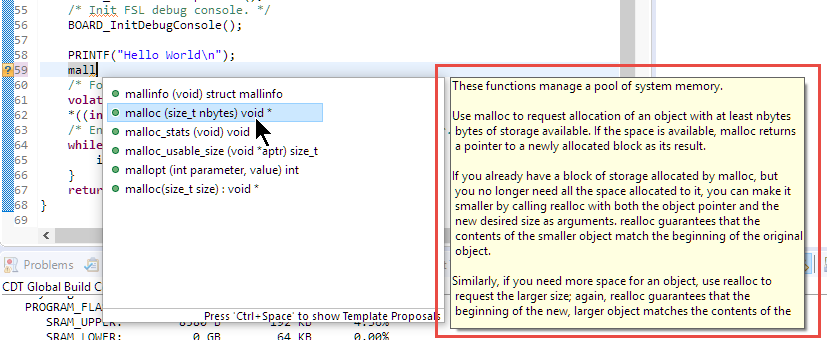
libhover
MCUXpresso Configuration Tools
The IDE includes the V5 of the configuration tools.
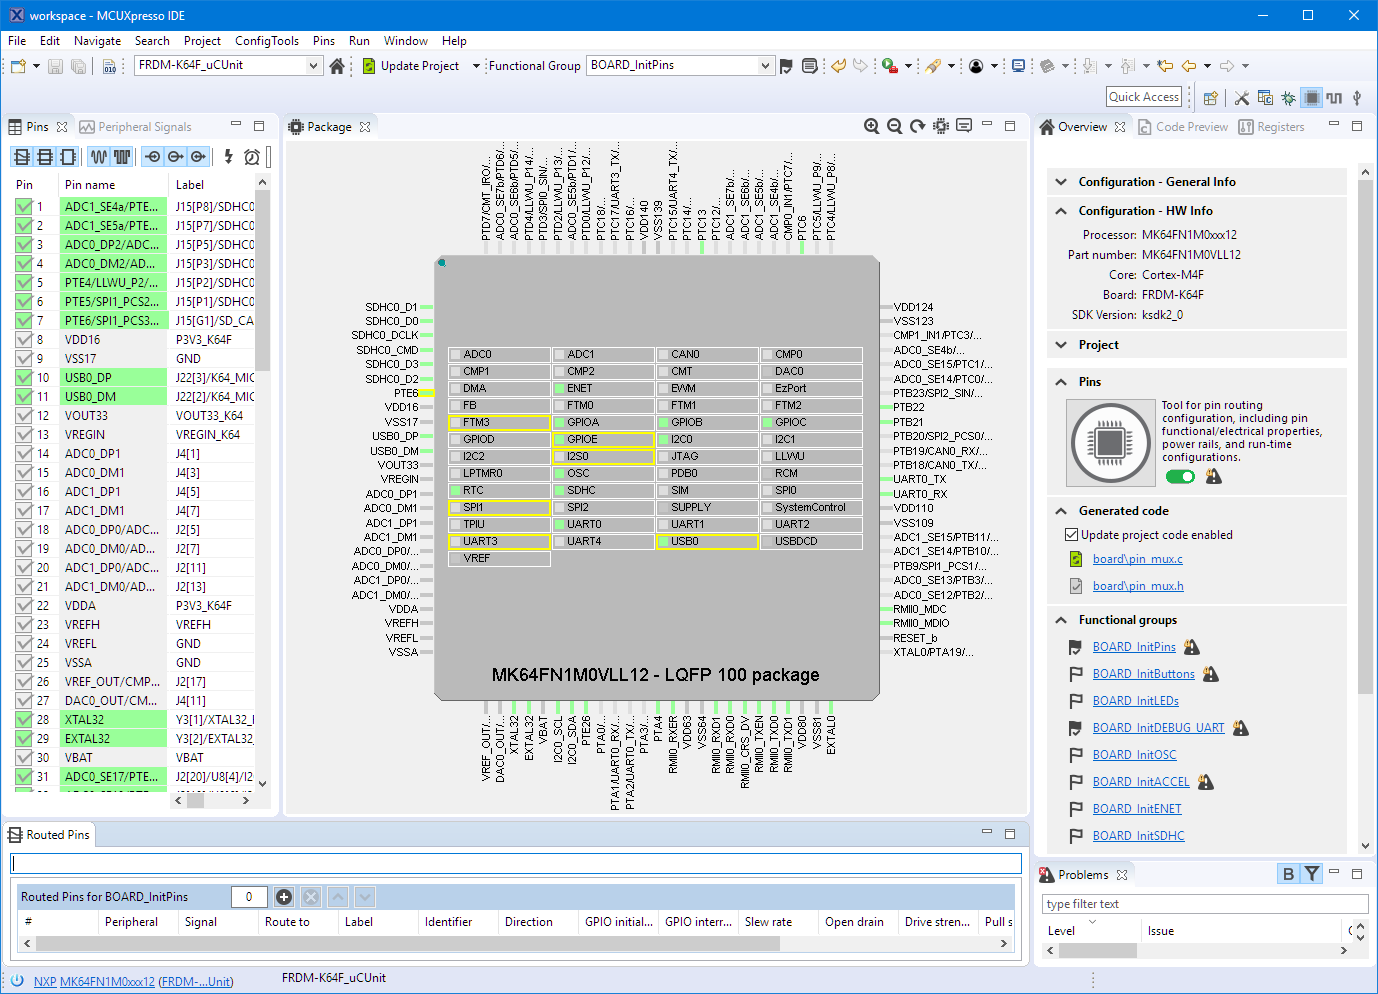
Pins Configuration Tools in MCUXpresso IDE 10.3.0
The V5 comes with Eclipse cheat sheet support:
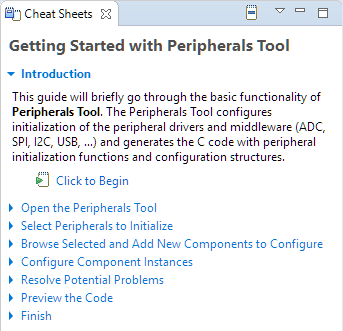
Peripherals Tool Cheat Sheet
Summary
The new MCUXpresso V10.3.0 release comes with many new features and enhancements. The ‘Faults’ view helps with the nasty hard faults of the ARM Cortex, the updated core Registers view helps inspecting the application. The SEGGER and P&E debug probes provide useful SWO trace data in addition to the NXP LPC-Link2, plus many other larger and smaller goodies. These all will be very handy and useful for that new ‘Advanced Embedded System’ course I’m going to create next semester. I think the students will like it too :-). I have not touched on all items mentioned in the release notes and provided documentation, so be sure you have a read of it yourself too.
Happy Xpressing 🙂
Links
- Community announcement: https://community.nxp.com/community/mcuxpresso/mcuxpresso-ide/blog/2018/12/14/mcuxpresso-ide-v1030-now-available
- MCUXpresso IDE: http://www.nxp.com/mcuxpresso/ide
- MCUXpresso SDK: http://mcuxpresso.nxp.com/
- GNU ARM Embedded Toolchain 7-2018-q2-update: https://developer.arm.com/open-source/gnu-toolchain/gnu-rm/downloads/7-2018-q2-update
- PEMicro: Real-Time SWO Debug and Power Measurement Support in NXP’s MCUXpresso
- Review of MCUXpresso 10.2.1
- Using FreeRTOS with newlib and newlib-nano

Hello
Its a fantastic news, but I do not understand why NXP don not release already the SDK with Peripheral Tools for Kinetis MK66 and i.MX RT1020. For me its an essential feature for the SDK.
And also when will be available, to order, the RT1020 TQFP144. Time ago NXP replied to me in their forum, and by private, that both would be available on Q4 2018. But we are already on December, TQFP144 not available, I have download the last SDK for both chips and the Peripheral Tools not available yet.
Do you know something about it ?.
LikeLike
No, I don’t know that release schedule. I see that the 2.5 release adds more devices and as well extended configuratation tool support. I have not checked out the K66 as I’m currently not using it for my designs.
LikeLike
Pingback: Variable Width Character Encoding in Eclipse Editor | MCU on Eclipse
Pingback: First Steps with the NXP i.MX RT1064-EVK Board | MCU on Eclipse
Pingback: Freelink LPC4322JET100 based Debug Circuit on NXP i.MX RT1064-EVK Board | MCU on Eclipse
Hi Erich,
I’m having a problem with MCUXpresso and I believe you are likely to be the fastest bestest resource to the fix…
I am bring up a new K22FN512 board, and using MCUX 10.3.0. I built a 2.5 SDK that had ‘all’ options on the builder website and installed it into MCUX. I started a new project, and picked my SDK. I wen through all the components of the SDK I think I need, and then set the clocks up and tried to build. I get the errors
Description Resource Path Location Type
fatal error: serial_port_uart.h: No such file or directory serial_manager.h /MK22FN512xxx12_Project/component/serial_manager line 46 C/C++ Problem
Description Resource Path Location Type
fatal error: usb_osa_bm.h: No such file or directory usb_osa.h /MK22FN512xxx12_Project/osa line 77 C/C++ Problem
What I’d like to do is go back to the selecting SDK components step and leave out the serial or select something different there and try again, but I don’t see any way of going back with out starting a whole new project. (This is my second attempt, my first attempt include an hour where I set up all the pins on the board to match me project, and ended with pretty much the same errors).
There must be a better way to change those SDK components after the initial project creation, but I can’t find it.
Oh, check out the latest video of my OpenPnP machine: https://youtu.be/nrLRSnpx7m0
Thanks, Brynn
LikeLike
Hi Brynn,
yes, saw that video already, amazing linear motors, wow!
Did you already use that ‘manage sdk components’ icon in the project view to enable/disable components?
Otherwise could you send me your project so I can have a look?
Erich
LikeLike
It gives me a ‘ the selected project does not contain any SDK reference or the SDK can not be found!’
The things in the SDK I selected are freeRTOS, adc, dac, uart_rtos, dspi, ftm, gpio, USB_device, shell. I did not select a board. I’ll email you the one I spent an hour entering pins on.
Thanks! Brynn
LikeLike
Oh sure, I found the one I spent an hour on and that one lets me manage the SDK components. But I’ll send you that because that’s the one I need to work with. It should just compile, I didn’t change any code yet.
I did use a 16Mhz crystal, if you changed that (and the number of pins) it should probably work on any of the eval boards with a K22FN.
Brynn
LikeLike
Okay, by doing the manage SDK components and adding the serial_manager and some uart thing I got it to compile with no problems.
Now the J-link doesn’t want to attach… Gives this error :
Error in final launch sequence
Failed to execute MI command:
-target-select remote localhost:2331
Error message from debugger back end:
localhost:2331: No connection could be made because the target machine actively refused it.
localhost:2331: No connection could be made because the target machine actively refused it.
Trying to power cycle things, (jlink and my target) but it is not helping
LikeLike
I just had sent you back the project with my modifications. Are you using that one?
LikeLike
I too getting same error…Pls, how to solve this.
LikeLike
Check if your cable is connected properly and your board has good power.
LikeLike
Grrr. first rule of debugging? Is it plugged in? I had pulled the debug wire off to take a picture.
So it is sortof working now, it is hanging up in the BOARD_InitBootClocks(). So I am messing with the clock tool to see if I can make it happy.
Brynn
LikeLike
🙂
LikeLike
are you trying to get it running at 120 MHz? I faced an issue recently (it was not setting the clocks correctly), then managed to get it working somehow.
Just in case, this is the project: https://github.com/ErichStyger/mcuoneclipse/tree/master/Examples/MCUXpresso/tinyK22/tinyK22_Blinky
It is for a custom board, but with the same MCU and clocking as the FRDM-K22F board.
LikeLike
Okay, in the clocks I had Osc Mode set to external reference clock, and should be use oscillator with external crystal. So now I can get past the initbootclocks. Now I just need to see the USB enumerate…
LikeLike
Pingback: GDB All-Stop and Non-Stop Mode with LinkServer | MCU on Eclipse
Pingback: FreeRTOS: how to End and Restart the Scheduler | MCU on Eclipse
Pingback: Tutorial: Booting the NXP i.MX RT from Micro SD Card | MCU on Eclipse
Pingback: Tutorial: HD44780 Display Driver with NXP MCUXpresso SDK | MCU on Eclipse
Pingback: Unboxing the NXP LPC845-BRK Board | MCU on Eclipse
Pingback: Tutorial: Using external Debug Probes with NXP LPC845-BRK Board | MCU on Eclipse
Pingback: Tutorial: Transforming the NXP LPC845-BRK into a CMSIS-DAP Debug Probe | MCU on Eclipse
Pingback: Tutorial: Blinky with the NXP LPC845-BRK Board | MCU on Eclipse
Pingback: Tutorial: Changing ARM Cortex Core or Microcontroller in Eclipse CDT Projects | MCU on Eclipse
Pingback: Debugging the Startup Code with Eclipse and GDB | MCU on Eclipse
Pingback: Different Ways of Software Configuration | MCU on Eclipse
Pingback: MCUXpresso IDE V10.3.1 available | MCU on Eclipse