Most embedded projects need an user input device. For the NXP i.MX RT1050-EVK board I have recently added a 480×272 full color touch LCD (see “Adding a Rocktech Capacitive Touch LCD to the NXP i.MX RT1052 EVK“). I have looked at different commercially available GUI libraries, but none of them really were matching my expectations: either very expensive or closed source, or an overkill for small LCDs and projects. But then I have found LittlevGL: free-of-charge, open source, easy to use, well documented and has everything I need. And it really looks gorgeous 🙂

Hello from LittlevGL
Outline
Software/Tools used
- MCUXpresso IDE 10.2.1
- MXUXpresso SDK for i.MX RT1050-EVKB 2.4.0
- LittlevGL v5.1.0
- NXP i.MX RT1050-EVKB with LCD
💡 You can find the example project used in this tutorial in the Links section at the end of his article.
LittlevGL
LittlevGL is an open source GUI library, developed and maintained by Gábor Kiss-Vámosi. I have found it very powerful, good-looking and extremely easy to use. It comes with many basic objects and they can be easily modified, enhanced or I can add my custom objects:
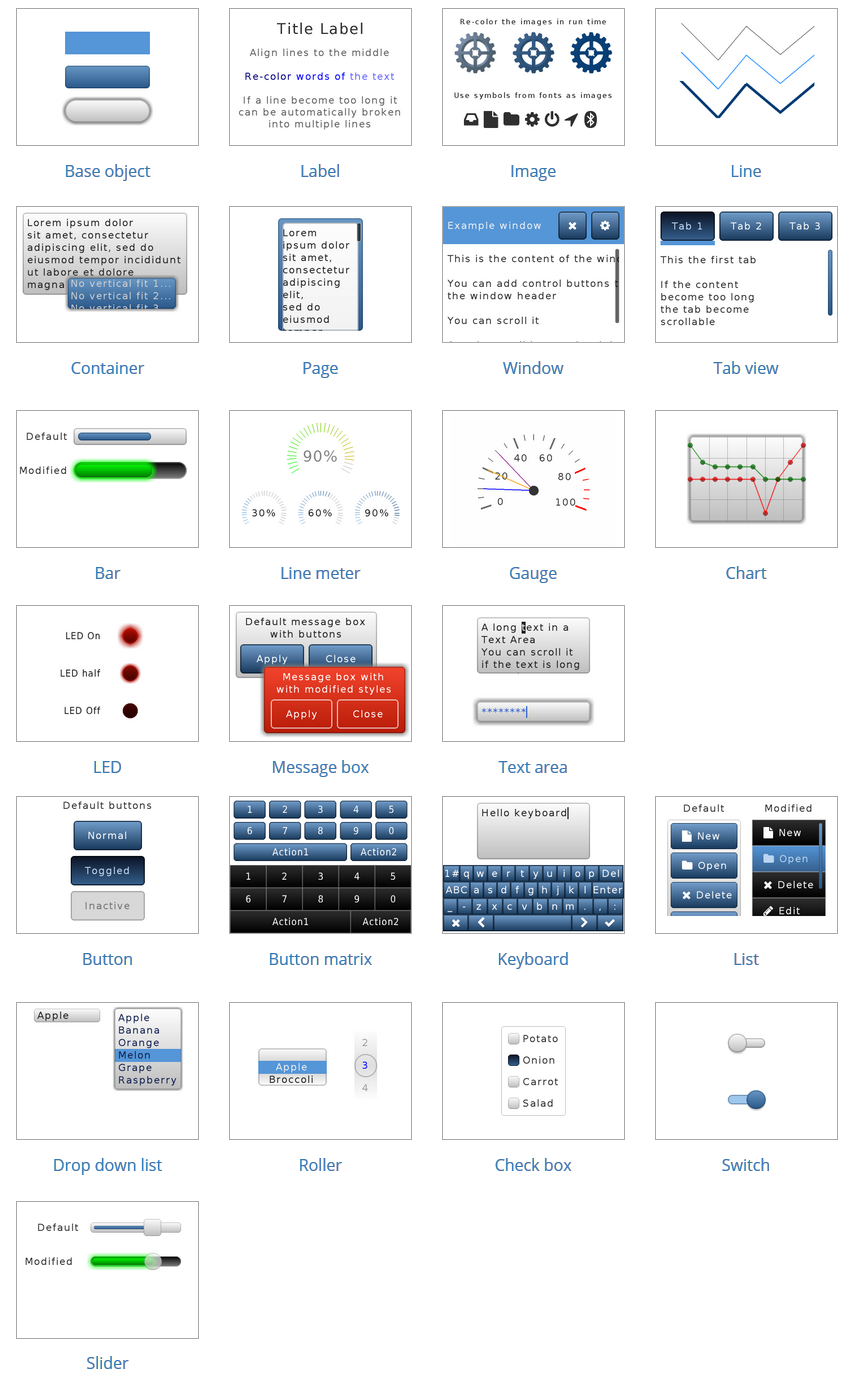
LittlevGL Standard Objects
Project
Create a project for your board and LCD if you don’t have already one. Best if you start with a very basic working LCD project. For the i.MX RT1050-EVKB I used the driver_examples\elcdif\elcdif_rgb one:
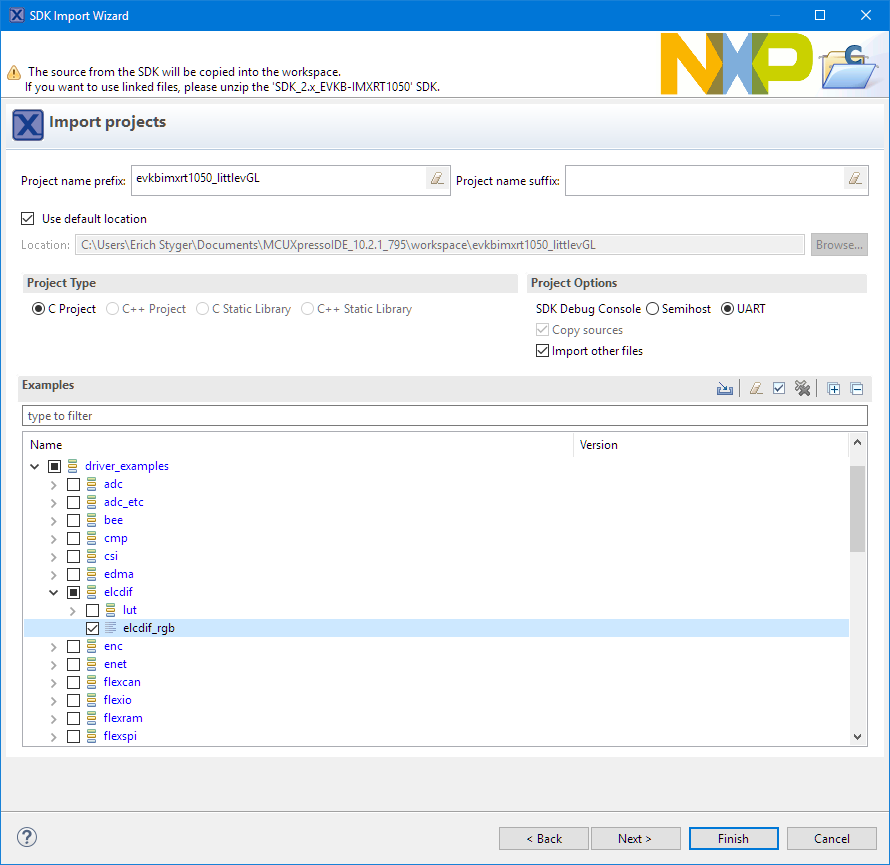
elcdif_rgb example
LittlevGL Sources
Download the library from https://littlevgl.com/download or clone it from GitHub (https://github.com/littlevgl/lvgl.git).
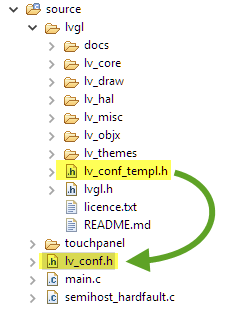
Place the sources into your project (best inside the ‘source’ folder).

lvgl sources
Add the path to the compiler include settings:
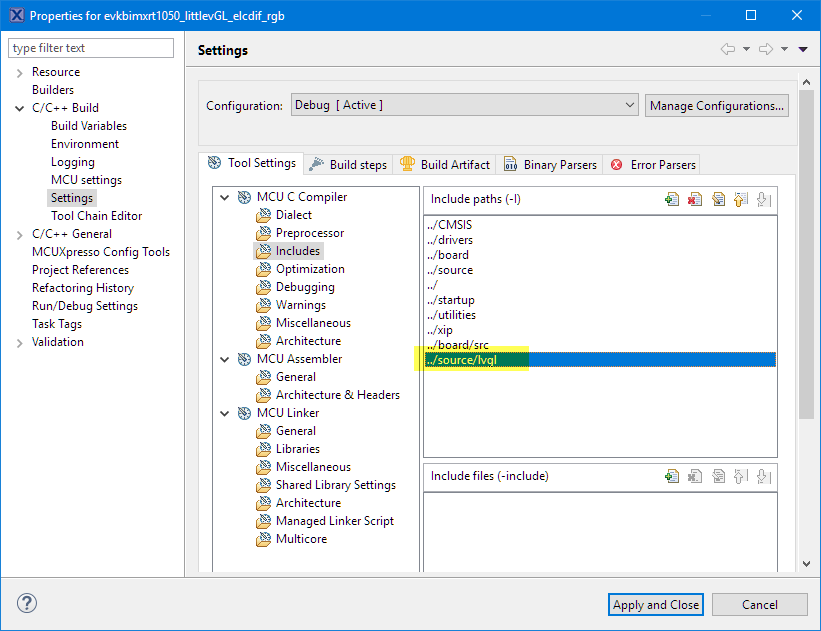
Compiler includes Setting
Configuration File
Copy the template configuration file one directory level up:
copy configuration file
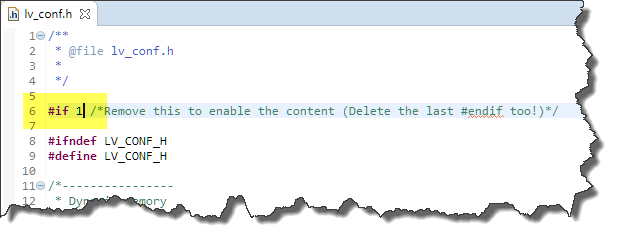
Enable the content in the header file:
enabling lv_conf.h
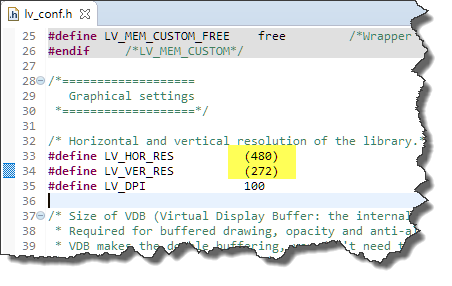
Change the horizontal and vertical resolution matching the LCD (LV_HOR_RES and LV_VER_RES):
LCD resolution
Check the number of bits per pixel matching the LCD:

LV_COLOR_DEPTH
Memory Management
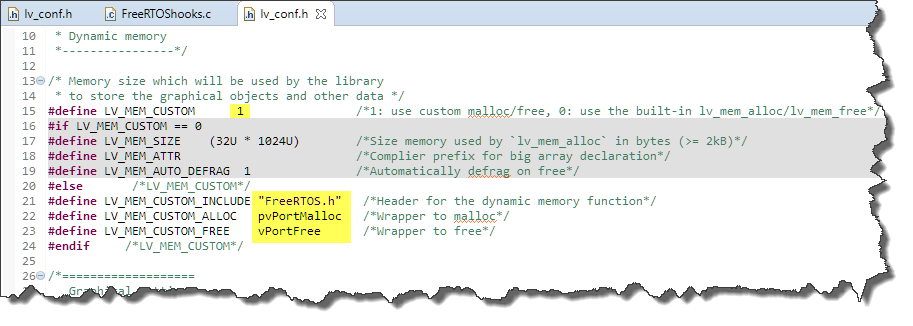
By default, LittlevGL uses the standard library dynamic memory with and a custom heap management. I recommend to use FreeRTOS and to configure it to use the FreeRTOS heap management to have it thread save:
Using FreeRTOS memory allocation
LittlevGL Tick
You have to call the LittlevGL periodically to give a time base, usually every 1 millisecond. Call the function lv_tick_inc() from a periodic timer interrupt or better use FreeRTOS and call it from the FreeRTOS Tick interrupt:
/*
** ===================================================================
**     Event       :  McuRTOS_vApplicationTickHook (module Events)
**
**     Component   :  McuRTOS [FreeRTOS]
**     Description :
**         If enabled, this hook will be called by the RTOS for every
**         tick increment.
**     Parameters  : None
**     Returns     : Nothing
** ===================================================================
*/
void McuRTOS_vApplicationTickHook(void)
{
  /* Called for every RTOS tick. RTOS is configured for 1 kHz tick frequency */
  lv_tick_inc(1); /* inform LittlevGL that another 1 ms time elapsed */
}
LittlevGL Period Task Function
The GUI library needs to be called periodically to get it updated. Unlike lv_tick_inc(), the timing is not critical, it can be done say every 1..10 ms. I have implemented the wrapper below which I can call from an endless loop or from a FreeRTOS task:
void LV_Task(void) {
  /* Periodically call this function.
   * The timing is not critical but should be between 1..10 ms */
  lv_task_handler();
}
Updating the Display
LittlevGL offers different methods to write to the display: double buffering, direct writes, buffered writes or even DMA or GPU usage. The simplest way is to provide a function which can write a single pixel as below which is what I’m using for the display on the i.MX RT1050-EVKB:
void LCD_WritePixel(int x, int y, int color) {
  s_frameBuffer[0][y][x] = color;
}
And then use it in the ex_disp_flush() function:
/* Flush the content of the internal buffer the specific area on the display
 * You can use DMA or any hardware acceleration to do this operation in the background but
 * 'lv_flush_ready()' has to be called when finished
 * This function is required only when LV_VDB_SIZE != 0 in lv_conf.h*/
static void ex_disp_flush(int32_t x1, int32_t y1, int32_t x2, int32_t y2, const lv_color_t * color_p) {
    /*The most simple case (but also the slowest) to put all pixels to the screen one-by-one*/
    int32_t x;
    int32_t y;
    for(y = y1; y <= y2; y++) {
        for(x = x1; x <= x2; x++) { /* Put a pixel to the display. */ LCD_WritePixel(x, y, color_p->full);
            color_p++;
        }
    }
    /* IMPORTANT!!!
     * Inform the graphics library that you are ready with the flushing*/
    lv_flush_ready();
}
💡 The above way is the most simple, but slow. However, it GUI is surprisingly fast, so I really had no need to optimize this (yet?).
The function ex_disp_flush() is used in buffered mode. In a similar way I can provide functions for unbuffered mode:
/* Write a pixel array (called 'map') to the a specific area on the display
 * This function is required only when LV_VDB_SIZE == 0 in lv_conf.h*/
static void ex_disp_map(int32_t x1, int32_t y1, int32_t x2, int32_t y2, const lv_color_t * color_p) {
    /*The most simple case (but also the slowest) to put all pixels to the screen one-by-one*/
    int32_t x;
    int32_t y;

    for(y = y1; y <= y2; y++) {
        for(x = x1; x <= x2; x++) { /* Put a pixel to the display.*/ LCD_WritePixel(x, y, color_p->full);
            color_p++;
        }
    }
}

/* Write a pixel array (called 'map') to the a specific area on the display
 * This function is required only when LV_VDB_SIZE == 0 in lv_conf.h*/
static void ex_disp_fill(int32_t x1, int32_t y1, int32_t x2, int32_t y2,  lv_color_t color) {
    /*The most simple case (but also the slowest) to put all pixels to the screen one-by-one*/
    int32_t x;
    int32_t y;

    for(y = y1; y <= y2; y++) {
        for(x = x1; x <= x2; x++) {
            /* Put a pixel to the display.*/
        	LCD_WritePixel(x, y, color.full);
        }
    }
}
Touchpad
The GUI can use a touch input, keyboard or push buttons. Below is my touchpad callback function which returns the pressed or released state with the coordinates:
/* Read the touchpad and store it in 'data'
 * Return false if no more data read; true for ready again */
static bool ex_tp_read(lv_indev_data_t * data) {
    /* Read the touchpad */
	int x=0, y=0, res;
	bool pressed;

	res = TOUCH_Poll(&pressed, &x, &y);
	if (res==1 && pressed) {
		data->state = LV_INDEV_STATE_PR;
	} else {
		data->state = LV_INDEV_STATE_REL;
	}
	data->point.x = x;
	data->point.y = y;
    return false;   /*false: no more data to read because we are no buffering*/
}
Initializing the GUI library
The last piece is to put everything together and initialize the library:
void LV_Init(void) {
  lv_disp_drv_t disp_drv;

  lv_init();
  /*Set up the functions to access to your display*/
  disp_drv.disp_flush = ex_disp_flush;            /*Used in buffered mode (LV_VDB_SIZE != 0  in lv_conf.h)*/
  disp_drv.disp_fill = ex_disp_fill;              /*Used in unbuffered mode (LV_VDB_SIZE == 0  in lv_conf.h)*/
  disp_drv.disp_map = ex_disp_map;                /*Used in unbuffered mode (LV_VDB_SIZE == 0  in lv_conf.h)*/

#if USE_LV_GPU
  /*Optionally add functions to access the GPU. (Only in buffered mode, LV_VDB_SIZE != 0)*/
  disp_drv.mem_blend = ex_mem_blend;              /*Blend two color array using opacity*/
  disp_drv.mem_fill = ex_mem_fill;                /*Fill a memory array with a color*/
#endif

  /*Finally register the driver*/
  lv_disp_drv_register(&disp_drv);

  /*************************
   * Input device interface
   *************************/
  /*Add a touchpad in the example*/
  /*touchpad_init();*/                            /*Initialize your touchpad*/
  lv_indev_drv_t indev_drv;                       /*Descriptor of an input device driver*/
  lv_indev_drv_init(&indev_drv);                  /*Basic initialization*/
  indev_drv.type = LV_INDEV_TYPE_POINTER;         /*The touchpad is pointer type device*/
  indev_drv.read = ex_tp_read;                    /*Library ready your touchpad via this function*/
  lv_indev_drv_register(&indev_drv);              /*Finally register the driver*/
}
Using the Library
Below a very simple 'hello world':
static void hello_world(void) {
    /*Create a Label on the currently active screen*/
    lv_obj_t *label1 =  lv_label_create(lv_scr_act(), NULL);

    /*Modify the Label's text*/
    lv_label_set_text(label1, "Hello world!");

    /* Align the Label to the center
     * NULL means align on parent (which is the screen now)
     * 0, 0 at the end means an x, y offset after alignment*/
    lv_obj_align(label1, NULL, LV_ALIGN_CENTER, 0, 0);
}
It creates a label in the middle of the screen:

Hello World
The following creates a button which toggles a LED:
static lv_res_t my_click_action(struct _lv_obj_t * obj) {
  LED_Toggle();
  return LV_RES_INV;
}

static void click_button(void) {
  /*Add a button*/
  lv_obj_t *btn1 = lv_btn_create(lv_scr_act(), NULL);           /*Add to the active screen*/
  lv_obj_set_pos(btn1, 2, 2);                                    /*Adjust the position*/
  lv_obj_set_size(btn1, 96, 30);                                 /* set size of button */
  lv_btn_set_action(btn1, LV_BTN_ACTION_CLICK, my_click_action);   /*Assign a callback for clicking*/

  /*Add text*/
  lv_obj_t *label = lv_label_create(btn1, NULL);                  /*Put on 'btn1'*/
  lv_label_set_text(label, "Click");
}
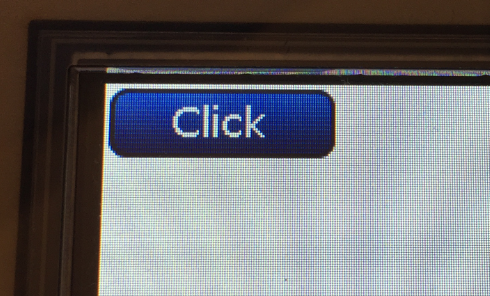
Click Button
Another example to display an image:
extern const lv_img_t red_flower;
static void show_image(void) {
    lv_obj_t *img_src = lv_img_create(lv_scr_act(), NULL); /* Crate an image object */
    lv_img_set_src(img_src, &red_flower);  /* Set the created file as image (a red flower) */
    lv_obj_set_pos(img_src, 10, 10);      /* Set the positions */
    lv_obj_set_drag(img_src, true);       /* Make the image dragable */

    lv_obj_t *img_symbol = lv_img_create(lv_scr_act(), NULL); /* create symbol */
    lv_img_set_src(img_symbol, SYMBOL_OK); /* use 'checkmark' as symbol */
    lv_obj_set_drag(img_symbol, true); /* make the symbol dragable */
    lv_obj_align(img_symbol, img_src, LV_ALIGN_OUT_BOTTOM_LEFT, 0, 20);     /* Align next to the source image */
}
It creates an image plus a label with a symbol (a check mark) and makes both 'dragable' so I can move them around on the screen using the touch input:

Dragable Image with Checkmark
There are different examples and tutorials available in https://github.com/littlevgl/lv_examples.
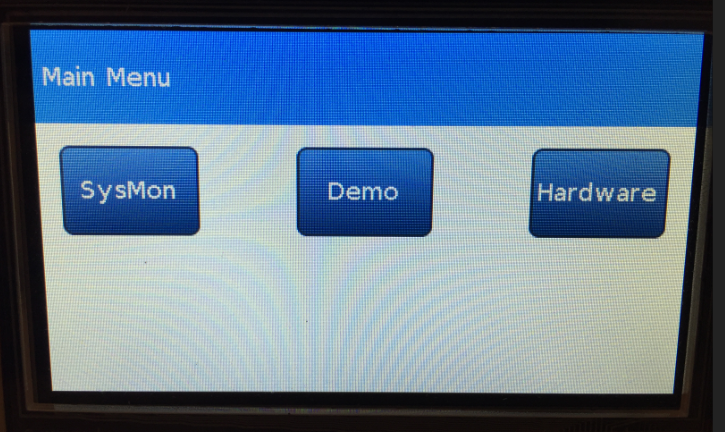
Simple Demo
Within a two hours, I was able to pull together a quick demo on the LCD. It is not a perfect demo, but shows how powerful and easy this library is.
A simple main menu with three buttons:
System Monitor
A system monitor updating periodically a graph with CPU and memory usage:

System Monitor
A screen showing the status of the LED and x, y and z of the accelerometer, everything updated in realtime:
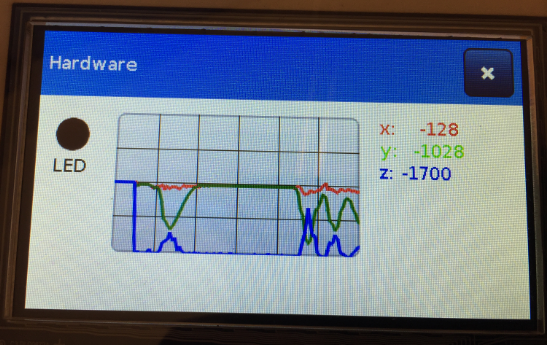
Hardware Monitor
An updated LittlevGL GUI demo with tabs and different input schemes:
Using on-screen keyboard as input device:
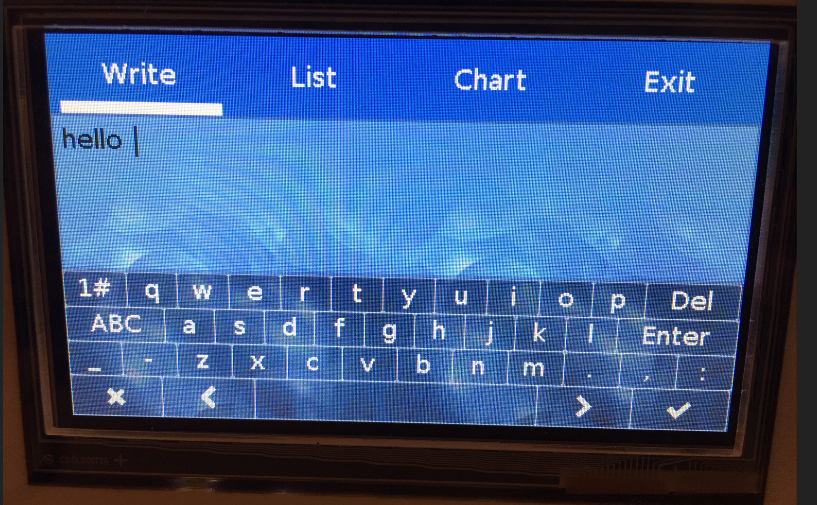
on-screen keyboard input
Dialog box usage:

Dialog box
Scroll-able list with symbols:
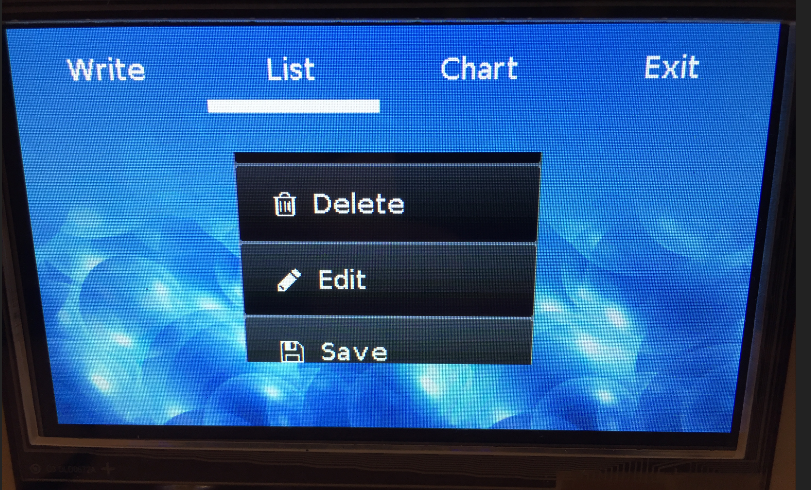
Scrollable List with Symbols
Dynamic bar chart:
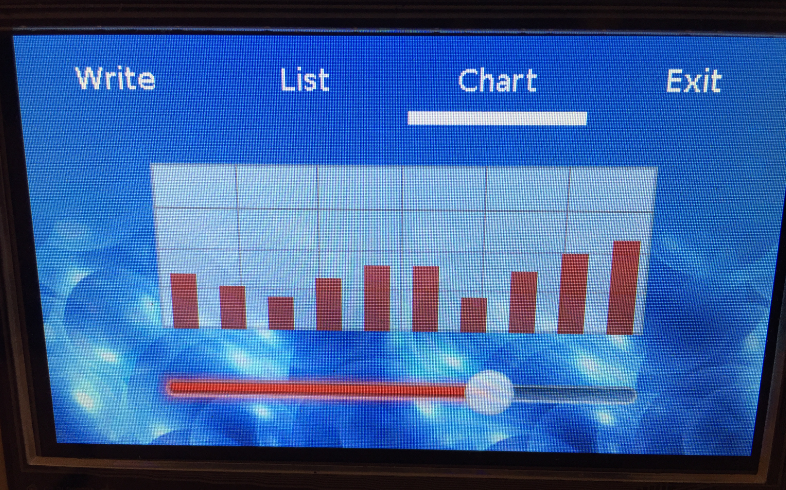
Bar Chart
Further Information
LittlevGL is documented very well, so be sure to check out the pages at https://littlevgl.com:
- Porting guide: https://littlevgl.com/porting
- Introduction and basic concepts: https://littlevgl.com/basics
- Overview of different GUI objects: https://littlevgl.com/object-types
LittlevGL does not include a 'designer tool', but I have not found something like this missing. It includes a simulator under Eclipse (https://littlevgl.com/pc-simulator). It includes utilities as a font converter (https://littlevgl.com/ttf-font-to-c-array) and an image converter (https://littlevgl.com/image-to-c-array)
Summary
I have found LittlevGL extremely easy-to-use and very powerful. It is very, very well documented on https://littlevgl.com and available in a permissible open source license. It nicely works with any microcontroller and hardware, either bare-metal or with an RTOS. So if you are looking for a library for small displays, open source and free-of-charge, then this might be right for you too.
💡 If you are going to use LittlevGL, consider donating to support this awesome project.
And the GUI nicely works on smaller displays too: below how it runs on a 128x128 SSD1351 display:
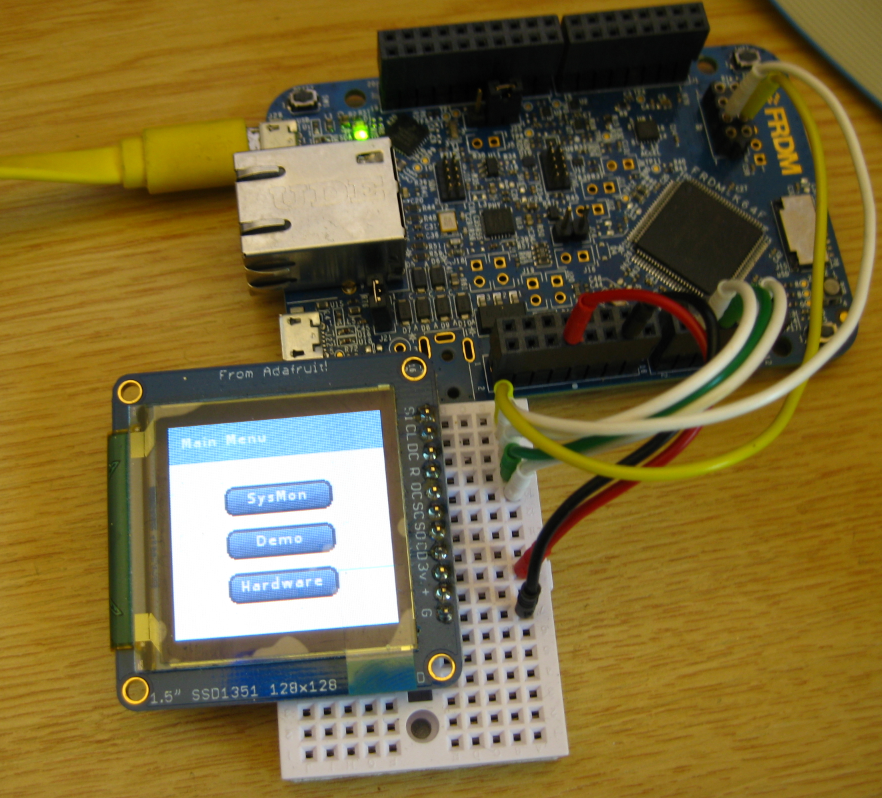
LittlevGL on FRDM-K64F
Happy GUI'ing 🙂
Links
- LittlevGL home page: https://littlevgl.com/
- Littlevgl on GitHub: https://github.com/littlevgl/lvgl
- McuOnEclipse example on GitHub: https://github.com/ErichStyger/mcuoneclipse/tree/master/Examples/MCUXpresso/i.MX%20RT1050_EVK/MIMXRT1052_LCD
- MCUXpresso SDK: https://mcuxpresso.nxp.com
- MCUXpresso IDE: http://www.nxp.com/mcuxpresso/ide
- Example used in this tutorial: https://github.com/ErichStyger/mcuoneclipse/tree/master/Examples/MCUXpresso/i.MX%20RT1050_EVK/MIMXRT1052_LCD
- LittlevGL examples: https://github.com/littlevgl/lv_examples

Looks like a very good solution for low-end micro-controllers. Think I might try to get this working with Micropython at some stage 🙂
Thanks very much for your wonderful blogs Eric !!
LikeLike
Hi Brendan,
I think not only for low-end microcontrollers, but as well for mid-range ones with say displays in the 600×400 or even higher areas. Of course usually with bigger sizes the RAM needs increase, but LittlevGL only needs a fraction of the memory buffer for its operations.
LikeLike
Geat job Erich,
I was looking for open source graphics library.
It seems that it is very good solution
Do you know if there is a possibility to run LittlevGL on S12X controlers with CW?
I suppose that the endianess would be a problem.
LikeLike
I don’t think there will be any problems, especially if the display only uses 8bit data or monochrome pixels. Endianess can be a problem even for ARM, so for example for a SSD1351 display I had to send first the high byte and then the low byte. But this is something you can handle in the display writing routine (as did for that case).
LikeLike
Hi Erich
I will try to run LittlevGL on S12X. I have some projects with seven segment display that should update them with a TFT display.
Is there a link for the project with the FRDM K64F in order to download it?
I can use it as starting point.
LikeLike
It is here: https://github.com/ErichStyger/mcuoneclipse/tree/master/Examples/KDS/FRDM-K64F120M/FRDM-K64F_Adafruit_SSD1351_LittlevGL
Note that this is a Processor Expert component and uses the latest components from https://github.com/ErichStyger/McuOnEclipse_PEx
LikeLike
Pingback: Tutorial: First Steps with Embedded Artists NXP i.MX RT1052 OEM Module | MCU on Eclipse
Hello Erich,
thank you very much for your article, I have also started to working with this board and try to implement LittlevGL into my project. But I have a question regarding using real double buffering with this library. It seems not to support video buffer switching like emWin does it. The virtual buffer is just an area in RAM and is copied to LCD RAM buffer pixel by pixel in the ex_disp_flush routine. It is not so terrible, static windows work just fine and it spares memory, but if you try to swipe windows you can easily observe visual artefacts. I have already disabled cache, but it will not help, because virtual buffer is drawn during the refreshing of the display picture. I haven’t found any possibility to implement double buffering by switching memory areas after the LCDIF_IRQHandler interrupt. But I have noticed some routines regarding switching buffers in your source code, but they seem not to be active. What do you think about it, do you mean it is possible to imlement such functionality or is it to complex?
With best regards, Alex
LikeLike
Hi Alex,
yes, the library supports double buffering and I have not used that not to waste memory. If might add a define or so to switch between double buffering and normal buffering?
LikeLike
Hi Alex,
See https://github.com/ErichStyger/mcuoneclipse/tree/master/Examples/MCUXpresso/i.MX%20RT1052%20Embedded%20Artists/EA_RT1052_LCD and the define PL_CONFIG_USE_LCD_DOUBLE_BUFFER platform.h: it enables using the LCDIF_IRQHandler.
I think this could be even combined with using LV_VDB_DOUBLE, but I have not tried that yet.
LikeLike
Pingback: McuOnEclipse Components: 30-Sept-2018 Release | MCU on Eclipse
Pingback: First Steps with the NXP i.MX RT1064-EVK Board | MCU on Eclipse
Pingback: Building a Raspberry Pi UPS and Serial Login Console with tinyK22 (NXP K22FN512) | MCU on Eclipse