NXP not only sells general purpose microcontroller, but as well a portfolio of automotive devices which includes the S32K which is ARM Cortex based. For this device family, they offer the S32 Design Studio (or S32DS) with its own Eclipse distribution and SDK. The interesting part is that the S32DS includes Processor Expert (which is a bit different from the ‘mainstream’ Processor Expert). It comes with its own components for the S32K SDK which includes a component for FreeRTOS. But that component in S32DS 2018.R1 comes with an old V8.2.1 FreeRTOS component:

FreeRTOS 8.2.1 in S32DS 2018.R1
So what to do if I want to use the latest FreeRTOS (currently 10.0.1) with all the bells and whistles?
This article describes how to upgrade it to the latest and greatest FreeRTOS V10.0.1:

FreeRTOS 10.0.1 in S32DS 2018.R1
Outline
The latest FreeRTOS V10.0.1 has many benefits: it is under a more permissible license, plus it comes with all the latest features like static memory allocation or direct task notification. Because it is not possible to directly update the FreeRTOS component in S32DS, I’m using the McuOnEclipse FreeRTOS component for S32DS. That component version is always up to the latest FreeRTOS version, supports multiple IDE’s (CodeWarrior classic, CodeWarrior for MCU 10.x, Kinetis Design Studio, MCUXpresso IDE and now as well S32DS) and a broad range of microcontroller (S08, S12, DSC, ColdFire, Kinetis and now as well S32DS). Additionally it seamlessly integrates SEGGER SystemView/RTT and Percepio FreeRTOS Tracealyzer.
💡 At the time of this article not all McuOnEclipse components have been ported to S32DS. More components will be released in the future.
This article describes how to add and use the FreeRTOS 10.0.1 McuOnEclipse components in S32DS, followed by a tutorial how to create a FreeRTOS project for the S32K144EVB board.
Example projects like the one discussed here are available on GithHub: https://github.com/ErichStyger/mcuoneclipse/tree/master/Examples/S32DS
Creating Project
In a first step we create a simply basic project we can debug on the board.
In S32DS, use the menu File > New > S32DS Application Project:
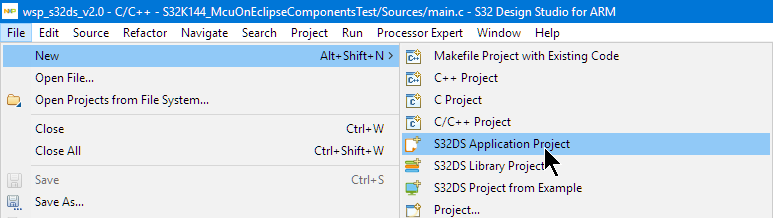
New Application Project
Provide a name for the project and select the device to be used:

Create a S32 DS Project
Press Next. Click on the browse button to select the SDK:

Choose SDK
Select the S32K144_SDK_gcc SDK:

S32K144 SDK
Press OK. Now the SDK is selected:

Selected SDK
Press Finish to create the project. In Eclipse I have now the project created:

Basic Project
Now it would be good time to build (menu Project > Build Project) and debug (Menu Run > Debug) the project to verify everything is working so far. Doing the Debug, it will ask me for which configuration I want to use: I select the Debug one:

Debug Configuration
Depending on the debug connection, I can set it to OpenSDA:

OpenSDA
With this, I should be able to debug the project:

Debugging the initial project
Congratulations! You can now terminate the debug session with the red ‘stop’ button and switch back to the C/C++ perspective.
Blinky LED
In a next step we mux the RGB LED pins on the S32K144EVB board. For this, double-click on the PinSettings component to open the Component Inspector for it:
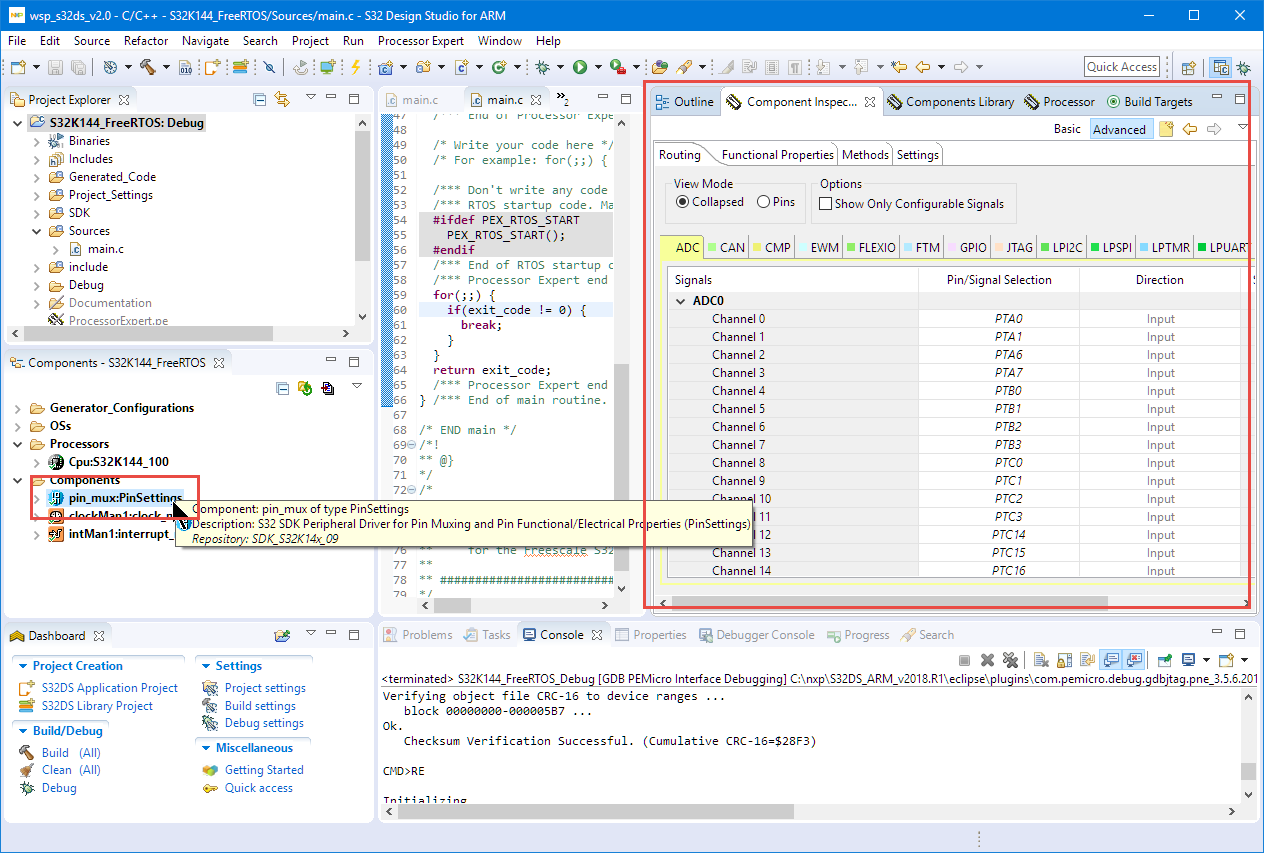
Pin Muxing Settings
The RGB LEDs are on PTD0, PTD15 and PTD16. Route them in the Inspector as shown below:

Routed Pins
Then generate code with the button in the components view:

Generating Code
Next, add the following code into main():
CLOCK_SYS_Init(g_clockManConfigsArr, CLOCK_MANAGER_CONFIG_CNT, g_clockManCallbacksArr, CLOCK_MANAGER_CALLBACK_CNT);
CLOCK_SYS_UpdateConfiguration(0U, CLOCK_MANAGER_POLICY_FORCIBLE);
PINS_DRV_Init(NUM_OF_CONFIGURED_PINS, g_pin_mux_InitConfigArr);
PINS_DRV_SetPinsDirection(PTD, (1<<0U) | (1<<15U) | (1<<16U)); /* set as output */

PINS_DRV_SetPins(PTD, (1<<0U) | (1<<15U) | (1<<16U)); /* all LEDs off */
PINS_DRV_ClearPins(PTD, (1<<15U)); /* RED pin low ==> ON */
PINS_DRV_TogglePins(PTD, (1<<15U)); /* RED pin high => off */

Added Code to main
This is to initialize the clock and GPIO pin drivers, followed by turning all LEDs off and then the Red one on and off.
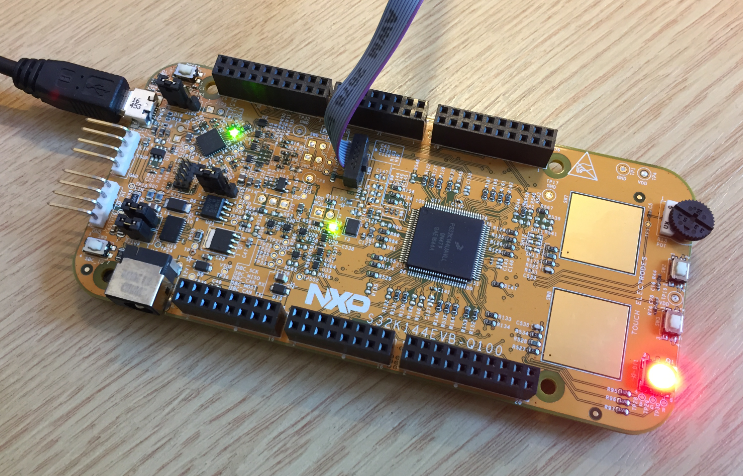
Blinky on S32K144EVB
Build and debug it on the board to verify everything is working as expected.
McuOnEclipse Component Installation
You need at the 1-July-2018 release or later.
Download from SourceForge the latest zip file and unzip it.
Use the menu Processor Expert > Import Component(s):

Processor Expert Import Components
Select *both* *.PEupd files and press Open:

Open .PEupd Files.PEupd Files
Specify/Select the component repository where to import the components:
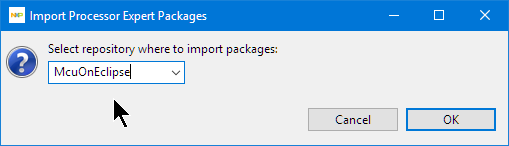
Component Repository
If that repository does not exist yet, add a new one:
💡 I’m using below the McuOnEclipse folder inside the S32DS installation folder. Create that folder first if it does not exist yet.

Add Repository
Because Processor Expert in S32DS does not include all needed Processor Expert include files, another manual step is required. These extra files are present inside the package you have downloaded from SourceForge:

Processor Expert Include Files
Adding FreeRTOS
Next, add the FreeRTOS component from the McuOnEclipse repository to the project:

Adding FreeRTOS Component to Project
This will bring in a few other components into the project. Open the Inspector view for the McuLibConfig component:

Inspector for the McuLibConfig component
Configure it to use the S32K SDK:

McuLibConfig
In the FreeRTOS settings, verify that the ARM core is matching your board:

Cortex CPU settings
This completes the settings. Generate code:

Generate Code
Initializing component drivers
In other IDE’s (Kinetis Design Studio, CodeWarrior, …), Processor Expert will initialize the component drivers. Because this is not implemented in the S32DS version, I have to call the Init functions separately. For this, add the following template to main.c:
static void Components_Init(void) {
  #define CPU_INIT_MCUONECLIPSE_DRIVERS
  /* IMPORTANT: copy the content from Cpu.c! */
/*------------------------------------------------------------------*/
/* copy-paste code from Cpu.c below: */

/*------------------------------------------------------------------*/
}
You find the code to copy at the end of Generated_Code\Cpu.c:

Initialization Code in Cpu.c
Copy that code and place it inside Components_Init() in main.c:
💡 Unfortunately, this is a manual process :-(. Whenever you add/remove a component, make sure you update the Components_Init() function.

Calling Components_Init()
Events
The next manual thing is about Processor Expert events. In other IDE’s Processor Expert is creating proper event modules. In S32DS it only adds the events to the Events.c which is not complete.
To solve this, first exclude the file Events.c from the build: Use the properties and turn on ‘Exclude resource from build’ (see “Exclude Source Files from Build in Eclipse“).

Events.c excluded from build
Then include the header file and source file into main.c:
#include "Events.h"
#include "Events.c"
This uses the preprocessor to place the event code into main.c:

Included Events Code
FreeRTOS Task
Add the following code for a FreeRTOS task to main.c which blinks the green LED:
static void AppTask(void *param) {
  (void)param; /* not used */
  for(;;) {
    PINS_DRV_TogglePins(PTD, (1<<16U)); /* blink green LED */
    vTaskDelay(pdMS_TO_TICKS(1000)); /* wait 1 second */
  } /* for */
}
Next, create the task in main() and start the scheduler:
  if (xTaskCreate(AppTask, "App", 500/sizeof(StackType_t), NULL, tskIDLE_PRIORITY+1, NULL) != pdPASS) {
    for(;;){} /* error! probably out of memory */
  }
  vTaskStartScheduler();

Blinky Task
Build and debug.

Debugging FreeRTOS Application in S32DS
And enjoy the blinking green LED:

Blinky Green RGB LED
Summary
It is great to see that Processor Expert at least continues to exist in the automotive part of NPX with the S32 Design Studio. However, that Processor Expert has been reduced to the S32K SDK and automatic component initialization and event handling needs a manual setup. Other than that, the first components work great in S32DS. And for everyone using S32DS, the McuOnEclipse components offer the latest FreeRTOS and extra features like tickless idle mode, Segger RTT, Segger SystemViewer and Percepio Tracealyzer :-).
Happy updating 🙂
Links
- Release on Sourceforge: https://sourceforge.net/projects/mcuoneclipse/files/PEx%20Components/
- Component installation instructions: McuOnEclipse Releases on SourceForge
- McuOnEclipse Library on GitHub: https://github.com/ErichStyger/McuOnEclipseLibrary

Sorry, I follow the entire guide but I have some issues:
1. the FRTOS1_vOnSleepProcessing does not have any code targeting the S32K mcu. It raises an error: “you must enter low power mode (wait for interrupt) here!”.
2. it seems that freertos and the osif components define multiple time the SysTick_Handler function
LikeLike
1. Yes, it does not contain any specific code to enter low power mode, as this very much depend on the device.
At the minimum, you can use
__asm volatile("wfi");LikeLike
About 2) I see that SysTick_Handler() is defined only once in port.c? There are different variants depending on toolchain used, but for S32DS and gcc I only see it defined once, or what is what I’m missing?
LikeLike
I‘m meet this problem too,so it’s not a single,may your S32DS version is deffirent with us?
LikeLike
maybe
LikeLike
I’m using the 2018.R1 version. But maybe your SDK is different? What are you using?
LikeLike
Actually, the processor expert includes the osif_baremetal.c file where there is another definition of SysTick_Handler.
LikeLike
I believe you have added the wrong FreeRTOS component to your project? It seems to me you are using the FreeRTOS component from the S32 SDK, and *not* the FreeRTOS from the McuOnEclipse repository.
Can you check this? If you move the mouse cursor over your FreeRTOS in the project, then it should show ‘Repository: McuOnEclipse’ and not the SDK repository.
LikeLike
Yes, I included the right component.
LikeLike
There are other processor expert components that use OSIF component, so it must be introduced.
LikeLike
You cannot have two operating systems in project. I’m not using OSIF.
LikeLike
Which components are using/requiring this?
LikeLike
EDMA, FlexCAN and sbc_uja11691 (the on-board CAN transceiver) components have as shared component the osif, which is not an operating system but an interface between device drivers and an eventual operating system. You can choose to use FreeRTOS (the one provided by the SDK) or a bare metal implementation, then the OSIF will interface the drivers with the desired implementation. For example, when you call the driver function FLEXCAN_DRV_SendBlocking, in the function body there is a call to: “OSIF_SemaWait” that will use the FreeRTOS semaphore if you had chosen a FreeRTOS implementation, otherwise the bare metal implementation (which is written in osif_baremetal.c). In practice, if you choose a bare metal implementation, the .c file used by the OSIF component is osif_baremetal.c, while if you choose the FreeRTOS implementation, the .c file used is osif_freertos.c.
The solution could be to adapt/add another .c file for the new os (freertos 10).
LikeLike
I see, I can now reproduce this. It seems to me that the osif component checkes some variables about what operating system is used and it does not recognize the McuOnEclipse FreeRTOS. I see if I can find out more…
LikeLike
*eventual operating system = *possible operating system (sorry)
LikeLike
I managed to get it working now with the OSIF component :-).
I have updated the files on GitHub (https://github.com/ErichStyger/mcuoneclipse/tree/master/Examples/S32DS).
Here are the steps:
How to use the McuOnEclipse FreeRTOS with the S32 SDK OSIF (OS-Interface):
a) name the FreeRTOS component as ‘FreeRTOS’
b) in the FreeRTOS component setting, use ‘Custom Port’ with ‘Source Folders’ enabled.
‘Manual Clock Values’ disabled
c) This generates FreeRTOS into folders inside the Generated_Code.
So you have to add the following to the compiler include path settings:
../Generated_Code/FreeRTOS/Source/include
../Generated_Code/FreeRTOS/config/gcc
../Generated_Code/FreeRTOS/Source/portable/GCC/ARM_CM4F
d) before including events.c, include FreeRTOS.h and task.h
#include “FreeRTOS.h”
#include “task.h”
#include “Events.h”
#include “Events.c”
e) add the following define to the compiler preprocessor settings:
USING_OS_FREERTOS
BUT: it requires an updated FreeRTOS component from my side. Interested to try it out?
LikeLike
I have posted instructions here: https://mcuoneclipse.com/2018/07/18/using-custom-freertos-with-s32k-and-osif-for-arm/
I hope this helps,
Erich
LikeLike
Thank you! If I will find issues I will contact you!
LikeLike
Ok, I found a problem in one OSIF function:
– I set FreeRTOS to use only the static allocation scheme
– OSIF function “OSIF_SemaCreate” function call the function “xSemaphoreCreateCounting”
PROBLEM:
“xSemaphoreCreateCounting” is only available if Dynamic allocation is available
Thus the compiler raises the following error: “undefined reference to ‘xSemaphoreCreateCounting’.
LikeLike
Maybe a good solution would be to modify the osif component such to use:
– xQueueCreateCountingSemaphoreStatic (in OSIF_SemaCreate)
– xQueueCreateMutexStatic (in OSIF_MutexCreate)
when only static allocation scheme is available.
LikeLike
* xSemaphoreCreateCountingStatic
* xSemaphoreCreateMutexStatic
LikeLike
Unfortunately, I have no control over the OSIF component or access to its sources. Only NXP would be able to improve that. I’ll pass that along to my contacts I have have, unless you have reported it already?
LikeLike
Go ahead! I did not report this problem! I kindly ask you if you can take us updated with the possible news from NXP. Thank you!
LikeLike
The NXP S32 SDK version of FreeRTOS is version 8.2.1, and static memory allocation is only available from 9.0.0 and higher.
LikeLike
Oh yes, I knew that, but I hoped they could update the SDK (I mean S32K are processors targeting the automotive domain, but they do not provide a version of FreeRTOS with static allocation?!) Writing my own driver at this moment would be too time consuming. Thanks a lot for the support!
LikeLike
I have asked if they plan for an update, will see. The other alternative would be to implement my own version of the OSIF. It is a matter of available time….
LikeLike
Sorry, I follow the entire guide but I have some issues too:
I can’t understand that the following:
“Because Processor Expert in S32DS does not include all needed Processor Expert include files, another manual step is required. These extra files are present inside the package you have downloaded from SourceForge:”
where this files should be coied? or I need to include this files in IDE?
LikeLike
Ok,the green led blink now.
LikeLike
great, so it seems you were able to install the components 🙂
LikeLike
Yes, you need to import the latest files from SourceForge (https://sourceforge.net/projects/mcuoneclipse/files/PEx%20Components/).
LikeLike
Hi, I have a question. I would use the tickless mode with a low power timer. How can I set the low power timer as tick interrupt directly from Processor Component?
LikeLike
I had no time (or need) to deep dive the S32 low power timer. Would probably need a couple hours to read the data sheets. But if you want, you can have a look how I did it for the K25Z: https://mcuoneclipse.com/2014/03/16/starting-point-for-kinetis-low-power-lls-mode/. Basically you need to setup the low power timer and deal with it in the FreeRTOS hooks.
LikeLike
thanks anyway!
LikeLike
Pingback: Using custom FreeRTOS with S32K SDK and OSIF for ARM | MCU on Eclipse
Any suggestions as to how I can get FreeRTOS debugging (as in MCUXpresso) with S32K ? Even a subset of the features. Thanks
LikeLike
There are several levels of FreeRTOS plugins in S32DS. It already has the FreeRTOS TAD plugins (see https://mcuoneclipse.com/2016/07/06/freertos-kernel-awareness-for-eclipse-from-nxp/) installed, but the plugins are outdated (v1.0.1, while MCUXpresso IDE v10.2 comes with 1.0.4). I have updated the plugin at least to 1.0.2 which is available from the update site mentioned in that article.
As for other debugging features, I have upgraded the SEGGER J-Link to work with FreeRTOS too, have a read at https://mcuoneclipse.com/2018/06/29/show-freertos-threads-in-eclipse-debug-view-with-segger-j-link-and-nxp-s32-design-studio/ .
I hope this helps?
LikeLike
Thanks Erich. Is this actually the same plug-in that MCUXpresso uses or are they two separate things/code-bases?
LikeLike
It is the same plugin and source base. It was originally released for KDS (this is where I have it found it first with the update site). It seems that the S32DS then inherited/used that version (but never updated it). MCUXpresso IDE is using the latest versions (but I have not seen a dedicated update site for it yet, I have to check).
LikeLike
Again thanks. Do you know if the source for this plug-in is available ? I think not but am asking anyway as I have placement student working on FreeRTOS who is hoping to add additional debug support for some experimental new features they are adding. I guess this is proprietary NXP code so we may have to explore other options (i.e. if an open-source FreeRTOS plug-in exists) or just use the variables window to look at the internal structures directly and interpret them
LikeLike
I was told a while back (last year I think) that NXP wanted to open source the plugin. I have not seen it released yet. With all the acquisition and Qualcomm stuff, it might have been delayed too.
LikeLike
Hello,
I followed your step, when do generate code, failed with below error.
Generator: FAILURE: at line 10: Error in including “Drivers\Common\GeneralParameters.inc” from directory C:\NXP\S32DS_ARM_v2018.R1\McuOne (file: Drivers\Common\FreeRTOSpvPortMalloc.Inc)
LikeLike
Do you have that file Drivers\Common\GeneralParameters.inc present in C:\NXP\S32DS_ARM_v2018.R1\McuOne?
It seems to me that you have not manually compied the files from the folder named ‘S32 Design Studio’ which is part of that zip file from SourceForge? Can you check this?
I hope this helps,
Erich
LikeLike
Yes, after copy the files into NXP/…/common/, it can compile pass.
But after add lpuart into project, compile failed, as lpuart depands on osif,
Description Resource Path Location Type
undefined reference to `xSemaphoreCreateCounting’ osif_freertos.c /S32K144_FreeRTOS_PEx/SDK/rtos/osif line 384 C/C++ Problem
Can you help to resolve my issue?
LikeLike
Did you turn on counting semaphores in your FreeRTOSConfig.h?
LikeLike
I think NXP has to fix that osif component. I had contacted them and they indicated that they might update the component in a new release, but I have not checked if this already happened.
LikeLike
Yes, the counting semaphores is enabled:
#define configUSE_COUNTING_SEMAPHORES 1
But the same failure if I set the define to 0.
LikeLike
I am using the S32K148EVB-Q176 and the LED Blink Example doesn’t seem to work neither the of them. I am sure someone can tell me what mappings to setup in the pn_mux:PinSettings [inspector] but more then that I would like to know how to look this up in the documentation, I don’t see anything in the Reference Manual. I put the board under a microscope and found the following labels on the 3 LEDs near the power connector, DS1, DS2, D3, and the single LED next to the switches was labeled. D11. I would also like to know how these relate to the pin_mux mappings?
Thanks,
Tom
LikeLike
Hi Tom,
not sure how much your board is different from the one I have used. And there are no schematics for your board available?
Erich
LikeLike
I found the issue, this model board is using PTE. I found this in the user manual, but even so the user manual has the RGB pin values wrong, for R and B they are reversed. The board I am using is also active high not active low on each pin.
LikeLike
Ah, good to hear that it is working now 🙂
LikeLike
Hi Erich,
I came accross your article on using FreeRTOS 10 in S32 Design Studio with NXP controllers (in my case S32K148). Thanks a lot for this article, it helped my very much in my setup process.
However, I am facing a little difficulty; it seems I am missing a file named MainSettings.inc
What I did so far is to dowload the latest Components release from SourceForge (2018-09-30) extracted the archive and placed the contents in C:\NXP\Drivers\Common. After creation of my project, I imported the PEupd files from the extracted archive and had to copy the inc files to my component repository manually.
When I try to build my project, I get the following error message:
Generator: FAILURE: at line 64: Error in including “Drivers\Common\MainSettings.inc” from directory C:\Users\Michael\MyComponents (file: Drivers\Common\Header.h)
The mentioned file “MainSettings.inc” does not seem to be located anywhere on my file system. Where can I get it from?
Best Regards,
Michael
LikeLike
Hi Michael,
I’m sorry about that problem, must be an oversight on my side, and I have to update the package.
You can easily fix this:
– go to C:\Users\Michael\MyComponents\Drivers\Common folder
– create there an empty file named ‘MainSettings.inc’
and this should fix your issue.
Let me know.
LikeLike
Hi Erich,
perfect solution! Thank you.
Best Regards,
Michael
LikeLiked by 1 person
Hi Erich,
About the section where you mention:
“Because Processor Expert in S32DS does not include all needed Processor Expert include files, another manual step is required. These extra files are present inside the package you have downloaded from SourceForge:”
How do I have to perform this step?
I am getting a lot of errors about files from that “Drivers\Common” folder not being able to include while generating Process Expert code for the FreeRTOS component.
Best Regards
Manuj Agrawal
LikeLiked by 1 person
Inside the zip file from SourceForge (https://sourceforge.net/projects/mcuoneclipse/files/PEx%20Components/) there is a folder ‘S32 Design Studio’ with a readme.
You need to place the files into your Drivers\Common directory of your component repository file location.
LikeLike
Thanks Erich for your comment. I was able to make it work.
LikeLiked by 1 person