I’m making great progress with the firmware for the new Mini Sumo Robot (see “New Concept for 2018 Mini Sumo Roboter“). The goal is a versatile and low-cost Mini Sumo robot, and the robot comes with the feature of magnetic position encoders. In a previous article I have explained how to mold custom tires for robots (see “Making Perfect Sticky DIY Sumo Robot Tires“), this article is about how to make DIY Magnetic disk encoders.

3D Printed Magnetic Encoders Disks
Outline
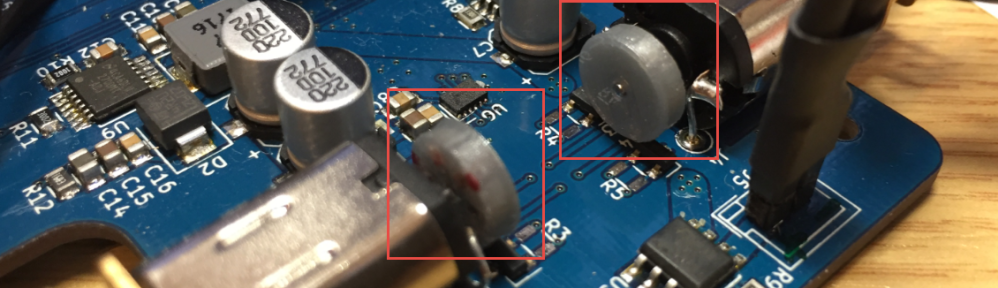
I have successfully used the Pololu Magnetic encoder disks (see https://www.pololu.com/product/2599). Below a picture how they are used in a Mini Sumo Robot (see “New Concept for 2018 Mini Sumo Roboter“):
Magnetic Encoder Disks with Micro Metal Gear Motors
Pololu sells the encoders in sets of 5 ($0.69 for a single disk). While Pololu offers free shipping inside the USA, it is rather expensive to get the encoder disks outside the USA, and I have not found any other supplier. In that case, here is a low-cost way (assuming you have a 3D printer available), making it possible to build magnetic encoder disks for less than $0.30 each.
Material
- 3D Printer and 3D model of the encoder disk (link at the end of the article)
- 2 small (1×1 mm round) neodymium magnets
- Non-magnetic tweezers (can be 3D printed)
- Glue (paper or wood glue)
Pololu Encoder Disk
The Pololu encoder disk generates 12 pulses per revolution. The disk is made of some magnetic material which gets polarized at the factory. So there are not physical magnets in the Pololu encoder disk, but it corresponds to 6 magnets placed like in the image below. I have attached external magnets to find the magnet poles:

Pololu Encoder Disk with 6 Poles
Magnets
I searched for tiny neodymium magnets, and finally found 1x1x1 round magnets. I ordered 100 Neodymium magnets from AliExpress for less than $5:

100 Mini Magnets with Pololu Magnetic Encoder Disk
3D Model
I created a model for the encoder disk plus a tweezers to handle the magnets (usual tweezers are made of metal and not usable):

Tweezer and Encoder Disk 3D
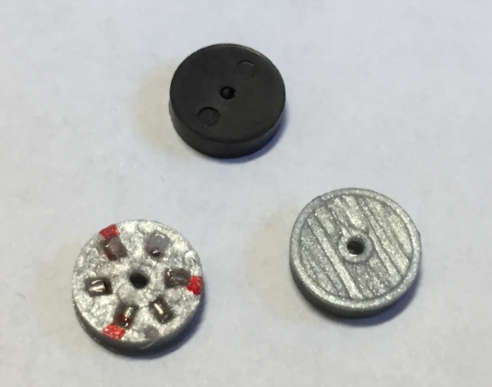
The picture below shows two printed encoder disks (grey), the original Pololu encoder disk, a 1×1 mm magnet and a 3D printed tweezers:
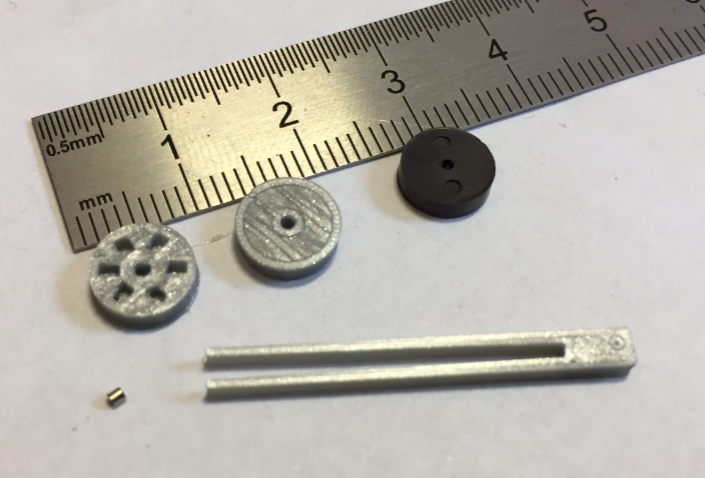
Printed Encoder Disks
To find the magnet pole, I use a scotch tape and several small magnets:

Magnet Pole Identifier
Using a felt tip marker, the magnets get a mark to know the pole:
Marked Magnet Pole
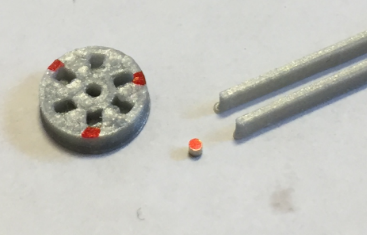
That way plus with the check of the other magnets it gets placed into the encoder disk:

Placed Magnet into Disk
That way placed and glued 6 magnets into each disk.
Finished Magnetic Encoders
💡 Depending on the sensitivity of the magnetic sensors, it might be necessary to use 12 magnets (2 in series). For this I have put on GitHub another 3D model for more magnets.
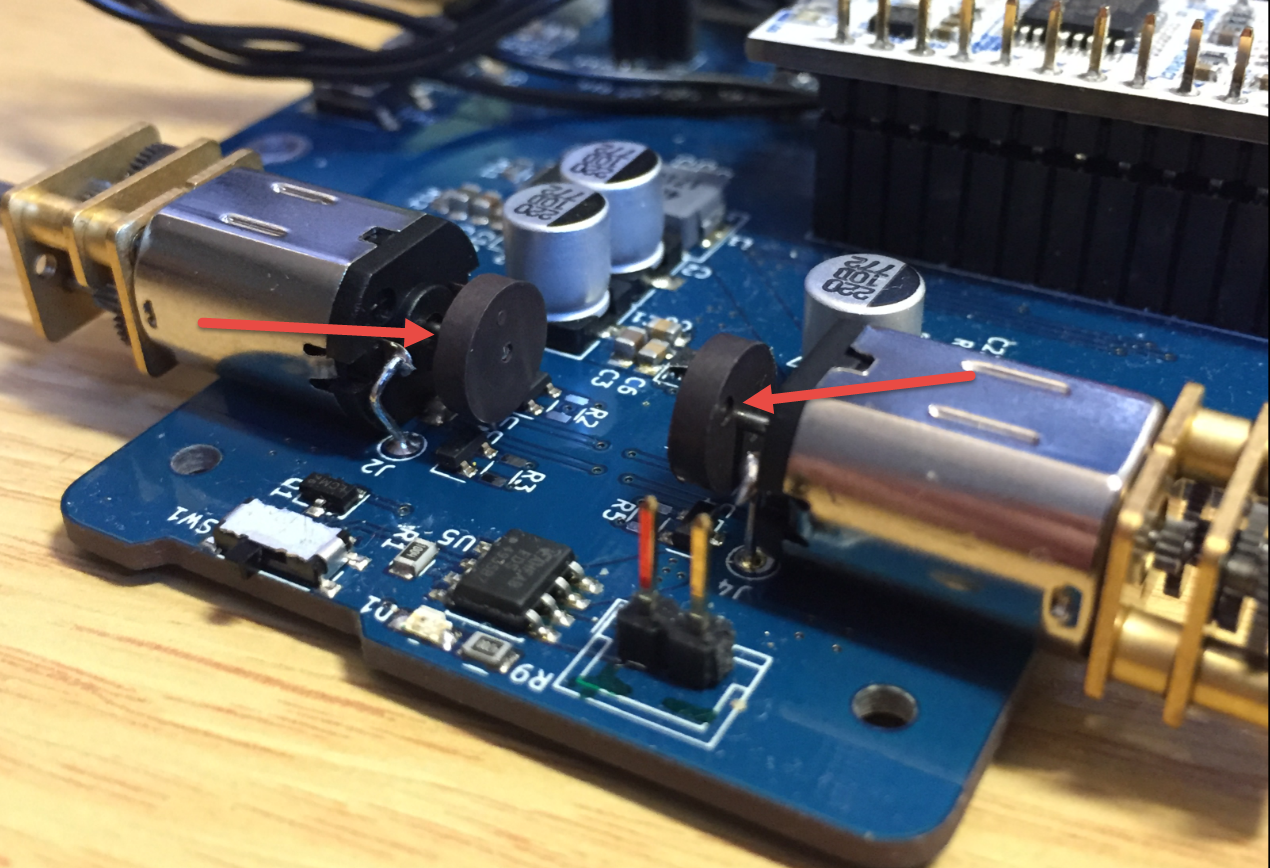
Ready to test the new disks: they produce a nice quadrature signal. Below the two disks mounted to the motor shafts:
3D Printed Magnetic Encoder Disks
Et voilà:
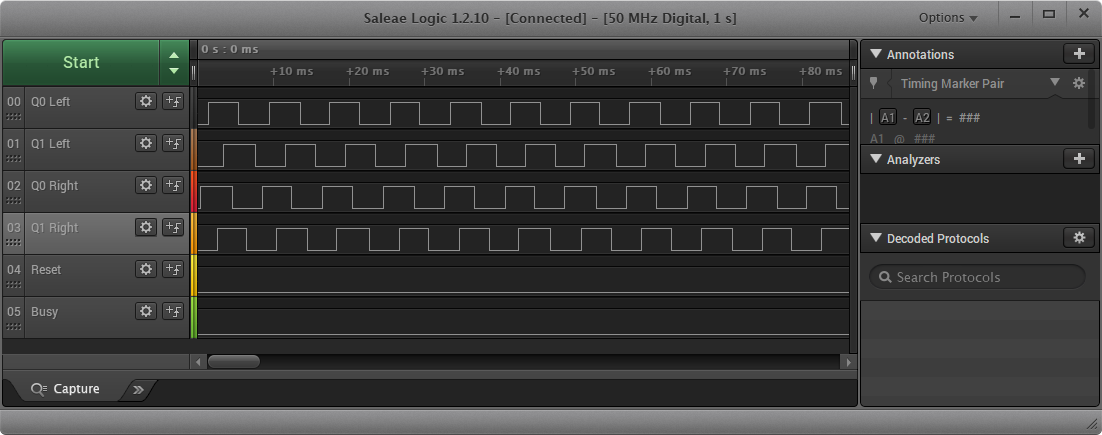
Quadrature Signal
Summary
In case you have a 3D printer available and need a custom magnetic encoder disk for you robotics project, you can print your own encoder disk. Sure it is easier to buy the encoders from Pololu, but always good to know that I can build them myself too.
💡 if you know another source for these magnetic encoder disks other than from Pololu, please let me know.
Happy Encoding 🙂
Links
- Mini MCU Sumo project on GitHub: https://github.com/ErichStyger/McuMiniSumoRobot (includes 3D CAD files)
- Pololu Magnetic Encoder Disc for Micro Metal Gearmotors, OD 7.65 mm, ID 1.0 mm, 12 CPR (Bulk): https://www.pololu.com/product/2599
- Zumo Robot with Magnetic Endoders: https://mcuoneclipse.com/2016/03/25/zumo-robot-with-magnetic-encoders/
- 1x1x1 mm Neydym Magenets: https://www.aliexpress.com/item/10pcs-1mm-x-1mm-1×1-cylinder-Neodymium-Permanent-powerful-Magnet-1-1-1-1mm-1mmx1mm-NEW/32722092863.html

Erich,
Nice job and good additions to the sumo.
LikeLike
Thanks! Still it is kind of tricky to place these small magnets into the disk. I had to to place one, glue it, wait, then the next one, etc. Otherwise one magnet could take out the other from its socket. Maybe I find an easier way?
LikeLike
If your 3d printer is accurate enough, perhaps you could make the cavities for the magnets be press-fit, and/or include a small overhang so the magnets get snapped into place and stay put long enough for the glue to set.
LikeLike
Yes, I tried to get close to that. There are always some small tolerances, and if the cavity is too small, enlarging it is tricky. That’s why I kept it 0.1 mm larger.
What comes to my mind is to approach it with a disk and holes from the ring side: as the holes are around 1mm, there is no problem with overhang, and I could enlarge them with a driller if needed.
LikeLike
Hi Erich,
I place the plastic part onto a steel ruler, then the magnet snaps downwards (in a different project involving plastic parts (cast resin) and magnets that have to be glued in with the correct orientation without one magnet pulling out the other).
I have 8 mm diameter and 2 mm thick disc magnets. To place them, I use an 8 mm plastic tube and a metal pin inside. The metal pin is good to pick up the part and hold it while placing it into the hole (8 mm deep). Then I pull out the metal pin while holding down the magnet with the plastic tube. Together with the steel ruler this works quite well. Allen keys (Inbusschluessel) work well for the metal pin since they are more or less round, have a flat end, and are available in different sizes.
I also use a steel ruler to park the magnets after marking one pole. That way I can pick them up one by one. First I had them stacked like you do but then the marker paint transferred from one to another while stacked (my workflow is mark all — glue all, not mark — glue — mark — glue). On the steel ruler they don’t move.
If they stick too much to the ruler, some tape on the ruler helps (I have a layer of tape on the back of the ruler anyway, it makes it less slippery).
If you plan on making many of the discs then perhaps a jig around the disc with (stronger?) magnets is an option so that the small magnets go into the disc with the correct orientation automatically. Similar to the single magnet in the photo “Placed magnet into disc”, but all around and fixed in place.
Superglue and activator spray hold the magnet in place quickly.
When I want to put ball bearings into 3D-printed parts (PLA), I print 0.5 mm undersized, then warm up the part with a hairdryer and squeeze-fit the ball-bearing into it. Perhaps an SMD hot air station on low heat with a small nozzle is more suited for this task than a hairdryer 🙂
Viele Gruesse,
Alex.
LikeLike
Hi Alex,
great tips and suggestions, thank you! I already found out that the metal ruler helps a lot to park the magnets. Great tip about the plastic tube, that indeep helps a lot too!
Heating up would help too, but one have to be careful to use only lower temperature as higher temperature might demagnetize the magnets: https://hackaday.com/2017/10/27/fail-of-the-week-accidental-demagnetization/
Viele Grüsse,
Erich
LikeLike
Hi Erich,
yes, staying below the Curie temperature is important. My hairdryer is not that hot, however (it would be a hair-cutter then 🙂 ).
PLA becomes soft around 60-70 degrees Celsius, so there is some room. I meant to warm up the plastic, not heating up the magnet and then with the magnet the plastic (as it is shown in the Hackaday article). On the other hand, I only have put one ball bearing into the plastic, not 6 small magnets so close to each other.
Your other idea with the holes coming in from the side has another advantage that you can keep all magnets stuck together when inserting them, then shearing it off when the frontmost magnet is in the hole. That would make the insertion of magnets very quick and easy, not much marking necessary. And it’s harder for one magnet to “jump out” and stick to the neighbour when the holes are radial.
Viele Gruesse,
Alex.
LikeLike
Nice idea Erich, this is how 3D printers should be used. And not for iPhone cases and fidget spinners. I found few encoders on ebay: https://www.ebay.ie/itm/Magnetic-Encoder-Pair-Kit-for-Micro-Metal-Gearmotors-12-CPR-2-7-18V/201448434785?hash=item2ee7432c61:g:cuAAAOSwcN1aVgJr but they are not cheap (but it’s the disc with the sensor) and the look suspisly similar to pololu stock.
LikeLike
Hi Anton,
thanks for that link to eBay: yes, these are the same endcoder kits as from Pololu (I have them too).
LikeLike
Pingback: Roll Your Own Magnetic Encoder Disks | Hackaday
Cool. I ended up doing pretty much the same things to some cheap gear motors I ordered.
They originally had 11 pole pairs or something crazy like that, and the hall switches would only trigger if they were dragging on the wheel, and still plenty of missed steps.
I printed a wheel with 6 bigger magnets in it, and it works great. Since it has an 80:1 gearbox, the 6 magnets also brought the resolution and pulse rate down to something a little easier to manage
LikeLike
Hi Nick,
ah, you used square magnets which are easier to handle than the cylinder ones I used. What is the size of your disk (diameter) and the size of the magnets?
Thanks for sharing!
Erich
LikeLike
It’s quite a bit larger than yours. The motor is about 25mm in diameter. The disk is 15mm, and the magnets are 3mm cubes. They actually were just ones I salvaged from a bunch of hard drives I was junking (they hold the heads in place when parked)
It’s actually a necessary fix for those motors (cheap worm geared motors from the usual suspects online). They have the encoder PCB and wheel on them to begin with, but they’re poorly matched. The wheel has 22 poles, and they’re either too weak, or too close together to properly trigger the hall switches. I had a microcontroller running them through an H bridge jogging back and forth, and the drift was visible within a few seconds.
There was also the issue that there’s no insulation on the back of the PCB and the pins on the connector were long enough to touch the motor can, but after both of those fixes it actually seems pretty decent.
LikeLike
I think I have seen these motor encoders in some places/shops. Good usage of these hard drive magnets!
LikeLike
Pretty interesting idea! My mind instantly jumped to a page I came across on ‘Single Track Grey Code Encoders’ (http://techref.massmind.org/techref/io/sensor/pos/enc/greycodes.htm) and it made me wonder if that could work for your project. Instead of LED’s, you’d use Hall effect sensors and replace the slots with magnets. What do you think?
LikeLike
The other option (I have used) are optical sensors like this one: https://mcuoneclipse.com/2014/03/08/processing-the-pololu-motor-shaft-encoders/
Pololu has them in store, and they work pretty good. But they need some signal conditioning and are subject of infrared light noise (e.g. sun light).
So hall sensors are my preferred solution: easier to use (on the PCB) and more reliable plus the hall IC has the hysteresis built-in.
LikeLiked by 1 person
Hi,
I haven’t tested with motors and high speeds, but another cheap way to build ring magnets is by using magnetic spheres: https://ao2.it/en/blog/2018/05/31/low-cost-and-precise-rotary-encoder-magnetic-spheres
Maybe these are too big for your particular use case, but I wanted to share the idea anyways.
Ciao,
Antonio
LikeLike
Hi Antonio,
thanks, that’s really interesting. And yes, for my use case they are too big (or I did not find magnetic sheres small enough?)
Erich
LikeLike
Pingback: PiWars 2021 Virtual Conference | Ourduino - Arduino, Electronics and Programming
What strength (pull force in N or strength in gauss) is appropriate for magnets to be used to trigger the hall switches used in these encoders? Thanks
LikeLike
I really don’t know. I bought the magnets from AliExpress without specs, and they worked fine.
LikeLike
I don’t think it’s really critical, you’re going to be alternating polarity, so as long as they’re not way too weak (like the cheap aliexpress motor I mentioned above), I think almost anything will work.
LikeLike
I know that 3D printing is all the rage, but I can’t help but think this might be a good use case for laser cutting or NC milling. You could cut six notches around the edge of a disk to hold the magnets, and glue on a very thin sheet top and bottom.
Heh. And unrelated, a thought: when assembling the magnets, place a single magnet at the center of the disk with north pole facing. Then place three magnets “south pole in” in slots 1, 3, 5 — the attraction should hold them in place. Once they’re glued, flip the center magnet around to attract the “north pole in” magnets into slots 2, 4, 6. Would that work?
LikeLike
3D printing was the easiest thing for me, and at that time I did not had a CNC available. I still would do it with a 3D printer, because the easiest and fastest for me. Laser cutting would work too (plywood or PMMA).
And good thinking about the assembly, and yes, that will work 🙂
LikeLike