
Back in March 2017, NXP had rolled the MCUXpresso IDE starting with Version 10.0.0. With the intent to unify the SDK, LPCXpresso, CodeWarrior, Kinetis Design Studio and Processor Expert into one unified and integrated set of tools. V10.0.0 was a good start. The MCUXpresso IDE V10.0.2 in July was more of a smaller update, and the Pin and Clock configuration tools were not integrated, no added tool for peripheral configuration.
A week ago the MCUXpresso V10.1.0 has been released which shows where the journey is going: an free-of-charge and code size unlimited Eclipse based integrated set of tools to configure, build and debug Cortex-M (Kinetis, LPC and i.MX RT) microcontroller/processor based applications.

Clock Tool inside MCUXpresso IDE
I have used it for a week, and although many things are still new, I thought I’m able to give an overview about what is new.
Overview
I have used the MCUXpresso IDE this year in several projects and migrated successfully lecture class material to the new environment: it is free-of-charge, code size unlimited, based on the industry standard Eclipse IDE and GNU tools for ARM Cortex-M. The IDE and debug tools have been a step forward from the ‘legacy’ IDEs. The gap compared with the ‘old’ days using Processor Expert was that using the SDK requires a in-depth knowledge of the device. There are tools to configure pin muxing and (core only) clock configuration, but because are separate tools outside of Eclipse, they did not help much with the development flow. And the configuration tools stopped at the clock boundary to the peripherals, so still a lot of learning and coding had to be done on that level.
Now with the advent of the MCUXpresso IDE v10.1.0 release, things are moving into an easier and better development flow:
- The MCUXpresso Configuration tools are now integrated into the Eclipse IDE and work directly on the projects. I can stay inside Eclipse and do muxing, clocking and peripheral configuration along with building and debugging.
- It includes the ‘Peripherals’ tools which closes a gap in the ‘post-Processor Expert’ era.
- Better handling and extension of the MCUXpresso SDK: The SDK is the central software and driver delivery method, and the wizard in the IDE can now add/remove drivers or middleware from a project.
- Additional device support, including for the new RT family
- Bug fixes and many smaller features and improvements added, including extended documentation set
Installation
The IDE (Eclipse 4.6/Neon) setup is available from http://www.nxp.com/mcuxpresso/ide/download. I can keep the earlier version installed, as the new version can be installed side-by-side. The IDE build version is 589:

MCUXpresso IDE 10.1.0 b589 About Box
What’s new?
Obviously the integration with the MCUXpresso Configuration Tools (Pins, Clocks and the *new* Peripherals) tools is the big thing in that 10.1 release (more about this later).
Still, there are many smaller things which make working with the IDE an even better experience. I suggest you consult the release notes/documentation, but below are the things worthwhile to mention from my view:
Eclipse Marketplace Client
The IDE now integrates the Eclipse Marketplace plugin, so there is no extra step any more needed to install it (see “MCUXpresso IDE: Adding the Eclipse Marketplace Client“). With the marketplace client, thousands of plugins are just a few clicks away.

Eclipse Marketplace Menu

Eclipse Marketplace Client
Now I can install e.g. doxygen/eclox for classroom environment from the marketplace client. In addition to the marketplace client added, XML, XPath and XSL editor and tools are now included.
Managed Linker Scripts
The managed linker scripts now generates _HeapSize, _StackSize, _image_start, _image_end and _image_size symbols, that way there is no need to manually add them (see “Tutorial: Porting BLE+NRF Kinetis Design Studio Project to MCUXpresso IDE“). This makes especially porting legacy projects which depend on these symbols easier.
Binary Utilities
The Binary Utilities menu has now a ‘ELF Information‘ menu item.

Binary Utilities: ELF Information
I can inspect any ELF/Dwarf files and it gives me information about which can be quite useful for ‘unknown’ binary files. The menu is using the GNU ‘readelf’ utility. Maybe not a ‘killer’ feature, but still useful.

ELF Information
Debug Probe Discovery
The MCUXpresso IDE nicely handles debug probe discovery (see my earlier article, debug probe setup in ‘normal’ Eclipse usually is huge pain). To trigger a new probe discovery in the V10.0 version of the IDE, I have used the trick to delete the existing launch (*.launch) configuration files. The new V10.1 version features a nicer way to do this: Holding the SHIFT key when clicking on ‘Debug’ in the Quickstart panel will force a new probe discovery:

Debug in Quickstart Panel

Debug Probe Discovery
Peripherals+ Viewer
The Peripherals+ Viewer shows the peripheral register details as renderings in the Memory view. Previously I faced sometimes issues if a peripheral was not clocked because it was not possible accessing the memory: now this seems works nicely in V10.1:
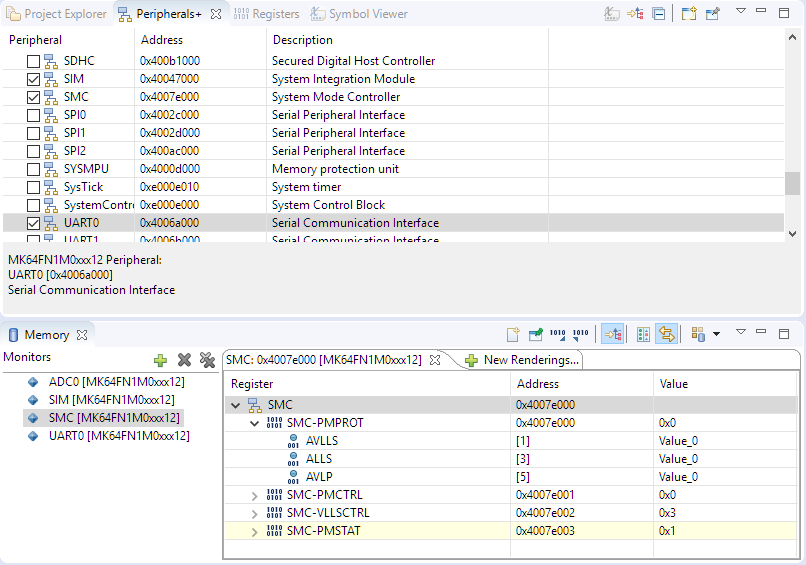
Peripherals Viewer
Semihosting
I have avoided semihosting in the past as much as possible, as it causes far too many problems. One thing is usually that it will block the target if there is no active debug session which is really a bad thing. The updated SDK now includes hard fault handlers so the target can continue running if no debug session is present. In the project wizard, I can choose if I want to use the UART or semihosting:

Project Configuration Options
More options are ini the advanced project settings:

Advanced Project Options
I still prefer real UART or USB CDC, but that changes makes semihosting less nasty. But still: I don’t like printf() :-).
GNU Tool Chain
The GNU toolchain for ARM has been updated to version 6 update 2. For all the C++ lovers this includes the latest C++ dialects:

GNU C++ Options
The new compiler did not create any problems with the pilot projects I have tested so far. I observed some code size reduction which is a good thing, but I’m not using the highest optimization levels anyway.
i.MX RT Support
Another exciting thing is that the MCUXpresso IDE supports the i.MX RT. The NXP i.MX RT is a ‘crossover’ processor which can cross the gap between a microcontroller system (say ARM Cortex-M4F running at 180 MHz) and an Embedded Linux System. I have ordered the RT1050-EVK board (ARM Cortex-M7 running at 600 MHz with 512 KB SRAM 🙂 ) to see how well this will fit a new advanced embedded computing course. Once I have that board and the time to use it, I plan to report back.

NXP i.MX RT1050 SDK

i.MX RT1050 in Wizard
MCUXpresso SDK
A bigger part of the changes are the things around the MCUXpresso SDK. NXP delivers all their software and drivers in the form of SDK packages (zip files with all the files plus an XML file with manifest information which is consumed by the IDE). With the release of the new IDE, the MCUXpresso SDK on https://mcuxpresso.nxp.com has been updated too. The SDK dashboard informs about the updates available.

MCUXpresso SDK Dashboard
The web site is accessible within the IDE too. After downloading the SDK packages, I can drag&drop them into the ‘Installed SDK’ view (same workflow as in 10.0). While it is recommended to upgrade to the latest and greatest SDK version, it nicely works with the older version too, so I’m not forced to do an upgrade.

Installed SDKs
The view shows the installed SDK and manifest version, together with different icons so I can easily see what SDK version is used.
So the new IDE 10.1 supports the new 2.3.0 SDK versions, and I still can continue using the IDE 10.0 with the earlier SDK versions in parallel, because the SDK default folder mechanism supports different versions too.
💡 I have a few critical research projects running with the SDK 2.3.0 and the MCUXpresso IDE V10.1, and I have used both the new SDK and IDE in parallel without any issues.
From the installed SDK’s I can create new projects or import example projects.

SDK Wizard
If using the 2.3.0 SDK, I can now add/remove middleware components:

SDK with Middleware
What is really cool is that I can add/remove components after I have created the project. For this I can use the context menu on the project or the ‘Manage SDK components’ button:
Manage SDK Components Icon
It shows a dialog in which I can change my settings:

Managing SDK Components
💡 Of course if I have used a middleware or driver in my project, it won’t affect my user code, it will add/remove the SDK drivers and components. Removing a middleware afterwards might still need some tweaking and worked fine for me.
Configuration Tools
The MCUXpresso Configuration tools and SDK are replacing Processor Expert (see “NXP MCUXpresso Software and Tools with Clocks Tool“). So far the ‘Pins’ and ‘Clocks’ were available as ‘standalone’ tools, and using the tools with Eclipse was cumbersome and complicated. Now things are much easier and simpler.
There is now the new ‘Peripherals’ tool, and all of them are integrated into the MCUXpresso Eclipse IDE. They are available with multiple views under the usual menu Window > Show Views:

MCUXpresso Configuration Tools Integrated in Eclipse
The Project Explorer View has now a new button for the configuration tools. I can click on the button or on the small triangle to select a dedicated tool:

Project Explorer View with Configuration Tools Button
This opens a custom perspective e.g. with the Pins tool. The Pins tool is responsible to manage the pin mapping and muxing and the electrical characteristics:

Pins Tool in MCUXpresso IDE
The cool thing is that the tool is able to extract the configuration data stored in the source files and places a .mex file into the project:

Configuration .mex File
The information is stored in a special format inside the source files:

Muxing Information
So if the project has been managed with the configuration tools as the SDK examples and projects, the tools are able to extract and keep up that information. With ‘Update Project Code’ the source files get updated:

Update Project Code
The same way I can change and update the clocking of my device. The Clocks tool in the MCUXpresso suite of tools is responsible for the core and bus clocking:
Clock Tool inside MCUXpresso IDE
The Clock tool has a cool graphical interactive and clickable clock tree view (see above). Configures the clocks of the core up to where the clocks are routed to the peripherals, but not the clock settings *inside* the peripherals, e.g. the generated baud rate of the UART.
This is the job of the a new member in suite of MCUXpresso Configuration tools: the Peripheral tool:

Peripheral Tool Perspective
With this the Peripheral tool closes a gap left after the discontinuation of Processor Expert. While the three tools can be used independently, they do a cross checking. As shown in the above screenshot, the Peripheral tool informs me that I using the UART1 but have not muxed it yet in the Pins tool. In Processor Expert all this was very tightly coupled, and as a result this slowed down Processor Expert especially for larger projects. Keeping things separate might sound like a backward step, but to me it makes sense: that way things can be managed and worked on separately too. Additionally this will enables using the tools with multiple users in a version control system, something which is not possible in Processor Expert.
I’m missing a few peripherals like RTC or DMA in the Peripherals tool, but compared to ‘bare’ SDK coding the Peripheral tool is a huge step forward. And the MCUXpresso IDE Eclipse integration of the configuration tools was something I have missed from the beginning, and now things are coming together :-).
Summary
The MCUXpresso IDE v10.1 comes with a lot of smaller extensions and features making it even more useful as before. What is a huge step forward is the MCUXpresso Configuration Tools integration: no need to step outside of Eclipse to change pin assignments or changing the clocks. With the Peripheral tools finally I have a tool to configure the SDK instead digesting all the SDK header files. I’m using the tools now for two pilot projects (a robotic and a communication application), and getting more and more familiar with the workflow. If there is any interest, I could come up with a series of tutorials. If you cannot wait: the included documentation for the IDE/Config tools is pretty decent and a good starting point too ;-).
Happy MCUXpressing 🙂
Links
- Download link: http://www.nxp.com/mcuxpresso/ide/download
- MCUXpresso IDE V10.1.0 available: https://community.nxp.com/community/mcuxpresso/mcuxpresso-ide/blog/2017/11/16/mcuxpresso-ide-v1010-now-available
- MCUXpresso IDE V10.0.0: https://mcuoneclipse.com/2017/03/28/mcuxpresso-ide-unified-eclipse-ide-for-nxps-arm-cortex-m-microcontrollers/
- MCUXpresso IDE V10.0.2 update: https://mcuoneclipse.com/2017/07/15/mcuxpresso-ide-v10-0-2-updated-eclipse-based-ide-for-lpc-and-kinetis/
💡 PS: In “MCUXpresso IDE: Installing Processor Expert into Eclipse Neon” I described an approach to install Processor Expert into Neon (or Oxygen). That approach worked in 10.0 (although not supported), but *not* in 10.1 because of a plugin conflict.

Thanks for the writeup, very informative as always. Looking forward for the report on the iMX RT kit :).
LikeLike
MKL27Z256xxx doesn’t seem to be supported in the peripherals tool.
Changing packages in the pins tool causes an error that doesn’t go away even though the correct package is shown.
Seem to be no way to disable debug console when using the new project wizard.
LikeLike
Hi Brad,
I quickly checked, and indeed it seems that only MKL27Z32xxx4 and MKL27Z64xxx4 seem to be supported in the peripherals tool today. As the data files are stored on a server, I hope/expect that more parts will be supported going forward.
LikeLike
Hi Brad, not sure which debug console you mean?
LikeLike
Thanks for posting! You already heard my discovery about how the new version breaks Processor Expert, so I’m probably not going to be able to use the new tools for a little bit. I’m using the standalone clocks tool and the graphical interface is something that’s been needed for a long time – and I like that it’s pretty good about telling you what consumes each clock. I hope someday they can expand that diagram to show peripheral clocks.
The i.MX RT is interesting but what I want is more powerful low pin count devices. Atmel has a 300 MHz Cortex-M7 in a 64-pin LQFP that I’ve been drooling over. I keep hoping NXP will put out something to match it. BGA packages are tough for small volume applications, and I need board flex and vibration tolerance. My dream part would be a 48-LQFP with a bunch of fast serial interfaces and as much RAM as can be crammed in there, but I don’t see that happening anytime soon.
I know you don’t like printf(), but I’ve gone the other direction with a couple of my bigger projects. My serial debug console has a bunch of performance tweaks, prints timestamps intelligently without cluttering up the display, shows the FreeRTOS task each line came from, and uses ANSI color codes. I love it. I’d never use it on a small project, but its great for complex systems where you really need to be able to see the complete sequence of events.
LikeLike
Maybe I should have been more specific about my printf() rant: The rant is about the standard library printf() which is bloated, usually allocates tons of memory and the main reason for stack overflows. What I’m using in my projects is a more embedded microcontroller friendly version of printf: https://mcuoneclipse.com/2014/08/17/xformat-a-lightweight-printf-and-sprintf-alternative/
About the lower pin count packages: yes, I share the same desire: BGA devices are really nasty, so a small breakout board which could be soldered on another board would be an option. That EVB board is reather expensive and huge, I’m wondering if someone will come up with a smaller and more affordable version so it could be used in a low volume production run.
LikeLike
Many thanks for this article Erich. I hope these guys are paying you for this; you’re a great evangelist for their tools.
Looking forward to porting an PE project into MCUX soon! 🙂
LikeLike
Cool. Getting usable now. I’ll think about doing a project in it now that it’s got some closure. Of course, the problem now is porting your stuff into it 😉
This is bundling FreeRTOS (V9) in it. Do you know if they’ve put the hooks for any of the RTOS trace tools in there? If so which one(s)? I see they have a middleware option of emWin now (They push this on some LPC parts) which would lead me to think they might have put the Segger hooks into it.
LikeLike
Hi Randy,
it provides hooks for FreeRTOS+Trace, means you can use it with Segger SystemView and Percepio tracealyzer. But the first thing I usually do is to replace the FreeRTOS version in the SDK with the McuOnEclipse one, as that port includes several fixes and extensions, plus enabling trace is a matter of turning on a define in the configuration. I have it running now as well on FreeRTOS v10 (see https://mcuoneclipse.com/2017/12/09/new-freertos-v10-0-0-amazon-segger-systemview-and-percepio-tracealyzer/) while the SDK still is on the older v9.
LikeLike
sounds like a plan to me… thanx!
LikeLike
Hello, Erich
Congratulations! Such a great article! I’m a Processor Expert fan, but I think there is no way for NXP to come back to it, since SDK Peripherals Tool completes the set of code initialization tools and no doubt that SDK generates less init code compared to Processor Expert, although it does not have the famous, convenient and helpful “Methods”, but the SDK API is well documented and is not difficult to use and understand.
What is the best method to use complex stacks like USB or LWIP, for example? I still see that, for such cases, the easiest way to go is to clone a demo code, reuse it and modify it according to the application. Clock, Pins and Peripherals Tools still can be used in these cases, but in a template project and then you can copy and paste the generated code.
LikeLike
I’m not sure I agree with the ‘well documented’ assertion. My experience has been that the documentation is inconsistent in quantity and quality, ugly (it’s all auto-generated from Doxygen or a similar tool with little cleanup), and the in-documentation examples can’t be trusted.
I think the biggest problem is that the level of detail provided in the documentation is not consistent with the level of abstraction provided by the components. For a simple example, take the WDOG chapter. It neglects to say what the watchdog timer is or what it does, what modes it works in, what the lock mechanism is, or how the windowing works.
At the moment I want to set up the WDOG so that it doesn’t run in STOP mode. The API docs say there’s a boolEnableStop field in struct wdog_work_mode_t that “Enables or disables WDOG in stop mode.” Is that “enable the WDOG to run in stop mode” or “enable the WDOG to enter stop mode”? PEx has had this ambiguity before, where ‘enable DMA in debug mode’ enables the disable flag, or vice versa.
Next, where does wdog_work_mode_t go? We have to skim through the section to see that it’s a member of struct wdog_config_t, then we have to scroll back up a page or two to see that WDOG_Init() takes a wdog_config_t parameter.
If you’re already intimately familiar with the hardware, you can look at the examples and use the docs as a reference to work backwards to help figure out what’s going on, but you’d go insane trying to write something from scratch using only the API docs.
Doxygen is a great tool for producing documentation if you take the time to actually add information and structure things appropriately. I think the main thing the API documentation accomplishes is giving the appearance to management that there’s a lot of documentation, when it’s mostly useless fluffl like “enum wdog_clock_prescaler_t { kWDOG_ClockPrescalerDivide1 = 0x0U, kWDOG_ClockPrescalerDivide2 = 0x1U, …}” – obvious, useless, and it doesn’t tell you where it goes.
This isn’t a new phenomenon. I started a job 20 years ago where I inherited bookcases of CDRL-mandated documentation binders that were just this sort of auto-generated junk. I doubt any developer on that system had ever referred to them. But at least they weren’t presented to the end user as legitimate documentation.
LikeLike
I have to agree with you. Doxygen in general gives lousy documentation largely because the people who are writing the code (who put the stuff that doxygen uses) aren’t the right people to write user facing documentation. And you really don’t want that level of crap in your source files anyway.
What you get is basically a 30,000ft (or M) view of the structure of the code without actually telling you anything about how to use it. What it means is that you have to be able to go to the code to figure out what it’s doing really anyway. But you can at least get pointed to the existence of it (if that’s all you get).
LikeLike
Doxygen is a great tool to explore ‘unknown’ code, but only if it has decent comments too. Just running doxygen over a bunch of files with useless comments does not generate anything useful, I agree. In the past there were dedicated documentation teams which have put together good documentation (for me, the HC11 documentation was one of the best ever). These days everything seems to be a copy-paste of older reference manuals, and API documentation is minimal or only the one writing the API might be able to understand it 😦
LikeLike
I should have been more clear about the documentation (will update that part): I was referring to the IDE and config tools documentation, not to the SDK documentation. The SDK documentation indeed looks more like a bunch of minimal doxygen generated documentation (nothing against doxygen, but if it is used for’having some documentation is better than having no documentation’ there is indeed no value). The series by Jay Carlson (see https://mcuoneclipse.com/2017/11/19/exploring-a-microcontroller-and-software-and-tools-for-the-next-project/) has some insights on this aspect too.
LikeLike
I am pleased that the Kinetis KE0x family is now supported in MCUxpresso, as well as the KE1x; this means we should be able to use a single IDE for all our current projects.
However, so far I’ve spent 1-1/2 days getting a working KDS KE06Z project just to compile under MCUxpresso – admittedly part of that was the CMSIS / register changes, but there’s so much difference in the two IDEs it’s incredible!
Maybe simple projects are not so hard, but our projects have a proprietary bootloader which means the actual project needs to link that bootloader code, be relocated in FLASH, have a checksum added, and many other requirements that are challenging with the managed script and other IDE changes.
And then there’s all the “slightly different version features / bugs” – for example I’ve just discovered that a copyright text string is being optimized out in the 10.1, but it wasn’t in the 10.0 MCUxpresso! I’ve had to add “–require-defined=OPERATIONALcopyright” to the linker commands to resolve it.
I guess this is why I rarely ever update my software tools, once they are working.
LikeLike
Same story here – changing tools is a lot of pain. I’ve also got a copyright string (plus a hidden version in case anyone skims through with a hex editor) and as a cross-platform fix I just memcpy it into a RAM buffer at startup so it’ll never get deadstripped.
LikeLike
I think this is because of the new GNU toolchain. That the linker dead-strips unused objects has been a struggle all the time with the GNU linker, and the ‘used’ attribute does not help in all cases. Artificially using things (e.g. using it with a pointer) is one way to deal with it.
LikeLike
Probably it is the linker which removes some objects you are not using? Might be because the compiler/linker version is upgraded.
LikeLike
I’ll have to keep an eye out for that dead stripping if the behavior has changed from CW10. I use an auto-start mechanism in some of my projects, where a macro adds an entry for a module’s entry point to a special section and the startup code scans the section and calls all of the auto-start functions. The linker has to be able to force inclusion of all objects in that section. I was never able to do that automatically with the HCS08 linker.
I use the same mechanism for my shell commands. Each shell function is declared using a macro that adds its name, function pointer, options, and description to a table. It lets me make the shell modular without a lot of defines – if I want file manipulation commands in my shell, I just add the appropriate .c file to the project and they get linked in and show up in the ‘help’ list. So far it all seems to be working in MCUX, but I’m not using the same toolchain for all projects.
LikeLike
It definitely has changed from CW10. This has been always kind of floating in the gcc compiler versions, and CW10 is using a really old one. The later GCC versions are much more agressive.
Btw, nice and cool way to build up a shell!
LikeLike
Oh … and why is there a tiny little exclamation indicator on the project icon in project explorer? It looks like it’s giving me a warning, but I can’t see any way to query and find out what is wrong 😦
LikeLike
Not sure. I wrote something about these icon decorators in general here: https://mcuoneclipse.com/2012/07/30/icon-and-label-decorators-in-eclipse/
There is an icon decorator in case the MCU is not assigned in the project. Plus if you import a project, you have to have the SDK for it installed, otherwise it will complain about it too.
Maybe this is the case here?
LikeLike
Erich,
Do you know about how the linkscript/etc decides the name for the files it creates? I made an original “TEST2” project, later renamed the project within MCUXpresso, later copied to a new project, different name … but that “TEST2” still lingers in the build file names!
example: TEST2_PGTbuild_memory.ld
I’ve explored all the settings I can within MCUXpresso and can’t find where to change it (I suppose I could edit the “.project” files but I don’t really want to do that)
LikeLike
Hi Ian,
it seems it takes it from the project name plus the configuration name. You can see the name it is using inside the project settings: Project > Properties > C/C++ build > Settings > Tool Settings > MCU Linker > Managed Linker Script.
If I rename the project and do a Project > Clean, that file name gets changed to for me.
LikeLike
Thanks Erich. You’re right I see the name there but it appears that it’s not “always” what is used. One project I just checked showed the desired name but was still using TEST2… as the actual name – even doing “clean”, deleting the TEST2 build files and then building, just re-created the TEST2 files.
I just toggled off / on the “use managed linker”, and that project now is using the name it says it would use – no idea if that is a fix every time but at least I have somewhere to check and try now.
It’s so much easier to copy / paste an existing project than to create from empty every time, and it so nearly works perfectly – it’s just a bit hard to discover the places where it doesn’t quite work 😉
LikeLike
Hello, Erich
I just installed MCUXpresso v. 10.1.0 to play with Config Tools. I don’t know why Peripherals Tool does not appear for me (only peripherals.c and peripherals.h files). I have MCUXpresso v. 10.0.2 installed in my computer as well as SDK v. 2.2. When I first opened MCUXpresso v. 10.1, all SDK v. 2.2 that were in MCUXpresso v. 10.0.2 were automatically installed in the new workspace.
At first, I thought SDK v. 2.3 and v. 2.2 might be conflicting with each other. So I uninstalled SDK v. 2.2 from the workspace and tried it again. No way!
The SDK I’m trying to use is SDK v. 2.3 for MK64FN1M0 and the board used is FRDM-K64F.
Regards,
LikeLike
Hi, Erich
Forget about it! I noticed that I have to manually add Peripherals window.
But I have another issue now: PIT does not show in the list of MK64FN1M0 peripherals.
LikeLike
Hi Marco,
I’m using the MK64FN1Mxx12, and the PIT register shows up for mi in the Peripherals+ view? Not sure what is different on your side? I’m using the SDK_2.x_FRDM-K64F 2.3.0.
LikeLike
Hello, Erich
It is the same SDK as mine, but for me PIT doesn’t show up.
I opened a discussion in NXP Community and Alice Yang from NXP confirmed that PIT is also missing in Peripherals View on her side too:
https://community.nxp.com/thread/465857
Strange to say the least!
Regards!
Marco Coelho
LikeLike
Hi Marco,
oh, I see. I was thinking it is about the Peripherals+ tools (the tool to see the Periopherals in the debugger/IDE on the target), not the ‘Peripherals’ tool to initialize the PIT. That’s indeed missing in that other tool.
LikeLike
No problem, Erich!
LikeLike
Pingback: MCUXpresso IDE V10.1.0 with i.MX RT1052 Crossover Processor | MCU on Eclipse
Pingback: Debugging the Teensy 3.6 with Eclipse MCUXpresso IDE and CMSIS-DAP LPC-Link2 | MCU on Eclipse
Hi Erich!
I am starting a project for Kinetis KV5 processor. I have been working for a while in Code Warrior environment (both Classic and Eclipse based). I also did some minor projects in Kinetis Design Studio and it worked very well for me, using FatFS, FreeRTOS and so on via Processor Expert is excellent.
Processor Expert tool is the only reason why I chose the Freescale/NXP processor and not the other manufacturer. I am pretty confident that Processor Expert will speed up the development process.
Do you think it is worth switching to MCUExpresso for this particular project? Of course I will do my own research about this, but maybe you have some thoughts? If choose on environment it will be hard to change it.
By the way thank you for your articles and tutorials, your web page is an incredible source of knowledge.
LikeLike
You are welcome, glad to hear that my articles are helpful 🙂
I have used the TWR-KV58F220M with KDS only (see https://mcuoneclipse.com/2016/06/24/first-steps-arm-cortex-m7-and-freertos-on-nxp-twr-kv58f220m/). Keep in mind that Processor Expert has been discontinued by NXP, and it is possible to install it into MCUXpresso IDE 10.1 because of plugin incompatibilities with the new MCUXpresso Configuration tools. So moving to MCUXpresso IDE 10.1 means burning bridges and going full blown SDK v2.x. The good thing is that this route is supposed to be supported by NXP.
LikeLike
Pingback: Flash-Resident USB-HID Bootloader with the NXP Kinetis K22 Microcontroller | MCU on Eclipse
Pingback: MCUXpresso IDE: Installing Processor Expert into Eclipse Neon | MCU on Eclipse
Hello Erich,
I must update a my old project based on kinetis MK64 over proprietary board, few years ago, developed by MCU CW 10.6 with large use of PE components (usb, uart, spi, i2c, ADC, DAC, CRC, RTC, several timer and, finally, read/write on flash by a custom bootloader program).
Now my hope is migrate to MK66 device (double flash and 180MHz of clock) but… PE is lost!
I have appreciate your last acrobatics to merge PE with SDK, but at now, what do you suggest me? Develop entire project interfacing with the new SDK API or try to use almost all old code merging this with PE over SDK (as your article https://mcuoneclipse.com/2017/03/25/tutorial-using-eclipse-with-nxp-mcuxpresso-sdk-v2-and-processor-expert/)?
I am very perplexed…
LikeLike
Hi Antonio,
unfortunately NXP stopped developing Processor Expert. As you have read, I have made some efforts for a compatbility layer which works fine for some of my projects. But I never will be able to carry on for all the peripherals.
So what I do is to stick as much as possible with the ‘older’ devices which are still supported by Processor Expert because things are much easier that way.
As for the K66, I’m affraid that probably the best way is that you restart from scratch and learn the SDK and develop your application again :-(.
LikeLike
Hello Erich,
trying to init the LPTMR peripheral on MCUXpresso 10.1.1 builded around a kinetis k66 device, i have noted the absence of LPTMR component also if this peripheral is activated by “manage SDK components” and also if the fsl_lptmr.c/.h files are presents on drivers folder. I think “don’t worry” because i can use anyway the API functions described on fsl_lptmr.h… but, how i can intercept the IRQ handler to, for example, increment a timer-marker variable on every timer-overflow interrupt?
LikeLike
You have to put your IRQ handler into a function named LPTMR0_DriverIRQHandler(). See \startup\startup_mk66f18.c
I hope this helps,
Erich
LikeLiked by 1 person
TNX Erich,
i noted if i write the new (and re-named) LPTMR0_IRQHandler() as my ISR, the compiler dont make exception because the original ISR is attributed as ((weak)), and work 🙂
LikeLike
Hello Erich,
i ask me if exist a macro to enable/disable lite interrupts on MCUXpresso IDE, like a CriticalSection(Enter/Exit) of PE…
LikeLike
Hi Antonio,
The IDE does not provide anything like this, it would be the SDK. The MCUXpresso SDK comes with CMSIS, but to my understanding there is no such nice critical section handling as in Processor Expert. It only has things like __enable_irq() and __disable_irq(). The simplest way would be that you use the Macros/Code from Processor Expert in your code.
LikeLike
Pingback: Overview of MCUXpresso IDE v10.2.0 | MCU on Eclipse
Pingback: MCUXpresso IDE: Adding the Eclipse Marketplace Client | MCU on Eclipse
Pingback: Porting Processor Expert Projects to MCUXpresso IDE | MCU on Eclipse
Pingback: Investigating ARM Cortex® M33 core with TrustZone® – Using the Pins Config Tool | MCU on Eclipse