
Using that 50 Watt laser machine (see “Getting Control over a 50 Watt CO2 Laser Cutter from China“) for several weeks now, I have added a few upgrades to the machine.

Magnets
Alignment Tools
To better align items on the honeycomb, I have cut out an alignment helper from 5 mm plywood. With that I have found out that I really have a 39.5×39.5 cm cutting area and not 40×40 cm. Maybe I can adjust this with moving the zero position.

Alignment helper
Measuring the height of the honeycomb bed, I noticed that the left lower corner was 1 mm off. Fixed that with a 1 mm washer. Added plastic zip ties to keep the honey comb in place.

Honeycomb fixture
Magnets
To tie down the wood properly to the honeycomb, I have added strong magnets to keep things down.
Strong Magnets
Works ok, but if the wood is deformed I need a different solution (see later in this post).
Water and Air Tubes
Originally the air and water tubes are just like this on the back side:

Air, water and power
While not really necessary, adding proper protectors makes look more professional :-):

water and air inlets
Front Door Stops
As the machine lid is hitting metal on metal, I added two small buffers to the bottom part to absorb the energy when closing the lid:

lid upgrade
Lights
The default illumination was not enough for me, and hard to see things while cutting because of the tinted window (the two white stripes are the reflections of the lamps on the ceiling):

Original illumination
I added 4 LED stripes with a total of 600 Lumen to the inside of the cover:

24V LED Array
That makes the view to the cutting area better:

Upgraded cutting area
High Voltage Wire
The red laser tube high voltage wire was very close to the water pipes:

Laser Tube High Voltage Connection
So I moved the water inlet tube away:

High Voltage Wire
Later I added some protection for the water tubes here too:

Tube Protectors
Additionally the wire got an extra black protection tube and better fixture tot he tube:

Extra High Voltage Wire Protection
The wires for the lights got a better fixture too:

Cable fixture
Water Chiller
That one for sure is the biggest upgrade I did. My workshop is not air-conditioned, and I saw that with cutting material the cooling water warmed up to 30°C, so I had to stop using the machine.
The original laser tube cooling is with a small aquarium pump with no active cooling. I tried the usually tricks with using ice packs to cool the water, but this all was really messy :-(.

First improvised laser tube cooling
I looked at the usual PC CPU cooling system, but this would have been rather messy too. An alternative would have been to use aquarium chiller systems which still needs an external water tank.
I asked around and checked many forums on that subject. What I ended up was adding an industrial cooling chiller (yes, again from China). I considered the CW-3000, but that one only has passive (fan) cooling so would not be good enough as the room temperature can be up to 30°C. I decided for the CW-5000 which is commonly used for laser tube cooling. So here is now the shiny (and overpowered) cooling engine:
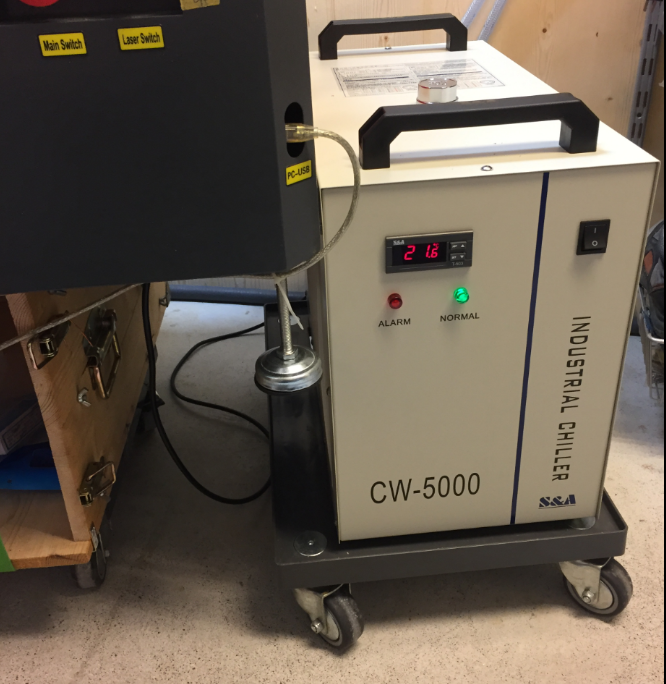
CW-5000 Chiller
It has an internal pump and water tank, can run in ‘intelligent’ mode (cooling temperature based on environment temperature) or ‘static’ mode (cooling to a given temperature). Yes, that one looks huge and usually is designed for laser tubes up to 100 Watts, but I did not find any good and smaller alternative. But who knows, maybe a next machine will need that extra cooling power :-).

Water Chiller Backside
The tubing has been a bit challenging because of different diameters. The chiller uses 10mm tubes, but the laser had 8 mm ones. To connect the different tubes, I had to 3D print a custom connector:

Water Pipe Reduction
This now connects the two different diameters. I plan to replace the original flexible tubes, but for now it works fine with no leakage.

Tube Connectors
Dealing with Plywood
I had some issues keeping down larger pieces of plywood. From the hardware store I organized heavy brackets which not only allow me to keep the material down, but serve as well as alignment tool.

Keeping down Plywood
Safety
Ah, yes: safety first. I still did not add a reed contact to shut down the laser if someone would open the lid. But added other safety measures:
Luckily I did not had to deal with fire yet (except a really, really tiny one 😉 ), so I have now a small water pump which can easily extinguish a small fire, of course only after shutting down the machine. For a bigger emergency I have a (powder) fire extinguisher ready, but that would be rather bad if I ever have to use it.

Fire Extinguisher
I always run the laser with the lid closed, but still I feel better wearing laser protection glasses. So I organized some special CO2 light protection glasses. Not sure how well protecting they really do for $20 from China, but I feel that might be better than nothing.

CO2 Laser Light Protection Glasses
Summary
Over time I have added a few things which make that machine more effective or more safe to run. The biggest thing for shure is the water cooling system. There might be other DIY solutions, but really I did not want to mess around with ice cubes or anything like that. Overkill? Yes, for sure. But that’s a laser cutter as well :-).
What else I have in mind?
- Laser cutter machine stand: Right now the machine is sitting on top of box with wheels. Need something better/higher. Something to put the cutting material/chiller/air pump etc inside
- Air pump: I’m not happy with the wiring and the location of the pump, and I would like to turn it on/off.
- Cover (reed?) switch: for safety reasons I want to be able to turn on the laser only if the cover is closed
- Water cooling and air tubes: replace the original (soft) ones with more durable tubes
- Air: now the ventilator of the machine uses the room air and blasts it out the window. I’m thinking about installing a second tube to get air from the outside, probably to the hole in the bottom of the machine.
So far I’m really happy, and I wish I would have more time on the weekends to operate the machine. But the lecture work has a higher priority for now. And if you have your own ideas and experience updating such a laser machine, let us all know with posting a comment!
Happy Updating 🙂

Erich: Cool stuff! I recently stumbled upon this article
https://snijlab.nl/nl/n/443/de-betere-sleufverbinding
It shows a really cool way to make “The better slot connection” (thank you Google Translate). You may have already seen this technique, but it was new to me. You might find it useful on future projects!
LikeLike
Oh, there’s also this mother lode (referenced from the snijlab.nl article): https://makezine.com/2012/04/13/cnc-panel-joinery-notebook/
LikeLike
Hi Robert,
thanks for sharing these links. Yes, I have seen some of these, and I have used one of the special ‘tabbed’ one with acrylic material too. Some of the joints in the joints in https://makezine.com/2012/04/13/cnc-panel-joinery-notebook are things I have to try out, so thanks again!
LikeLike
For future enhancements, have you considered a nitrogen gas assist? If I understand correctly, by displacing the O2, you don’t get scorch marks.
LikeLike
Interesting thought. I have seen nitrogen gas assist for (high power) metal cutting with CO2 lasers, but not for wood.
LikeLike
I wasn’t sure that nitrogen would help with cutting wood, but I found a few posts online that said it does prevent burning and scorching. If you can trust what you read on the internet, evidently it doesn’t require a high flow, just enough to displace the O2. Seems plausible.
LikeLike
Yes, it sounds very plausible. I did not had any issues with burning except for material too thick and too strong (mea culpa!), and scorching is not that bad (or even can make a nice effect).
I don’t have nitrogen around, so it might be too much of an effort for too little of impact. But maybe others have some experience and can share it?
LikeLike
We’ve got dry chemical extinguishers around the shop at the doorways, but I also keep a couple of CO2 extinguishers closer to the equipment because they don’t make a mess. There’s also one Halon 1211 bottle and a larger one of Halon 1301 but neither of those can be refilled anymore and I wouldn’t count on them working after so many years without service, but if CO2 doesn’t do the job I’m probably not going to want to stick around and fight a fire myself anyway.
One of these 50w laser cutters is at the top of my wish list. No real justification for it yet, but someday…
LikeLike
Yes, Halon would be ideal, but hard to maintain or get. The one I have is a dry chemical one (will be a big mess if I ever have to use it, but better than nothing).
As for the justification for the laser cutter: I really did not had one too, except just curiosity 🙂
LikeLike
Great improvements !!! You are smart!!!
1. Have you tried using a painting tape to fix it?
2. Points from any, even cheap plastic should be protected, as they stop the wavelength of this laser (50 W). For metal lasers special glasses should be used. This is due to the wavelength of the laser.That is, if the plastic passed the wave, then it would not leave traces of the laser.
3. A good idea with plastic clips for a small diameter of water pipes.
LikeLike
1. Yes, I have used painting tape to fix items. It works for some items, but not for all.
2. Yes, agreed, they do the job as well to some level, but blockign the specific wavelength helps too 🙂
LikeLike
Hi, I’m new in the subject of engraving machines – but I’m seriously interested in that one. Of course because of its price:) . Can Iuse it for engraving bigger items than 40×40 cm, I mean using it with “open door” :)’? Is this ok for cutting 4 mm plywood, or engraving in wooden hangers? Can I use it for lacquered or painted wood?
LikeLike
Yes, you can use it for larger objects, but the cutting/engraving area is limited by 40×40 cm.
Cutting 4 mm plywood is working fine, but that depends on the type of plywood: the more layers you have, the harder it will be.
Engraving normal wood is fine too.
I would not use it with any painted wood, as this can create dangerous smoke depending on the color used.
LikeLiked by 1 person
Hi, I’m new to laser engraving & cutting and just got a pcs. of alu honeycomb. The honeycomb isnt painted in any way. As I’m using a small (12W) blue/violet laser is it usefull to paint the aluminium i.e. using a heat resistent black paint (as used for charcoals) ?
Thank you fot any hint, regards
Peter
LikeLike
You don’t need to worry about the heat in my opinion. The painting only would absorb more energy so less is reflected back to the material. In my opinion, you have to paint it at all.
LikeLike
Thank you Erich for sharing your experience. After reading about you on Hackaday I ordered exactly the same machine from the same seller. Just like you suggested I am using K40 Whisperer and Inkscape. Although I like sketchup very much and I use it for the model which i convert to PDF for the InkScape. I am using doPDF printer for the conversion. It all works very well. Cutting is amazing! So detailed and sharp I could not believe it.
I had to get a 110V->220V step up transformer however because they shipped 220V model and did not even warned me. But that is OK.
Engraving is giving me a hard time though. For some reason instead of gradient I am getting binary engraving with no middle tones. So the gradient bar on the dark half is uniformly engraved to the same depth and the light side is not even touched. I suspect I am doing something wrong, but can not find it. I have tried test files from thingverse too with the same failure. I would appreciate any advise.
Thank you very much
/pavel
LikeLike
Hi pavel,
in K40 Whisperer, use the Settings > Raster Settings menu and enable the Halftone option. That is probably the missing piece on our end.
LikeLike
Thank you Erich. How did I miss it? I will have to wait a little before I test it however. Last night the water pump failed and before i realized what was going on the tube overheated and sustained irreparable damage near ground electrode. It took less then a minute. I ordered a new tube and while waiting I decided to spend some time making flow meter with inflow and outflow temperature sensors. Your water cooler is absolutely justified.
LikeLike
Hi Pavel,
I’m so sorry to hear that! Yes, this was the kind of things I heard from others, and with the recommendation to have a reliable cooling system. That water cooler has flow sensors plus is temperature controlled, so solves that problem for me. Plus it is not such a mess as with the aquarium pump.
LikeLike
Pingback: Using a Laser Cutter and Engraver with Cellulose Acetate Sheets | MCU on Eclipse
Pingback: Using a 50 Watt Laser Cutter with tesa Laser-Labels | MCU on Eclipse
Pingback: Upgrading a Laser Cutter with Cohesion3D Mini and LCD | MCU on Eclipse
Pingback: Replacing a cheap Chinese CO2 Laser Tube | MCU on Eclipse