
We are creating a new course (PRG-G) at the Lucerne University. This course teaches C programming and is part of the new curriculum in EE (Electrical Engineering). Every student will receive a microcontroller board on an extension board as give-away, in a custom card box for the board and cable. To make things a bit more exciting, why not laser engrave that box? That gives me a perfect excuse to experiment with the laser cutter 🙂

Laser Engraved Card Box
Card Boxes
A laser cutter can be used (as the name indicates) for cutting materials. With reduced laser power or if the laser beam does not go through, it can engrave materials. So the idea is to use reduced laser beam power to engrave card box material.
We have 1mm card box material. Below a pile of foldable sheets for a total of 80 boxes:

Material for 80 boxes
Vector Engraving
The first idea was to use laser vector engraving with reduced power not to cut through the material, but to engrave writing and a logo. Below a first test enclosure with vector engraving (25 mm/sec @ 5% laser power):

Card Box Engraving
It did not cut through which was intended and was pretty fast (2.5 minutes). Round paths were fine, but some path showed laser head mechanical oscillation:

Cardbox Engraving Detail
The problem is that the air assist tends to blow out smaller pieces.

Card Box Cut Out Parts
Raster Engraving
The next version is using raster engraving: the graphics is put on the target line by line like a bitmap image. The upper line of text has been engraved with 150 mm/sec @ 5% laser power and nearly was cutting through. So I reduced the laser power to 3% for the lower part:

Cardbox Raster Engraving
Raster engraving takes longer. With 5% the writing is clear, but tends to cut out, and with 3% the look is not ideal neither.
So raster engraving was not ideal, and normal vector engraving did cut out things even with the lowest laser power I can use (2%).
Using Dashed Lines
The solution was to use dashed lines: that way the laser could cut through through and pieces or parts of the letters do not fall out. From the first design the amount of text has been reduced to have a cleaner look:

Design in Inkscape
K40 Whisperer V0.5 has been used to engrave the box:
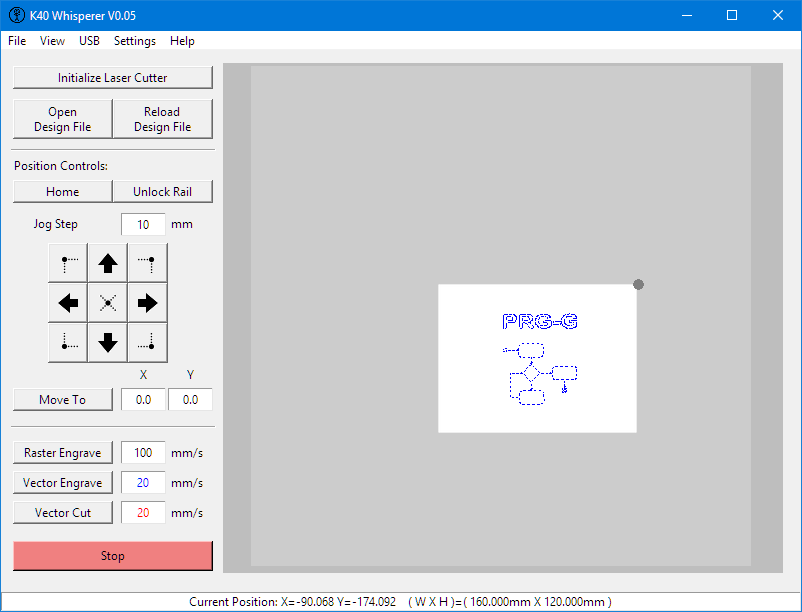
PRG-G Design in K40 Whisperer
Initially I used 2% laser power with 10 mm/sec and with this the laser was cutting through the material. So I had to increase the speed to 20 mm/sec: that way the laser did not cut through and the process was faster too (around 2 minutes for a box).
Below the first box engraved in the laser machine:

Design in Laser Cutter

PRG-G Engraving
Laser Engraved Card Box
Summary
Engraving card board material is one use of a laser cutter. With a combination of low laser power and moderate speed good results are possible without cutting through the material. To avoid cut-outs I have used dashed lines which worked fine and gives a distinctive look.
Happy Cardboxing 🙂

Wish my universities had given away stuff like this. Box looks awesome!
LikeLike
Thanks! I wish my university at that time would have done that too. But at that time computers and hardware was simply too expensive 😦
We do that for many reasons:
a) research indicates that students are more motivated and using the boards for their own experiments. That way they learn better and faster.
b) the kits can be less expensive and robust, as the intended usage time is not over many semesters. And with giving them away we don’t have to maintain an inventory, repair them (students can repair them if needed).
c) there might be a redesign after the first semester too, so there is a chance that we have to redo the boards. As we gave it to the students, we don’t have to recycle/scrap them
Plus you can recycle the card box too (we use special plastic boxes for other courses which are not a give-away).
LikeLike
Pingback: Tuning a Laser Cutter and Determining the Maximum Usable Laser Power | MCU on Eclipse
Nice work !
I’ll be a bit nerdy here but it seems your PRG-G activity diagram is broken (not UML 2.5 compliant) and it seems almost everyone is ignoring that.
Quote from JOT Vol 13, no 2. 2014, page 12, http://www.jot.fm/issues/issue_2014_06/article1.pdf () :
“Multiple control flows into the same UML action cause the action to be executed once, after all actions on the other ends of the control flows are finished, as if a join were used”
where we’d probably all expect an implicit merge instead of an implicit join.
I’m sorry but since someone told me about this common mistake, I can’t prevent myself from seeing it in any Activity Diagram I observe. Maybe now it’s your turn 😉
LikeLike
Hi Tim,
yes, it is not UML 2.5 compliant, and for example is missing as well the necessary labels. But this was because of keep it simple. And otherwise I always can say it was on purpose so students can find the mistake(s) :-).
Erich
LikeLike
I like your post. It’s a nice information about laser engravers. Thanks for sharing the post.
LikeLike
You are welcome, thanks for providing feedback! I plan to make more post especially about box design and engraving them with the laser cutter.
LikeLike
Pingback: Using a Laser Cutter and Engraver with Cellulose Acetate Sheets | MCU on Eclipse