
MQTT is a lightweight and broadly used internet protocol (see “MQTT with lwip and NXP FRDM-K64F Board“). And probably the majority of IoT applications today are using Mosquitto as server (or ‘broker’ in MQTT language). By default, Mosquitto is using a protocol without encryption. In “Introduction to Security and TLS (Transport Layer Security)” I have covered the basics and needs for encryption. This article is about how to enable Mosquitto and clients to use the TLS protocol.

TLS Handshaking with certificates and keys
Outline
This article walks though the basic principles and settings how to configure Mosquitto broker and MQTT client with the TLS (Transport Layer Security) protocol. TLS is the successor of SSL (Secure Sockets Layer), and is often used as combination of TLS/SSL. To use TLS between the broker and the client, a set of keys and certificates has to be generated and deployed, along with configuration settings on the broker and the client.
In this article I’m using the following set of software and tools:
- Broker: Mosquitto version 1.4.11 (build date 20/02/2017)
- Key and certificate generation: OpenSSL 1.0.2j 26 Sep 2016
- MQTT client: MQTT.fx 1.3.1
See “MQTT with lwip and NXP FRDM-K64F Board” about how to install the above tools. On Windows, OpenSSL gets installed with Mosquitto installer.
The steps are:
- Create a CA key pair
- Create CA certificate and sign it with the private key from step 1
- Create the broker key pair
- Create a CA certificate sign request using the key from step 3
- Use the CA certificate from step 2 to sign the request from step 4
💡 It is important that you run the openssl tool in administrator mode!

Running as administrator
On the broker, I need the following things:
- Certificate from the CA (Certificate Authority)
- Server certificate, signed by CA with its private key
- Server Private Key for decrypting of the incoming messages
1. Create CA Key Pair
Run as administrator the following command:
openssl genrsa -des3 -out m2mqtt_ca.key 2048
Options used (see https://wiki.openssl.org):
- genrsa: generate a RSA private key
- -des3: Using DES3 cipher for the key generation
- -out: specifies the output file name (.key)
- 2048: number of bits for the private key
which gives
C:\tmp\ssl>openssl genrsa -des3 -out m2mqtt_ca.key 2048
Generating RSA private key, 2048 bit long modulus
...................................+++
..+++
e is 65537 (0x10001)
Enter pass phrase for m2mqtt_ca.key:
Verifying - Enter pass phrase for m2mqtt_ca.key:
The pass phrase is used to protect the private key. The generated private file m2mqtt_ca.key looks like this and has both the private and public key:
-----BEGIN RSA PRIVATE KEY-----
Proc-Type: 4,ENCRYPTED
DEK-Info: DES-EDE3-CBC,F908DA05008A3132

alfCGiw0kcL7zfQvEBAE3gAs0o1IAbDtJpsJDok4Q9XlU+D8P8STQA0TFmhTCN1I
<more text here>
Lvme6Tl4b7kfFc3rvXf3tZwCVy8UOLzv9wbVdKwvwxnpm0ANKi8317vpbwb9Mrmy
-----END RSA PRIVATE KEY-----
2. Create CA Certificate
Next I’m creating a certificate for the CA, using the key pair I have created in step 1:
openssl req -new -x509 -days 3650 -key m2mqtt_ca.key -out m2mqtt_ca.crt
Options used (see https://wiki.openssl.org):
- req: certificate request and certification utility.
- -new: generate new certificate, it will prompt user for several input fields.
- -x509: create a self signed certificate.
- -days: specify the number of days the certificate is valid.
- -key: key file with private key to be used for signing
- -out: specifies the file name for the certificate (.crt)
This generates a certificate (m2mqtt_ca.crt). I have to provide an additional pass phrase for the PEM (container for multiple items, see https://www.hyperaffiliates.com/working-with-pem-files/) (note: I previously linked to how2ssl.com/articles/working_with_pem_files/, but this link is dead :-().
C:\tmp\ssl>openssl req -new -x509 -days 3650 -key m2mqtt_ca.key -out m2mqtt_ca.crt
Enter pass phrase for m2mqtt_ca.key:
You are about to be asked to enter information that will be incorporated
into your certificate request.
What you are about to enter is what is called a Distinguished Name or a DN.
There are quite a few fields but you can leave some blank
For some fields there will be a default value,
If you enter '.', the field will be left blank.
-----
Country Name (2 letter code) [AU]:CH
State or Province Name (full name) [Some-State]:Switzerland
Locality Name (eg, city) []:Lucerne
Organization Name (eg, company) [Internet Widgits Pty Ltd]:HSLU
Organizational Unit Name (eg, section) []:T&A
Common Name (e.g. server FQDN or YOUR name) []:ErichStyger-PC
Email Address []:mail@hslu.ch
As common name I give the name of my host PC (which is acting as CA for me). The generated certificate m2mqtt_ca.crt looks like this:
-----BEGIN CERTIFICATE-----
MIID6DCCAtCgAwIBAgIJAP8FtRqBHYWxMA0GCSqGSIb3DQEBCwUAMIGIMQswCQYD
<some more text here>
x9uEvaymIwyH7HNUOi9K3ycizDvCBSASPJ+XGHK/r6cPOybzNzTG6bLrg08=
-----END CERTIFICATE-----
On windows I can use the Certificate viewer to inspect it:

Windows Certificate Viewer
3. Create Mosquitto Broker Key Pair
Next, I’m creating a private key for the server (m2mqtt_srv.key) with:
openssl genrsa -out m2mqtt_srv.key 2048
Options used (see https://wiki.openssl.org):
- genrsa: generate a RSA private key
- -out: specifies the output file name (.key)
- 2048: number of bits for the private key
💡 Note that I’m not using the -des3 option, as otherwise the key will be password protected, and this password I would have to enter when I start the broker. Not something I want.
which gives
C:\tmp\ssl>openssl genrsa -out m2mqtt_srv.key 2048
Generating RSA private key, 2048 bit long modulus
........................++++++
..........++++++
e is 65537 (0x10001)
💡 If you get a “unable to write ‘random state'” in the output, make sure you run the command prompt as Administrator!
The private key file looks like this:
-----BEGIN RSA PRIVATE KEY-----
MIIEpAIBAAKCAQEA4PZ20QWql4IU0RFO6NCCqjQgWnXa3P8Coyy20tmc2bnfZBcY
<more text here>
ub3uwTWCLTbpHP8AueLJlTMWU/en88Ed4T2hXMRnzetmKWMsJ9XW3g==
-----END RSA PRIVATE KEY-----
4. Create Certificate Request from CA
That key we need to be certified, so we create a certificate request for it, and the certificate needs to be signed by the CA:
openssl req -new -out m2mqtt_srv.csr -key m2mqtt_srv.key
Parameters used (see https://wiki.openssl.org/index.php/Manual:Req(1)):
- req: certificate request and certification utility.
- -new: create new request file file
- -out: file name for the certificate signing request (.csr)
- -key: file name of the key to be certified.
which gives:
C:\tmp\ssl>openssl req -new -out m2mqtt_srv.csr -key m2mqtt_srv.key
You are about to be asked to enter information that will be incorporated
into your certificate request.
What you are about to enter is what is called a Distinguished Name or a DN.
There are quite a few fields but you can leave some blank
For some fields there will be a default value,
If you enter '.', the field will be left blank.
-----
Country Name (2 letter code) [AU]:CH
State or Province Name (full name) [Some-State]:Switzerland
Locality Name (eg, city) []:Lucerne
Organization Name (eg, company) [Internet Widgits Pty Ltd]:HSLU
Organizational Unit Name (eg, section) []:T&A
Common Name (e.g. server FQDN or YOUR name) []:ErichStyger-PC
Email Address []:mail@hslu.ch

Please enter the following 'extra' attributes
to be sent with your certificate request
A challenge password []:
An optional company name []:
I’m using ‘ErichStyger-PC’ because this is the machine which will run the broker.
This creates the m2mqtt_srv.csr (Certificate sign request) which looks like this:
-----BEGIN CERTIFICATE REQUEST-----
MIICzjCCAbYCAQAwgYgxCzAJBgNVBAYTAkNIMRQwEgYDVQQIDAtTd2l0emVybGFu
<more text here>
4PwJlZU81GN+fLwR01iTT6MhwjbKNouPjtMsI30SpPZxhNIBrsSYdESD/Abp+g3j
Bv0=
-----END CERTIFICATE REQUEST-----
5. Verify and Sign the Certificate Request
The last step is to sign the server request through the CA to get the broker certificate:
openssl x509 -req -in m2mqtt_srv.csr -CA m2mqtt_ca.crt -CAkey m2mqtt_ca.key -CAcreateserial -out m2mqtt_srv.crt -days 3650
with the following options (see https://wiki.openssl.org):
- x509: certificate display and signing utility
- -req: a certificate request is expected as input
- -in: input file for the certificate
- -CA: specifies the file to be signed
- -CAkey: CA private key to sign the certificate with
- -Cacreateserial: the serial number file gets created if it does not exist
- -out: output file name
- -days: how long the certificate shall be valid
which gives:
C:\tmp\ssl>openssl x509 -req -in m2mqtt_srv.csr -CA m2mqtt_ca.crt -CAkey m2mqtt_ca.key -CAcreateserial -out m2mqtt_srv.crt -days 3650
Signature ok
subject=/C=CH/ST=Switzerland/L=Lucerne/O=HSLU/OU=T&A/CN=ErichStyger-PC/emailAddress=mail@hslu.ch
Getting CA Private Key
Enter pass phrase for m2mqtt_ca.key:
The output file looks like this:
-----BEGIN CERTIFICATE-----
MIIDBjCCAe4CCQDiXkSmKAt/BDANBgkqhkiG9w0BAQsFADBFMQswCQYDVQQGEwJD
<more lines here>
OezkwBv5rqmBajfux+DasTjXg1Cfe7QcRdSYrnwLMYAIjkpT8LCGvQLxdxjyF8X3
2LWbh6UQSitcVw==
-----END CERTIFICATE-----
Files
This has created the following files:
m2mqtt_ca.crt  : CA Certificate
m2mqtt_ca.key  : CA key pair (private, public)
m2mqtt_ca.srl  : CA serial number file
m2mqtt_srv.crt : server certificate
m2mqtt_srv.csr : certificate sign request, not needed any more
m2mqtt_srv.key : server key pair
Inside the Mosquitto installation, create a folder (e.g. ‘certs’ if it does not already exist) and copy the following files we have created in the previous steps:
- <mosquitto>/certs/m2mqtt_ca.crt
- <mosquitto>/certs/m2mqtt_srv.crt
- <mosquitto>/certs/m2mqtt_srv.key
The ca.crt belongs to the client (needs to be copied there).
Mosquitto Configuration
Using a text editor, open and edit <mosquitto>/mosquitto.conf:
💡 Under Windows, make sure you have administrative rights to edit the configuration file. Best if you edit a copy outside of the c:/program files folder (where Mosquitto is installed by default) and copy the file into the program file folder.
Use port 8883 as default port:
# =================================================================
# Default listener
# =================================================================

# IP address/hostname to bind the default listener to. If not
# given, the default listener will not be bound to a specific
# address and so will be accessible to all network interfaces.
# bind_address ip-address/host name
#bind_address

# Port to use for the default listener.
port 8883
Specify the certificate and key files:
# -----------------------------------------------------------------
# Certificate based SSL/TLS support
# -----------------------------------------------------------------
# The following options can be used to enable SSL/TLS support for
# this listener. Note that the recommended port for MQTT over TLS
# is 8883, but this must be set manually.
#
# See also the mosquitto-tls man page.

# At least one of cafile or capath must be defined. They both
# define methods of accessing the PEM encoded Certificate
# Authority certificates that have signed your server certificate
# and that you wish to trust.
# cafile defines the path to a file containing the CA certificates.
# capath defines a directory that will be searched for files
# containing the CA certificates. For capath to work correctly, the
# certificate files must have ".crt" as the file ending and you must run
# "c_rehash <path to capath>" each time you add/remove a certificate.
#capath
cafile C:\Program Files (x86)\mosquitto\certs\m2mqtt_ca.crt

# Path to the PEM encoded server certificate.
certfile C:\Program Files (x86)\mosquitto\certs\m2mqtt_srv.crt

# Path to the PEM encoded keyfile.
keyfile C:\Program Files (x86)\mosquitto\certs\m2mqtt_srv.key

# This option defines the version of the TLS protocol to use for this listener.
# The default value allows v1.2, v1.1 and v1.0, if they are all supported by
# the version of openssl that the broker was compiled against. For openssl >=
# 1.0.1 the valid values are tlsv1.2 tlsv1.1 and tlsv1. For openssl < 1.0.1 the
# valid values are tlsv1.
tls_version tlsv1
Mosquitto
I launch my local Mosquitto broker with the -c option pointing to the modified configuration file:
mosquitto -c mosquitto.conf -v
This launches now the broker listening on the secure port 8883:

mosquitto listening on port 8883
Server Certificate for the Client
In the client (e.g. MQTT.fx) I have to load the certificate of the server:
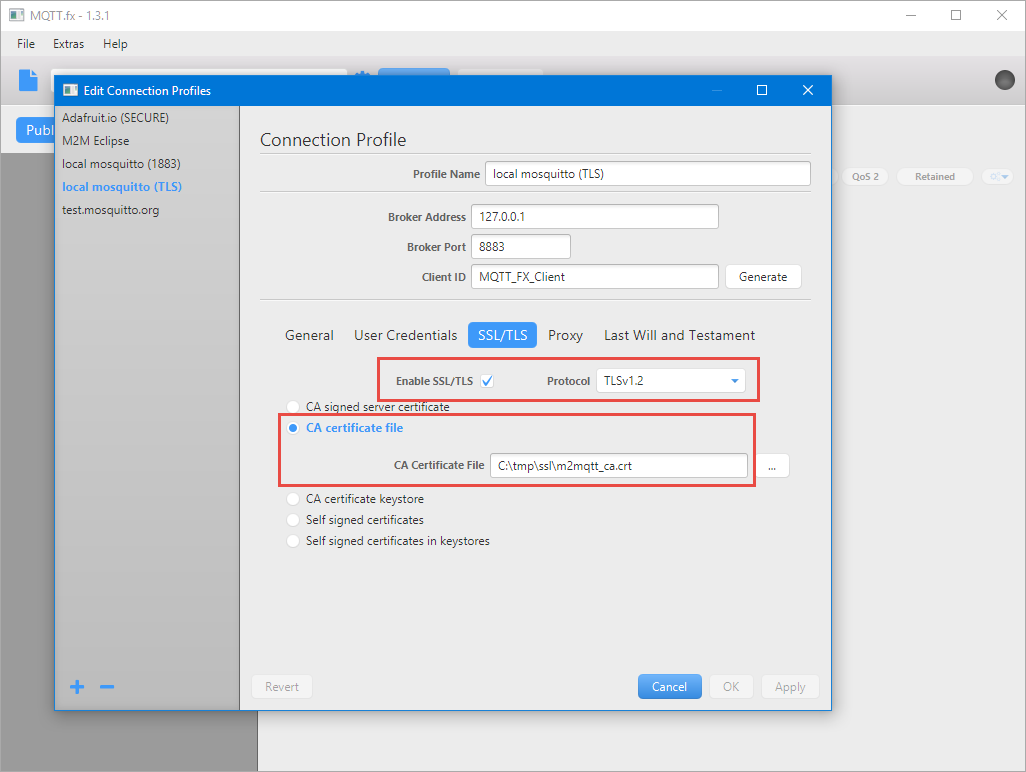
Configured Server Certificate in MQTT Client
With this, I can connect to the broker in a secure way:

Client connected to Port 8883 to broker
Summary
Establishing a secure TLS connection to the Mosquitto broker requires key and certificate files. Creating all these files with the correct settings is not the easiest thing, but is rewarded with a secure way to communicate with the MQTT broker.
In a next article I plan to write about how to use TLS with lwip and the mbedTLS library on the NXP FRDM-K64F board.
Happy Encrypting 🙂
Links
- Introduction to Security and TLS: Introduction to Security and TLS (Transport Layer Security)
- Wikipedia: https://en.wikipedia.org/wiki/Transport_Layer_Security
- Mosquitto with FRDM-K64F Board: MQTT with lwip and NXP FRDM-K64F Board
- Mosquitto manual page about configuring SSL/TLS support: https://mosquitto.org/man/mosquitto-tls-7.html
- Mosquitto configuration file syntax: https://mosquitto.org/man/mosquitto-conf-5.html
- Adding SSL/TLS to Mosquitto: http://www.steves-internet-guide.com/mosquitto-tls/
- MQTT over SSL/TLS: http://www.embedded101.com/Blogs/PaoloPatierno/entryid/366/mqtt-over-ssl-tls-with-the-m2mqtt-library-and-the-mosquitto-broker
- SLL for secure MQTT: http://rockingdlabs.dunmire.org/exercises-experiments/ssl-client-certs-to-secure-mqtt
- Behind the Scenes of SSL Cryptography: https://www.digicert.com/ssl-cryptography.htm

Awesome, very useful, looking forward to the next post!
LikeLike
Hi Carl,
thanks 🙂
Yes, I plan to work on that part. I have it mostly working in lwip RAW mode using a TCP connection. What is not working fully yet is receiving TCP packets through the callbacks: they are asynchronous and I need to buffer them somehow. I have found some mbedTLS examples, but they are all using sockets which I don’t use/have in bare metal mode. So still a long way to go (and then to write the article of course). But that’s what long Easter weekends are for, right? 😉
Erich
LikeLiked by 1 person
Hi Erich,
I had worked on adding lwIP 2.0 support to KSDK/MCUx. Its Socket RTOS API is OK, but Bare-metal lwIP TCP RAW API is night-mare.
I hardly suggest to try the FNET bare-metal TCP/IP stack (http://fnet.sourceforge.net/).
It has user friendly bare-metal Socket API. Also, it contains k64+FNET+mbdtTLS server example which may be used as a reference.
Based on my experience with many other stacks (RTCS, lwIP, uIP, InerNitche), the FNET is the most comfortable and easy to use for bare-metal (IMHO).
Your BLOG is in my favorite one. Thank you,
Andrey Butok
LikeLike
Hi Andrey,
yes, I have found that using the bare metal RAW API is not that bad in lwip, once I get used to it. I faced more problems with its socket API, probably more because of the not complete MCUXpresso SDK intergration of the network driver and lwip (wrong priorities, things not reentrant, etc). I hesitated to use the FNET stack (btw, contratulations to that excellent work and I hear very good things about it) because my projects are using microcontrollers from different vendors, and here lwip is a perfect fit as it is available for many ports.
Thanks!
Erich
LikeLike
Pingback: Easter Weekend Apple Juice Brined Pulled Pork Smoked on Beech Wood | MCU on Eclipse
Pingback: Tutorial: Secure TLS Communication with MQTT using mbedTLS on top of lwip | MCU on Eclipse
Pingback: Tuturial: mbedTLS SLL Certificate Verification with Mosquitto, lwip and MQTT | MCU on Eclipse
Hi! This is probably the clearest guide to create self-signed certificates to use with mosquitto I’ve found. However there is a doubt I haven’t been able to solve: what commonName do I have to insert? I tried with my Raspberry hostname and it seems to fail (I get a SSL:CERTIFICATE_VERIFY_FAILED error), and I’ve read no IP should go in commonName. I’ll have my broker in a Raspberry Pi behind a router with port forwarding. Thanks
LikeLike
Yes, I had the same question about what I should use for the common name. I have used the host name as it used by the DNS and had no problems with it?
LikeLike
What about accessing from outside the same network? Host for sub/pub will be my router public IP, and hostname my internal network name, so they won’t match, isn’t it?
LikeLike
The name needs to match the server (see https://support.dnsimple.com/articles/what-is-common-name/). Maybe try it out if it works with a wildcard?
LikeLike
I finally setup a ddns, and it works like a charm. Thank you so much for this guide and your answers, they were the key to complete my task
LikeLike
🙂
LikeLike
Thanks very much.
Also can you please explain , how to enable websockets over MQTT using libwebsocket .
It will very helpful to me.
Thanks,
Archunan K
LikeLike
Hi Archunan,
I have not enabled websockets because currently the NXP Ethernet driver is not reentrant for usage with FreeRTOS. See https://mcuoneclipse.com/2015/10/28/tutorial-lwip-with-the-freertos-and-the-freescale-frdm-k64f-board/ for a tutorial using websockets, but using the older SDK V1.x
LikeLike
Im using ubuntu facing the same problem.
LikeLike
Can you try with Windows? I believe it must be a Linux problem.
LikeLike
actually it is not about windows. when I run server and broker on the same machine(Ubuntu) it works. but when the client is on another machine the error appears. I think it must be the Common Name. Do you know how should I configure it? I read the links you gave above but didn’t improve.
thanks
LikeLike
I had created all the keys and certificates on Windows. My client was working on Windows and NXP FRDM-K64F (ARM Cortex-M4 based device) with Mosquitto brokers running on Windows, Linux/Raspberry Pi and I have not faced such an issue. That’s why I think something is different if you create the keys/certificates on a non-Windows machine?
LikeLike
Hi Erich,
I followed the steps you outlined above to configure TLS for my Broker (Server). My setup is as follows
CA and Broker running on a raspberry-PI (hostname: ram-pi2)
Client: running on a MAC
I generated the certificates on my Mac. But they were configured with CN=ram-pi2 (as outlined in your steps 2 and 4), so that they can be installed on my pi. I updated the mosquitto.conf on my pi and restarted mosquito. When I connect to the broker on PI from my Mac using the ca.crt, I see the following error
On PI
1503429691: mosquitto version 1.4.14 (build date Mon, 10 Jul 2017 23:48:43 +0100) starting
1503429691: Config loaded from mosquitto.conf.
1503429691: Opening ipv4 listen socket on port 8883.
1503429691: Opening ipv6 listen socket on port 8883.
1503429839: New connection from 192.168.0.113 on port 8883.
1503429839: OpenSSL Error: error:14094418:SSL routines:SSL3_READ_BYTES:tlsv1 alert unknown ca
1503429839: OpenSSL Error: error:140940E5:SSL routines:SSL3_READ_BYTES:ssl handshake failure
On Mac client
Client mosqsub/9688-Rams-Macbo sending CONNECT
Error: A TLS error occurred.
Can you help point what I may be missing here?
Thanks for the step by step guide
Ram
LikeLike
Hi Ram,
what I see is that it reports an unknown certificate authority. As I don’t have a Mac, I cannot replicate your setup. Can you try the same thing with Windows as I did in this article?
I hope this helps,
Erich
LikeLike
Hi, I’m doing a similar thing with my mac (client) connecting to my Pi. Have you resolved this?
LikeLike
Unfortunately, I don’t own a Mac computer, so I cannot comment on this. Except that it should be possible?
LikeLike
Hi
I have followed steps mentioned here
From admin cmd I run
mosquitto_pub -h My-PC -t house/bulb1 –cafile c:\mosquitto\Certs\m2mqtt_ca.crt -m “test message” -p 8883
Error: A TLS error occurred.
on mosquitto broker (running in another Admin Cmd )
1521133084: New connection from fe80::5c3d:1f97:91f7:93a9 on port 8883.
1521133084: Socket error on client , disconnecting.
I did following steps to make sure
– firewall is not blocking TCP traffic
– tried different port number
– running mosquitto_pub on separate admin cmd (console window) ,
– running mosquitto_pub on vmware
– can establish mqtt communication without TLS/SSL
– make sure that password file is not mentioned and password required is off
– make sure allow allow_anonymous true (i.e default but tried explicitly set)
I ran following command and don’t get any error except
openssl s_client -showcerts -connect My-PC:8883
Protocol : TLSv1.2
Verify return code: 18 (self signed certificate)
I have tried ruining client from other machine on network, vmware, and running mqtt.fx but no luck
Any help would be appreciated.
following is exception log from mqtt.fx
018-03-15 16:51:30,652 ERROR — MqttFX ClientModel : Error when connecting
org.eclipse.paho.client.mqttv3.MqttException: MqttException
at org.eclipse.paho.client.mqttv3.internal.ExceptionHelper.createMqttException(ExceptionHelper.java:38) ~[org.eclipse.paho.client.mqttv3-1.1.0.jar:?]
at org.eclipse.paho.client.mqttv3.internal.ClientComms$ConnectBG.run(ClientComms.java:664) ~[org.eclipse.paho.client.mqttv3-1.1.0.jar:?]
at java.lang.Thread.run(Unknown Source) [?:1.8.0_131]
Caused by: java.net.SocketException: Software caused connection abort: socket write error
at java.net.SocketOutputStream.socketWrite0(Native Method) ~[?:1.8.0_131]
at java.net.SocketOutputStream.socketWrite(Unknown Source) ~[?:1.8.0_131]
at java.net.SocketOutputStream.write(Unknown Source) ~[?:1.8.0_131]
at sun.security.ssl.OutputRecord.writeBuffer(Unknown Source) ~[?:1.8.0_131]
at sun.security.ssl.OutputRecord.write(Unknown Source) ~[?:1.8.0_131]
at sun.security.ssl.SSLSocketImpl.writeRecordInternal(Unknown Source) ~[?:1.8.0_131]
at sun.security.ssl.SSLSocketImpl.writeRecord(Unknown Source) ~[?:1.8.0_131]
at sun.security.ssl.SSLSocketImpl.writeRecord(Unknown Source) ~[?:1.8.0_131]
at sun.security.ssl.Handshaker.sendChangeCipherSpec(Unknown Source) ~[?:1.8.0_131]
at sun.security.ssl.ClientHandshaker.sendChangeCipherAndFinish(Unknown Source) ~[?:1.8.0_131]
at sun.security.ssl.ClientHandshaker.serverHelloDone(Unknown Source) ~[?:1.8.0_131]
at sun.security.ssl.ClientHandshaker.processMessage(Unknown Source) ~[?:1.8.0_131]
at sun.security.ssl.Handshaker.processLoop(Unknown Source) ~[?:1.8.0_131]
at sun.security.ssl.Handshaker.process_record(Unknown Source) ~[?:1.8.0_131]
at sun.security.ssl.SSLSocketImpl.readRecord(Unknown Source) ~[?:1.8.0_131]
at sun.security.ssl.SSLSocketImpl.performInitialHandshake(Unknown Source) ~[?:1.8.0_131]
at sun.security.ssl.SSLSocketImpl.startHandshake(Unknown Source) ~[?:1.8.0_131]
at sun.security.ssl.SSLSocketImpl.startHandshake(Unknown Source) ~[?:1.8.0_131]
at org.eclipse.paho.client.mqttv3.internal.SSLNetworkModule.start(SSLNetworkModule.java:93) ~[org.eclipse.paho.client.mqttv3-1.1.0.jar:?]
at org.eclipse.paho.client.mqttv3.internal.ClientComms$ConnectBG.run(ClientComms.java:650) ~[org.eclipse.paho.client.mqttv3-1.1.0.jar:?]
… 1 more
2018-03-15 16:51:30,656 ERROR — MqttFX ClientModel : Please verify your Settings (e.g. Broker Address, Broker Port & Client ID) and the user credentials!
org.eclipse.paho.client.mqttv3.MqttException: MqttException
at org.eclipse.paho.client.mqttv3.internal.ExceptionHelper.createMqttException(ExceptionHelper.java:38) ~[org.eclipse.paho.client.mqttv3-1.1.0.jar:?]
at org.eclipse.paho.client.mqttv3.internal.ClientComms$ConnectBG.run(ClientComms.java:664) ~[org.eclipse.paho.client.mqttv3-1.1.0.jar:?]
at java.lang.Thread.run(Unknown Source) [?:1.8.0_131]
Caused by: java.net.SocketException: Software caused connection abort: socket write error
at java.net.SocketOutputStream.socketWrite0(Native Method) ~[?:1.8.0_131]
at java.net.SocketOutputStream.socketWrite(Unknown Source) ~[?:1.8.0_131]
at java.net.SocketOutputStream.write(Unknown Source) ~[?:1.8.0_131]
at sun.security.ssl.OutputRecord.writeBuffer(Unknown Source) ~[?:1.8.0_131]
at sun.security.ssl.OutputRecord.write(Unknown Source) ~[?:1.8.0_131]
at sun.security.ssl.SSLSocketImpl.writeRecordInternal(Unknown Source) ~[?:1.8.0_131]
at sun.security.ssl.SSLSocketImpl.writeRecord(Unknown Source) ~[?:1.8.0_131]
at sun.security.ssl.SSLSocketImpl.writeRecord(Unknown Source) ~[?:1.8.0_131]
at sun.security.ssl.Handshaker.sendChangeCipherSpec(Unknown Source) ~[?:1.8.0_131]
at sun.security.ssl.ClientHandshaker.sendChangeCipherAndFinish(Unknown Source) ~[?:1.8.0_131]
at sun.security.ssl.ClientHandshaker.serverHelloDone(Unknown Source) ~[?:1.8.0_131]
at sun.security.ssl.ClientHandshaker.processMessage(Unknown Source) ~[?:1.8.0_131]
at sun.security.ssl.Handshaker.processLoop(Unknown Source) ~[?:1.8.0_131]
at sun.security.ssl.Handshaker.process_record(Unknown Source) ~[?:1.8.0_131]
at sun.security.ssl.SSLSocketImpl.readRecord(Unknown Source) ~[?:1.8.0_131]
at sun.security.ssl.SSLSocketImpl.performInitialHandshake(Unknown Source) ~[?:1.8.0_131]
at sun.security.ssl.SSLSocketImpl.startHandshake(Unknown Source) ~[?:1.8.0_131]
at sun.security.ssl.SSLSocketImpl.startHandshake(Unknown Source) ~[?:1.8.0_131]
at org.eclipse.paho.client.mqttv3.internal.SSLNetworkModule.start(SSLNetworkModule.java:93) ~[org.eclipse.paho.client.mqttv3-1.1.0.jar:?]
at org.eclipse.paho.client.mqttv3.internal.ClientComms$ConnectBG.run(ClientComms.java:650) ~[org.eclipse.paho.client.mqttv3-1.1.0.jar:?]
… 1 more
2018-03-15 16:51:30,659 INFO — ScriptsController : Clear console.
2018-03-15 16:51:30,659 ERROR — BrokerConnectService : MqttException
LikeLike
Have you used my process with openssl to generate the certificates?
LikeLike
Yes I did
LikeLike
when I run mosquitto broker I don’t get
“enter pem passphrase:” prompt
if you want I can send you my open ssl generated files
LikeLike
I’m really not sure what you might be missing. Maybe you can switch to the same mosquitto version I’m using?
LikeLike
Hi Erich,
works like a charm with mosquitto 1.4.10 on raspberry pi 3 (and debian stretch with latest upgrades).
Thanks for sharing.
Clients are:
a: esp8266 — with NodeMCU (Arduino ‘PubSubClient’ Library for esp8266)
b: Android tablet and mobile phones — with MQTT Dash (from Vadim Mostovovy)
Access on both ports is possible. I use a local network with the esp8266 nodes as ensors and the Andriod MQTT Dash for accessing the Broker from outside. The WAN router connects external devices to the SSL port 8883. The nodes have actually SSL not built in.
LikeLike
“enter pem passphrase:” Which password to be entered ? I tried all passwords which i had given during certificate generation of server & CA.. For both , I am getting an error as: “Unable to connect (A TLS error occurred.)”
LikeLike
You need to enter the passphrase you have specified, not a password.
LikeLike
Hello,
At step 4 I am facing the following problem: “problem creating object tsa_policy1-1.2.3.4.1 6116:error:08064066:object identifier rountines: OBJ_create:oid exists:crypto\objects\obj_dar.c:698: error in req ”
Can you help me regarding this problem?
LikeLike
See https://github.com/openssl/openssl/issues/2795
LikeLike
hey! great tutorial but it didnt work. Not sure what I am doing wrong. How do I go about debugging it? The only difference i had was the server common name. In step 2, the common name i put was my computer name. For the server common name, i placed “test.mosquitto.org”. For the extra fields, i just pressed enter and skipped down. All the other entries in step 2 and 4 were different from one another.
Once I proceeded with step 5, i turned on the mqtt.fx client and put my PC name is the client name field. I placed the correct port # 8883 and tried to connect but as you guessed…it didnt work.
Any ideas?
Thanks in advance!
LikeLike
Were you able to communicate with your MQTT broker using another application, say from your host PC?
LikeLike
Yes. the simple mosquito eclipse paho client using basic commands without any security over 1883.
Do you agree with my Common Name choices in my earlier post?
Any ideas about debugging? I am using windows 7…
LikeLike
The names should not matter as long as they are correct and consistent. Is your client working with security enabled too?
LikeLike
Eric-
1- Lets say the name of my pc is “My-PC” and the server I want to connect to is “test.mosquito.org”. In step 2 of your tutorial, I would put “My-PC” in the common name? And in step 4, I would put “test.mosquitto.org” in the common name?
2- Then when I have completed the tutorial to step 5, I would open MQTT.Fx and use the signed ca.crt with the broker address “test.mosquitto.org” and use “My-PC” as the client name?
3- In step 4, when asked to add extra fields (optional password etc.) I just press enter and move along. I don’t bother putting a period there…is that ok?
4- I am skipping the part of your tutorial starting from the header “Files” all the way to “Mosquitto”. I jump past that part of the tutorial and move to the “Server Certificate for the Client”. Is that what you mean when you ask ” your client working with security enabled too?”
LikeLike
Can you add mosquitto_sub/mosquitto_pub with TLS for this demo, since mosquitto-clients are much useful in command line in Linux/WSL. Thanks.
LikeLike
You could could create functions for suscribe and publish and then use the shell interface to access it.
LikeLike
Thanks for posting this guide.
I have followed the guide to set up my MQTT broker with TLS. I am running my broker on Ubuntu which is running on an AWS EC2 server. When I try to run the MQTT broker I get the following error:
mosquitto version 1.4.15 (build date Tue, 18 Jun 2019 11:42:22 -0300) starting
Config loaded from /etc/mosquitto/conf.d/default.conf.
Opening ipv4 listen socket on port 8883.
Error: Unable to load server key file “/etc/mosquitto/certs/m2mqtt_srv.key”. Check keyfile.
I have ensured that my key and cert files are in the correct location. I used my hostname for the common name – is this correct?
If I remove the key and cert rows from my conf file I can successfully connect to the broker on port 8883 – however this is obviously not done over TLS/SSL.
I hope you can shed some light on my issues as this is my first time setting up an MQTT broker with TLS.
Thanks,
Gregor
LikeLike
Does that key file exist as shown in that error message? Otherwise I think the key might be encrypted in the wrong format, so double check this.
LikeLike
Hi,
Thanks for your response. I’ve checked that the key file exists as shown in the error message. The contents of my /etc/mosquitto/certs/ directory is:
m2mqtt_ca.crt
m2mqtt_srv.crt
m2mqtt_srv.key
I have changed my default.conf file to point to these:
# =================================================================
# Default listener
# =================================================================
port 8883
# —————————————————————–
# Certificate based SSL/TLS support
# —————————————————————–
cafile \etc\mosquitto\certs\m2mqtt_ca.crt
# Path to the PEM encoded server certificate.
certfile \etc\mosquitto\certs\m2mqtt_srv.crt
# Path to the PEM encoded keyfile.
keyfile \etc\mosquitto\certs\m2mqtt_srv.key
# This option defines the version of the TLS protocol to use for this listener.
# The default value allows v1.2, v1.1 and v1.0, if they are all supported by
# the version of openssl that the broker was compiled against. For openssl >=
# 1.0.1 the valid values are tlsv1.2 tlsv1.1 and tlsv1. For openssl < 1.0.1 the
# valid values are tlsv1.
tls_version tlsv1
I notice in the comments in the file, it says you must run c_rehash to add/remove a certificate. Could it be something to do with this?
The .conf file on my instance matches the one in the tutorial – with only the file paths changed to match where my certs are.
Thanks,
Gregor
LikeLike
So, by changing the paths to /home/ubuntu/m2mqtt_ca.crt and leaving the files here after they’ve been created now allows me to start the broker.
I’m now getting this error when trying to connect with my client (RPi running node-red):
OpenSSL Error: error:1408F10B:SSL routines:ssl3_get_record:wrong version number
Is this just an issue with how I’ve set up the client or is this still a server-side issue?
Thanks for the help so far, it has been invaluable as this is my first time setting up tls on a broker.
Thanks,
Gregor
LikeLike
See https://stackoverflow.com/questions/55085550/tls-wrong-version-number-with-openssl-1-1-1, maybe this is the same problem?
LikeLike
rehashing is necessary to update the internal data structures. A reboot usually does the same.
LikeLike
Hi Erich, thank you very much for this tutorial, it’s been really helpful. What happens when the CA expires? I’m concerned that if I had lots of devices, I would need to reload the renewed CA in all of them, is that correct? If this is correct, then I suppose the CA must be created with a rather long expiration, because updating it in potentially hundreds of devices would be a heck of a lot of work.
Cheers,
Diego
LikeLiked by 1 person
Hi Diego,
yes, that’s always the challenge with such devices: you have to update the certificates. But not only this: you will need to be able to update the devices with new firmware anyway, because new security issues might come up, or other vulnerabilities. Creating long expiration time for certificates does not solve the problem, it only let you think that you don’t need an update mechanism: but you need one for sure, including updating certificates. I hope this helps?
LikeLiked by 1 person
Thank you very much for your insight, it’s very much appreciated. I agree, a mechanism to upgrade firmware is certainly needed in all cases. Thanks again! All the best, Diego.
LikeLiked by 1 person