
There are many mergers going on in the industry, and one of the largest one was in 2016 the integration of Freescale Semiconductor with NXP Semiconductors, with both providing Eclipse based IDE’s to their customer base. Consequently, the company merger triggered a merger of the IDE’s, and last week NXP has released the result: the MCUXpresso IDE.
MCUXpresso IDE
MCUXpresso IDE Series
This article is part of a series to get up to speed using the new NXP MCUXpresso IDE. Published so far are:
- MCUXpresso IDE: Unified Eclipse IDE for NXPs ARM Cortex-M Microcontrollers
- MCUXpresso IDE: S-Record, Intel Hex and Binary Files
- MCUXpresso IDE: Adding the Eclipse Marketplace Client
- MCUXpresso IDE: Importing Kinetis Design Studio Projects
- MCUXpresso IDE: Installing Processor Expert into Eclipse Neon
- MCUXpresso IDE: Terminate and Disconnect a Debug Session
Overview
MCUXpresso is basically ‘LPCXpresso on steroids’ (see “Embedded World Nürnberg 2017 Impressions: MCUXpresso, Hexiwear, NTAG, LPC800-DIP and Alan Hawse”), supporting both NXP Kinetis and LPC devices (ARM Cortex-M0(+)/M4/M7), and it is built upon the feature set of LPCXpresso. From LPCXpresso it inherits the Pro edition option (with IDE email support and extended trace features), and as Kinetis Design Studio, it is free of charge and unlimited in code size. For existing LPCXpresso IDE users it brings unlimited code size (the free LPCXpresso IDE has a code size limit of 256 KByte) beside of all the extra features like MCUXpresso SDK support.
Traditionally, at the university we are using a combination of CodeWarrior for MCU 10.x, Kinetis Design Studio v3.2 and LPCXpresso v8.2. Because the new IDE both supports Kinetis and LPC devices, I plan to migrate the LPCXpresso and Kinetis Design Studio course material to the new MCUXpresso IDE. In this post I give a brief overview about some of the main features which think will be very useful. Other than that, I think the information below is useful for anyone upgrading either from LPCXpresso or Kinetis Design Studio to the new NXP Eclipse IDE.
Installation
The IDE is available from http://www.nxp.com/mcuxpresso/ide. Downloading needs a user account at NXP, but no other registration or activation is needed for the free and code size unlimited version.
Support for the free version is community based (http://www.nxp.com/mcuxpresso/ide/forum) as for Kinetis Design Studio and LPCXpresso. There is a Pro version available which adds one year IDE email based support plus extended trace support (an existing LPCXpresso Pro license is recognized by the MCUXpresso IDE too).
I have used the version 10.0.0 (Build 344):

MCUXpresso IDE v10.0.0
Compared to other IDE’s, the download size is rather small (576 MByte on Windows), and it is available on Mac and Linux too (I have it installed on Windows 7 and 10 so far). It installs all the debug probe drivers.
Documentation
I think tools should not need a manual, as they should be intuitive so you don’t need to read the documentation. On the other side, especially for new users or for advanced topics, having a look at the documentation is not a bad idea (even if it is only to avoid a ‘RTFM’ answer from the support :-)):
The help menu has an entry for the electronic documentation:

Help Contents
This shows all the help files:

Help Content
There is a direct link to the MCUXpresso IDE User Guide too:

MCUXpresso User Guide
The electronic IDE user guide is searchable, so this usually should give me what I’m looking for:
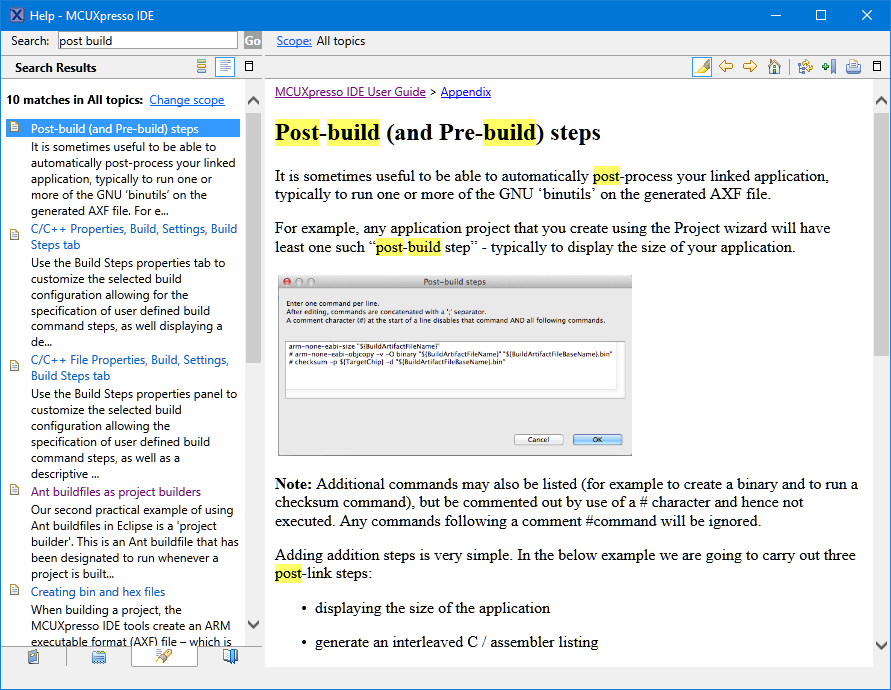
Help about post build steps
The documenation is accessible both from http://www.nxp.com/mcuxpresso/ide and from the installation folder of the IDE.
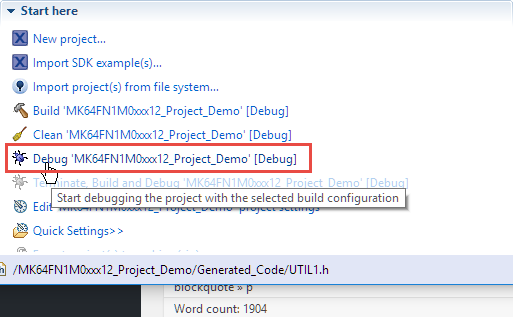
QuickStart Panel
As LPCXpresso, the IDE includes a Quickstart Panel which gives access to the most used functions:

Quickstart Panel
💡 I strongly recommend to use the Quickstart Panel, especially using the blue icon in there to start a debug session (more about this below).
Students typically are a bit lost with finding the project settings in Eclipse or how to do a build/debug. Using that panel will make things easier for them to find.
It includes the a ‘blue’ debug button to launch a debug session, and that’s the recommended way to start the debugger. The ‘blue’ one is present in the toolbar too.

Debug Toolbar Button
There is as well the default ‘green’ debug icon of Eclipse, but that one should only be used if I have a debug connection (launch configuration) configured, as the ‘blue’ one is able to automatically detect a debug probe and configure it automatically (more about this later).
MCUXpresso SDK
The IDE comes with legacy LPCOpen support for LPC devices. Everything else is data driven with the addition of MCUXpresso (formerly Kinetis) SDK.
I have to download the SDK for a device from https://mcuxpresso.nxp.com/ using the SDK Builder:

SDK Builder
When building a new SDK/Configuration, make sure that the MCUXpresso IDE is selected, so it can be used with the IDE:

MCUXpresso Configuration Setting
SDK Package Manager
In the IDE, there is a SDK package manager which is available under Window > Show View > MCUXpresso IDE:

MCUXpresso Installed SDKs view
The easiest way to import the SDK’s is to drag and drop the SDK zip file into that view:

Installed SDKs
The SDK package not only includes the driver sources files, but as well example projects and everything else the IDE needs to know about the device, for example toolchain support and debugger information.
By default, the SDK is used as a zip file. With this, the IDE extracts files from the zip and copies the files into the project. There is a workspace option to unzip the files to allow ‘linked files’ in the projects, but I do not recommend to use such linked files in projects.
From the ‘Installed SDKs’ view, I can directly open the Config and Builder page using a toolbar button:

Button to open SDK Builder Page
For the classroom setup I plan to download the SDK zip files and then pass it to the students so they can import the zip file(s).
New Projects
Projects can be created (as ‘new project’) or imported from the SDK examples:

New Project or Import Example Project
For new projects, I can select a device or board from the SDK Wizard:

SDK Wizard
In the next dialog I can choose what I want to use in the project:

SDK Wizard Options
In the next Advanced Projects settings I have options for the library and memory settings. Beside of the usual Newlib and Newlib-nano I have the choice of the Redlib, a proprietary library more optimized for embedded devices:

SDK Wizard Options
Importing example projects is very similar, except that I have the choice of which examples I would like to import:

SDK Example Importer
Using the previous SDK with the linked files were really hard (or even impossible?) to use, so I think students will very much like that new functionality.
Build System
MCUXpresso IDE uses the GNU Tools for ARM Embedded Processors version 5 (Q3 2016 release). The IDE is using the same project file format/build settings as LPCXpresso, so legacy LPC projects can be imported easily. Existing Kinetis Design Studio can be used with a few migration/porting steps.
💡 Kinetis Design Studio projects can be imported or migrated as the project format is different from the GNU ARM Eclipse one used in Kinetis Design Studio. I have ported several university KDS projects to MCUXpresso, but this is subject of a future article.
There is a ‘MCU settings’ panel in the project settings which tells the IDE the device used with the memory map:

MCU Settings
This information is used for the managed linker scripts: by default, the IDE creates and maintains the GNU linker script, with other settings to manage the libraries, heap and stack settings:

Managed Linker Scripts
Probably I will disable the managed linker script feature: the GNU linker files are really not that hard to read/write/use, and hiding the linker scripts behind this generator makes the object allocation not very transparent. But for inexperienced users, that’s certainly a useful feature.
Debug Probes
The IDE supports P&E probes (Multilink, …), SEGGER probes (J-Link, …) and the LPC-Link/LPC-Link2 (CMSIS-DAP) probes. So the NXP embedded OpenSDA circuit on Kinetis Freedom and Tower boards are supported with P&E, Segger and CMSIS-DAP firmware, the SEGGER and P&E commercial probes, the NXP embedded LPC-Link and LPC-Link2 probes. I have the IDE working with different Tower, Freedom and LPC boards and debug probes (J-Link EDU is missing on the picture below):

Boards and Probes
What is new for Kinetis Design Studio users: it supports the LPC-Link2 probe which can load either a CMSIS-DAP or Segger firmware (for LPC). CMSIS-DAP with KDS really never worked well, so now I can use the LPC-Link2 with CMSIS-DAP to debug the Kinetis K22 on our robots:

LPC-Link2 with CMSIS-DAP debugging Robot
So that would be a very affordable debug probe option as the LPC-Link2 is priced at US$ 20.
To debug the project, it is important to use the blue debug icon (and not the normal green one!). Use either the one in the toolbar:

Debug Button in the Eclipse Toolbar
or the one in the quickstart panel:
Debug Button in the Quickstart Panel
💡 Using the green one only works properly if I have a project selected, and a launch configuration available. Kinetis Design Studio works with the green debug button very well because the behaviour for the green button has been enhanced in that Eclipse distribution. MCUXpresso uses the ‘stock Eclipse’ green debug button which does not have that extension.
What is really cool is the probe discovery: When I start debug the project, it offers me to pick from any of the detected probes:
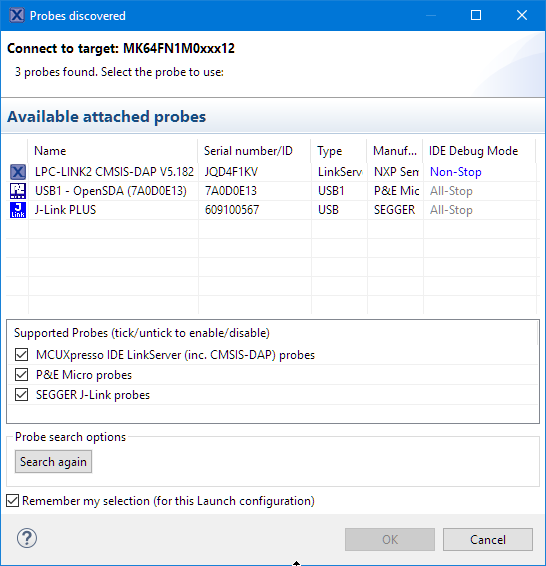
probes discovered
With this, it automatically creates the launch configuration file in the project root folder.
💡 In case I want to re-trigger a full probe discovery, I can delete the .launch files and it will recreate them.
That feature will be very useful for our classroom setup, where students debug from one machine multiple boards with multiple debug probes. This will be now much simpler and easier with the probe discovery.
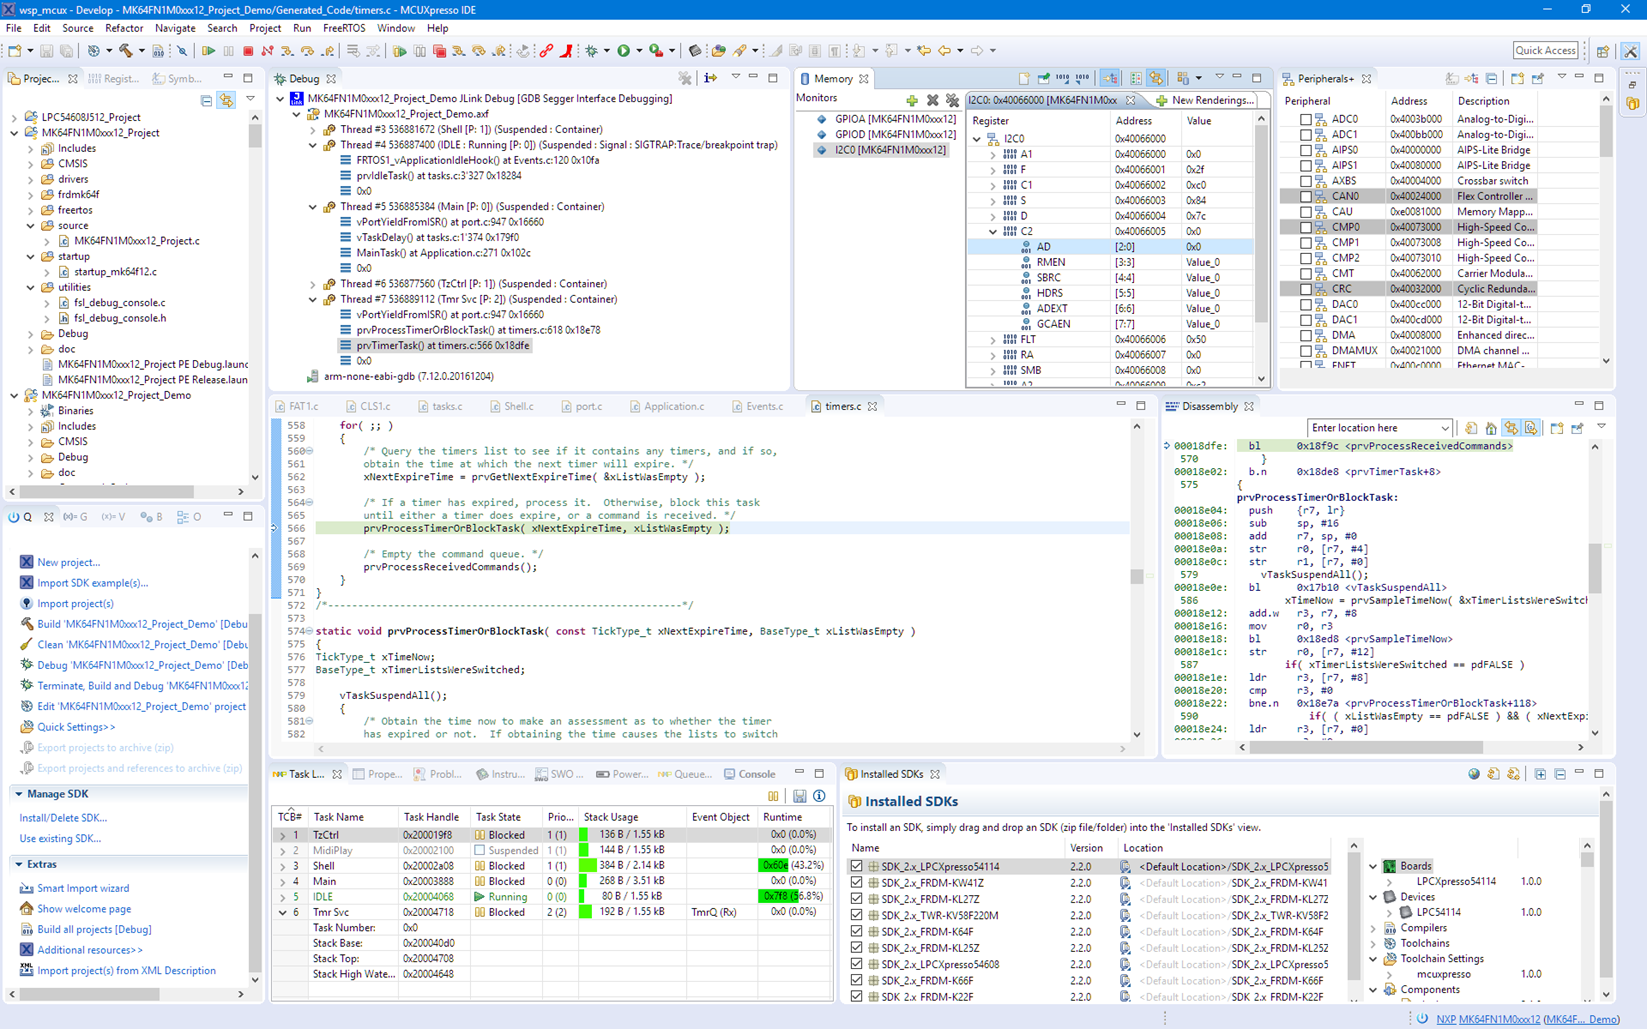
Develop Perspective
As in LPCXpresso (see “CodeRed Debug Perspective in Kinetis Design Studio“), the new IDE offers a ‘Develop’ perspective:

Debugging with MCUXpresso
Unlike in normal Eclipse where I would switch between ‘C/C++’ and ‘Debug’ perspectives, I can stay in a ‘Develop’ perspective. Especially on small laptop displays that unified perspective is a plus for the students too.
Global Variables
Normal Eclipse has a problem that it does not really show normal global variables (see “Variable Debugging with Eclipse Kepler“). Instead, the Expressions view had to be used (this has been a constant complain from the students too). MCUXpresso offers a ‘Global Variables View’ which solves that problem: I can browse and add global variables to that special view:

Global Variables View
Peripherals+ View
Kinetis Design Studio included the EmbSysRegView (see “Freescale CMSIS-SVD Register Files with Eclipse MARS and EmbSysRegView“) which worked well, but did not automatically use the target device SVD files. In MCUXpresso IDE there is the ‘Peripherals+’ view which basically extends the memory view:
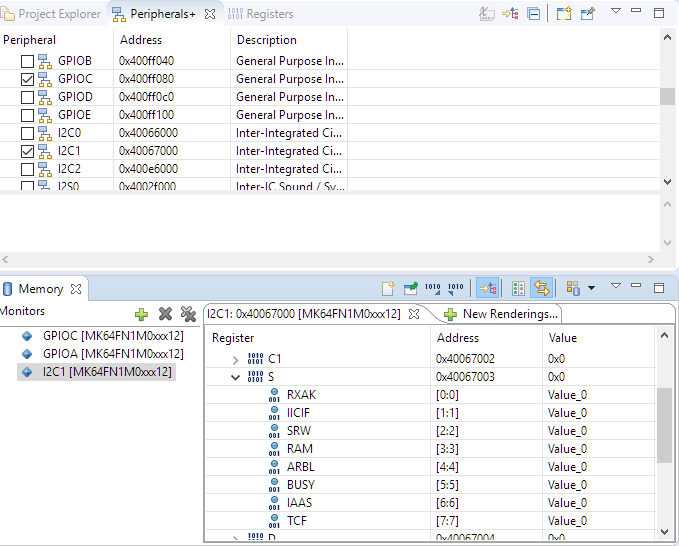
Peripherals View
I feel the EmbSysRegs view is somewhat more versatile and easy to use (but that’s probably only me?).
💡 A mistake I made with the Peripherals+ view was trying to inspect a peripheral for which the clocks were not enabled. I only can inspect peripherals which are clocked and accessible!
FreeRTOS
What I really like in that IDE is the support for FreeRTOS :-). All the debug connections (P&E, Segger and CMSIS-DAP) include FreeRTOS thread awareness:
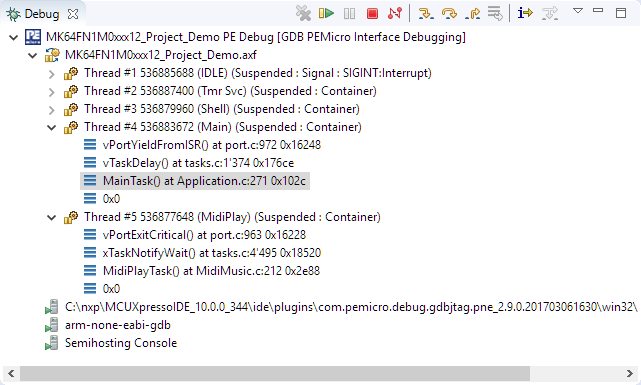
FreeRTOS Thread Awareness
Plus the IDE includes the NXP FreeRTOS Kernel views (see “FreeRTOS Kernel Awareness for Eclipse from NXP“) for Tasks, Heap, Timer and Queues:

FreeRTOS Task List

FreeRTOS Heap Usage

FreeRTOS Queues

FreeRTOS Timers
So far students had to load that plugin, now it is included in the IDE installation.
Summary
The MCUXpresso IDE combines the features of Kinetis Design Studio plus LPCXpresso. For LPC users it has unlimited code size, Segger and FreeRTOS support added. For Kinetis users it adds CMSIS-DAP, trace support, automatic probe discovery, but there is no Processor Expert included. For Kinetis and LPC it provides a unified and modern IDE and build system, with a common SDK and nice project creation and added nice debugging features.
I have not touched on many other aspects and features like multicore support, watch/live variables, extended registers view or any of the (really cool!) SWO/trace/profiling/printf features with the LPC-Link2 debug probe. So I think these things might deserve another article about MCUXpresso IDE and tools.
I plan for more articles about the MCUXpresso IDE in preparation for the next semester, and compared to LPCXpresso and Kinetis Design Studio, I can use the new IDE with less efforts in the class as most things come pre-installed, and several features make it easier to use.
I have explored areas like what other plugins I would add/install, or how to use or migrate existing Kinetis Design Studio projects. And even how to use it with Processor Expert projects :-). And if you are interested in any particular topic, post a comment or thought and I try to get on it.
Happy Xpressing 🙂
Links
- MCUXpresso IDE web page: http://www.nxp.com/mcuxpresso/ide
- MCUXpresso IDE community: http://www.nxp.com/mcuxpresso/ide/forum
- MCUXpresso Config tools and SDK: https://mcuxpresso.nxp.com/

Do you have any knowledge if other existing processors will get added, like KE06Z for example.
LikeLike
Hi Ian,
I don’t know. For me the best place is to check the table in https://community.nxp.com/docs/DOC-333073. And that one lists the KE06 as ‘not planned’. I have not recently tried, but there is the S32 Design Studio for the automotive parts, maybe that one supports it?
LikeLike
You are the best. Thanks for the huge explanation!
LikeLike
Hi Erich,
Great summary, I am looking forward to trying it out – as soon as you show how to use Processor Expert with it :-).
Does your Mar 25 post (Tutorial: Using Eclipse with NXP MCUXpresso SDK v2 and Processor Expert) work with this new IDE? [it says any eclipse version…]
Thank you for all you work and help…
Brynn
LikeLike
Hi Brynn,
yes, the principle of https://mcuoneclipse.com/2017/03/25/tutorial-using-eclipse-with-nxp-mcuxpresso-sdk-v2-and-processor-expert/ applies for MCUXpresso too, with a few minor tweaks.
LikeLike
I love the Processor Expert!!!!!
LikeLike
Me too!!!! 🙂 🙂 🙂
LikeLike
I haven’t used the Kinetis board i have (KL25Z) since KDS came out, i like more this new IDE, a little more intuitive, i think it doesn’t have PE available, or i haven’t search it properly.
A little detail to notice is that to be able to debug a project the user need to use the blue bug button, available on the Quickstart panel, i lost 5 minutes clicking on the green bug button ;(.
Thanks for the excellent blog 🙂
LikeLike
EDIT: Is it possible to add driver files to a already created project? 😀
LikeLike
Hi Carlos,
not with the wizard (at least not in that version I have used). What I have done is a) create a project with all the drivers or b) copy them over from a ‘full driver’ project. That has worked fine for me.
LikeLike
KDS is mostly stock Eclipse and GNU tools. The additional polish and ease-of-use features (like the Quickstart panel, which btw did exist in CodeWarrior too) makes it easier to use.
MCUXpressoe does *not* include Processor Expert. As noted in other articles, NXP does not continue its development. But I have found a way to install it into the MCUXpresso IDE, and I’m in the process of writing up the steps for it. Clearly that is not something officially supported by NXP, but that capability (to use Processor Expert) allowed me to carry over easily projects for which I would use Kinetis Design Studio otherwise. That way I think I can easily leave Kinetis Design Studio and LPCXpresso behind, and do all my new development with the MCUXpresso IDE. I still will keep KDS and LPCXpresso installed, just in case or for projects I want to keep ‘as is’.
LikeLike
Hi Carlos,
yes, that green debug button thing has trapped me several times too. I have now make a more prominent note about this in the article, thanks for reminding me about it!
LikeLike
Glad to help :). Thanks for the other answers as well.
LikeLike
The SWO/Trace/profiling will be interesting particularly if it will work with the Kinetis devices. I was in the NXP FTF session that covered tht for LPCXpresso. Diagnosing causes of hard faults & assertions may soon be easier.
LikeLike
From what I tried out, the SWO/Trace/Profile is to the level what is in LPCXpresso. It does however need the LPC-Link2 debug probe as it does not talk directly to a GDB server.
LikeLike
I installed this, hoping to have a awesome tool, but I can’t live without Procesor Expert. Maybe one day they will add it or you’ll use your skills to some-sort-of add it.
LikeLike
yah, no PE is a deal killer for me too. That said, they broke PE up into three tools that are cloud/desktop based to cover the things that PE used to do. The first is a pins tool. The second is a clock configuration tool. The third is supposed to be a peripherals setup tool but although it was due last fall, still isn’t out yet. If it’s anything like the other two, the combination of the three will be better than PE. Without all three, I’m not going to move off KDS.
That said, the last I heard from my FAE was that they were supposed to release that last bit at the same time as MCUexpresso which was 31-March-2017. They beat that with MCUexpresso.
LikeLike
Any news on the Peripherals Tool ? It’s still listed as ‘Coming 2017’ on https://www.nxp.com/support/developer-resources/run-time-software/mcuxpresso-software-and-tools/mcuxpresso-config-tools:MCUXpresso-Config-Tools
I’ll be staying with CW until this changes,. and I’m dead keen to go there. 🙂
LikeLike
There are still 3 months to go in 2017, so I think we have to be patient.
LikeLike
Howdy,
It sounds like MCUXPresso has some nice features. Before I start using it, I want to verify some important details. What license is the program released under? Is the complete source code available? I pretty much ignore closed source tools I don’t want to invest the learning time in dead end products. All closed source is pretty much a dead end.
LikeLike
There is the software content register file and the product license file installed in the installation root folder which I think gives you all the information you need?
LikeLike
Pingback: MCUXpresso IDE: S-Record, Intel Hex and Binary Files | MCU on Eclipse
Pingback: Installing NXP MCUXpresso In Linux >> Karibe
Hello Erich,
I have a problem trying to connect JLink using MCUExpresso, my setup is working with KDS 3.2.0, the error message has little clue about the cause, it says, Error in final launch sequence
Cannot get Jtag device.
I am trying to connect to Hexiwear, my working setup for KDS use the SWD interface.
I will appreciate your comments,
LikeLike
Hi Manuel,
I would need to know more about the error and the error message details (Segger J-Link GDB log for example, found in the console view, plus the GDB traces (see https://mcuoneclipse.com/2016/07/01/board-bring-up-tips-gdb-logs-and-traces-in-eclipse/)). Maybe you could post the information in forum as it is more suitable for this kind of information posting?
Erich
LikeLike
Pingback: The Influence of Software and Tools on ARM Cortex-M Microcontroller Vendor Selection | MCU on Eclipse
Pingback: MCUXpresso IDE: Adding the Eclipse Marketplace Client | MCU on Eclipse
Pingback: MCUXpresso IDE: Importing Kinetis Design Studio Projects | MCU on Eclipse
Pingback: Automatically Refresh Eclipse Projects before Build | MCU on Eclipse
Hi Erich,
One thing I was really missing in KDS is the “Refresh While Running” in Variables view present in CodeWarrior. Do we have this important feature in MCUXpresso?
LikeLike
Hi Marcio,
yes, this has been implemented in MCUXpresso (I wanted to write an article about this). There is support for this for the P&E connection (see https://mcuoneclipse.com/tag/live-variables/), plus there is support for this with the LPC-Link/CMSIS-DAP debug probe (but not with J-Link).
LikeLike
Oh, this is really good news! : )
LikeLike
Pingback: MCUXpresso IDE: Installing Processor Expert into Eclipse Neon | MCU on Eclipse
Pingback: Using the LPCXpresso V2/V3 Boards to Debug an external Board | MCU on Eclipse
Pingback: MCUXpresso IDE: Terminate and Disconnect a Debug Session | MCU on Eclipse
Pingback: MCUXPresso IDE: Blinky the NXP LPC800-DIP Board | MCU on Eclipse
Hi,
I’m having troubles with MCUXpresso, it doesn’t “find” my debug probe, in this case i’m using the FRDM-KL25Z board. The error message says “Target not debuggable.” I had the same problem one week ago and fixed it following your tutorial on updating the OpenSDA firmware of the board, now i tried the same and had no success :(.
I read someone who flashed the mbed firmware into the board and drag&drop the bin file generated by the project compilation, this is more like a hack than a solution.
I found more help on here than the nxp forums, already searched the problem there and find no solution, do you think there’s a solution for this? Thanks in advance 🙂
LikeLike
Hi Carlos,
what is the firmware on your board? I recommend to use the P&E or Segger firmware, not the mbed/CMSIS-DAP one. First make sure that the board shows up properly (serial port, debug driver) in the Windows device manager (I assume you are using Windows). It could be that your launch configuration inside the project somehow is corrupted. What you can do is to delete the *.launch files (make a backup, just in case). If there are no .launch files, the IDE will trigger a search of the attached debug probes. This usually fixes problems like this. Let me know how it goes!
LikeLike
Hi,
I’m using Ubuntu 16.04, just followed [1] and the board shows up like a MSD named FRDM-KL25Z, plus when i do lsusb it appears like the CDC interface.
$ ~ lsusb
Bus 003 Device 008: ID 1357:0089 P&E Microcomputer Systems OpenSDA – CDC Serial Port
Anyways the IDE is unable to connect to it, maybe the driver got corrupted, maybe is the udev file, i will try searching about that and let you know if i get it working again.
Thanks for the fast reply 🙂
[1] https://mcuoneclipse.com/2014/11/01/illustrated-step-by-step-instructions-updating-the-freescale-freedom-board-firmware/
LikeLike
Update: Ended up installing MCUXpresso again [1] and now the IDE found the probe, it appears listed as a OpenSDA probe.
[1] http://karibe.co/2017/03/installing-nxp-mcuxpresso-in-linux/
LikeLike
Hi Carlos,
I don’t have an explanation why the probe was not detected any more. Installing it again should not be the solution 😦
LikeLike
Pingback: GNU Code Coverage on Embedded Target with Eclipse Neon and ARM gcc 5 | MCU on Eclipse
Is there a method to get an SDK package for processors that are NOT listed in the Configuration settings of the MCUXpresso SDK? Is there a method to convert the information in KDS for use in MCU?
I am using the MKE04Z8 processor.
Thanks,
LikeLike
Hi Mark,
You mean for a device where there is no SDK package listed/supported? If it exists for KDS, then I think it exists for MCUXpresso too (correct me if I’m wrong).
Otherwise: You might download a package very close to your processor, and then you would have to port/modify the drivers to match your device. But that’s defintely not easy, as the KE parts are very different from the K parts.
LikeLike
yes, it is NOT listed as a choice in the SDK Builder.
I am not the person who created the project under KDS, I will find out what the processor choice was for KDS too see if that choice is available or if I will need to modify a close match.
Thanks
LikeLike
Hi Mark,
I believe that all the devices supported in KDS should be supported in MCUXpresso IDE. In any case, I started writing an article how to port KDS projects into MCUXpresso IDE projects, but had no time to finish it (yet).
LikeLiked by 1 person
Pingback: MCUXpresso IDE v10.0.2 – Updated Eclipse based IDE for LPC and Kinetis | MCU on Eclipse
Pingback: Troubleshooting Tips for FreeRTOS Thread Aware Debugging in Eclipse | MCU on Eclipse
Hi Erich: thanks for your various blogs. They have been extremely useful. I have an CW 10.7 project that I need to set the secure bit on. It’s greyed out in CW. It’s a bare metal project with some modified files from PE. Can CW projects be imported into MCUXpresso directly or do they need to be converted to KDS and then MCUXpresso?
LikeLike
Hi Mark,
no, you cannot import them directly. There is a way how to use KDS projects in MCUXpresso which requires installation of extra plugins (see https://mcuoneclipse.com/2017/04/02/mcuxpresso-ide-importing-kinetis-design-studio-projects/). I rather recommend that you create a blank/new project in MCUXpresso IDE in your case and copy the source files over.
LikeLike
Pingback: Eclipse MCUXpresso IDE 10.1 with integrated MCUXpresso Configuration Tools | MCU on Eclipse
Hi Eric,
I am just wondering – what are the differences between s32 design studio and MCUXpresso, except from Processor Expert?
Does NXP plan to merge also Design studio into MCU Xpresso?
One useful tool that I saw in others IDEs was the build analyzer, that displayed to the developer the flash occupaion for each section and the ram usage – Ok, you already made a tutorial on using SysV -x, but the visual tool reduces the complexity a lot 😀
LikeLike
Well, I could say here “Eclipse is Eclipse is Eclipse” 🙂
Processor Expert can be installed into MCUXpresso IDE (but is not officially supported). And yes, a few views are different. S32DS took over more of the CodeWarrior world, while MCUXpresso IDE more of the LPCXpresso world. The two IDE’s serve different markets (automotive vs. industrial/general purpose), and as such support different sets of microcontroller architectures (S32K, S32V, MAC57Dx, KEA vs. Kinetis, LPC, i.MX RT just to list the ARM devices). As such, some of the tools (FreeMaster) are different and the SDK approaches. One big difference is that MCUXpresso IDE supports SWO and trace plus the LPC-Link2 ($20) debug probe. Other than that, I feel MCUXpresso IDE is more targeting the mass market with ease-of-use, where the S32DS is more in a market where other commercial IDE’s (Lauterbach, …) dominate.
Just my view and my $1 cent.
I hope this helps?
LikeLike
Hi Erich,
Can we use Ulink 2 debugger with MCUXpresso IDE for Kinetis series MCU(Cortex M4) ?
if yes, then how could we do it ?
regards
Bipin Kumar
LikeLike
I don’t own any ULink2 debug probe, so I cannot tell for sure. But I doubt unless the probe is using a true CMSIS-DAP protocol.
Can you re-program the probe that it looks like a J-Link? Then it would be supported.
LikeLike