
The Hexiwear device is a great and versatile device with two microcontrollers on it. Developing firmware on a Hexiwear means changing what was originally on it. And sometimes it happens that I’m not sure if the changes are for good. Or that I accidentally destroyed the firmware on the NXP Kinetis KW40 BLE microcontroller :-(. So I had to find a way to restore the original firmware, and this is what this post is about.
Restoring the Hexiwear Firmware with a Segger J-Link
Because there is no way to rebuild the KW40 firmware (it requires proprietary tools and closed source (library) files), I had to find a way how to re-flash the firmware without the need to rebuild the binaries.
Segger J-Link
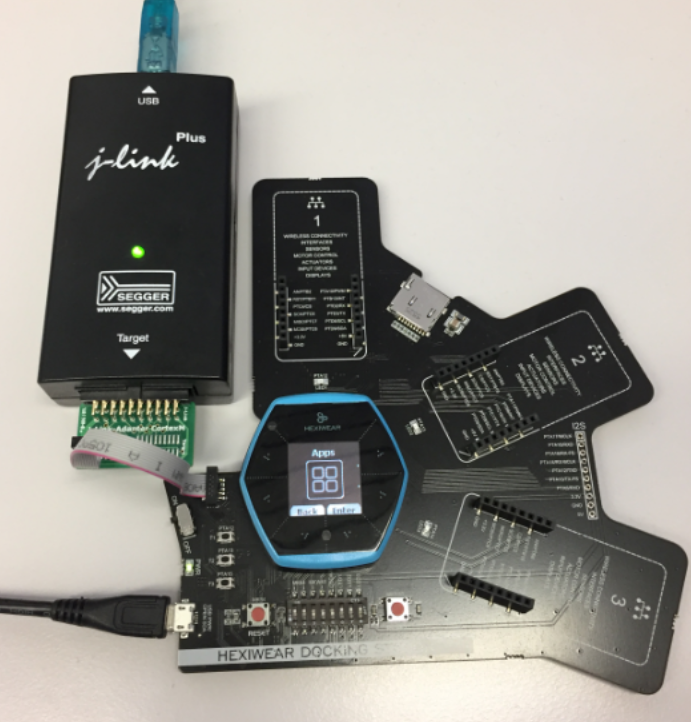
The OpenSDA circuit on the Hexiwear docking station did not work well for me (slow and sometimes failed), so I have used both P&E Multilinks and Segger J-Links to program the Hexiwear. That was another reason to build our own docking station, see “Prototype of tiny Hexiwear Docking Station“).
In this article I use the Segger J-Link as its scripting capabilities makes it easy to batch program multiple units: not only for restoring the firmware, but as well to program our custom firmware on multiple devices.
To program the binary files, I’m using the J-Link application with a batch file (.bat) and a J-Link Script file (.script):
Script Files
Binaries
The Segger J-Link accepts binary (bin) files. See “Binary (and S19) Files for the mbed Bootloader with Eclipse and GNU ARM Eclipse Plugins” how to create binary files.
The originally binaries from MikroElektrtronika are available on GitHub. There are two binaries, one for the NXP Kinetis K64F and one for the NXP Kinetis KW40:

Hexiwear Images on GitHub
Restoring the K64F Binary
For restoring the K64F binary, the following DIP switch settings are used:
- MK64F: both switches in the ON position
- MKW40: both switches in the OFF position
- OSDA: OFF (disabled)
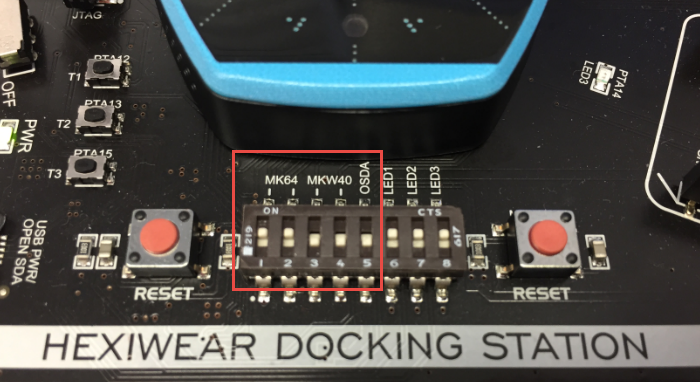
Hexiwear DIP Switch Settings for restoring K64F Binary
The batch file has the following content, with a variable pointing to the JLink executable:
REM *******************************************************
REM * Batch file to program a bin file with Segger J-Link *
REM *******************************************************

SET JLINK="C:\Program Files (x86)\SEGGER\JLink_V612\JLink.exe"

%JLINK% -device MK64FN1M0xxx12 -CommanderScript ./jlink_k64f.script
pause
The above batch file calls the J-Link script jlink_k64f.script which does the programming with the binary file:
si swd
speed 4000
r
h
loadbin "HEXIWEAR_MK64.bin",0
r
exit
To program the K64F device, run the batch file ProgrammWithJlink_K64F.bat.
Restoring KW40 Binary
For restoring the K64F binary, the following DIP switch settings are used:
- MK64F: both switches in the OFF position
- MKW40: both switches in the ON position
- OSDA: OFF (disabled)
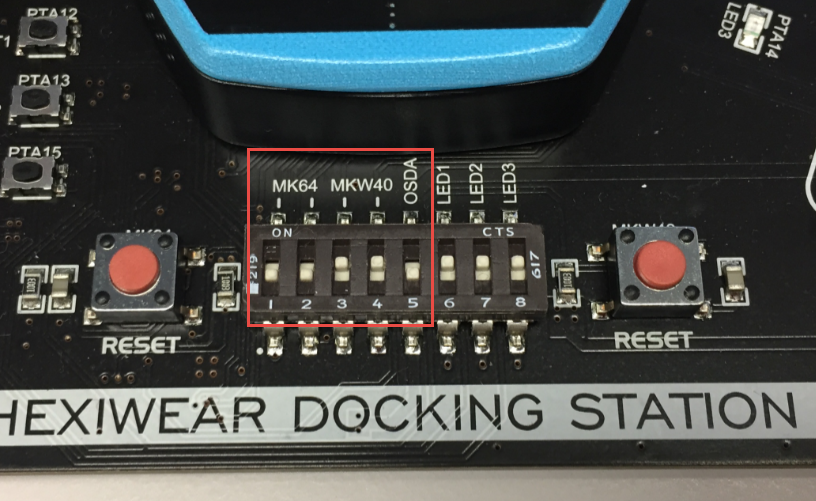
Hexiwear DIP Switch Settings for restoring KW40 Binary
The batch file has the following content, with a variable pointing to the JLink executable:
REM *******************************************************
REM * Batch file to program a bin file with Segger J-Link *
REM *******************************************************

SET JLINK="C:\Program Files (x86)\SEGGER\JLink_V612\JLink.exe"

%JLINK% -device MKW40Z160xxx4 -CommanderScript ./jlink_kw40.script
pause
The above batch file calls the J-Link script jlink_kw40.script which does the programming with the binary file:
si swd
speed 4000
r
h
loadbin "HEXIWEAR_KW40.bin",0
r
exit
To program the KW40 device, run the batch ProgrammWithJlink_KW40.bat file.
Summary
With the presented approach I can easily restore the original firmware or program multiple Hexiwear (or other devices) with a new firmware. You can change the script and batch files for needs, they are available on GitHub too.
Happy Restoring 🙂
Links
- GitHub repository: https://github.com/ErichStyger/HEXIWEAR/tree/master/SW/binaries
- Batch Programming with J-Link: Batch Programming with GDB: Segger J-Link and P&E Multilink

Pingback: Reprogramming the Mikroelektronika Hexiwear Dockingstation | MCU on Eclipse
Hey Erich!
I too destroyed the KW40Z firmware and I’m having some trouble restoring it to the initial state.
I tought I could just drag and drop the default firmware binary into the DAPLINK interface from the docking station, but when I try to do so, if I connect it with the Hexiwear on, and KW40Z switches on, it shows up in Manteinance Mode.
To get around this I power it with all the switches except the OpenSDA switch off, so it comes up as DAPLINK, and then put the KW40Z switches on and copy the binary to DAPLINK. After doing this, the HID disconnects and connects back on, coming back with a FAIL.txt file that reads “The transfer timed out.”
Any idea of how i can fix this?
Thanks for your help
Jaime
LikeLike
Hi Jaime,
in order to program the KW40Z with a binary using the MSD (mass storage bootloader, copy the binary to a virtual disk drive), that board needs to run a firmware for that mikrocontroller. So you would have to have there a MSD bootloader for the KW40, but you have right now (I assume) one for the K64F loaded. You cannot flash a binary for the KW40 with a loader for the K64F.
The simplest and easiest way is to use an external probe (believe me: sooner or later you need one anyway). You should be able to use the Segger board specific firmare for the KW40 (see https://www.segger.com/downloads/jlink#JLinkOpenSDABoardSpecificFirmwares).
LikeLike
Hi Eric Styger,
Do you know if the j link devices on ebay work?
Without a external probe how can we flash the OpenSDA with a KW40 MSD bootloader?
Thank you
LikeLike
My advice would be to NOT buy such a thing if it is a clone (pirate product). It would be dangerous, illegal and not fair considering the amount of good stuff SEGGER does for us all out here.
If you doing this for a hobby, educational or non-commercal product, then you can buy a EDU version for around $60 (https://www.segger.com/products/debug-probes/j-link/models/j-link-edu/?L=0).
I hope helps,
Erich
LikeLike
Hi Heric,
And there exists some other option to an external programmer?
Without a external probe how can we flash the OpenSDA with a KW40 MSD bootloader?
LikeLike
As the KW40 does not have a ROM bootloader, you need an external debug probe. There are plenty of choices: Segger J-Link, P&E Multilink or LPC-Link2 (for this you need the MCUXpresso IDE), and probably many others. But the ones listed here are the ones I’m using most of the time.
LikeLike
But for a beginner what would be recommended? Only is needed a JTAG programmer right?
LikeLike
I recommend the J-Link EDU. You need the JTAG programmer and the binary you want to program. The Segger J-Link software comes with a small programmer utility you can use to program the S19/BIN/HEX file.
LikeLike
Hi,
And this https://evola.fr/en/dangerous-prototypes/264-bus-pirate-v4.html could be used?
Thank you
LikeLike
I guess so, but I have not used it. The problem with this kind of things is the software needed to program the part.
The LPC-Link2 (http://www.nxp.com/products/microcontrollers-and-processors/arm-processors/lpc-cortex-m-mcus/lpc1100-cortex-m0-plus-m0/lpc-link2:OM13054) only costs half of the price of the BusPirate and works with the free-of-charge MCUXpresso IDE.
LikeLike
Hey Enrich,
I want to restore KW40 code for hexiwear. As per mentioned method, I didnt find ” jlink_kw40.script ” in my project to make changes. Also please help in making connection of J-LINK (EDU) with Hexiwear doking station.
LikeLike
Hi kvarad,
the script content is in the article itself: copy the script content and paste it into a file on your disk. And the approach works witht he J-Link EDU as it does with any other J-Link probe.
LikeLike
In addition to that, the script files are available as well in my own Hexiwear firmware repository on Git: https://github.com/ErichStyger/Hexiwear_v2/tree/master/binaries
LikeLike
Hi Erich,
Thank you for your time. These files are very helpful.
Need some help in connection diagram. Please go through link for image of my hardware setup.
Will you please share detailed steps for restoring KW40.bin file.
It will be very helpful 🙂
LikeLike
You need a J-Link 9-pin Cortex-M Adapter, see https://www.segger.com/jlink-adapters.html
LikeLike
How about J Link EDU Mini? Is a better choice than LPC Link2?
LikeLike
Each has its pros and cons. The mini is smaller, works for any ARM device, needs an extension USB cable if the board is not close to the PC, has all the Segger tools, but is limited to academic and hobby usage.
The LPC-Link2 is larger, can be used for professional work, plugs easier with a normal USB mini cable, but is usable only for NXP devices.
LikeLike