Getting a board from a distributor like Farnell/Element14/Mouser (add your own distributor) means that chances are high that the default firmware on it is written years from now because the inventory has not been updated, or because boards are still produced with that original firmware (because of testing?). So what happens if I use board with a firmware developed pre-Windows 8/10 area?

Freshly Unboxed NXP FRDM-KL25Z Board
It might work, but chances are high that the bootloader and firmware is not ready for the ‘modern age’, and as a result the board might be bricked. If you still have a Windows 7 machine around (I do!), you are lucky. If not, then you need to read this article….
UPDDATE: Be aware of the Bootloader Version!
There is one important aspect which showed up after I wrote the article below. The workaround presented below only works if the bootloader of the board has been already updated to V111 (BOOTUPDATEAPP_Pemicro_v111.SDA), see https://mcuoneclipse.com/2014/11/01/illustrated-step-by-step-instructions-updating-the-freescale-freedom-board-firmware/.
Outline
In this article I describe how the OpenSDA (or any other virtual USB MSD bootloader or application) might be affected by Windows 8 and 10 machines. I describe a way how to recover OpenSDA boards if the bootloader is not working or the parts of the debug firmware has been erased or corrupted, without the need for a Windows 7 machine or an external debug probe. I have created a video (towards the end of this article) which shows all the needed steps.
MSD Bootloaders
So we are in the year 2016 now, but still a lot of software has been developed years ago. What I have found difficult in working with all the different host systems (mainly Windows, but as well Linux (but still do not own a Mac machine 😦 ) is that a new version of a host operating system can add a lot of challenges. While everyone tries to prepare for the future, sometimes it is simply hard. The Freescale (now NXP) OpenSDA and mbed bootloader present on all the FRDM (Freedom) and TWR (Tower) boards is no exception to this with its MSD (Mass Storage Device) bootloader.
The MSD bootloader is actually a cool thing: the board enumerates on the host as a virtual USB Memory stick. I can copy/send files to that ‘virtual memory stick’ and it will program that file either to the board debug firmware or program the target application with it.
But the problem is that this ‘virtual’ MSD is not a full MSD one: it only emulates the thumb/memory device, without actually providing the full memory. So the bootloader or virtual MSD device tries to detect if I copy/transfer a firmware image (S19, binary, intel hex) file. Basically the ‘virtual’ device intercepts write accesses and transforms this into something to program the microcontroller flash memory, either its own or the one of the target device.
However, the USB protocol is not simple and easy. Plus the developers test with the actual environment to do the job of the virtual MSD device. The problem is that newer operating systems (Windows 8, Windows 10 and others) tend to communicate with newly plugged in devices much more than older operating systems. And these other accesses might confuse the virtual MSD device if they are not prepared for the extra chatter and communication. For example virus scanners probe the device. Or the operating system tries to index and catalog the memory device. Even worse, it might try to write all kind of stuff and index files to the device. And this might confuse that virtual MSD device. Up to the point that the device either creates a buffer overflow, or interprets an index file write as the application file and wrongly programs the device. Which then can brick the board.
OpenSDA Bootloader
This is a real problem. And it is not unique to one vendor or implementation. Both the Freescale OpenSDA V1 (see “FRDM Board Bootloader fails with Windows 8.1 Preview“) and the mbed (OpenSDA V2.x) bootloader (see “How to Recover the OpenSDA V2.x Bootloader“) are affected by this.
For OpenSDA V1 there is the workaround to update the bootloader with a Windows 7 machine (see “Illustrated Step-by-Step Instructions: Updating the Freescale Freedom Board Firmware“), and with this updated bootloader things work well with Windows 8 and 10.
For OpenSDA V2 the consequences are much worse: the mbed bootloader needs to be reprogrammed with an external SWD/JTAG debug probe (see “How to Recover the OpenSDA V2.x Bootloader“) as that bootloader does not include an update mechanism.
No Windows 7?
But what if you do not have a Windows 7 (or XP) machine, and you do not have a debug probe? Then this article could help you, as it shows a way how to change a setting in Windows 8/10 which prevents Windows to write things to the virtual MSD device.
💡 I have verified the approach presented here on my Windows 10 (64bit) machine. I do not have a Windows 8 machine any more (sorry), but I have no sign that the presented approach would not work on any 32bit/64bit Windows 8 and 10 machine.
Factory Firmware on Board
If you get a new board from the factory, you can check the firmware and bootloader on it.
Freshly Unboxed NXP FRDM-KL25Z Board
For example the FRDM-KL25Z enumerates as FRDM-KL25Z device:

SDA Info File
Double click on the info HTML file and it shows the firmware version of that board:

OpenSDA Bootloader Version 1.09
So above board reports the old V1.09 board exposing the problem described in “FRDM Board Bootloader fails with Windows 8.1 Preview“. With using a Windows 7 (do NOT do this with Windows 8 or 10!!!!) I could update the bootloader to a newer version as outlined in “Illustrated Step-by-Step Instructions: Updating the Freescale Freedom Board Firmware“.
Windows 8 and 10 Erases the Debugger Firmware in Bootloader Mode
It might not happen the first time when I enter BOOTLOADER mode (power the board with the reset button pressed), but with Windows 10 it happens latest after several tries: the board gets bricked, the debug application erased and I cannot debug the board any more.
In normal mode, the small green LED nearby the OpenSDA K20 device is off. And in BOOTLOADER mode the green LED blinks an error code (see video).
The LED error codes are in section 3 of : http://www.nxp.com/files/32bit/doc/user_guide/OPENSDAUG.pdf:

OpenSDA LED Error Codes
I had cases where for some reasons I was not able to re-enter BOOTLOADER mode again, but somehow then it worked again. If you are able to enter the BOOTLOADER mode, then I can indeed see that the (debug) application on the board is erased:

Application Erased
Group Policy for Windows Search
Because the bootloader is confused by the extra accesses of the host USB controller, the solution is to turn this extra communication. For me this was caused by the Windows ‘feature’ to create an index and library of all drives and files in the background to speed up search. So the solution is to turn this feature off.
Group Policy Editor: disable removable devices from the library search
I can turn this ‘feature’ off with the Microsoft Windows Group Policy Editor (you might need administrative rights for this).
💡 It seems that the Group Policy Editor is available in Windows 10 Pro Edition, and *not* part of the ‘Home’ edition. See below for doing the same directly in the registry.
To launch the editor, use <Windows>+<R>, then type launch
gpedit.msc

Launching Group Policy Editor
This launches the management console. Dive down to
Computer Configuration \ Administrative Templates \ Windows Components \ Search \ Do not allow locations on removable drives to be added to libraries
and enable that setting (which turns that feature off):
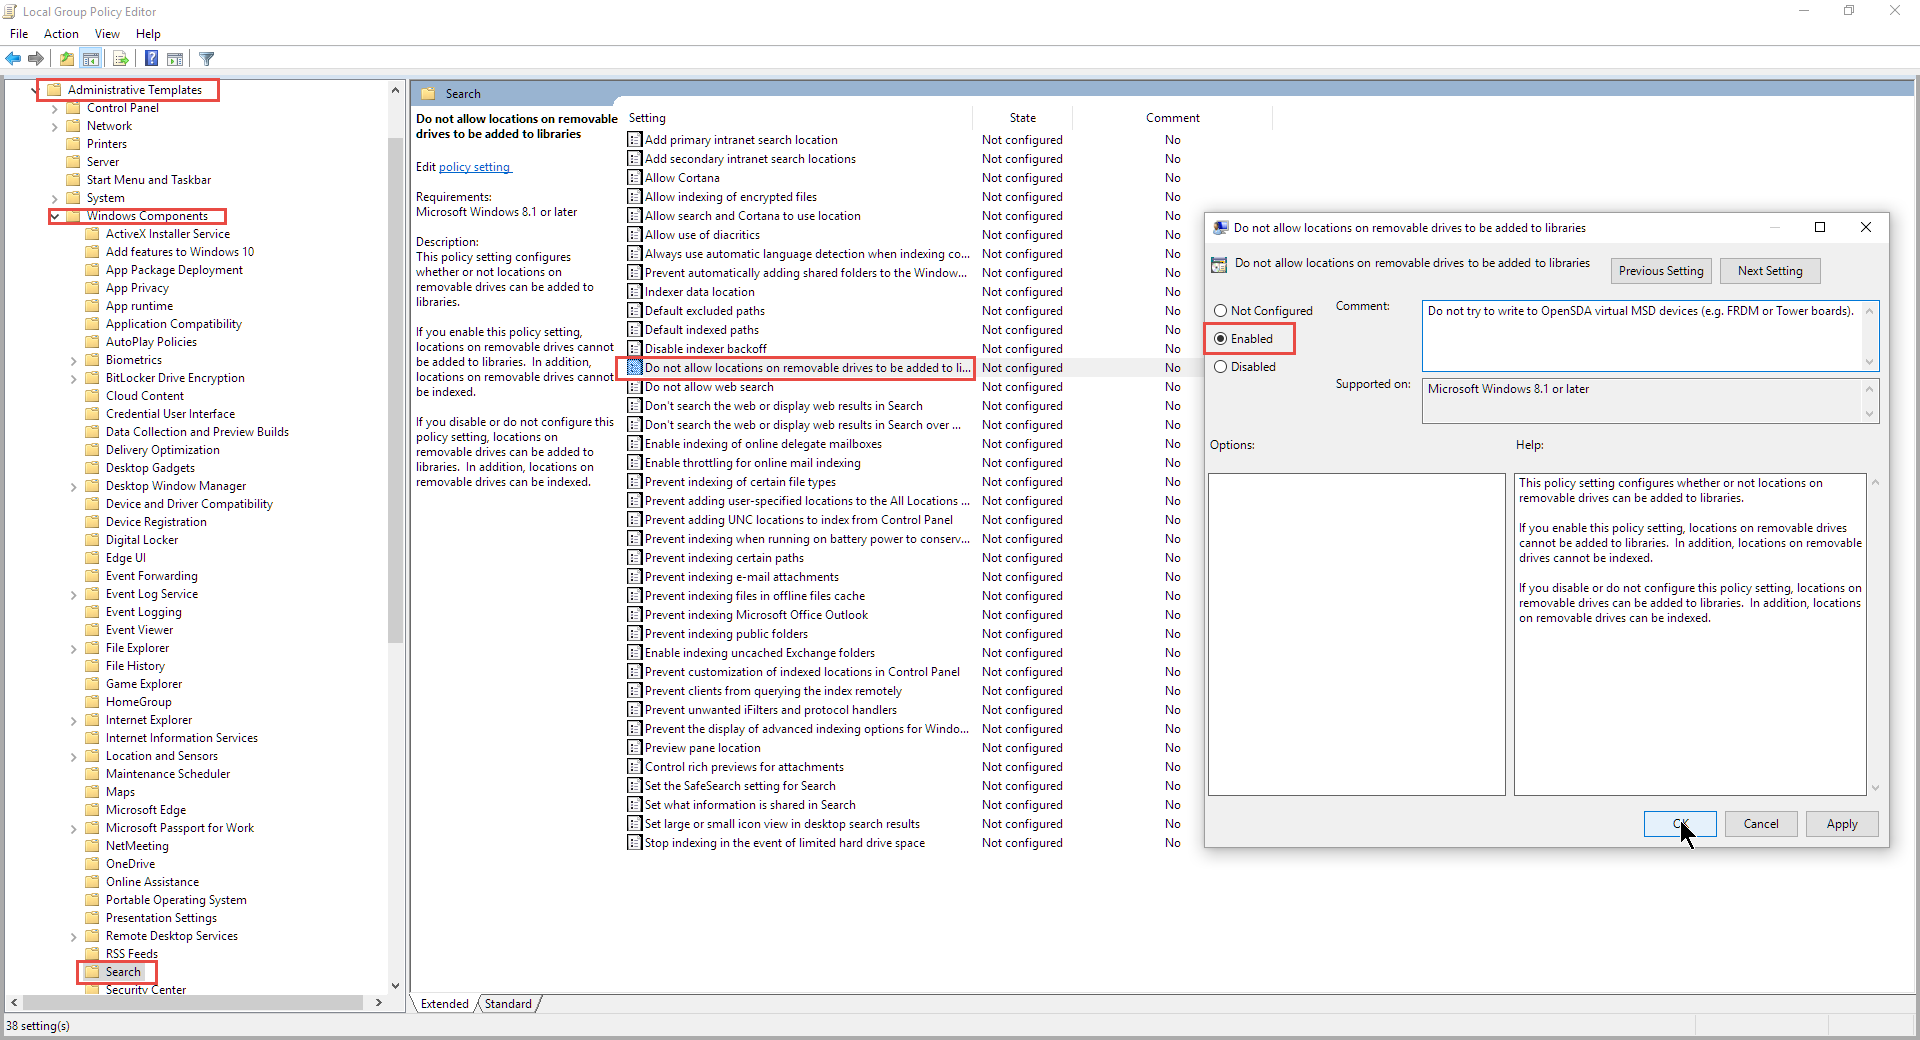
Local Group Policy Editor
With this enabled, the bootloader and debug/firmware loading works as expected with the Bootloader V1.09 as it comes originally on my FRDM-KL25Z board.
Using Windows Registry
After writing this article, I have found out that the ‘home’ edition does not include that group policy editor. I used this group policy search tool to search for “Do not allow locations on removable drives to be added to libraries” registry key: it is under
HKLM\SOFTWARE\Policies\Microsoft\Windows\Windows Search
with the key “DisableRemovableDriveIndexing“. Run regedit (you need to have administrative rights) with <Windows>+<R> and “regedit”. Set “DisableRemovableDriveIndexing” to value 1:
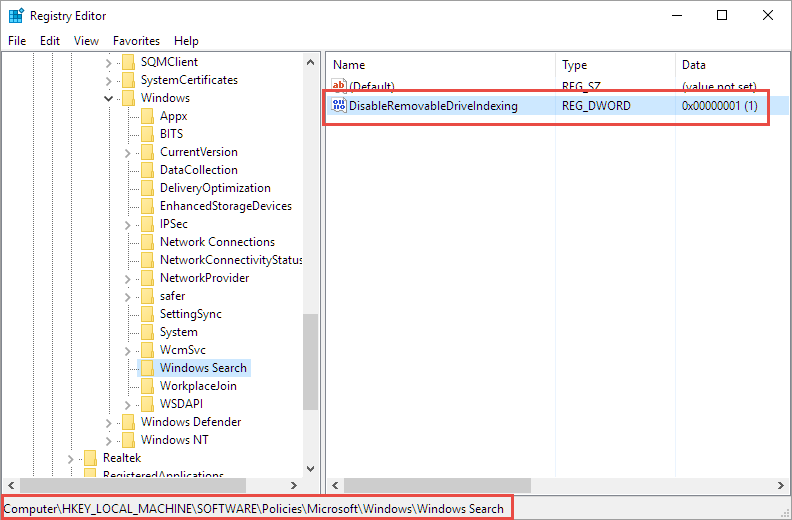
Windows Registry
Video
The following video shows how I bricked and unbricked a FRDM-KL25Z board:
Summary
There are many boards shipped with firmware which is not able to deal with the latest host operating systems. So far my recommended way was to use a Windows 7 machine to updated the bootloader on OpenSDA boards. Now I have verified an approach which works for me without the need to update the bootloader or a Windows 7 machine. I still recommend to update the bootloader if possible as this will prevent the OpenSDA V1 bootloader to be bricked with Windows 8 or 10 if in BOOTLOADER mode. For OpenSDA V2.x I recommend to update the bootloader with the new DAPLink (but this requires a debug probe!, see “How to Recover the OpenSDA V2.x Bootloader“).
Happy Unbricking 🙂
Links
- Microsoft community post about group policy settings: http://answers.microsoft.com/en-us/windows/forum/windows8_1-hardware/how-do-i-prevent-system-volume-information-files/815b0046-d631-4419-a43e-44083a3733f5?auth=1
- How to Recover the OpenSDA V2.x Bootloader
- Illustrated Step-by-Step Instructions: Updating the Freescale Freedom Board Firmware
- New P&E OpenSDA Firmware v114

Erich,
Thanks for this update. I somethimes use my heavy CAD machine to do a quick program while doing a board layout. It runs Win10 and that explains the 3 new Freedom boards that do not function any longer. Will have to try the above method.
LikeLike
I tried this on Windows 10 Home and it would not update the firmware. I ended up successfully updating using an old XP laptop.
LikeLike
Hi Harry,
what part of the steps did not work? I don’t have a Home edition, but I don’t see a reason why it should not work?
Thanks!
Erich
LikeLike
Hello Erich,
I used an old 2012 Gateway desktop with Windows 10 home and searched the registry for DisableRemovableDriveIndexing which it found and I set the bit to 1. I dragged the v1.11 bootloader update file on to the controller which was showing BOOTLOADER. However, it never updated and stayed at v1.09. I also right clicked on the update file bringing up the dialog box and used “send to” copying that way but it didn’t work. I tried rebooting and power down but those had no effect. The v1.18 software also did not update. I thought the board might be bad so I dragged out an ancient HP Pavilion laptop with XP (that I forgot we still had at home – hadn’t powered up in 3 yars) and it flashed correctly.
A few of us are using the KL25 for virtual pinball machines for a project started by Mike Roberts.
https://developer.mbed.org/users/mjr/code/Pinscape_Controller/wiki/Homepage
Thanks,
Harry
LikeLike
Error codes for the OpenSDA LED: http://www.nxp.com/files/32bit/doc/user_guide/OPENSDAUG.pdf (see section 3).
Thanks for the blog, Eric
Adrian
LikeLike
Hi Adrian,
thank you very much for this, finally found it 🙂 I have updated the post.
LikeLike
Hi Erich,
on Windows 10 Home edition did not work for me too.
GPedit.msc does not show the key you have signalled in the post and video too.
Used the tool to localize the key in register: the path should be
HKLM\SOFTWARE\Policies\Microsoft\Windows\Windows Search
But I can’t find Windows Search subdirectory!!!
Found the key
here:
HKLM\SOFTWARE\Policies\Microsoft\PolicyManager\current\device\Search
and there:
HKLM\SOFTWARE\Policies\Microsoft\PolicyManager\default\Search
set to 1 both fields but no change on bootloader behaviour (I have 1.10 version instead of 1.11 but it’s the same).
😦
LikeLike
Hi Roberto,
that’s strange :-(. Unfortunately I only have the Pro edition available, and cannot try it on Home. Maybe the issue does not exist on Home edition?
LikeLike
Hi Erich,
your post is nearly perfect.
I have just needed to add the key and its subkey.
Thanks again
LikeLike
Unbelievable!
First time it was ok (I have replied to you telling that!) then Windows started writing SystemVolumeInformation again!!!
Entered Register key is as before.
Of course FRDM board is no more working.
LastStat.txt says “Programming” and no SDA application is in.
Thanks the same
😥
LikeLike
Hi Roberto,
what I noticed is that if there is the old (pre V1.11, see https://mcuoneclipse.com/2013/12/14/new-pe-opensda-firmware-v114/) bootloader on the device, it still can happen. For the boards I have updated the bootloader to V1.11, the problem seems to be gone in combination with the registry key changes.
Erich
LikeLike
Hi Erich,
together with register key modification you have posted, disabling Storsvc and WSearch services on my Win 10 Home, causes SystemVolumeInformation to be written with some delay (some tenth of seconds, quite enough to download bootloader 1.11).
After that it’s like you have written: with bew bootloader version the board does not take care of SystemVolumeInformation.
I have entered debug, plugged and unplugged the board several times.
I think I can state it’s ok.
Thank you very much
LikeLike
Pingback: Reprogramming the Mikroelektronika Hexiwear Dockingstation | MCU on Eclipse
This might sound rather outlandish but has it every occurred to you to simply use a Mac or Linux machine to upgrade it? Heck you could even simply boot a distribution from a USB stick on your high-end Windows 10 machine just for the upgrade of all your boards…
LikeLike
Hi Daniel,
that does not work, as early versions of bootloader only work on Windows, and do not work on Linux or Mac.
LikeLike
1) Thank you. After much searching and wringing of hands, this article provided the vital ah-ha about Win 10 corrupting the download file transfer. I have a FRDM-KV31F with Microboot 1.06 and Bootloader 1.12 that had a wiped out application (0.00). I hadn’t been able to upgrade it and then I lost the application. Now it’s upgraded to 1.20.
2) I tried doing this on Win10 with a DisableRemovableDriveIndexing set to 1, but no success. I also tried doing it on a VirtualBox WinXP, but it wouldn’t properly recognize the FRDM-KV31F USB. Doing the download on the host Linux Mint OS is what finally worked. Perhaps the later bootloader now supports Linux.
LikeLike
I have seen a similar issue with corrupting the bootloader on Mac OS too, but not on Linux as I’m using that one not much. But the later bootloader had much better protection against the problem. On Windows 10 the issues dropped by factors, but I still see it once or twice during a semester with a classe of 30 or so students.
LikeLike
Pingback: Recovering and Updating the NXP OpenSDA Bootloader with P&E Multilink and MCUXpresso IDE | MCU on Eclipse
Pingback: Adding a Delay to the ARM DAPLink Bootloader | MCU on Eclipse
Hi, this got me going in the right direction, but my Windows 10 had “Storage Service” which puts a WPSettings.dat into “System Volume Information”. After disabling the service I was able to flash my bootloader successfully.
LikeLike
Hi Jon,
great, thanks for sharing that approach/solution to all of us, appreciated!
Erich
LikeLike
For boards running OpenSDA v2 board that are based on DAPLink we’ve written a blog that outlines the root cause of the problem and steps to ensure all boards can be updated and safely or recovered. Many thanks to Erich and NXP for working together to provide solutions to this.
https://os.mbed.com/blog/entry/DAPLink-bootloader-update/
LikeLike
Pingback: Recovering OpenSDA Boards with Windows 10 | MCU on Eclipse
Hi Erich, I tried the above but wasn’t able to get a FRDM-KL46Z board updated. Tried a couple of times on different Win10 laptops but no success. I ended up creating a Windows7 installation media on a thumb drive, and booted to that from a Win10 laptop. When presented with the option to install, do NOT “Install Now”, but instead select “Repair Your Computer”, then “Use recovery tools”, then finally “Command Prompt”. From here it is easy to copy the required files from the host C: drive to the FRDM-KL46Z board. Just make sure the required PEMicro files are already resident on the host drive. I suppose it’s possible to have those files resident on another thumb drive, but I was out of USB ports… While using the Command Prompt and DOS copy commands, it was pretty easy to confirm bootloader and application versions by using the “more” command on OPEN_SDA.HTM and LASTSTAT.TXT.
LikeLiked by 1 person
Yes, a Win7 machine is always the easiest way to get the boards updated. That’s why I keep an old laptop with Win7 around just for such a scenario. A Win7 bootable thumb drive is a good option too.
LikeLike
Hi normsiegel, could you possibly send a step by step as to how you recovered the board?
LikeLike
afik, there are no special steps, except that he is using a Win7 image/machine. Follow https://mcuoneclipse.com/2014/11/01/illustrated-step-by-step-instructions-updating-the-freescale-freedom-board-firmware/
LikeLike
Hi Erich, I’m using a FRDM-K22F board and my problem is that it doesn’t enter to the bootloader mode (the BOOTLOADER folder doesn’t show up on windows explorer) and is not being reckognized it’s USB port for openSDA debug. I did this sequence:
a. Disconnected all the power, external circuits and USB cables.
b. Pressed and holded the button marked RESET (SW1)
c. Connected a USB cable with debug interface
And then the green/yellow LED near to the RESET button turned on, but nothing happens and when I disconnect the USB cable and reconnect it the LED turns off and remaing at this state.
Can you please help me on that? I really don’t know what to do anymore or if this board is lost : (
LikeLike
To enter the bootloader mode (FRDM-K22F):
a) disconnect everything (as you wrote)
b) press and hold SW1 (button with black cap near the K20 SDA USB)
c) while having SW1 pressed, power the board with the USB SDA port (the one near the SW1 button), and keep the SW1 button pressed for several seconds (this seems to be necessary with latest Windows versions). During that time, no LED shall be on.
d) release the SW1 button. Now the small green LED near SW1 goes on and it should show up in bootloader mode as a MSD device on the host.
LikeLike
Yes I did this but the BOOTLOADER folder still doesn’t show up in my windows explorer (I’m using windows 10). The thing is, it’s been a while since I’ve used this board and one of the last tests was exactly to create a custom bootloader project in the first 64kB (respecting the vector table) of flash memory and leave the rest for the main application. Maybe I have to rewrite the “bootloader.bin” program via a debugger probe like PEMicro?
LikeLike
Are you saying that you changed the bootloader/firmware on the K20? Then yes, I would recommend that you restore the original bootloader/firmware.
LikeLike
Yes, that’s it. And to make it work the openSDA debugger I’ll need to restore de original bootloader firmware?
LikeLike
If you changed the bootloader: yes.
LikeLike