I’m currently building a home automation project around Raspberry Pi: I want to be able to monitor and control things like the lights, garage doors and the heating system both at home and from remote. I already have added a touch screen to one of my Raspberry Pi 2 computers (see “Adding a Touch LCD to the Raspberry Pi 2“). This article is about how to install the openHAB on that Raspberry so it can be the brain of the automation system.
openHAB Demo House on Pi
openHAB
openHAB (http://www.openhab.org/) is an open source platform which runs on many platforms for home automation. openHAB is a very flexible ‘concentrator’ and ‘smart hub’ for anything I can imagine: to turn on/off lights, to report temperature, to control heating systems or whatever you can imagine. openHAB implements a server which talks to devices with multiple protocols. And of course it comes with tools to configure it, and there are apps available for tablets and smart phones. openHAB includes a powerful engine to parse and process messages and to perform any task implemented.

openHAB Architecture (Source: https://github.com/openhab/openhab/wiki)
openHAB is using an Event Bus and ‘Bindings’ to communicate with everything connected to the bus:
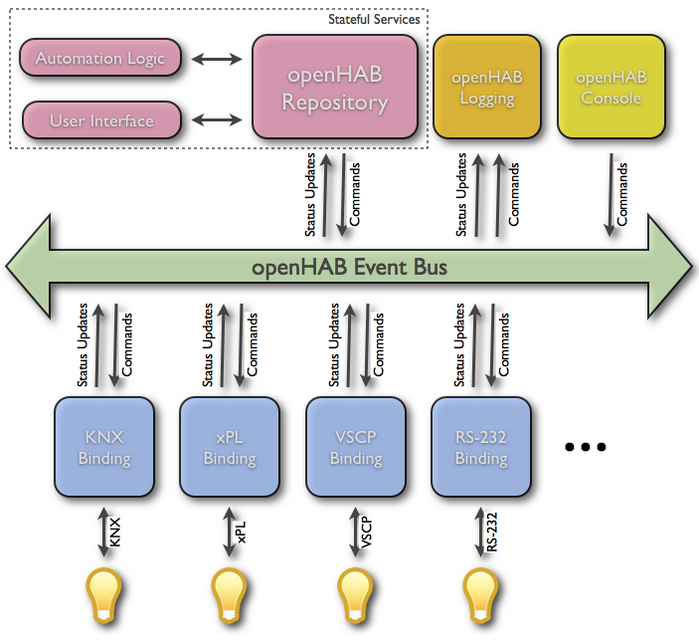
OpenHAB Event Bus ((Source: https://github.com/openhab/openhab/wiki))
Hardware
I’m using the following base hardware and software:
- Raspberry Pi Model 2 (while it is possible to use the model B, the model 2 is highly recommended)
- Linux distribution, I’m using Raspian (see “From Zero to NOOBS: Starting with Raspberry Pi Zero“)
- The usual USB cables, keyboard, mouse, LCD/monitor and a power supply for the Raspberry Pi
- A network connection (wired or WiFi)
Update Check
openHAB is using Java. First, make sure that Java is installed with
sudo apt-get install oracle-java7-jdk
With
java -version
I can check the version. For me it shows:
java version "1.8.0"
Java(TM) SE Runtime Environment (build 1.8.0-b132)
Java HotSpot(TM) Client VM (build 25.0-b70, mixed mode)
As a good practice before doing any larger changes, do a full update of the system while connected to the internet:
sudo apt-get update
Then do
sudo apt-get upgrade
*Update* installing openHAB via apt-get on Raspberry Pi leads to far fewer pitfalls and allows easy upgrade to 1.8 which is due out soon. This is the consensus at https://community.openhab.org. A tutorial is available on the wiki. The steps below for Runtime, Bindings and Configuration files are ‘manual installs’.
Installation: Runtime
openHAB comes in two parts: the runtime and the addons which are available on http://www.openhab.org/getting-started/downloads.html
Create the openHAB directory with
sudo mkdir /opt/openhab
Then go to the directory with
cd /opt/openhab
Download the Runtime core file from http://www.openhab.org/getting-started/downloads.html and place the file into the /opt/openhab folder.
Next, unzip the file with
sudo unzip distribution*.zip
As the zip file is not needed any more, delete it with
sudo rm distribution*.zip
Installation: Bindings (Add-Ons)
In order for openHAB to communicate with different protocols over the event bus, we need to install the bindings. For this, download the Addons from http://www.openhab.org/getting-started/downloads.html and place the zip file into /opt/openhab/addons.
Go to the addons folder
cd /opt/openhab/addons
Extract the bindings:
sudo unzip *addons.zip
💡 At the end, we will *not* keep all add-ons, as the more add-ons exists, the slower openHAB will start. Removing addons or bindings means to remove them from the addons folder
Then remove the zip file as not used any more:
sudo rm *addons.zip
Configuration File Copy
Next step makes a copy of the default configuration file
sudo cp configurations/openhab_default.cfg configurations/openhab.cfg
The openhab_default.cfg comes with every openHAB distribution, but my personal settings are in openhap.cfg. If I update later openHAB it will overwrite the openhab_default.cfg. Having a copy in openhab.cfg will make sure that I keep my personal settings.
Demo Application: Demo House
To check first if openHAB is workign properly, let’s install the demo. From http://www.openhab.org/getting-started/downloads.html download the ‘Demo setup’ (distribution-1.7.1-demo.zip) and copy it to /opt/openhab.
To speed up the demo, the original ‘addons’ folder should be renamed, as it has *many* add-ons which affect performance, and items in the demo might not be updated properly. Rename to a different directory name with
sudo mv addons addons.org
Then unzip the demo.zip with
sudo unzip *demo.zip
As we are overwriting existing configuration files, agree to overwrite them.
As the zip file is not needed any more, it can be removed:
sudo rm *demo.zip
Starting openHAB
In case the start.sh is not executable, add the ‘x’ executable flag to it:
sudo chmod +x start.sh
Then start openHAB with
sudo ./start.sh
This will write a bunch of startup messages. Because we have all bindings included, that might take a minute or so.
Demo House: Web Browser
Now with openHAB (hopefully) running, I can use a web browser to inspect it. All I need is a web browser and the IP address of the Raspberry Pi (see “Raspberry Pi Tips: IP Address“).
Then I can use the following URL (replace the IP address with the one from your Raspberry Pi):
http://192.168.0.108:8080/openhab.app?sitemap=demo

openHAB Demo in Web Browser
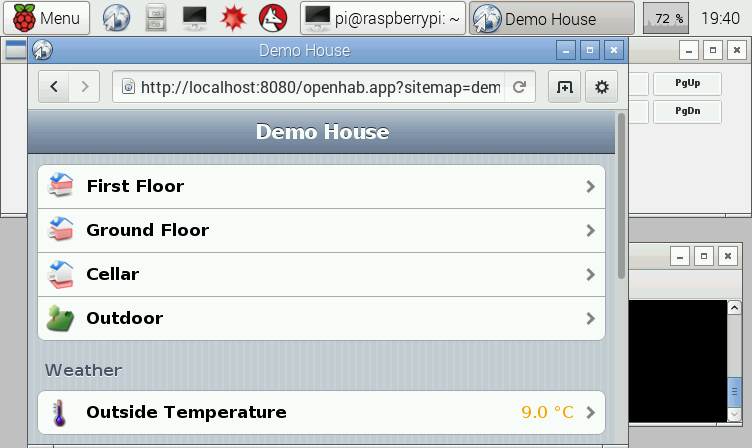
I can show the same thing on the Raspberry Pi itself (see “Adding a Touch LCD to the Raspberry Pi 2“):
openHAB Demo House on Pi
openHAB supports many, many widgets, including charts:

openHAB Chart
Summary
With this, I have openHAB installed and running with a demo on my Raspberry Pi 2. That way I have an inexpensive, versatile and flexible home automation server. In future posts I will describe how further configure it, have it communicating with Freescale (now NXP) Freedom boards or other NXP Kinetis devices.
Links
- openHAB: http://www.openhab.org/
- Raspberry Pi Model 2: https://www.raspberrypi.org/products/raspberry-pi-2-model-b/
- Installing Raspian: From Zero to NOOBS: Starting with Raspberry Pi Zero

Pingback: Autostarting openHAB on Raspberry Pi | MCU on Eclipse
Pingback: Blinky LED with openHAB on Raspberry Pi | MCU on Eclipse
Hi Erich, did you tested another options?
I’m working too in an home automatization system and I’m seeing OpenHAB, Domoticz and Home-Assistant. I find Home-Assistant the more flexible solution and I want to know you opinion about that or if you only played with OpenHAB.
Regards
LikeLike
I looked at the other projects (there is as well HAS, see http://www.pi-house.com). I think it is mostly of personal taste which one to select. I have selected openHAB as to me it has the broadest and most universal use and distribution, and seems to be widely used. The openHAB GUI/UI is maybe not the most ‘sexy’ one, and this might be improved with openHAB v2 coming out soon. The other factor for my decision to use openHAB was that there is a lot of material available online, and with some googling all my questions have been answered very fast that way. I have not seen such a community for the other systems I looked at.
LikeLike
Thanks!
LikeLike
Erich, you were right!
openhub is better than my other choice. I have everything working like a charm: a sensor network made with MySensors [1] and managed by openhub through an mqtt broker.
I can’t wait until the new openhub 2.0 release 🙂
Regards
[1] http://www.mysensors.org/
LikeLike
Pingback: Autostarting openHAB on Raspberry Pi -
Hi Erich,
Happy new year!
I read this post with interest. Well done for progressing with openHAB. Do you intend to use any Eclipse integration (Eclipse smarthome) to develop your home automation project?
I’m quite interested by the products coming from Google’s Nest brand. They have open sourced their API and have a thing called https://nest.com/uk/works-with-nest/. Would be interesting to see how this could be made to work with openhab/eclipse smarthome.
cheers john
LikeLike
Hi John,
There is already a connector in openHAB for nest: https://github.com/openhab/openhab/wiki/Nest-Binding. But as I don’t have any Nest product, I’m not able to use it.
Have you seen the openHAB designer (Eclipse based) already?
LikeLiked by 1 person
Ah great. Thanks for the links.
I haven’t used the designer yet.
cheers john
LikeLike
The designer makes it really easy to define all the objects and site maps. Of course I can use a normal text editor too, but the designer makes it more interactive. And Eclipse Smarthome is really close to the openHAB (if you check the history between the two of them).
Erich
LikeLike
Hi Thanks for the tutorial. After running sudo ./start.sh I get this error: java.net.BindException: Address already in use
Any idea how I can fix that?
LikeLike
It seems that a port is already used by something else. Have a look here:
https://confluence.atlassian.com/pages/viewpage.action?pageId=196837806
https://community.openhab.org/t/openhab-start-problem-os-x-10-11/3115
I hope this helps,
Erich
LikeLike
Pingback: Controlling NXP Freedom Board RGB LED with openHAB and Raspberry Pi | MCU on Eclipse
hi, thanks for the manual. one question. If I logout ssh session and login back I don’t see java openhab screen with the log. how can I return there? cheers!
LikeLike
There are logs inside the openhab installation folder. See https://github.com/openhab/openhab/wiki/Samples-Tricks
LikeLike
thanks!
but if I close ssh session it closes openhab as well. How can I fix that? cheers!
LikeLike
you need to run openHAB outside of your ssh, e.g. automatically starting it up from the system. See https://mcuoneclipse.com/2015/12/24/autostarting-openhab-on-raspberry-pi/
LikeLike
ok, thank you!
LikeLike
Hi Eric, can you please have a look at my question regarding connecting openHAB and Philips Hue? http://stackoverflow.com/questions/35906348/controlling-philips-hue-using-openhab-in-raspberry-pi
LikeLike
Hi Mona,
I don’t have a Hue lamp, so I cannot help you much. But I had read that Philips changed their API to make it not compatible any more with anything else than their own solution. Not sure if this is the problem you see, and I think Philips might have reverted that decision?
Erich
LikeLike
2 minutes on your site and I have the demo running. Thank you.
I have been fighting for days, was told I was doing something wrong more times than I can count.
It turns out that I just needed to enter the actual ip for the pi in the browser 192.168.0.000:8080 and NOT raspberrypi.local:8080/openhab.app?sitemap=demo
Thank you
LikeLike
Hello,
Yes, I have seen some other articles using that kind of URL too. That only works if your DNS is resolving it to the correct IP address of your PI. I always prefer to use the low level IP address in case of issues with DNS or name tables.
LikeLike
Pingback: Hexiwear with Raspberry Pi and OpenHAB Home Automation | MCU on Eclipse