
When using a bootloader (see “Serial Bootloader for the Freedom Board with Processor Expert“), then I usually protect the bootloader FLASH areas, so it does not get accidentally erased by the application ;-). When programming my boards with the P&E Multilink, then the P&E firmware will automatically unlock and erase the chip. That’s not the same if working with the Segger J-Link, as it but requires extra steps.

Protected FLASH Pages with Processor Expert
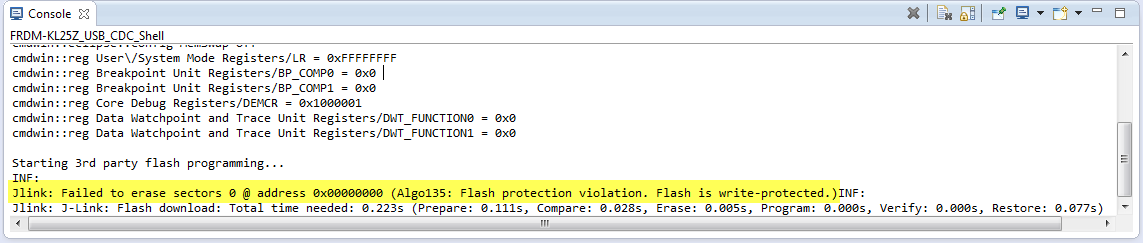
Failed Programming with protected FLASH
If I try to re-program the protected bootloader with Segger J-Link (both in CodeWarrior and Eclipse/KDS with GDB), then the download silently fails. The effect is that somehow the application on the board does not match what it should be. Looking at the Console view, it shows that erase has failed (but no real error reported) :-(:
Jlink: Failed to erase sectors 0 @ address 0x00000000 (Algo135: Flash protection violation. Flash is write-protected.)
J-Link Failed to Erase in CodeWarrior
The GNU ARM Eclipse Segger integration with GDB (e.g. Kinetis Design Studio) is not better: no error sign, the only thing is a hidden ERROR in the Console log of the JLinkGDBServerCL:
ERROR: Failed to erase sectors 0 @ address 0x00000000 (Algo135: Flash protection violation. Flash is write-protected.)

ERROR Algo135 Flash Protection Violation about failed FLASH Programming
What I need is to unprotect the memory and then erase it.
Erasing
The Segger J-Link features a very fast programming. Part of that speed is that the Segger firmware checks each FLASH page if it really needs to be programmed, and only then it erases and reprogrammed that page. So downloading twice the same application actually will not touch the FLASH memory at all. Additionally, it does not do a complete erase of the device: it only programs the pages I’m using in my application. The advantage of that is first speed. And it does not erase the application data I’m using in non-volatile memory (see “Configuration Data: Using the Internal FLASH instead of an external EEPROM“). However, sometimes I really need to clear all my data in FLASH too, and then I need to erase all my FLASH pages on the device.
Segger has product named ‘J-Flash’ which is used to Flash and Erase devices outside of an IDE. There is a free-of-charge ‘Lite’ version available for download from Segger. This utility is not intended to be used for production. With this utility I have a GUI to erase and program my device.

J-Flash Lite
But J-Flash Lite cannot unlock my locked FLASH pages :-(.
If my device is not locked, I can use the CodeWarrior ‘Flash file to target’ (see “Flashing with a Button (and a Magic Wand)“) to erase the device:

Erasing Device with Flash File to Target
Again, this does not work if the device is locked. CodeWarrior has another feature called ‘Target Task’ which can be used to erase/unsecure (if your device is supported), see “Device is secure?“.
So I need to use a different tool to unlock and unprotect my device: the J-Link Commander.
Unlocking and Erasing with J-Link Commander
To unlock the device, Segger has a utility named ‘J-Link Commander’, available from http://www.segger.com/jlink-software.html. The binary is ‘jlink.exe’ on Windows and is a command line utility. To unlock the device use
unlock Kinetis

Unlocking Device
But it seems that I need to do an unlock, followed by an erase to make it permanent. To erase the device, I can use the same command line utility. But I need to specify the device name first, and then I can erase it (example for the KL25Z):
device mkl25z128xxx4
unlock kinetis
erase
❗ I need to do the erase operation right after the unlock. a) set device b) unlock and c) erase, otherwise it will fail?

Unlocking and Erasing with J-Link Commander
Summary
In order to re-program the protected FLASH sectors with Segger J-Link, I need first to unlock and mass erase the device. For this, there is the J-Link Commander utility which has a command line interface to unprotect and erase the device. For erasing only, the J-Flash (and Lite) is a very useful tool, especially to get a ‘clean’ device memory.
To me, the Segger way and tools are very powerful. In this case, things are very flexible, but not that obvious. So I hope this post can help others to get his device unlocked and erased.
Happy Erasing 🙂

Pingback: Debugging Failure: Check List and Hints | MCU on Eclipse
KDS shoud have an option to unlock flash or at least hint user more precisely what to do in its log.
Thank you for this this exlanation. It saved me a lot of time.
LikeLike
this issue solved? i have one requisition, connect jlink Pop-up box unsecured than i can select ok/canal, but now skip unsecured and don’t have pop-up box. how to setup jlink pop-up box warn?
LikeLike
The pop-up shows up if the device is not responding, and the J-Link tries to unlock it.
LikeLike
Hi Erich,
I am trying to use similar procedure as yours to “erase my secure Kinetis KV31 device”, I use J-link utility – unfortunately I can’t erase it due to device is secured.
J-Link>unlock Kinetis
Found SWD-DP with ID 0x2BA01477
Unlocking device…O.K.
J-Link>erase
Erasing device (MKV31F512xxx12)…
****** Error: Failed to erase sectors 8 @ address 0x00004000 (Algo135: Flash pro
tection violation. Flash is write-protected.)
Info: J-Link: Flash download: Total time needed: 1.155s (Prepare: 0.689s, Compar
e: 0.000s, Erase: 0.067s, Program: 0.000s, Verify: 0.000s, Restore: 0.398s)
ERROR: Erase returned with error code -5.
J-Link>
Is there a way to unlock secured device and erase it?
I am OK with deleting my flash I just want to reprogram device again.
Thanks for you advice.
Peter
LikeLike
Hi Peter,
are you using the latest Segger J-Link firmware and drivers? I do not have a KV device, so cannot try out things on my side. Otherwise I recommend that you contact Segger (they are usually very responsive).
LikeLike
I have had the same problem with the k22f board and jlink opensda 2.1 firmware. It took me a moment to realize I have exactly the same problem as mentioned here because the error message is a little different:
ERROR: Failed to erase sectors 0 @ address 0x00000000 (Algo135: Illegal command)
The cure is exactly as described here, after doing
unlock kinetics
all was fine.
Thank you for your great blog,
Michael
LikeLike
Hi Eric,
I have a problem with my custom pcb which has the k64 as the mcu. I use the segger jlink to program the mcu via swd. for some unknown reason, jlink sometimes can connect to the mcu and then not. I have no clue why it been behaving this way. I know my problem seems not to be related to your article here. But as you are an expert in this field, I would be thankful for your help
thanks in advance
LikeLike
Hi Hung,
first, I would look at the reset line: is it properly pulled up? Is the capacitor on the reset line not too big? If it is to big, then the debug probe might not be able to pull it down fast enough. The other thing with the K64F (and others): make sure you have disable the EZPort of the device, as otherwise the device wants to load/boot from the EZPort.
I hope this helps,
Erich
LikeLike
HI Erich
I Had the “Device is secured” problem on 2 of 5 MKV31F devices.
Using universal multilink i had no way to unlock it,and the odd thing is that one of the devices was new,so i was not able to flash it for the very first time.The project that i tred to load was working fine with other boards let’s call it “A_project”.
I built an almost empty project,let’s call it “Dummy” and i have found a difference in Hex files:
In A_project the byte ad address 0x40C=0x7E and in “Dummy” 0x40C=0xFE.,at least the SEC bits were Unsecured,i will check why i haveKEYEN Field= Backdoor key access disabled
Furthermore the reset pin toggles continously(it has 10K to VDD,100nF to GND).
I dont ‘have a Segger J-Link,but almost for shure i should have some demo board with a J_Link on board.
Do you think i can do something?
This is a 100 pins IC,and i ‘m am scared that after changed it by hand ,i could face the same problem.
Many thanks once more.
Diego
LikeLike
Hi Diego,
yes, using a J-Link might work for you. The ‘real’ J-Links have stronger pull down circuit I think so would be better. But give it a try. Ultimately, I always have J-Link at hand for these kind of things. The reason why you see the reset pin toggling is that the device is continuously resetting: it starts, then runs into a hard fault, restarts again, etc. You might try as well to pull down (e.g. push button) the reset line while you connect to the target. This would give the debug probe a chance or larger time window to connect to the microcontroller and halt it. You migt try this several times.
I hope this helps, and good luck!
LikeLike
HI Erich,
will this tool work for all controller, lets say I am using sj 63110 and the memory is locked, I am not able to unblock now, how can I do this please help.
PS this is from cypress and for a eval kit
LikeLike
You need to check the UM08001_JLink.pdf from Segger (J-Link User manual) as the unlocking is specific for each device.
As far as I see Kineits, LM3Sxxx and EFM32Gxxx are supported.
Erich
LikeLike
Similar to the “Kinetis Recovery Utility” you mentioned in a previous post, do you know if it is possible to use JLink to connect to a board where the RESET pin has been set to GPIO via the FOPT config byte?
LikeLike
No, there is no utility for this as far as I know. So in your case the reset pin is still active after power-up until it reads the FOPT register. With JTAG you can reset the device using the JTAG command. So if you are using JTAG, you should be able to connect. If you only have SWD, then you need to be able to connect with the debugger during this tiny window. So I would try to debug it while the microcontroller is powered up. You might need 10, 50, 100 or more tries, but I think this is what you can do.
The other way is that you add a button to the reset pin and pull it to GND. Give it a try.
LikeLike
Dear Erich,
regarding your post I’m having a similar problem with internal KE02 EEPROM.
I’m using KDS (3.2.0) with Segger JLink Plus ( V622d ) on MKE02Z64xxx4 and I get the following silent error on the console:
Downloading 82 bytes @ address 0x10000004 – Verify failed
Downloading 4 bytes @ address 0x10000058 – Verify failed
Downloading 52 bytes @ address 0x1000005C – Verify failed
Downloading 4 bytes @ address 0x10000090 – Verify failed
Downloading 40 bytes @ address 0x10000094 – Verify failed
also in GDB server log file:
03-00000000-00-00001636-0029: Downloading 82 bytes @ address 0x10000004
02-00000000-00-00001681-01FA: T1768 001:637 JLINK_WriteMem(0x10000004, 0x0052 Bytes, …) – Data: 00 46 00 50 00 28 00 28 00 05 00 3C 00 46 A4 01 … — CPU_ReadMem(4 bytes @ 0xE000ED90) — ————————————– — Start of determining dirty areas in flash cache — End of determining dirty areas — Start of preparing flash programming — Calculating RAM usage — RAM usage = 4096 Bytes — Preserving CPU registers — Preparing memory — Determining CPU clock frequency — CPU frequency = 16021 kHz — Preparing target
02-00000000-00-00001794-01AC: — Downloading RAMCode — Checking target RAM & preparing RAMCode — End of preparing flash programming — CPU is running at 16021 kHz. — Start of comparing flash — CRC check was estimated as fastest method — Comparing range 0x0000 – 0xD5FF (107 Sectors, 53 KB), using multi-block CRC calculation — All CRCs match — Comparing range 0xF600 – 0xF7FF (1 Sector, 512 Bytes), using multi-block CRC calculation — All CRCs match
02-00000000-00-00001880-01F0: — Comparing range 0x0000 – 0xD5FF (107 Sectors, 53 KB), using alternative multi-block CRC calculation — All CRCs match — Comparing range 0xF600 – 0xF7FF (1 Sector, 512 Bytes), using alternative multi-block CRC calculation — All CRCs match — End of comparing flash — Start of erasing sectors — End of erasing sectors — Start of flash programming — End of flash programming — Start of verifying flash — End of verifying flash — Start of restoring — Restoring RAMCode — Restore target
02-00000000-00-00001882-012A: — Restore memory — Restoring CPU registers — End of restoring — Bank 0 @ 0x00000000: Skipped. Contents already match — Bank 0 @ 0x00000000: Skipped. Contents already match — CPU_WriteMem(16 bytes @ 0x1FFFFC00) — CPU_WriteMem(82 bytes @ 0x10000004) returns 0xFFFFFFFF (0246ms, 1002ms total)
02-00000000-00-00001883-00C2: T1768 001:883 JLINK_ReadMem (0x10000004, 0x0052 Bytes, …) — CPU_ReadMem(82 bytes @ 0x10000004) – Data: AA AA AA AA AA AA AA AA AA AA AA AA AA AA AA AA … returns 0x01 (0001ms, 1003ms total)
03-00000000-00-00001884-0010: – Verify failed
Any idea or suggetion to solve the problem?
Thank you very much
Mat
LikeLike
Hi Mat,
not sure, as I’m not using that device. But it seems to me that the Segger J-Link has a problem to access/read the internal EEPROM (that’s located at 0x100000000, right?).
Is this related to unlocking the device or just about using the EEPROM? In any case, I think the best would be if you contact the Segger support (they are usually very responsive) about this.
I hope this helps,
Erich
LikeLike
Hi Erich,
I thought it could be a KDS unlocking problem or advanced settings to be set, but probably you are right.
I will take your advice.
Thank you very much and congratulations for mcuoneclipse 😉
Mat
LikeLike
I would like to ask you for advice on your JLink tools. I am
trying to do FLASH erase on my secure Kinetis MKV31F512xxx12 device.
I would like to use J-link for this. Unfortunately I can’t
erase it due to device is secured. I do the following with JLink commander:
LikeLike
You did not provide your JLink commander command, but if you have secured your device with mass erase disabled, there is no way you will be able to recover it. You would have to unsolder your MKV32 and replace it with a new one.
LikeLike