
For the next semester I will do things differently in my advanced embedded systems programming course (INTRO) at the University of Lucerne: Instead of using the Freescale provided CodeWarrior, we will use a DIY tool chain for ARM with Eclipse Kepler.

Eclipse Kepler Ready for Classroom Usage
That way we we can offer students an open and convenient tool chain for their lab work, course assignments and own projects both at work and at home. So this post is about spending about 30 minutes to build your own tool chain which then can passed to students and coworkers so they have a complete toolchain installed in a few minutes.
Outline
The process is the following: instead having every student to install and configure the IDE, I prepare an archive. That way the students do not need to go through extended installation steps, and can be up and running in minutes.
What I have to prepare upfront:
- Download and install Eclipse with the needed libraries and tools: Eclipse, gcc, gdb, Segger, …
- Inside Eclipse, install the needed plugins: Processor Expert, eGit, Eclox, P&E, …
- Setup workspace environment and variables and export it so it can be re-distributed and re-used.
- The result is a layout/zip file with all the needed files for the students.
The students only need to:
- Unzip the archive with the Eclipse IDE and tools set up.
- Import the extra Processor Expert components (step only needed once).
- For a new workspace, import the XML settings.
And then they are ready to be productive 🙂
Constructing a DIY IDE for ARM Cortex-M
The steps below are for Windows 7 64bit, but similar steps apply to Linux and Mac too. To the normal Eclipse and ARM tools, I’m adding the Freescale Kinetis SDK and Freescale Processor Expert to my IDE.
My class is currently using the Freescale FRDM-KL25Z (migrating to a Kinetis K20 and a FRDM-K64F). So what I need for the course is:
- Eclipse Kepler from Eclipse.org (Open Source)
- GCC ARM Embedded toolchain from ARM (Open Source)
- Kinetis SDK from Freescale, with my port of FreeRTOS for it (Open Source)
- GNU ARM Eclipse plugins (Open Source)
- Segger and P&E GDB debugging (Properietary)
- FreeRTOS Kernel Awareness (Proprietary)
- Processor Expert (Proprietary)
- McuOnEclipse GitHub examples
- McuOnEclipse components on SourceForge (see “McuOnEclipse Releases on SourceForge“)
- Doxygen with Eclox (Open Source)
- eGit version control plugin (Open Source)
- Braketeer (Open Source)
Constructing the IDE for the Classroom
I’m using C:\Tools\IDE as my installation folder. Steps are explained in my DIY series (see https://mcuoneclipse.com/2014/02/15/diy-free-toolchain-for-kinetis-part-9-express-setup-in-8-steps/), but repeated here so everything is in one place.
The steps to download and construct the IDE:
- Eclipse Kepler: Got to http://www.eclipse.org/downloads/ and download the “Eclipse IDE for C/C++ Developers” (eclipse-cpp-kepler-SR2-win32-x86_64.zip). Extract it into C:\Tools\IDE
- GCC ARM Embedded: Go to https://launchpad.net/gcc-arm-embedded and download the archive (gcc-arm-none-eabi-4_8-2014q1-20140314-win32.zip). Extract it into C:\Tools\IDE\gcc
- Cross Build tools: Go to http://sourceforge.net/projects/gnuarmeclipse/files/Miscellaneous/ and download the Cross Build Tools.zip file. Extract echo, rm and make into C:\Tools\IDE\gcc\bin (rename the files so they are echo.exe, make.exe and rm.exe)
- Kinetis SDK: Go to http://www.freescale.com/ksdk and download the Freescale Kinetis SDK package (KSDK_1.0.0-beta.zip). Extract it into C:\Tools\IDE\sdk
- FreeRTOS for Kinetis SDK: Go to https://github.com/ErichStyger/mcuoneclipse/ and download the FreeRTOS zip file (FreeRTOS_V8.0.0.zip). Place the files (without the root folder) into C:\Tools\IDE\sdk\KSDK_1.0.0-Beta\rtos\FreeRTOS
- Segger: Go to http://www.segger.com/jlink-software.html and download the J-Link Software and Documentation pack. Install it into C:\Tools\segger
- MCUonEclipse Processor Expert Components: Go to https://sourceforge.net/projects/mcuoneclipse/files/PEx%20Components/ and download the latest zip archive, and extract the Part1_*.PEupd and Part2_*.PEupd files. Place the two files into C:\Tools\IDE.
We will install them later from Eclipse.
Next, I’m going to install the needed Eclipse plugins so they are present in the IDE. I launch Eclipse (C:\Tools\IDE\eclipse\eclipse.exe). Using the menu Help > Install New Software I install the following plugins with the provided update site (‘Work with:’):
- GNU ARM Eclipse: Use http://gnuarmeclipse.sourceforge.net/updates as update site and install the GNU ARM Eclipse plugins.
- GNU ARM PEMicro: Use http://www.pemicro.com/eclipse/updates as update site and install the P&E plugins.
- Processor Expert: Go to http://www.freescale.com/webapp/sps/site/prod_summary.jsp?code=PE_DRIVER_SUITE&tid=PEH and download the ‘Microcontrollers Driver Suite plug-in for existing Eclipse’ (DriverSuite_10.4_Install_into_Eclipse_3.7_4.2.zip). Unzip the archive.Use com.freescale.eclipse3.7-4.2.updater.custom.updatesite.zip as local update site and install it. Same for PExDriverSuite_v10.4_eclipse.zip: use as local update site and install it.
- FreeRTOS (Wittenstein) State Viewer: Install http://www.highintegritysystems.com/StateViewer/
- Eclox (optional): Use download.gna.org/eclox/update/ as update site and install eclox (no need for the ‘hot’ part)
- eGit (optional): Use http://download.eclipse.org/egit/updates as update site and install it.
- Backeteer: (see “Bracketeer: the ultimate bracket plugin“). Use chookapp.github.com/ChookappUpdateSite/ as update site and install it including CDT support.
With this, I have my DIY IDE ready, and the directory structure looks like this:

DIY Eclipse IDE for ARM Directory Overview
Eclipse Workspace Environment
While I have a functional IDE, there are a few things which need to be setup for every new workspace. In Eclipse I can use the Export function to export the settings as XML, see “Copy my workspace settings“.
- ${jlink_path}is the path totheSeggerGDB server, defined as ‘StringSubstitution’ (menu Window > Preferences > Run/Debug > String Substitution) to ${eclipse_home}\..\segger
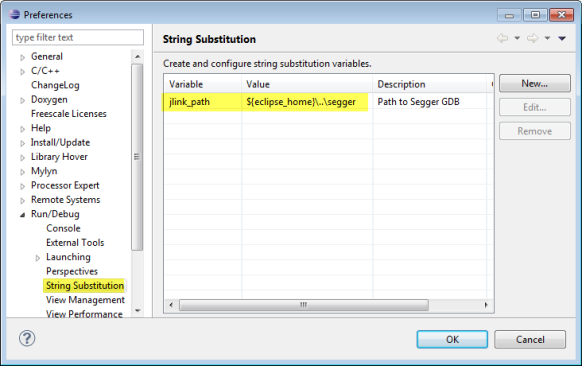
Segger jlink_path string variable
This is used in the debugger settings for Segger J-Link:

Segger jlink_path
- ${gcc_path} which points to the GCC ARM Embedded binaries (menu Window > Preferences > C/C++ > Build > Build Variables: ${eclipse_home}\..\gcc\bin

gcc_path Build Variable
This is used in the build panel for the tool chain:

gcc_path in project settings
- KSDK_LOC Linked resource variable pointing totheKinetis SDK root folder (menu Window > Preferences > General > Workspace > Linked resources) pointing to C:\Tools\IDE\sdk\KSDK_1.0.0-Beta:

Linked Ressource Setting
This is used to create linked files to the Kinetis SDK while adding files to the project:

File Operation to use Link to Files
- ksdk_path which points totheKinetis SDK (${eclipse_home}\..\sdk\KSDK_1.0.0-Beta) with menu Window > Preferences:

ksdk_path build variable
This is used in the build tool settings e.g. for the header file include path:


This and other options just need to be defined once: I can expert them as XML file and then students can import that into a new workspace.
Packaging
The above Eclipse workspace settings get exported with the menu File > Export > General > Preferences:

Exporting Eclipse Preferences
And then store it as an XML (.epf) file inside the IDE root folder:

Exporting Preferences
With all the needed files in C:\Tools\IDE, I can put everything in a single zip file which I give to the students:

Eclipse IDE with configuration files
The need to:
- Unpack the archive to C:\Tools
- Launch Eclipse, then import the two *.PEupd files in C:\Tools\IDE with the menu Processor Expert > Import Component(s)
- For their new workspace, import the settings (File > Import > Preferences) from C:\Tools\IDE\wsp_preferences.epf
Summary
It is a little work to have my classroom IDE put together, but compared to silicon vendor provided Eclipse versions, I get *exactly* what I need, even with more features and flexibility. Moreover, I’m not limited to the ARM microcontroller of a single vendor: I have a cross-platform and cross-vendor IDE all together. And with providing the zip file with a few extra files for the students is much easier and faster than to go with the silicon vendor IDEs anyway.
Putting together the above DIY Eclipse took about one hour for me (one time, including downloading and installing all files). With this, I have an IDE with many cool plugins pre-installed for development of ARM microcontroller projects. And students are able debug their first project just in a few minutes 🙂
Happy Constructing 🙂

Erich, This is excellent. I some how got roped back into teaching next year part time and had some issues with CW in the classroom. I may have to look at this more and see if it is a good direction.
Great work.
Bill
LikeLike
Erich, the toolchain global path is not stored in the project, so you can directly enter an absolute path there, it does not affect project portability.
Liviu
LikeLike
Hi Liviu,
I do not want (need) the toolchain path in the project, I want it setup for the workspace. I see that my approach does not work cleanly yet (if I start a new workspace, I need to browse/specify the toolchain path in your plugin the first time. How can I avoid that? I want to have the IDE installed, and the students should have everything set up. I thought I saw in the preferences a panel showing the variables you are using, but cannot find it rigth now?
LikeLike
Erich, would you share your package?
Cai.
LikeLike
Hi Cai,
yes, but I need to think what would be the best way for this.
On the other end: if you follow the steps, it takes you less about 30 minutes (depends if you use all features/etc).
Erich
LikeLike
Hello
I will be happy if you do the same thing using the STM32 family (from ST)
Best regards
Yves Accard
LikeLike
It already supports the STM32 family 🙂 Yes, Processor Expert and the Kinetis SDK do not apply for the STM32, but everything else does, so yo can use this (e.g. with the Segger J-Link) with the STM32.
LikeLike
Brilliant! Great tutorial. Thanks Erich.
If other MCU vendors had someone like you to thoughtfully explain how to set up Eclipse for their silicon on Windows, Mac, and Linux, there would be tens of thousands of hours saved for their users and the vendors would sell a great deal more of their silicon, AND there would be a whole lot more MCU based inventions created by people who are not engineers but have a great idea and are willing to work hard to make it happen.
This is why Arduino and Raspberry Pi are so popular, they may not be the best MCUs, BUT they are usable.
It should not take weeks to figure out how to configure Eclipse to work with a new vendor’s products, but in the last few months I have had to do that with both STM and NXP. They both have “free” IDEs but they are so limited as to be unusable.
It’s too bad Freescale doesn’t pay you for making their silicon so available to the average technical non-engineer such as myself.
LikeLike
I’ve been using codelite (codelite.org) for developing on ARM and AVR’s processors (using gcc)
LikeLike
Pingback: Tutorial: Data Logger with the FRDM-K64F Board | MCU on Eclipse
Pingback: Tutorial: Freedom Board with Adafruit Ultimate GPS Data Logger Shield | MCU on Eclipse
Thanks for setting up such a great resource, Erich! I just walked through this setup and quickly had a new Eclipse environment up and running for my Kinetis project. Nicely done!
My hardware is a FRDM-KL46Z and I’m using the OpenSDA firmware and GDB server from PEMicro.
I’m having a little trouble with the FreeRTOS StateViewer plugin that I’m hoping you can help with. I have opened the three DSF tables views: Task, Queue, and Timer. The Queue and Timer tables seem to work as expected but the Task table is always blank. I’ve noticed that when I pause the debugger and click on the Timer and Queue tabs I can see the memory reads in the GDB server log window. However, clicking the Task tab never generates any memory reads. I did try using the non-DSF debugging and views but they behaved similarly. Have you experienced this behavior or do you have any ideas how I might be able to fix it?
Thanks!
Eric
LikeLike
The DSF viewers work for me. But make sure you use the OpenRTOS (*not* the SafeRTOS) ones. And make sure you have the latest and greatest installed. I have 2.0.6.201309271121
LikeLike
The Safe vs. Open version was the problem. It is so very often the simple things. Thanks so much!
LikeLike
Hello Erich, I’m starting to use mBed platforms after a couple of years with Arduinos. I use a Macbook Pro for my work and wonder if I can install this suite of tools using Wine so that I can use PE which appears to be windows only?
Cheers
Mike
LikeLike
I do not have a Mac, so I cannot tell for sure. But I now that students in my class were using Macs and a VM and they had it working nicely.
LikeLike
Pingback: Tutorial: DIY Kinetis SDK Project with Eclipse – Startup | MCU on Eclipse
Pingback: Replicating an Eclipse Update Site for Offline Usage | MCU on Eclipse
I just picked up a teensy 3.1 with a Freescale Cortex M4 processor and am looking to port my code from my FRDM kl25z over to it. I’m hoping that an approach like this will get me there as codewarrior doesn’t seem to support this chip/board.
Most people run a specialized arduino code on it, but I would much rather run straight C++ with my processor expert beans and code from my FRDM board. One issue I forsee is the use of the Half Kay bootloader where the frdm board uses the open sda.
I’ll do some more research. Thanks a lot for another terrific how to.
You’re the reason I stick with Freescale chips!
-Ben
LikeLike
Hi Ben,
when I saw the first time the Teensy 3.x board, I immediately thought I need one. But then I saw that there is no way to debug it with a JTAG/SWO adapter. I saw several posts about this, but as far as I can tell the debug pins have not been routed to the pin headers. So you cannot use normal tools with that board :-(. So I’m affraid that you will not be able to debug that board in the usual way, except with that Halfkay bootloader 😦
LikeLike
Hi Ben, I finally ordered a Teensy 3.1 and I have hacked it to do SWD/JTAG debugging 🙂
See https://mcuoneclipse.com/2014/08/09/hacking-the-teensy-v3-1-for-swd-debugging/
LikeLike
Pingback: printf() and scanf() with GNU ARM Libraries | MCU on Eclipse
Pingback: Switching ARM GNU Tool Chain and Libraries in Kinetis Design Studio | MCU on Eclipse
Pingback: Hacking the Teensy V3.1 for SWD Debugging | MCU on Eclipse
I Erich, thank you for yours excellents posts.
I have a problem when I try to install PExDriversuite :
“An error occurred while installing the items
session context was:(profile=epp.package.cpp, phase=org.eclipse.equinox.internal.p2.engine.phases.Install, operand=null –> [R]com.freescale.processorexpert.standalone_root 10.4.0, action=com.freescale.updater.customactions.actions.FreescaleInstall).
org/eclipse/core/runtime/adaptor/LocationManager
org/eclipse/core/runtime/adaptor/LocationManager”
I have installed Eclipse luna (an error?)
Have you have any ideas how I might be able to fix it?
Thanks
Jean-Louis Vern
LikeLike
Hi Jean-Louis,
Processor Expert Driver Suite plugins do not support Eclipse Luna (yet). You need Eclipse Kepler for this (which works fine for me).
Erich
LikeLike
Hello, and thank you for your reply.
When I download the “Kinetis SDK”, it ceases to be rated “beta” and is no longer as “zip” but in executable form.
Several things are not very clear to me:
– Should I choose the “minimal” installation or “custom” (selecting all?) (And after crushing “FreeRTOS”?)
– If you install to “C: \ Tools \ IDE \ sdk” it is not created additional directory KDSK_1.0.0 (-beta). New directories are simply in ..sdk\. I’m not sure that this will not have an impact…
Jean-Louis
LikeLike
Yes, the new v1.0.0-ga SDK comes with an installer. I have not adopted it yet into the DYI toolchain on my side (but I will when I get the time). You can install it into the default installation (which is in C:\Freescale\KSDK_1.0.0) and then copy the files into your DIY toolchain location. Because of the folder name changes and others, SDK beta projects are not compatible with the GA SDK.
LikeLike
Pingback: GNU Libs with Debug Information: Rebuilding the GNU ARM Libraries | MCU on Eclipse
Hi Erich,
Thank you for the excellent tutorial!
I was able to install all pieces of software following your steps. Then I tried setting up Eclipse Workspace Environment and couldn’t find Toolchains on build panel as shown on #2. gcc_path in project settings (C/C++ Build -> Settings panel). In other words, Toolchains is missing in my set up. Could you let me know what could be wrong on my set up?
Thanks,
Jack
LikeLike
Hi Jack,
I think you missed this step:
GNU ARM Eclipse: Use http://gnuarmeclipse.sourceforge.net/updates as update site and install the GNU ARM Eclipse plugins.
?
Erich
LikeLike
Hi Erich,
Thanks for your quick response. I checked my installation and it seems that I installed the GNU ARM Eclipse plugins. I will follow your post and re-install again. Hopefully I can resolve this issue.
Jack
LikeLike
This is great! I have used about 90% of your instructions (and very little variance) to setup the same environment under Mac OS X. Thank you for the help!
LikeLike
Hi Mike,
glad to hear that. Have you installed Processor Expert too?
Erich
LikeLike
Hi Erich,
Regarding the Kinetis SDK, which one do i download?
“Freescale Kinetis SDK_1.0.0 – Windows installer” (This is a .exe – i guess i can use winrar to extract)
“KSDK 1.0.0-GA Eclipse Update 1.0.1” – This is a zip file but appears to be an update
Also does PE support Luna yet? do you know when this will happen? (i am guessing it will happen when KDS gets updated)
Thanks
LikeLike
Yes, the Kinetis SDK is an installer exe (run the executable on Windows). You do not need to extract it.
And that upate is an Eclipse update (install it in Eclipse using menu Help > Install new software).
Processor Expert does not support Luna yet. This is probably something to come in 2015.
Erich
LikeLike
Do you know if this is already avallable?
LikeLike
Yes, it is available, and has been released at the same time as Kinetis Design Studio v3.0.0. It is called ‘Processor Expert for Kinetis v3.0.0’ and available on the http://www.freescale.com/webapp/sps/site/prod_summary.jsp?code=PE_DRIVER_SUITE&tid=PEH:
PEx-KINETIS-v3.0-PLUGIN-ECLIPSE_4.4 (REV 3.0.0) by FREESCALE
Processor Expert for Kinetis plug-in for existing Eclipse 4.4 (SOMNIUM DRT Freescale Kinetis Edition, Emprog ThunderBench 3.38 or later)…
LikeLike
Pingback: Tutorial: Playing MP3 Files with VS1053B and FRDM Board | MCU on Eclipse
In step 3 : (rename the files so they are echo.exe, make.exe and rm.exe) There are many files, I don’t now which file I should to rename.
LikeLike
check the “Cross Build Tools.zip” (https://sourceforge.net/projects/gnuarmeclipse/files/Build%20Tools/Cross%20Build%20Tools.zip/download) file. The files in in it are named cs-make.exe, cs-rm.exe and echo.exe.
LikeLike
Pingback: Toolchain: KSDK 1.2.0 with Eclipse 4.4 (Luna) and GNU ARM Plugin | Centaurian
Eric this was a great blog, really helped me figure a lot out. KSDK 1.2.0 is out, Awesome! Now you can use Eclipse Luna with KSDK. I decided to create a similar blog to yours but for KSDK 1.2.0 as a reminder to myself on all the steps to follow but I’m sure others will appreciate it as well. Please check it out at: http://centaurian.co.uk/2015/05/22/toolchain-ksdk-1-2-0-with-eclipse-4-4-luna-and-gnu-arm-plugin/
LikeLike
Thanks for sharing, excellent summary and post you have put together, congratulations!
LikeLike
HI,
I tried to find out the the Part1_*.PEupd and Part2_*.PEupd files from https://sourceforge.net/projects/mcuoneclipse/. But unfortunately i was not able to find it as the file is not in github. What should i do now?
Can you help me sir
LikeLike
The components have been moved to SourceForge (https://sourceforge.net/projects/mcuoneclipse/), see https://mcuoneclipse.com/2014/10/21/mcuoneclipse-releases-on-sourceforge/
LikeLike
It’s a nice and kind guide to set up DIY IDE.
I am trying to do the same for my MCU. Thanks for your complete tutorial.
By the way, if I take different MCU, which parts of the steps above should be replaced ?
LikeLiked by 1 person
You will have to use a different tool chain, if you are going to use it for something non-ARM.
LikeLike
Hi,
How to add the library. Please give me the idea.
Thankyou.
LikeLike
See https://mcuoneclipse.com/2017/07/23/how-to-use-custom-library-names-with-gnu-linker-and-eclipse/
LikeLike