On Friday, Freescale has updated CodeWarrior for MCU10 from V10.4 to V10.5, available on http://www.freescale.com/cwmcu10. I have not had much time to use it over the week-end, but here is a list of the things which in my view will make me switch my projects over to 10.5 and use it in my university classes:
- Smaller: smaller setup and less disk space
- Faster: faster debugging and flashing
- Features: Eclipse Juno, detachable editor views, ‘unlimited’ breakpoints, simplified debugger attach/connect/download, and more.
Installer
As in MCU10.4, the installer allows me just to install the needed architectures.
💡 No need to uninstall an earlier version of CodeWarrior. I have 10.5 installed in parallel (in a different folder) from the earlier CodeWarrior versions.

MCU10.5 Installer
Even with more devices supported, the needed disk space and download size is reduced.
For a combined S08/RS08, ColdFire and Kinetis/ARM installation:
- MCU10.4: 1.11 GB setup/download size, 3.2 GB installed on disk
- MCU10.5: 1.05 GB setup/download size, 2.4 GB installed on disk
For Kinetis/ARM only:
- MCU10.4: 852 MB setup/download size, 2.2 GB installed on disk
- MCU10.5: 684 MB setup/download size, 1.4 GB installed on disk
So 10.5 is smaller to download, and uses much less space on disk :-).
Eclipse Juno
The biggest visual change is that CodeWarrior 10.5 is using the Eclipse Juno 4.2.1 and CDT 8.1.1.

Eclipse Juno in 10.5
Debugger Toolbar Icons
With the move to Eclipse Juno, the debugger icons for stepping/etc are moved are not any more in the Debug view:
Moved Debugging Icons because of Juno
The CodeWarrior specific ones like ‘Reset’ or ‘Restart’ are still in Debug view. The motivation for the Eclipse community to move the standard debugging icons to the main toolbar was to allow debug operations without having the ‘Debug’ view open. Not a big deal until I get used to search for the icons in the main toolbar I guess.
💡 The old toolbar can be restored with ‘Show Debug Toolbar’:
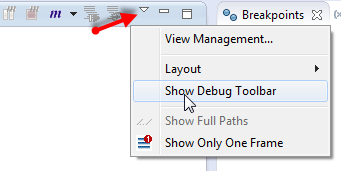
Show Debug Toolbar
Detachable Views
Eclipse Juno comes with a nice feature: Detachable Views 🙂 With the earlier version, it was possible to have a detached main window or view. But this was not supported for the Edit view (the one with the sources) where it would make most sense. Now this is supported too:

Detached Source Window
The detached view is always in front of the main window, but can be moved everywhere, as well outside (e.g. on a second display).
To detach, grab the tab and move it outside of the main window:

Detaching Source Window
To ‘un-detach’, grab the view tab (the tab, not the window title bar!) and drop it back in to the main window:

Un-Detaching Source Window
💡 To move a window to its ‘tabbed’ position, simply drag it to the tab location in the tab list.
Debugger Download, Connect and Attach
Instead of going trough different launch configurations, MCU10.5 makes it much simpler to either download, connect or attach: I can select the debug session type in the same launch configuration now:

Debug Session Type
If selecting ‘Custom’, I can disable the reset sequence and the initialization script in the dialog, without going into the target configuration.
Debugging Performance
I noticed that debugging/stepping is faster with 10.5. I measured the time to download for a 64 KByte application with P&E OpenSDA (OpenSDA V1.06 firmware):
- MCU10.4: 13 seconds
- MCU10.5: 10 seconds
So this is at least for this combination a 25% improvement :-).
MCU10.5 installs in the installation folder a new OpenSDA firmware:
C:\Freescale\CW MCU v10.5\OpenSDA\firmware
It has the DEBUG-APP_Pemicro_v108.SDA firmware in it: I used so far V1.06 and missed that P&E has released a new version on their website. Using that firmware added yet again about 10% improvement:
- MCU10.5: 9 seconds (with V1.08 P&E OpenSDA Firmware) 🙂
The Segger OpenSDA is still 30% faster (6 seconds instead of 9 seconds), but it does not offer a combined USB CDC device class :-(. So if you do not need the virtual COM port, the Segger OpenSDA is a faster option.
Processor Expert and C++
The release notes say that Processor Expert supports now C++. Checking the generated sources it indeed has added awareness for C++. However, the wizard to create new projects still do not allow to select Processor Expert as option for C++ projects :-(. So from a user perspective C++ is still not easily possible, so I still need to use my manual approach described here.
Segger ‘Unlimited’ Breakpoints
Microcontroller like the KL25Z on the FRDM-KL25Z have only a limited number of breakpoints available. MCU10.5 supports now the ‘unlimited’ breakpoint feature of Segger: I can set more than the normal two breakpoints: 🙂
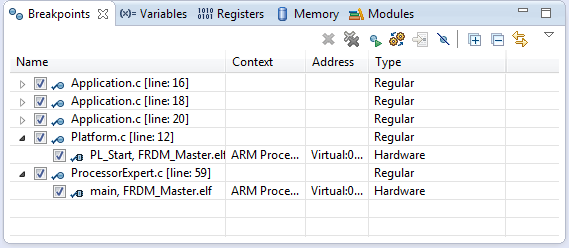
Unlimited number of breakpoints
Segger is using the hardware breakpoints first, and then is using ‘software’ breakpoints in FLASH:

Segger Control Panel with two hardware breakpoints and 3 ‘software’ breakpoints
Because the Segger unit is programming the flash ‘on the fly’ and very fast, the added delay is nearly not noticeable.
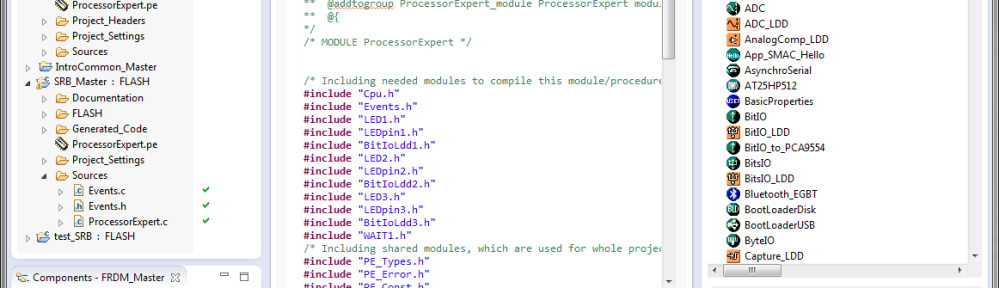
Processor Expert Pins Searching is Over!
Can you spot and select in the list below the pin PTC0?

Find PTC0
Yes, with all the pin muxing and multi-purpose-pin assignments it is pretty hard to spot it :-(. This even gets harder as the list can contain many, many pins, so you might scroll up and down too.
The good news is: With 10.5 it is possible to enter text and it will filter for every item having that text in it :-):

Filtering for Pin Name
Upgrading Projects
So far I have not seen any issues with my projects I upgraded to MCU10.5. As a general rule: Eclipse might add some more stuff into the project files, so while upgrading typically works fine, downgrading (going to previous Eclipse versions) might be problematic. For sure I recommend to use a new workspace, and *not* to share a workspace with different versions of Eclipse. So I have a workspace for 10.4 and a workspace for 10.5.
License
CodeWarrior needs a new 10.5 license file, so an existing 10.4 one does not work, so you need to do a license version renewal o the Freescale web site. Additionally, the MQX Kernel-Awareness plugin is included in all (including free) editions. Unfortunately for FreeRTOS you would need to use GDB as described in this post.
Summary
The new CodeWarrior for MCU10.5 is smaller, it is faster and comes with a set of new nice features. Eclipse Juno has for sure the biggest and most visual impact, and for sure I will need more time to explore it further. What for me counts most is the increased performance, and this is what counts every day.
Happy Upgrading 🙂

Reblogged this on Sutoprise Avenue, A SutoCom Source.
LikeLike
Hi Erich, good article!
I have downloaded the CW 10.5 and i have tried to make a small project, but i found a small problem.
Few components in the proj:
Cpu: kinetis kl25z128 (as in the FRDM-KL25Z)
ExtInt: (general input pin as hardware interrupt source) on pin PTA4 (yes, the NMI pin)
Even though i disabled the NMI pin in the Internal peripherals properties of component inspector Cpu, the PE found an error on ExtInt component relative to PTA4 pin: Peripheral “TSI0_CH5/PTA4/I2C1_SDA/TPM0_CH1/NMI_b” does not support interrupt
And if you try to make the same project with the 10.4 version, it build without errors! May be a small bug?
LikeLike
Hi Antoinio,
thanks 🙂
That indeed sounds like a bug. I suggest that you submit this one on the Freescale forum as it is monitored by Processor Expert engineers. Or have you done this already?
LikeLike
Not yet Erich.. if you want just do even you.
LikeLike
Pingback: Optimized BitIO_LDD Programming with Processor Expert | MCU on Eclipse
For anyone who had problems installing CW 10.4 … like me… CW 10.5 installed without any drama and was much quicker than earlier CW versions. 10.4 was a big problem for me and so I was concerned about 10.5… thankfully my concerns were unwarranted and all installed without a hitch… whew… I am quite relieved.
Anyway, just some feedback from someone who had past installation issues with 10.4
Thanks again Erich for the excellent site and work that you do!
Cheers,
Sam
LikeLike
Hi Sam,
thanks :-), and thanks for letting us all know. On my machine the installation of 10.5 still takes a lot of time (more time than I think it should, but maybe it is because I have so many differnt tool chains installed).
Good to know that 10.5 works on your side.
LikeLike
Good day Erich,
You are most welcome!
In my case 10.4 took hours to install and finally I had to stop and then boot into safe mode to get it to install. CW 10.5 took me about 10 minutes for about 90% of the install and then it took maybe 15 minutes more for the final 10%. Overall I found the installation much faster than previous versions and more importantly no drama!
As for how well 10.5 works… I cannot say, as I just installed it and I am just writing a small program as I type this. So far I am pleased and it does seem much “snappier” than previous versions. I will have a better handle on how well this new version is in a few weeks as I work on a new Kinetis (K60) project.
Cheers,
Sam
LikeLike
Pingback: Link Order: Using Multiple Definitions with ARM GNU Linker and Eclipse | MCU on Eclipse
Pingback: How to Avoid Slow Processor Expert Projects | MCU on Eclipse
Pingback: Be Aware of the Baud Problem | MCU on Eclipse
Pingback: Tutorial: Using the FRDM-KL25Z as Low Power Board | MCU on Eclipse
I had been putting off upgrading until I read this. I just upgraded because I am migrating from a freescale tower setup to a custom board and had to move about 20 pins. In 10.4 this was like finding a needle in a haystack in PE, and in 10.5 that search feature is that cat’s meow.
LikeLike
Yes, it sounds like a small feature, but it is saving my day every day 🙂
LikeLike
Pingback: Tutorial: Using a Terminal Input and Output; *without* printf() and scanf() | MCU on Eclipse
Although I love Eclipse Juno, and it’s time Freescale updated to it, Freescale seems to have missed the Eclipse Marketplace client. This is normally a part of the CDT build (which looks like what Freescale based CW 10.5 off of).
When I try to manually install the client, using the Help -> Install New Software -> http://download.eclipse.org/releases/juno -> General Purpose Tools -> Marketplace client; Everything appears to go as planned but apon restarting CW 10.5, I get some error messages, and I’m told about other updates that if I install, basicly kill CW 10.5.
Anyone else seeing this issue?
LikeLike
I have not missed the Marketplace client, as I can use the normal updater links from http://marketplace.eclipse.org instead.
So I never tried to add the client itself.
LikeLike
Thanks for your personal marvelous posting! I quite enjoyed reading it,
you ccould be a great author.I willl be sure tto bookmark yoyr blog
and definitely will come back in the future. I want to encourage
yourself to continue your great posts,have a nice holidy weekend!
LikeLike
Hi
I am working with CodeWarrior 10.5 and I am trying to automate some of the development steps. Using command line (batch files) I want to create a new project, import an executable file, set the breakpoints, attach some actions to the breakpoints, run a debug session and close the IDE if some conditions are met. Using TCL scripts in debugger shell and a batch file, I am enable to set breakpoint, run the debug session and close the IDE; but I did not find a way to create a new project, Import the executable file and attach an action to breakpoint. If there is a way please guide me.
LikeLike
I’m not aware for an automated way to create a project inside Eclipse. I recommend that you create that project outside of the IDE with a script. You could take an ’empty’ project as an example. For importing a project, there might be some scripting inside Eclipse (not sure about this, I have not done that myself). For attaching an an action to a breakpoint I would look at Eclipse CDT interface.
On an other thought: you might be better off using GDB for example inside Kinetis Design Studio than using CodeWarrior for this, as GDB has extensive scripting support.
I hope this helps,
Erich
LikeLike
Pingback: USB with the TWR-K60F120M and TWR-K70F120M | MCU on Eclipse