
This is the second part of a multi-part tutorial about how to set up an open source tool chain with GNU ARM gcc + Eclipse to build and debug an application for Kinetis ARM devices.
List of Tutorials
- Part 1: Setting up ARM GNU tool chain
- Part 2: Setting up Eclipse IDE
- Part 3: Setting up the debugger (P&E and Segger)
- Part 4: Setting up Processor Expert
- Part 5: Setting up FreeRTOS Kernel Awareness
- Part 6: Linux Host Support with OpenOCD and CMSIS-DAP
- Part 7: GNU ARM Eclipse Plugins
- Part 8: Processor Expert with GNU ARM Eclipse Plugins
- Part 9: DIY Free Toolchain for Kinetis: Part 9 – Express Setup in 8 Steps
- Part 10 – Project Creation with GNU ARM Eclipse 2.1.1

Eclipse Kepler
Eclipse? Kepler!
❗ If you plan to use Eclipse with Processor Expert (what I recommend anyway ;-): Eclipse Luna is *NOT* supported in Processor Expert 10.4! Eclipse Luna is expected to be supported in Processor Expert 10.5 coming out in 2015! So if you are using Processor Expert 10.4, then make sure you are using Eclipse Kepler.
In my previous post I showed how to use the ARM GNU tool chain to compile and build an application for the FRDM-KL25Z board. I was not using a special editor or IDE: a simple thing like Notepad is what is needed. Of course you can use any text editor. However, while using Notepad or similar plus make files is fine for small projects, using an IDE will greatly improve productivity. I’m adding here the Eclipse IDE, as I use it for many of my projects. While Eclipse for sure cannot meet the needs of everyone, it is today a de-facto standard in my view.
Many vendors today deliver their tool chains bundled with Eclipse, and most of the time this is a modified version of Eclipse. While this is not wrong, it always takes time for the vendors to adopt to the latest and greatest version of Eclipse. So instead of waiting, using my steps you can add the most recent version of Eclipse to the ARM gcc from the first part of this tutorial.
At the time of this writing, the latest Eclipse version has the code name ‘Kepler’. And this is what I’m going to install.
❗ This is not a tutorial on Eclipse itself. It is expected that you have basic IDE and especially Eclipse knowledge.
Downloading and Installing Eclipse
- Go to http://www.eclipse.org and select the Download tab. A direct link to the Kepler release is with http://www.eclipse.org/kepler/
- Download “Eclipse IDE for C/C++ Developers” for your platform:

Eclipse IDE for C C++ Developers
- Unpack the archive into into a filder, e.g. into “C:\Freescale\Kepler” so you have a folder structure like “C:\Freescale\Kepler\eclipse”. Of course the structure is up to you, but this way the directory structure is similar to e.g. CodeWarrior.
- Use eclipse\eclipse.exe to launch the IDE. I recommend to add a shortcut, plus to add -showlocation to the command line (see this post).

Eclipse Kepler Splash Screen


Launching Eclipse
Eclipse will ask you for a workspace location. The workspace is where Eclipse stores project information and settings, and where you can have the project files.

Workspace Selection
If it is the first time you launch Eclipse, it will show a welcome screen. Click the ‘Go to the workbench’:

Go to Workbench
This then will show the workbench:

Eclipse Kepler Workbench
Creating Project
I’m going to create an Eclipse project, with the same files as I used in part one of this tutorial. But instead of using a make file, I let Eclipse create and manage that make file. That way I do not need to ‘program’ the make file.
💡 I’m using here the standard GNU build tools integration which comes with Eclipse. A build tools integration provides panels and more to set up compiler options and so on. The standard GNU panels are very basic, and there is a more powerful one: the GNUARM Eclipse plug-in. This plugin is very similar to the one Freescale delivers in their Eclipse based CodeWarrior. To keep things simple, I’m going with the standard GNU build tool integration and panels.
- Create a new project with the menu File > New > C Project.
- Give a Project name, select Empty Project from the Executable group and have Cross GCC as tool chain selected:

C Project
- In the next dialog, you can select your configurations. I usually only need ‘Debug’ (see this post):

Select Configurations
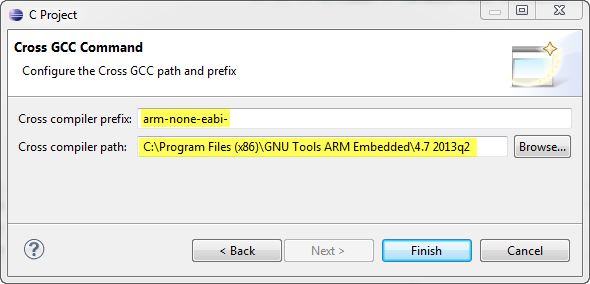
- Next, you need to enter the compiler prefix (arm-none-eabi-) with the path to your GNU ARM installation from part one of this tutorial (C:\Program Files (x86)\GNU Tools ARM Embedded\4.7 2013q2, where you have ARM GNU gcc installed). You need to enter this only once (Eclipse remembers the settings for next time). Linux users use something like /home//gcc-arm-none-eabi-4_7-2013q2.

Cross GCC Command
- Press Finish, and the project gets created:

H Project Created


❗ There is that ‘Program “gcc” not found in PATH’ error message. Don’t worry about this one.
Adding Source Files
- Download the .zip file from part one of this tutorial from here.
- Place the Sources, Project_Settings and Project_Headers folder inside your project, so it looks like this:

Project Explorer with Project Files

💡 You can drag&drop the files from WinZip into the Eclipse Project Explorer tab.
Project Properties
We cannot build the project yet, as the build tools are not fully configured yet. For example we need to tell the compiler where to look for header files, which file to generate, and so on.
To change the project settings, select the project in the Project Explorer view and use the menu Project > Properties:

Project Properties
- Go to the C/C++ Build > Settings. The Cross Settings shall have the entries we specified during project creation. If you switch later to a different GNU ARM gcc version, then you can change the settings in the dialog below. Linux users use something like “/home//gcc-arm-none-eabi-4_7-2013q2”.

Cross Settings
- In the Cross GCC Compiler > Includes, add the include paths where the compiler has to find the header files. Use the ‘+’ icon to add new paths or copy-paste them from an existing project:

Added Include Paths
- In the Compiler > Miscellaneous settings, add the following options (use -mcpu=cortex-m4 for M4 cores, or cortex-m0plus for M0+ cores):
-mcpu=cortex-m0 -mabi=aapcs -mthumb -msoft-float
Compiler Miscellaneous Options
See this GNU ARM options for details.
- In the Linker > General settings, enable -nostartfiles:

Do not use standard start files
- Under Linker > Miscellaneous, specify that we are compiling in thumb mode, and specifiy with the -T option the linker file. With the -mcpu we need to specify the core (cortex-m0, cortex-m0plus or cortex-m4 (depending on the core used), see comments to this post below):
-mthumb -mcpu=cortex-m0 -T${ProjDirPath}/Project_Settings/Linker_Files/MKL25Z128_flash.ld
Linker Miscellaneous Options (add as well the -mcpu option!)
- Under the Build Artifact tab, by default the Artifact extension is empty :-(. Set the extension to ‘elf’:

Build Artifact with Artifact Extension
- Finally, I want to create an S19 file so I can load it with the FRDM-KL25Z OpenSDA MSD bootloader as in part one of this tutorial. The command line to generate an S19 file from the ELF file is
arm-none-eabi-objcopy -O srec ${ProjDirPath}/Debug/${ProjName}.${BuildArtifactFileExt} ${ProjName}.s19


Generating S19 File as Post Build Action
Building the Project
With this, we are ready to build the project. Select the project in the Project Explore and use the ‘hammer’ icon to build it:

Building Project
In the Console View you can see the command lines and output of the tools:

Console View with Build Tools Output
The Problems view should not show any errors:

Problems view with no errors
💡 The Problems view reads the output of the Console View. I always trust the Console View more than the problem view, because if the build tools are generating strange or unusual error messages, they might not show up in the Problems view.
Application ELF and S19 Files
The application .elf and .s19 files are generated inside the project:

Debug Folder with Output Files
💡 The output folder cotains all the object files and generated make files. You can simply delete that output folder, and Eclipse will re-generate all the files. That might be a useful thing if you want to do do your own ‘tabula rasa’ action.
As debugging is subject of the next part, you can try out the generated .s19 and download it with the OpenSDA MSD Bootloader to the FRDM-KL25Z, as we did it in part one.
Clean with rm
To do a ‘clean’ of the project (to remove generated files, like ‘make clean’ in previous tutorial), select first the project and then do a Clean:

Cleaning Project
If you get an error
make (e=2): The system cannot find the file specified.
then this means that clean did not find the ‘rm’ command.

make clean, the system cannot find the file specified
‘rm’ is a common command under Linux, similar to ‘del’ for Windows. While it would be possible to use ‘del’ instead, it is much more convenient to add ‘rm’ to our set of tools. ‘rm’ is part of the GNU core utilities:
- Go to http://gnuwin32.sourceforge.net/packages/coreutils.htm
- Scroll down, and under ‘Download’ select the binary Zip file
- You do not need everything. As in part one of this tutorial, copy the ‘rm’ (in the ‘bin’ folder to your GNU ARM bin folder (C:\Program Files (x86)\GNU Tools ARM Embedded\4.7 2013q2\bin).
With this, ‘clean’ shall be functional:

rm functional
Summary
This Eclipse project is available on GitHub here, so you have a ‘working version’ in case you missed step or did a mistake. I admit that the tool chain integration is not as easy to use as e.g. the one provided in Freescale CodeWarrior or other ‘commercial’ tool chains. These tool chains come with wizards, header files and example projects which are not provided here. But nothing prevents you to get the header files/linker files/etc for your device from the silicon vendor and go from there.
We are not covering debugging yet, so this will be the subject of the next part: Part 3: Setting up the debugger (GDB Server with P&E and Segger).
But with this part of the tutorial you should be able to open source tools to edit, compile and link your application for the FRDM-KL25Z board.
Happy Eclipsing 🙂

Pingback: DIY Free Toolchain for Kinetis: Part 1 – GNU ARM Build Tools | MCU on Eclipse
Nice one Erich!!!! Works on linux too. Just had to change the paths in C/C++ Build > Settings > Cross Settings > Path to /home//gcc-arm-none-eabi-4_7-2013q2.
LikeLike
Hi Georg,
cool! I expected it to work on Linux too, but as always with some small modifications. I’ll point to your comment from the main article.
Thanks!
LikeLike
Anytime. Looking forward to the next installment. thank you for all the good work you have been doing so far.
LikeLike
I’m working on the GDB server part. Found one for Windows, but will check if there is something on Linux too. Or do you know?
LikeLike
Hi Erich!
As always, a very useful post!
I have a doubt. In my customK70 Board I haven’t the OpenSDA MSD Bootloader interface. I only have one PE Micro connection (JTAG). Is it possible to debug with JTAG (PE Micro) without CodeWarrior?
Thank you very much in advance! 🙂
LikeLike
Hi Angel,
thanks :-).
Are you having a P&E Multilink? If so, yes, this should be possible. I’ll probably publish article number 3 on debugging tonight or maybe tomorrow (depends how much free time I can find do write down things).
LikeLike
OK Erich. Yes, I have a P&E Multilink. I’ll see the article number 3.
Thank you very much!
LikeLike
Pingback: DIY Free Toolchain for Kinetis: Part 3 – Debugger (GDB Server with P&E and Segger) | MCU on Eclipse
Thank you for the tutorial, Erich. I have one question. Shouldn’t objcopy be used with “srec” as the output format, instead of “ihex”? I understand that ihex is for “Intel HEX” format, and from what I see, P&E’s MSD OpenSDA application does not recognize the this format. In other words, I can’t load my application on KL25Z, if I use the ihex format, but the same application load successfully, if i use the srec format. Thanks again.
LikeLike
Hi Dmitriy,
yes, indeed, I need to fix this. srec is the correct option to write an S19 file. Thanks for finding this!
LikeLike
Pingback: DIY Free Toolchain for Kinetis: Part 4 – Processor Expert for Eclipse | MCU on Eclipse
Pingback: DIY Free Toolchain for Kinetis: Part 5 – FreeRTOS Eclipse Kernel Awareness with GDB | MCU on Eclipse
Ok so my problem in eclipse is, how to include the .S file in startup source? the linux makefile works in terminal since there is the entry:
# List ASM source files here
ASRC = Project_Settings/Startup_Code/startup.S
how do i configure that in eclipse?
LikeLike
Hi Karibe,
hmm, maybe I miss your point, but that file gets included automatically into the make file by Eclipse, as using manged make.
LikeLike
Pingback: DIY Free Toolchain for Kinetis: Part 6 – Linux Host with OpenOCD and CMSIS-DAP | MCU on Eclipse
Hello I’m ANtonio,
I have two questions: First. When a set the compiler prefix i get two errors, one as in figure and other almost the same but it said g++ program not found in path.
Second, in C/C++ Build>Settings > Tool Settings I can’t see any information about GCC Linker but G++ Linker and G++ Compiler. What can i do to put only Gcc Linker?
Thanks in advance.
LikeLike
Hi Antonio,
if you get a ‘not found’ message, then you need to add it to the PATH. See about this in a later tutorial (https://mcuoneclipse.com/2013/08/03/diy-free-toolchain-for-kinetis-part-4-processor-expert-for-eclipse/). It happened to me only in this step, maybe because I had it already in my path?
To remove the C++ part: Select the project properties, then under C/C++ Build > Tool Chain Editor use the ‘Select Tools…’ button.
I hope this helps,
Erich
LikeLike
Hi Erich, somewhere in the text you have the following statement:
“The standard GNU panels are very basic, so CodeSourcery has contributed a more powerful plugin here.”
and the word ‘here’ has a link to the GNUARM Eclipse project, stored on SourceForge.
For your information, CodeSourcery is not a contributor of the GNUARM Eclipse project.
Best Regards,
Liviu Ionescu
LikeLike
Hi Liviu,
thanks for the heas-up. I wrongly took that conclusion because of the ‘Sourcery’ in the plugin. I’ll correct this in the post.
Many thanks again!
LikeLike
You’re welcome! I would appreciate if you could explicitly use the name of the plug-in, for example “The standard GNU panels are very basic, and there is a more powerful one, the GNUARM Eclipse plug-in”, with the link behind the full name instead of the word ‘here’.
Regards,
Liviu
LikeLike
Hi Liviu,
thats a very good suggestion. I have fixed this.
Best regards,
Erich
LikeLike
At step 5. Under Linker > Miscellaneous … on my cortex-m4 part, I needed to add -mcpu=cortex-m4 to get the right version of libgcc linked. Not doing this resulted in arm code (ie not thumb code) being linked in which resulted in core hard faults when using floating point.
LikeLike
Hi Chris,
thanks for this point! I have missed that, sorry. I have it added to the post.
Thanks!
Erich
LikeLike
Pingback: S-Record Generation with gcc for ARM/Kinetis | MCU on Eclipse
On the linker setting you can set the cpu to cortex-m0+ with: -mcpu=cortex-m0. This needs to be done for the compiler and linker miscellaneous sections.
LikeLike
Hi Rodfrigo,
yes, this was missing in my original post, and that information has been added this morning.
thanks!
LikeLike
Hi, first all thanks by this tutorial !
I follow the steps, but in the Building the Project This Error is showed:
01:10:06 **** Build of configuration Debug for project FRDM-KL25Z-Blinkled ****
make all
Building file: ../Sources/main.c
Invoking: Cross GCC Compiler
arm-none-eabi-gcc -I”/home/felipe/workspace/frdm-kl25/FRDM-KL25Z-Blinkled/Project_Headers” -I”/home/felipe/workspace/frdm-kl25/FRDM-KL25Z-Blinkled/Project_Settings” -I”/home/felipe/workspace/frdm-kl25/FRDM-KL25Z-Blinkled/Sources” -O0 -g3 -Wall -c -fmessage-length=0 -mcpu=cortex-m0 -mabi=aapcs -mthumb -msoft-float -MMD -MP -MF”Sources/main.d” -MT”Sources/main.d” -o “Sources/main.o” “../Sources/main.c”
Finished building: ../Sources/main.c
Building file: ../Sources/sa_mtb.c
Invoking: Cross GCC Compiler
arm-none-eabi-gcc -I”/home/felipe/workspace/frdm-kl25/FRDM-KL25Z-Blinkled/Project_Headers” -I”/home/felipe/workspace/frdm-kl25/FRDM-KL25Z-Blinkled/Project_Settings” -I”/home/felipe/workspace/frdm-kl25/FRDM-KL25Z-Blinkled/Sources” -O0 -g3 -Wall -c -fmessage-length=0 -mcpu=cortex-m0 -mabi=aapcs -mthumb -msoft-float -MMD -MP -MF”Sources/sa_mtb.d” -MT”Sources/sa_mtb.d” -o “Sources/sa_mtb.o” “../Sources/sa_mtb.c”
/usr/bin/../lib/gcc/arm-none-eabi/4.7.4/../../../../arm-none-eabi/bin/ld: warning: cannot find entry symbol __thumb_startup; defaulting to 00000800
Finished building: ../Sources/sa_mtb.c
./Project_Settings/Startup_Code/kinetis_sysinit.o:(.vectortable+0x4): undefined reference to `__thumb_startup’
collect2: error: ld returned 1 exit status
Building file: ../Project_Settings/Startup_Code/kinetis_sysinit.c
Invoking: Cross GCC Compiler
make: *** [FRDM-KL25Z-Blinkled.elf] Error 1
arm-none-eabi-gcc -I”/home/felipe/workspace/frdm-kl25/FRDM-KL25Z-Blinkled/Project_Headers” -I”/home/felipe/workspace/frdm-kl25/FRDM-KL25Z-Blinkled/Project_Settings” -I”/home/felipe/workspace/frdm-kl25/FRDM-KL25Z-Blinkled/Sources” -O0 -g3 -Wall -c -fmessage-length=0 -mcpu=cortex-m0 -mabi=aapcs -mthumb -msoft-float -MMD -MP -MF”Project_Settings/Startup_Code/kinetis_sysinit.d” -MT”Project_Settings/Startup_Code/kinetis_sysinit.d” -o “Project_Settings/Startup_Code/kinetis_sysinit.o” “../Project_Settings/Startup_Code/kinetis_sysinit.c”
Finished building: ../Project_Settings/Startup_Code/kinetis_sysinit.c
Building target: FRDM-KL25Z-Blinkled.elf
Invoking: Cross GCC Linker
arm-none-eabi-gcc -nostartfiles -mthumb -mcpu=cortex-m0 -T/home/felipe/workspace/frdm-kl25/FRDM-KL25Z-Blinkled/Project_Settings/Linker_Files/MKL25Z128_flash.ld -o “FRDM-KL25Z-Blinkled.elf” ./Sources/main.o ./Sources/sa_mtb.o ./Project_Settings/Startup_Code/kinetis_sysinit.o
01:10:07 Build Finished (took 916ms)
I´m running the tools over ubuntu 12.04 LTS and eclipse Kepler,
You know the source of this error? thanks again
Felipe
LikeLike
Hi Felipe,
good to hear that the tutorials are useful for you 🙂
As for your problem: it is the linker who complains that it does not find __thumb_startup. This function is in my startup code (startup.S). Are you compiling this one (well, it is an assembly file)?
I remember that my toolchain only accepted (not sure why?) *.S, and not *.s (lower case ‘s’). Maybe the same problem for you?
I hope this helps?
LikeLike
I just want to say : Thank You !
This Tutorial is really good !
Thanks again for your job !
LikeLike
You are welcome! Glad to hear that things are useful 🙂
LikeLike
Hi Erich sorry by late in response, now it’s worked. At the step “Application ELF and S19 Files” everything is ok 🙂 so I gonna try to download the .s19 file to the board, when I write lsusb in my bash terminal is showed this result (I can do it because I followed the tutorial of Karibe, 2013/08/setting-up-linux-opensource-build-and-debug-tools-for-freescale-freedom-board-frdm-kl25z/#comment-1951; so thanks to Mr. karibe too)
>>Bus 001 Device 004: ID c251:f002 Keil Software, Inc.
Then, I think the board is correctly recognized like a peripheral by the OS. so now I want download the s19 file to the board …..
Thanks again
LikeLike
Hello Erich!
First all thanks for this great tutorial!
I tryed this on Linux.
I have this problem when building the project:
/usr/bin/../lib/gcc/arm-none-eabi/4.7.4/../../../../arm-none-eabi/bin/ld: unrecognised emulation mode: thumb
I try with -mcpu=cortex-m0 & -mcpu=cortex-m0plus and still get the same error.
Do you know what the problem could be?
LikeLike
Have you set the cpu option in the linker settings too?
LikeLike
I’ts working now!! 🙂
The problem was I was adding in Other options(Xlinker[option]) instead that Linker flags.
LikeLike
Hi Misael,
good news! It is not that easy to pass this option(s) to all parts of the tools.
LikeLike
Hi, I just saw today, there is a new GNU ARM plugin for eclipse (Version 1.1.2.201310210535). The URL with install instructions is: gnuarmeclipse.livius.net/blog/install/.
It seems very amazing, there are a lot of (new) options, including full toolchain customization.
LikeLike
Hi Rodrigo,
this pretty much looks like the ARM Gnu plugins in CodeWarrior. And they are are pretty good, but looks this one has even more features. I have downloaded and installed them, will take me some time to get through all the things which are news.
LikeLike
As author of GNU ARM Eclipse Plug-in, I confirm that a new, fully redesigned, version of the plug-in is available. I would appreciate your comments, critics, suggestions, etc.
Regards,
Liviu
LikeLike
Hi Liviu,
excellent and great job, thanks for doing that contribution! I will check it out for sure and will post something about. Has to wait probably for the weekend or afterwards as I have another urgent assignment.
thanks again!
LikeLike
No problem. But when you do, please read the documentation carefully (with a critic eye, to eventually spot any mistakes/misunderstandings!) and use the latest version available, since I’m improving it constantly.
LikeLike
FYI: I just added some new features, C/C++ project templates to build STM32F1x and STM32F4x sample projects, based on the original STM standard peripheral libraries.
LikeLike
Hi Liviu,
thanks, I have seen the update. Still need to find some time to use it, but from the documentation the plugin looks really good.
LikeLike
Hi Erich
Thank you for all the work you have done in presenting this “how to” so clearly and with so many images. Much appreciated.
I am using a Freescale MKL05. Not finding much support for a MacOS toolchain; running the prebuilt Freescale Eclipse on VirtualBox emulated Windows is un-useably slow. So I am trying to use Eclipse directly on Mac OS using your approach. I have got as far as trying the example Blinky project above and get the following build error. Do you have any idea what the issue might be?
Building file: ../Sources/sa_mtb.c
Invoking: Cross GCC Compiler
arm-none-eabi-gcc -I”/Users/Liam from MBP/Documents/Liam’s Dox/Personal/Geeking Out/Liams Programming Projects/Freescale/Workspace/FRDM-KL25Z_Blink2/Project_Headers” -I”/Users/Liam from MBP/Documents/Liam’s Dox/Personal/Geeking Out/Liams Programming Projects/Freescale/Workspace/FRDM-KL25Z_Blink2/Project_Settings/Startup_Code” -I”/Users/Liam from MBP/Documents/Liam’s Dox/Personal/Geeking Out/Liams Programming Projects/Freescale/Workspace/FRDM-KL25Z_Blink2/Sources” -O0 -g3 -Wall -c -fmessage-length=0 -mcpu=cortex-m0 -mabi=aapcs -mthumb -msoft-float -MMD -MP -MF”Sources/sa_mtb.d” -MT”Sources/sa_mtb.d” -o “Sources/sa_mtb.o” “../Sources/sa_mtb.c”
/bin/sh: -c: line 0: unexpected EOF while looking for matching `”
Finished building: ../Sources/sa_mtb.c
/bin/sh: -c: line 1: syntax error: unexpected end of file
sa_mtb.c is unaltered from the file included in your zip.
Many thanks.
LikeLike
Fixed it. Sorry to bother you.
gcc and link world not compatible with MacOS directory/filenames that embed spacings. Once those were removed built fine.
LikeLike
ah, good catch. Glad to hear that you are up and running. 🙂
LikeLike
thank you
excellent effort
LikeLike
finally getting this work, I do not know it is the problem with the directory I set(bo li/documents/bli) or I had not installed the plugin…
LikeLike
I’m trying to use eclipse with the TWRK70. So i’m trying to configure the toolchain but with many problem !!! I’ll try to explain :
### Shall I need to change write in the artifact extension : elf ?
### On the upper exemple the file extension add is the S19 : “arm-none-eabi-objcopy -O srec ${ProjDirPath}/Debug/${ProjName}.${BuildArtifactFileExt} ${ProjName}.s19”
This one I suppose it’s just use with the K25. Wich extension shall i use for the K70 ?
Thanks again Erich for all !
LikeLike
This is a post build step, intended to create a binary image, in addition to the .elf created by the compiler.
For your information, the GNU ARM Eclipse Plug-in provides more configuration options for this step, as for two more additional steps, creating the listing and printing the sections sizes.
LikeLike
thank you for quick reply.
I looked in source as your suggestion i got file under “Project_Header” directory
the problem I found was with include path.
I have typed whole path with small mistake(Human Error).
later added path using gui (the button “workspace” appears while adding include path)
Solved my problem
and now i have generated .elf file and .s19 file both are not working when i dropped them in kl25z. but no luck i think it is expecting .bin file in default boot-loader.
so can you please help me with that?
By the way I have looked in your git repository.
great work and good that you have shared your work with
us. It is great help for engineers like me who are getting started. And your blog posts are really educational.
Thank you for this work
Open source Rocks!
LikeLike
What format (.s19 or .bin) depends on the bootloader. By default the bootloader on the FRDM-KL25Z expects a S19 file, while the FRDM-K64F expects a binary file.
LikeLike
Pingback: DIY Free Toolchain for Kinetis: Part 7 – GNU ARM Eclipse Plugins | MCU on Eclipse
Pingback: DIY Free Toolchain for Kinetis: Part 8 – Processor Expert, Eclipse and GNU ARM Eclipse Plugins | MCU on Eclipse
Pingback: DIY Free Toolchain for Kinetis: Part 9 – Express Setup in 8 Steps | MCU on Eclipse
Pingback: DIY Free Toolchain for Kinetis: Part 10 – Project Creation with GNU ARM Eclipse 2.1.1 | MCU on Eclipse
I am newbie in arm and you tutorials are very helpful and informative to me as newbie.
I followed this tutorial series from part 1.
and I am working in ubuntu 12.04.
As per my understanding this is not OS issue.
sorry if i have missed something but i am getting error while building your code
i followed every thing.
my error is eclipse is not able to locate derivative.h which is included in main.c in source directory
error says
“Description Resource Path Location Type
make: *** [Sources/main.o] Error 1 FRDM-KL25z-blinky C/C++ Problem
Symbol ‘GPIOB_PTOR’ could not be resolved main.c /FRDM-KL25z-blinky/Sources line 31 Semantic Error
Invalid project path: Include path not found (/home/dev/workspace/FRDM-KL25z-blinky/Debug/$(workspace_loc::/$(ProjName)/Project_Headers)). FRDM-KL25z-blinky pathentry Path Entry Problem
Symbol ‘GPIOB_PDDR’ could not be resolved main.c /FRDM-KL25z-blinky/Sources line 27 Semantic Error
Invalid project path: Include path not found (/home/dev/workspace/FRDM-KL25z-blinky/Debug/$(workspace_loc::/$(ProjName)/Project_Settings/Startup_Code)). FRDM-KL25z-blinky pathentry Path Entry Problem
Symbol ‘GPIOB_PSOR’ could not be resolved main.c /FRDM-KL25z-blinky/Sources line 24 Semantic Error
Invalid project path: Include path not found (/home/dev/workspace/FRDM-KL25z-blinky/Debug/$(workspace_loc::/$(ProjName)/Sources)). FRDM-KL25z-blinky pathentry Path Entry Problem
Symbol ‘PORTB_PCR18’ could not be resolved main.c /FRDM-KL25z-blinky/Sources line 21 Semantic Error
Symbol ‘SIM_SCGC5_PORTB_MASK’ could not be resolved main.c /FRDM-KL25z-blinky/Sources line 18 Semantic Error
Symbol ‘SIM_SCGC5’ could not be resolved main.c /FRDM-KL25z-blinky/Sources line 18 Semantic Error
fatal error: derivative.h: No such file or directory main.c /FRDM-KL25z-blinky/Sources line 6 C/C++ Problem
”
please point out where is my mistake.
I hope lots of people commented saying it worked for them so What is it that I am missing.
kindly please help
LikeLike
Can you search in your project sources where you have GPIOB_PTOR defined? It looks you are missing to compile/link some files.
Same for derivative.h: this one must be found in your compiler include path settings.
LikeLike
Thanks Erich I solved my problem
Problem was Include Path I corrected it and everything is Fine now
Thanx
LikeLike
Pingback: Tutorial: DIY Kinetis SDK Project with Eclipse – Startup | MCU on Eclipse
Pingback: Command Line Programming and Debugging with GDB | MCU on Eclipse
You mention that PEx 10.4 works with Eclipse Kepler, and that a forthcoming PEx 10.5 is required to work with Eclipse Luna. I still could not find PEx 10.5 on the freescale web site, so I decided to donwload KDS (Kinetis Design Studio) rather than a DIY Kepler with PEx. KDS 3.0.0 was released on 6 May 2015. I figured it was Kepler but the About dialog box says it’s built on Luna SR2 (4.4.2). So hopefully Freescale will release PEx 10.5 soon for DIY Ecliplse Luna installs 🙂
Anyone know if/when PEx 10.5 is likely to be released ???
LikeLike
Hi Brendan,
correct, DS 10.5 is not out, but KDS v3.0.0 is (as you noticed). And KDS v3.0.0 is Eclipse Luna (4.4.2), not Kepler. As for getting Processor Expert into Luna: There is a ‘Processor Expert for Kinetis v3.0.0’ available on the PEx 10.5 download page:
PEx-KINETIS-v3.0-PLUGIN-ECLIPSE_4.4 (REV 3.0.0) by FREESCALE
Processor Expert for Kinetis plug-in for existing Eclipse 4.4 (SOMNIUM DRT Freescale Kinetis Edition, Emprog ThunderBench 3.38 or later)…
LikeLike
Pingback: Merging NXP LPCXpresso IDE with the Freescale Kinetis Design Studio, Processor Expert and Kinetis SDK | MCU on Eclipse
Very informative article Erich,
I compiled the project you shared, with the help of this article and it is working.
Now, I tried compiling my own project with the same steps, but I got following issue…
C:\Users\abc\AppData\Local\Temp\cc9DX5kg.s:49: Error: selected processor does not support requested special purpose register — `msr basepri,r3′
make: *** [Sources/HAL/Cpu.o] Error 1
I am using kinetis MK20 series MCU and Cross GCC as toolchain.
I then tried creating new project with “Cross ARM GCC” toolchain. Now, I am facing different issue…
‘Invoking: Cross ARM GNU C Compiler’
arm-none-eabi-gcc -mcpu=cortex-m3 -mthumb -Os -fmessage-length=0 -fsigned-char -ffunction-sections -fdata-sections -g3 -I”C:\Users\abc\eclipse\EmbeddedWorkspace\LT500Test\Project_Headers” -I”C:\Users\abc\eclipse\EmbeddedWorkspace\LT500Test\Project_Settings\Startup_Code” -I”C:\Users\abc\eclipse\EmbeddedWorkspace\LT500Test\Sources\APL” -I”C:\Users\abc\eclipse\EmbeddedWorkspace\LT500Test\Sources\DAL” -I”C:\Users\abc\eclipse\EmbeddedWorkspace\LT500Test\Sources\HAL” -I”C:\Users\abc\eclipse\EmbeddedWorkspace\LT500Test\Sources\LIB” -std=gnu11 -MMD -MP -MF”Project_Settings/Startup_Code/__arm_end.d” -MT”Project_Settings/Startup_Code/__arm_end.o” -c -o “Project_Settings/Startup_Code/__arm_end.o” “../Project_Settings/Startup_Code/__arm_end.c”
../Project_Settings/Startup_Code/__arm_end.c:41:24: fatal error: ansi_parms.h: No such file or directory
}
^
compilation terminated.
make: *** [Project_Settings/Startup_Code/__arm_end.o] Error 1
I have copied the EWL_C folder from the Code Warrior installation and pasted it in the Workspace. Then I added EWL_C folder path in the Path Include option of the Compiler settings.
“${workspace_loc:/EWL_C/include}”
Yet, I get the above error.
Please let me know, how to resolve this.
LikeLike
The messages
Error: selected processor does not support requested special purpose register — `msr basepri,r3′indicates that you don’t have the correct processor selected in your project settings, can you verify this?And I would *not* mix things with EWL (and not use EWL at all): using it in combination with the GNU libraries will cause only troubles.
I hope this helps,
Erich
LikeLike
Thank you for reply!
I searched in the project settings, but could not find the way to select the MCU.
In fact, for the project mentioned in this article, there is no MCU selected either.
Please confirm, how to do this setting.
Also, as a part of information…
Please share some details on
what is the difference between Cross GCC and Cross ARM GCC tool chains
What is EWL library and why will make things difficult if we use them with Cross GCC.
LikeLike
‘Cross GCC’ is a generic cross compiler (usually for host systems). You have to use the Cross ARM gcc (https://developer.arm.com/open-source/gnu-toolchain/gnu-rm) for ARM Cortex development.
EWL is the ‘Embedded Warrior Library’, proprietary and CodeWarrior compiler specific. It does now work with the standard GNU ARM library which is newlib and newlib-nano.
If you are using the GNU ARM Eclipse plugins (which I assume), then the CPU settings are under Project > Properties > C/C++ Build > Settings > Tool Settings > Target Processor
LikeLike
Thank you Erich for quick response.
Now things started making some sense to me.
The path you shared to select MCU is correct and default selection was M3. I have changed it to Cortex-M4 but the issue of EWL still exist.
Well, since I am trying to port my project to open source Eclipse and gcc, I must get rid of EWL also.
But, the point in my case is…
1. EWL library functions form the thin layer between my s/w and the MCU initialisation i.e. The activities lying between the power ON/Reset, to the execution jumps to Main().
If I try to remove the EWL, then what would the equivalent files/functions/api in the Cross ARM GCC??
Also, it is quite sensitive region/piece of code. Is there any specific guideline available on how to do that?
2. The srec file/Motorola Hex file that I generated with CW and gcc compiler. Is there any chance that now, I use gcc compiler with Eclipse and generate the exactly same motorola hex file with the same source code???
LikeLike
1. EWL is a version of the standard library, providing you functions like malloc(), printf(), strcmp() and many others. It is basically a a replacement of the standard ANSI library. The open source variant of this is newlib or newlib-nano which comes with the GNU ARM GCC toolchain.
Startup code is a different piece, and it mostly depends on the library used and the linker file.
2. You can generate S19/Motorola files and Intel Hex files with GCC too (see https://mcuoneclipse.com/2014/04/20/binary-files-for-the-mbed-bootloader-with-eclipse-and-gnu-arm-eclipse-plugins/).
but as you change the compiler, the files will be not comparable and different.
LikeLike
thank you Erich,
As I understand, that the EWL or NanoLib has nothing to do with the Start up code. Am I correct?
I have now blindly removed the EWL component and my code finally compiling. I have copied the startup.s file from the project you shared in this article and pasted it in mine.
Now I am facing following problems…
1. There is an error in post-build ste ->
arm-none-eabi-objcopy: supported targets: elf32-littlearm elf32-bigarm elf32-little elf32-big plugin srec symbolsrec verilog tekhex binary ihex
make[1]: [post-build] Error 1 (ignored)
‘ ‘
‘Invoking: Cross ARM GNU Create Flash Image’
arm-none-eabi-objcopy -O srec “TestGcc.elf” “TestGcc.srec”
‘Finished building: TestGcc.srec’
‘ ‘
‘Invoking: Cross ARM GNU Print Size’
arm-none-eabi-size –format=berkeley -x “TestGcc.elf”
text data bss dec hex filename
0x0 0x0 0x0 0 0 TestGcc.elf
‘Finished building: TestGcc.siz’
2. The Map file is empty. ->
All functions/variables are allocated the Address 0x00. The snapshot of map file is this…
.text.IFsh1_GetByteFlash
0x00000000 0x6 ./Sources/HAL/IFsh1.o
.text.IFsh1_SetWordFlash
0x00000000 0x18 ./Sources/HAL/IFsh1.o
.text.IFsh1_GetWordFlash
0x00000000 0x6 ./Sources/HAL/IFsh1.o
.text.IFsh1_SetBlockFlash
0x00000000 0x4 ./Sources/HAL/IFsh1.o
.text.IFsh1_GetBlockFlash
0x00000000 0x4 ./Sources/HAL/IFsh1.o
.text.IntFlashLdd1_OnOperationComplete
0x00000000 0x10c ./Sources/HAL/IFsh1.o
.text.IntFlashLdd1_OnError
0x00000000 0x40 ./Sources/HAL/IFsh1.o
.bss.IFsh1_CmdPending
0x00000000 0x1 ./Sources/HAL/IFsh1.o
.bss.IFsh1_CmdResult
0x00000000 0x1 ./Sources/HAL/IFsh1.o
.bss.IFsh1_CurrentCommand
0x00000000 0x4 ./Sources/HAL/IFsh1.o
I have verified the linker file of your project with that of mine. I could find they are by and large same.
LikeLike
1. With the GNU ARM Eclipse plugins, you don’t need to run an explicit postbuild step: only check the checkboxes in the project settings (see my previous post).
2. to me this is a problem of your project settings or linker file. Why not taking a copy of my workign project and take it from there? There are so many things you could do wrong in case you don’t know what you are doing 😦
LikeLike
Thank you Erich,
Really appreciate your help! 🙂
Well, you were right, it is the problem of settings.
GNU Linker -> General -> Scripts.
I haven’t added the linker.ld file there.
Now I added the linker.ld file to it and it is working and generated the serc file.
By referring your other post, I have created a batch file that combines this srec file (renamed as .hex) and the bootloader.hex file to generate a merged.hex file.
I have started validation of it now. Hopefully, it will work 🙂
I wish to ask you few more questions…
1. While using CodeWarrior, I chose ARM GCC compiler. And now while interfacing the Eclipse, I used ARM GCC compiler only. So, the hex file generated for optimisation level (Os) must be same.
However, the hex files generated by CW based GCC and Eclipse based GCC are different. Moreover, the Eclipse generates the hex file that is 8kb smaller to the hex generated by the CW for same source and optimisation level. How is this happening???
2. Assuming, the hex file validation is successful, how safe the Eclipse + GNU ARM GCC toolchain will be for future development? I mean, if they suddenly stop providing (Eclipse + GNU ARM GCC toolchain ) or it becomes paid versions or for new ARM MCUs from NXP, there won’t be compatible Eclipse and GCC toolchain. Can you share some comment on this?
LikeLike
1) You only can get the exact same binary (hex, S19) if
– using the exact same compiler
– using the exact same libraries
– using the exact same source files
– using the exact same options for compiler and linker
– using the exact same linker file
Any difference of above will create a different binary file
2. You can easily store your downloaded setup files in a version control system or a backup system. Plus I recommend to store the whole installation folder, better the whole image of your host PC.
Actually for some saftety critical applications, we store the whole development machine (notebooks) in a safe so we can reproduce things years later on.
LikeLike
Thank you Erich,
When I programmed the srec file created, I could see nothing happening on the h/w board.
so, I interfaced P&E using your article and now I can debug.
I have realised that the execution doesn’t come out of the startup.S. and CPU resets continuously
The startup.S file, I am using, is copied as it is from the project you shared.
movs r1, #0
b LoopCopyDataInit
CopyDataInit:
ldr r3, =___ROM_AT
ldr r3, [r3, r1]
str r3, [r0, r1]
adds r1, r1, #4
LoopCopyDataInit:
ldr r0, =_sdata
ldr r3, =_edata
adds r2, r0, r1
cmp r2, r3
bcc CopyDataInit
ldr r2, =__START_BSS
b LoopFillZerobss
The execution doesn’t reach to “ldr r2, =__START_BSS”
I put the break point there but it never hit.
Apparently, the execution forces MCU to reset in CopyDataInit or LoopCopyDataInit functions.
I am using Kinetis MK20 MCU, while you had created project for M0/M3.
Please help me identifying the problem.
LikeLike
It looks you have the watchdog enabled? I suggest you use the startup code I have used?
LikeLike
I have used the same startup.S file that you shared with your project. Here it is…
.syntax unified
.cpu cortex-m0
.fpu softvfp
.thumb
.global g_pfnVectors
.global Default_Handler
/* start address for the initialization values of the .data section. defined in linker script */
.word ___ROM_AT
/* start address for the .data section. defined in linker script */
.word _sdata
/* end address for the .data section. defined in linker script */
.word _edata
/* start address for the .bss section. defined in linker script */
.word __START_BSS
/* end address for the .bss section. defined in linker script */
.word __END_BSS
/**
* \brief This is the code that gets called when the processor first
* starts execution following a reset event. Only the absolutely
* necessary set is performed, after which the application
* supplied main() routine is called.
* \param None
* \retval : None
*/
.section .text.__thumb_startup
.weak __thumb_startup
.type __thumb_startup, %function
__thumb_startup:
/* Copy the data segment initializers from flash to SRAM: */
movs r1, #0
b LoopCopyDataInit
CopyDataInit:
ldr r3, =___ROM_AT
ldr r3, [r3, r1]
str r3, [r0, r1]
adds r1, r1, #4
LoopCopyDataInit:
ldr r0, =_sdata
ldr r3, =_edata
adds r2, r0, r1
cmp r2, r3
bcc CopyDataInit
ldr r2, =__START_BSS
b LoopFillZerobss
/* Zero fill the bss segment: */
FillZerobss:
movs r3, #0
str r3, [r2]
adds r2, r2, #4
LoopFillZerobss:
ldr r3, = __END_BSS
cmp r2, r3
bcc FillZerobss
/* Call the clock system intitialization function: */
bl __init_hardware
/* Call the application’s entry point: */
bl main
bx lr
.size __thumb_startup, .-__thumb_startup
/****END OF FILE****/
If I modify this file and jump directly to __init_hardware, the code starts executing. It means the problem lies with startup.S only. Now, since I am using Cortex-M4 and your project (and so startup.S) is for Cortex-M0, I suspect, the as is file may not work. What you say??
LikeLike
Hi Erich,
About linker option -nostartfiles , what is the “standard start files”? is it provided by GNU and processor related? Where can I find it?
For instance, there’re a startup_MCIMX7D_M4.S in imx7_colibri_m4 project with “bl SystemInit” “bl _start” in it. where are those function come from? meanwhile in this project the -nostartfile option is de-selected.
I guess those function were defined in some startfile?
I’m newbie, please enlighten me, or link me to some useful site.
Thanks!
PingQi
LikeLike
Hi PinQi,
I always have used -nostartfiles: that way I tell the linker that I will care about my own startup and files. There are startup files present with the GNU libraries, and the entry point is the _start(). From the manual (https://gcc.gnu.org/onlinedocs/gcc/Link-Options.html):
-nostartfiles
Do not use the standard system startup files when linking. The standard system libraries are used normally, unless -nostdlib or -nodefaultlibs is used.
I believe this comes from the host world where it would use the host operating system startup routines. This does not make sense for embedded targets. Here usually the tool and/or silicon vendors provide startup files (see as well https://mcuoneclipse.com/2012/11/11/optimizing-the-kinetis-gcc-startup/).
This is what you have as startup_MCIMX7D_M4.S. “bl SystemInit” is used to call system initialization (e.g. clock setup, turning on watchdog, etc) while “bl _start” calls the GNU ANSI library startup routine which does memory initialization (zero-out and copy-down) plus calls the global C++ constructors (if any). _start() will call main() at the end.
I hope this helps,
Erich
LikeLike
Hi Erich,
I was trying to locate some code looks like:
…
_start:
…
bl main
…
but I didn’t find them. Sounds like it’s inside some binary/obj file? What does the “_start” exactly do? As the Freescale provided .S file (startup_MCIMX7D_M4.S) already finished the job like BSS and data section initialization before the “bl _start” calls.
The article of “slimming” is more like a map/big picture for me and very helpful, thank you very much!
PingQi
LikeLike
PS: the project I’m running and testing is from “https://github.com/ErichStyger/freertos-toradex”
LikeLike
_start() provided as part of the standard ANSI library. It does initialization of global memory, but as well initializes other library components as global heap needed for example for printf() functions. More important it does call all the C++ constructors for global objects.
LikeLike