Not everyone is familiar with Git, and not everyone wants to use it. Although I think using Git or SVN is something every software engineer today needs to master 😉 To make it easier for the ‘non-Gitter’ to use the Processor Expert components, they are available now as *.PEupd files as described here. However, the *.PEupd files are just a snapshot, and not the latest and greatest. So how to use the latest component sources and example projects without Git?

gits in a box
💡 How to use Git with the MCUonEclipse GitHub repository, see this wiki page.
Locating the User Working Directory
First, you need to find where Processor Expert stores the ‘user’ components. This might depend on which Processor Expert version you are using.
In CodeWarrior for MCU, the path where the components are installed is shown with the Eclipse menu Window > Preferences > Processor Expert > Component Development:

PEx Folder Location in CodeWarrior
It is here too:

User Components Directory Location in CodeWarrior
Because both paths cannot be selected for copy-paste, it is reported as well in the Console View at Processor Expert startup:

User Working Directory in Console View
Make sure that you select the proper console output:

Selecting Processor Expert Console Output View
💡 I recommend to create a shortcut on the Windows desktop to that directory location.
For me Processor Expert stores the ‘user’ components in this folder:
💡 ‘user’ components are components ‘outside’ of the Processor Expert installation. Components I have created with CDE (Component Development Environment) or components you have imported.
C:\ProgramData\Processor Expert
On my machine this folder looks like this:

Processor Expert User Folder
💡 the CWMCU_PE5_00 has a green check-mark, because on my machine I have it under (GitHub) version control.
As you can see: Processor Expert unfortunately uses different folders depending on which Processor Expert version is used :-(:
- CW_PE3_02: this is for classic CodeWarrior for S12(X) V5.1
- CWMCU_PE5_00: this one is for Eclipse base CodeWarrior for MCU 10.x
- PEXDRV_PE3_3: this one is for the Eclipse based Processor Expert Drivers Suite 10.0
- PECache: this is a folder which is used by Processor Expert for caching the components.
💡 In case of troubles with Processor Expert, sometimes it helps to delete the PECache folder. That cache folder will be re-created a Processor Expert startup time.
In my steps below I will use the CWMCU_PE5_00 folder, but things apply to the other PEx_yy folders too.
Note: To my knowledge, the Processor Expert drivers are compatible between the different versions. So if you want to use the same components across different folders as above and in sync, you need to synchronize them manually (or copy them between the folders).
Getting the Files from GitHub
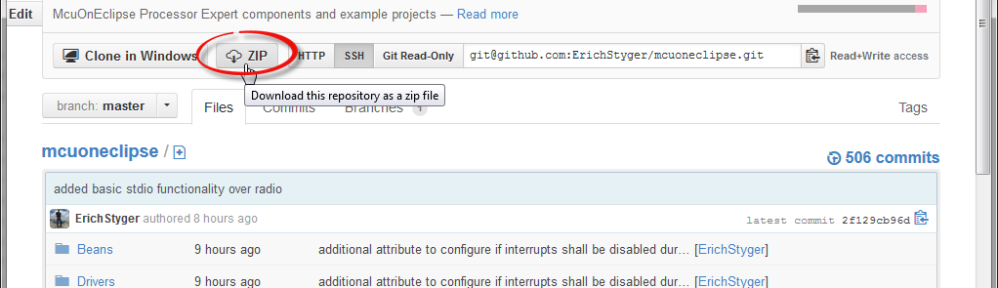
From GitHub, you can download the repository as zip file:

Download as Zip File from GitHub
This gives you an archive file with all the latest and greatest files in the repository.
Using the Processor Expert Components
❗ Close CodeWarrior/Eclipse/Processor Expert/Driver Suite first.
You need the two following folders in the archive (as they contain all the Processor Expert files):
- Beans
- Drivers
💡 In case you already have beans/drivers or other files in this folder, then it is a good idea to make a backup of this folder, or rename it so you can go back later on. If you already have older versions of the components, then I recommend to remove/rename/delete the folder too to have a clean state.
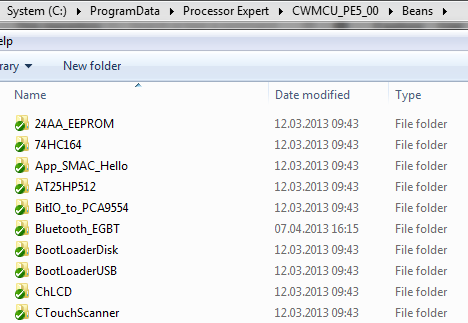
Unzip the two folders into your Processor Expert user working directory (mine is C:\ProgramData\Processor Expert\CWMCU_PE5_00).
💡 it does not hurt if you unpack the repository into the user working directory. But if you only interested in the components, then only install the Beans and Drivers folders.
On my machine this looks like this:

CWMCU_PE5_00 Folder
Processor Expert might create the following folders:
- Config: Contains Bean Wizard ini file
- DOCs: HTML files created by the Bean Wizard?
- Templts: has user templates (I’m not using these)
💡 the “Bean Wizard” is the ‘classic’ version of CDE to create user components.
So you do not need to worry about these folders. All what you need is ‘Beans’ and ‘Drivers’.
The ‘Beans’ folder has a folder for each component describing mainly the interface and properties:
Beans Folder
The driver code is inside the Drivers folder:

Drivers Folder
💡 See this post about a dissection of the different Processor Expert Driver files.
If you start now Eclipse/CodeWarrior, the installed components should show up in the Component Library view. If not, use the ‘Refresh’ context menu:

Components Library
With this, you are ready to use the components :-).
GitHub Example Projects
All the example projects are in that GitHub Zip file:

Example Projects from GitHub
I recommend to extract the projects you are interested in either into your workspace, or that you unzip it to a place outside of your workspace and then drag&drop the project(s) into your workspace.
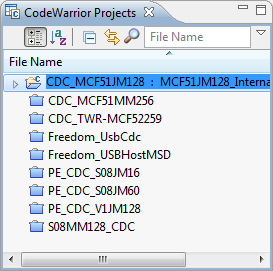
Projects in Workspace
If the components are properly loaded, they should show up in color (otherwise they are grayed out if missing).

Project Components
Summary
It is not hard to use Processor Expert components or projects from GitHub: the repository can be downloaded as zip archive. As for the components, I need to place the Beans and Drivers folder into the right place. The projects I can use like normal Eclipse/CodeWarrior projects.
Happy Gitting 🙂

I have to admit, GIT puzzles me, but I am becoming familiar with it. The idea of backups, source control, and branches…. I don’t know how anyone survives without that functionality. Being able to just pull an archive and not have to worry about GIT, that’s user friendliness. 🙂
LikeLike
Hi Jim,
If coming from something like CVS or SVN, then Git is indeed ‘different’ because of the distributed nature. I’m was puzzled at the beginning why I do have to do a pull before a push, but I think this is just how things are exposed in the VCS client. And TortoiseGit gets better and better from one release to another. And yes, I have no idea how otherwise I would survive without something like SVN or Git 🙂
LikeLike
I think there is one advantage SVN don’t have. when copy a directory that under control by SVN to other PC, then in other PC can not show log. but I’m not familiar with GIT too
LikeLike
GIT is a distributed version control system, so you can have the full history locally on your machine, even if not connected to the remote repository.
This means: you have a copy of the repository on your local machine, or where you copy it.
SVN cannot do this.
LikeLike
Pingback: Tutorial: Arduino Motor/Stepper/Servo Shield – Part 2: Timed Servo Moves | MCU on Eclipse
Pingback: Tutorial: Arduino Motor/Stepper/Servo Shield – Part 3: 74HCT595 Shift Register | MCU on Eclipse
This helped me get the files I needed thanks. I am looking at a 24FC interrupt based EEPROM driver. Between the 24AA_EEPROM and the genericI2C is this possible?
LikeLike
Hi Dave,
yes, I think this is possible. Are you going to contribute this?
LikeLike
Hi Dave,
ok, I think I start to realize that you posted a similar request in the Freescale forums (where I responded too). Good news for you: the 24AA_Component supports now the 256/512/1024 variants. But I have not looked into enabling interrupts on the I2C side. It might be that it works out of the box, but I’m not sure (it has been a while since I used the 24AA).
Erich
LikeLike
Pingback: DIY: Changing Processor Expert Components | MCU on Eclipse
I was able to download the mcuoneclipse-master.zip and verify (with 7-zip) that the archive was downloaded error-free.
I was able to import all those components without error.
However, when I tried to add the PWMServo16bit component to my project, I got this error:
BeanLoader.loadTemplate: error loading template Templts/Init_PWM_MCF.dev error: Could not find template file.
Above, you said you didn’t use the “Templts” on your system, but it seems that maybe this component does. :).
Do you know how to fix? I’m using DS-5 with PEx and I’m targeting the Vybrid Tower.
Thanks.
LikeLike
Hi Jack,
I would need to check that. I’m not using ‘external’ template files, but the components themselves are using templates (together with interface files).
The thing is this: I’m using that PWMServo16bit component ColdFire (ColdFire has normal 8bit PWM registers, but special 16bit registers). That’s why the component seems to refer to that MCF (MCF stands for Motorola ColdFire). Obviously you do not have ColdFire Processor Expert installed. I would need to check what the solution would be, but I do not have DS-5 and Vybrid (yet). Could you just use a normal PWM instead? Can you try the Servo component instead (I have not tested it with ARM/Vybrid)?
LikeLike
I tried to use the Servo component, but it gives me errors. It says that “Component is not selected”, so I figured it was referring to the TimerUnit_LDD component it automatically added. Under System->Shell->PWM, it says “Error in the inherited component settings”. So I picked “FTM0_CNT for the “Counter” field, but the “Module name” field stayed blank. Under “Details”, it said “Unassigned peripheral”.
LikeLike
Hi Jack,
not sure if this helps, but I have used the Servo component as described in this post:
LikeLike
I looked at your link. I think I found a problem. Looking at the pic “Servo1 PWM Configuration”, you are able to configure the PWM component. I am not able to – the entire Component Inspector for the included PWM is completely grayed out so I cannot configure anything. Any idea why that might be?
LikeLike
Okay, I just recovered from that. PEx was asking me about including TimerUnit_LDD, but that dialog was underneath the other big window. I dismissed it and now I’m able to configure the PWM component. However, I still have errors. When I try to select a PWM or PPG device, the drop down box has every item precded by a “[!]”. What does that mean? The output pin dropdown box has the same thing. Does that mean those pins are not available?
LikeLike
Yes, that [!] means that a pin is already used by something else and not availble. You can hover over it and it should tell you with a tool tip what is using the pin.
LikeLike
I rolled the mouse over the items in the drop down list, the ones with the “[!]” in front of them (which is all of them) and no tool tip comes up. However, in the “Details” column, it says,
“Peripheral-signal is not specified for the pin routing.”
Do you know how to fix that? Thanks so much.
LikeLike
Sorry, I’m lost 😦
Can you point me to the downloads/tools you are using so I can try it out on my machine? My Processor Expert does not have an option for Vybrid.
LikeLike
DS-5 Vybrid Tower Starter Kit: http to ds.arm.com/vybrid/vybrid-tower-starter-kit/
Processor Expert: http://www.freescale.com/webapp/sps/site/prod_summary.jsp?code=PE_DRIVER_SUITE&fpsp=1&tab=Design_Tools_Tab
I’m running this on Ubuntu 12.10 32-bit.
I also took screen shots of the problem. if you’d like those, I can send them to you (five .png files). Thanks.
P.S. I just noticed that PEx v10.3 came out just yesterday. See 2nd link above.
LikeLike
Ok, I need to download that. Thanks for the links!
LikeLike
Hi Erich,
I was able to use the TimerUnit_LDD component and simply set the period time and offset to do what I wanted for a PWM. However, I’m still interested in seeing a PWM component work for Vybrid (esp the M4 core).
LikeLike