Maybe Eclipse is ‘too much’, and you are looking for something different? The cool thing with Processor Expert is that while this is Eclipse based, you can use it easily with other tool chains like IAR Embedded Workbench. So you have the choice, and I have explored things a little with porting FreeRTOS for Cortex-M0+ to IAR :-).
In this tutorial I’m showing how use IAR with FreeRTOS and the Freedom FRDM-KL25Z Board, using Processor Expert components.
All what you need is the IAR Embedded Workbench, the Processor Expert Driver Suite and components, plus the FRDM-KL25Z board (or any other Kinetis-L (ARM Cortex-M0+) board.
We will need three software packages:
- Processor Expert Driver Suite: here we will generate the code from components.
- Additional Processor Expert components: we are using more open source components to generate code for the RTOS and drivers.
- IAR Embedded Workbench: here we will compile and debug, and using the files created by Processor Expert
IAR Embedded Workbench IDE
The IAR IDE is well-known and respected in the industry, and supports many processor families. That IDE does not offer all the bells and whistles as Eclipse. But it has the advantage to have a real good compiler (better than gcc) and as well the debugger is faster than Eclipse. IAR offers a 32Kbyte limited version of their toolchain for ARM/Kinetis, and I’m using that version (IAR Embedded Workbench for ARM, V6.50.2.4585) in this tutorial.
Download the IAR Embedded Workbench for Freescale/ARM and run the setup.
Processor Expert Software: Microcontroller Driver Suite
To work with other tools than CodeWarrior, there is a special ‘Microcontroller Driver Suite‘ of Processor Expert, called ‘Processor Expert Software – Microcontroller Driver Suite‘. Basically this is a standalone version of Processor Expert in Eclipse, either bundled with Eclipse or as plugin into an existing Eclipse installation. To keep things simple, I recommend to download and install the bundle version. While it would be technically possible to use the generated code from the CodeWarrior version, I’m using the ‘bundle version’:
Run the setup after downloading.
Additional Processor Expert Components
For this tutorial, I’m using three open source Processor Expert components (sources and latest and greatest versions are available on GitHub). Download the three components from the following links (with version information of them what I used here):
- LED: a component for LED’s (V1.049)
- Utility: General string manipulation and utility functions, used by the FreeRTOS (V1.083)
- FreeRTOS: the RTOS as Embedded Component (V1.203)
Installing added Processor Expert Components into Driver Suite
Run the Driver Suite (for me this is C:\Freescale\PExDrv v10.0\eclipse\eclipse.exe):
It will ask you for a workspace folder where to store the project: go with the default or create a new folder:
For a new workspace it shows a welcome screen view (which you can close), so you have the ‘normal’ Eclipse layout:
Disabling Code Analysis
The Processor Driver Suite Eclipse version comes with a great Eclipse feature: Code Analysis (see this post). The problem is: how the Processor Expert Driver Suite is set up and configured, it only leads to bogus errors. So the best way is to simply diable it :-(: For this, I use the menu Window > Preferences > C/C++ > Code Analysis and disable all options:
Installing Components
Next I’m going to install the components with the menu Processor Expert > Import Package:
In the dialog, select all the components downloaded:
Next, to show all the Processor Expert views:
❓ CodeWarrior uses ‘C:\ProgramData\Processor Expert\CWMCU_PE5_00’ to store the components, while the Driver Suites uses ‘C:\ProgramData\Processor Expert\PEXDRV_PE5_3’. This means if running CodeWarrior and the Drivers Suite in parallel, the components are not shared and needs to be duplicated or kept in sync. I’m using a File/Directory synchronization utility to keep the components in sync.
As we have loaded new components, I need to refresh the Library:
In the Components Library view the three added components should show up:
💡 In case the components are not shown: use the ‘Refresh’ context menu in the view to refresh it again.
Creating Project
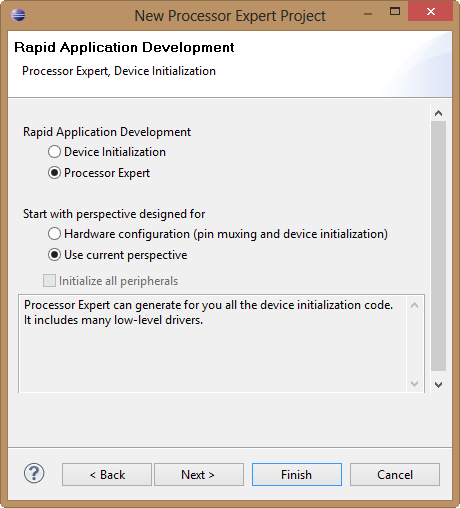
With the menu File > New > Processor Expert Project I launch a wizard to create a new project. First I give the project a name:
Next, to select the Device:
In the next dialog I can go with the defaults:
Next I’m selecting the compiler:
Time to press Finish! This creates the project:
Using Components
Time to add the FreeRTOS component to the project:
Note: the Utility component is added automatically to the project. If not, a dialog box will ask to confirm this.
Now I need to configure the RTOS tick timer:
- Counter: SYST_CVR (ARM SysTick)
- Counter Direction: Down
💡 Update: the latest FreeRTOS component makes this step much easier, see this post.
For the Counter Frequency, I click on the … button:
In the Timing dialog, I deselect the Auto select timing and double-click on the Value on the right side to use it as Init. value:
Pressing OK, and now the tick timer is ready to go:
Adding an LED
In the FreeRTOS task (to be created), I want to blink the Red LED. For this, I add the LED component to the project:
The Red part of the RGB LED is connected to the pin TSI0_CH11/PTB18/TPM2_CH0 on the KL25Z processor:
Generating Code
With this I, I have all my drivers set up. Time to generate code! For this, I press this small button:
The generated code will be inside the ‘Generated_Code’ subfolder of the project.
Writing the Application Code
The application main() is inside the ProcessorExpert.c file:
Above main() I’m adding a simple FreeRTOS task to blink the LED:
static portTASK_FUNCTION(MyTask, pvParameters) {
  (void)pvParameters; /* not used */
  for(;;) {
    LED1_Neg();
    FRTOS1_vTaskDelay(1000/portTICK_RATE_MS);
  }
}
The code to create the task is added to main():
if (FRTOS1_xTaskCreate(MyTask, (signed portCHAR *)"Task", configMINIMAL_STACK_SIZE, NULL, tskIDLE_PRIORITY, NULL) != pdPASS) {
  for(;;){} /* error */
}
So it looks like this:
The next steps are how to build and debug what we have created.
Creating the IAR Project
Now we can launch the IAR Embedded Workbench:
💡 I usually keep the Processor Expert IDE open, so I can do adjustments as needed, for example regenerate code with changed components.
This brings up the IAR IDE Main Window:
Creating an Empty Project as Base
First, I’m going to create a new project:
This will be an Empty Project:
Then it asks me where to save the project file:
💡 I’m free where to save the project file. But if I save it where I have created the above Processor Expert Driver Suite project, the path setup later on will be *much* simpler. So I recommend to store the *.ewp file in the project folder of the Processor Expert project.
Pressing ok, and the IAR project gets created.
❗ If asked by the IAR Embedded Workbench to save the workspace: save the workspace file as well inside the Processor Expert Driver Suite project folder. Otherwise you need to set up additional paths and this will complicate things!
Enable Project Connection
The IAR Embedded Workbench V6.50 comes with the ability to semi-automate project creation with a Processor Expert Project. For this I have to enable this in the Tools > Options menu:
And in the Project settings the ‘Enable project connections’ has to be enabled:
With this it very much will simplify the project setup.
Connecting to the Processor Expert Project
To connect to the Processor Expert project, I use the ‘Add Project Connection…’ entry:
This asks me the connection kind:
Then I select the ProjectInfo.xml file in the Processor Expert project root:
This adds the Processor Expert files to my project:
Configuring the Project Settings
💡 Update: the IAR v6.7 configures automatically the microcontroller, linker file and path settings, see this post.
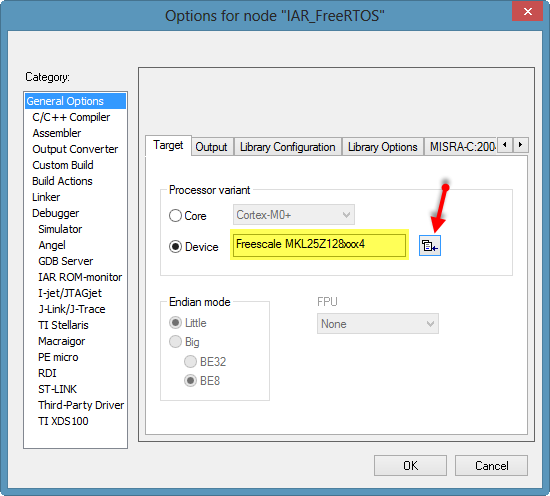
Finally, the settings need to be set up correctly for the project using the Project Options:
Target Device
💡 Update: the IAR v6.7 configures automatically the microcontroller, see this post.
First, the device needs to be selected:
Debugger Settings
I’m going to use the OpenSDA on the FRDM-KL25Z board, so I set the debugger to P&E:
As I want to download and debug in Flash, I need to set the flash loader option:
And finally: It needs to know that I’m using OpenSDA:
❗ Make sure that SWD is selected for SWD targets (e.g. for FRDM-KL25Z)
Build
Time to build/make the project:
💡 IAR Embedded Workbench uses its own linker file. Processor Expert has one created too. In the project settings you can overwrite the default in the Linker Config settings.
💡 Update: the IAR v6.7 configures automatically linker file, see this post.
Building the project should now complete with no errors:
❗ There are a few warnings produced by the current implementation of the FreeRTOS kernel. I plan to work on tweaking the sources so no warnings are shown by default. I *love* warning free sources, but having sources that way is a challenge across different compilers….
Debug
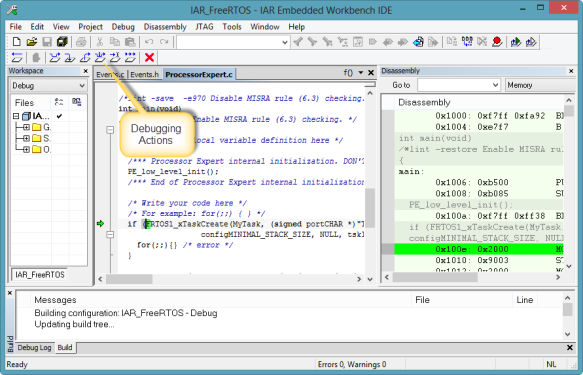
Download and debug starts with this icon:
And after a few seconds: I’m already debugging 🙂
From here on, I think things are pretty obvious. And you can go back to Processor Expert and change settings, re-generate code and build and debug it in the IAR IDE.
💡 If you create new files, then you need to add them in the IAR IDE as too. Unfortunately, I have not seen an ‘automatic refresh’. What I do is to use the menu ‘Project > Add Project Connections’ again.
💡 Update: the IAR v6.7 now automatically detects the new or removed files, see this post.
Summary
Processor Expert components are not limited to CodeWarrior: They are very useful with other tool chains and IDE’s too, and the IAR Embedded Workbench is one. There is as well Processor Expert support for Keil, but I have not tried it out yet.
FreeRTOS has been ported to the IAR compiler forthe Cortex-M0+ (Kinetis-L), with at least some minimal testing. I’ll see when I can find time to finish as well the part for Cortex-M4(F). And everything is open source and available on GitHub.
Happy IARing 🙂


May you please upgrade Utility (V1.083) download link
instead of Utility (V1.082).
Thnx
LikeLike
Thanks for reporting this. I have updated the web page, and the link is no pointing to V1.083.
LikeLike
Good guide! Thanks!
LikeLike
Pingback: Tutorial: Creating a Processor Expert Component for an Accelerometer | MCU on Eclipse
Pingback: Red Suite 5: Eclipse Juno, Processor Expert and unlimited FRDM-KL25Z | MCU on Eclipse
Pingback: How to use MCUonEclipse GitHub without Git | MCU on Eclipse
Pingback: Using Keil µVision (ARM-MDK) with Processor Expert Driver Suite | MCU on Eclipse
Pingback: FreeRTOS V7.5.0 released | MCU on Eclipse
Pingback: DIY Free Toolchain for Kinetis: Part 4 – Processor Expert for Eclipse | MCU on Eclipse
Pingback: A new Freedom Board: FRDM-KL46Z | MCU on Eclipse
Pingback: Tutorial: FreeMASTER Visualization and Run-Time Debugging | MCU on Eclipse
The process is easy to follow and it seems like it should work. I am trying to use this with PE 10.4 and IAR 7.30 for a Vybrid project. I am getting the impression that PEX is setting the Vybrid up for the A5 core even though I don’t see any selection for which core to use. So when I try to compile the combined project I get errors like: ARM mode is not available in this core. Also when first connecting the projects I receive a warning box stating: Unkown Device name MVF61NN151CK50. Is there a configuration setting somewhere that I am missing? Thanks.
LikeLike
Hi Mark,
unfortunately, I think I will not be able to help you, as not experienced in Vybrid. I guess that the compiler options in the IAR project are wrong?
LikeLike
OK, time for confession. I did not read the release notes for Processor Expert 10.4 until after I was having the problem. Here is what it says:
Vybrid limitations:
– Tested with Eclipse 4.2
– No dual-core support. Only A5 core supported in the generated code.
So, back to the good old-fashioned way of initializing registers manually.
LikeLike
Pingback: Using Kinetis Design Studio with IAR Embedded Workbench IDE | MCU on Eclipse
Pingback: Tutorial: Using Kinetis Design Studio V3.0.0 with IAR and Keil IDE’s | MCU on Eclipse
Pingback: USB with the TWR-K60F120M and TWR-K70F120M | MCU on Eclipse
Hi,
I want to use the HVP MC3PH and HVP KV46F150M to implement sensorless or Hall sensor control of the BLDC. The Freescale HVP-KV46F150M hardware is
a simple yet sophisticated design featuring the Kinetis V-series MCU, built around the ARM® Cortex®-M4.
Now I found the example program HVPKV46F150M_SNSRDVEL_IAR_1_2_0_426(or other) corresponding to my hardware in the KDS. There is also an example program AN4796SW suitable for my control algorithm, which is for KE02_LV_TWR_BLDC_Sensorless.built around the ARM® Cortex™-M0+.
My question is: How do I integrate and modify them to achieve my goal?
Is this method supported and completed?
Best regard!
wang xuan
LikeLike
I’m not really familiar with the V series, I have not used it it in any projects. I assume the example programs are written in C and do not include library/binary code?
In that case, and if the peripherals are the same, you simply could compile it with KDS and they should work.
LikeLike