Sometimes I show to much in a tutorial: only writing something to the UART? Sounds boring, so why not adding tasks, LEDs and a full shell implementation to the mix as in this post? Yes, definitely too much to start with at the beginning :-(. So less is more, and if it is just about the UART. And I promise: it is doable with around 50 lines of application code :shock:.
AND: I admit, this post title is a trap ;-). It is not about printf(). But it *is* about using the UART on the KL25Z Freedom board and to do things like printf(), and even more. Trust me. It is about how to write *and* read from the UART. While I’m using here the Kinetis-L ARM Cortex-M0+ KL25Z Freedom board, it is applicable to any other Kinetis device.
Goal
What I’m going to implement here, is how to use an UART to send/receive characters.To have things a little challenging: using interrupts and buffering :-).
Without Processor Expert?
I’m going to use (again) Processor Expert with gcc and CodeWarrior for MCU10.3. But if you do not like it, then download the project here and remove Processor Expert. Done, and you have a normal C/C++ project.
Why not printf()?
In my opinion, using printf() (or sprintf() and all the other variants) in an embedded project is a bad thing. printf() can easily can add 10-15 KByte to the code size alone. My goal is to have an application which reads and writes to the UART with less than 5 KByte *total* code size. Using it for something like
printf("Hello world!\n");is just a wast of resources. If I want to use the standard library, then using it like
puts("Hello world!\n");is a better alternative. In the example below I’m using my version of
puts().And:
printf()can result in a severe problem: buffer overflow.Creating the project
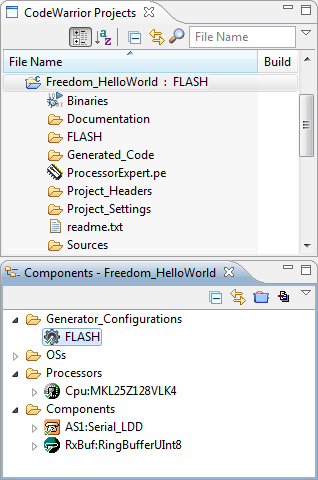
Creating the project is simple (I hope): Use the menu File > New > Bareboard and create a Processor Expert project. If not: this tutorial goes through the project creation steps.
Adding the Processor Expert Components
In this tutorial I need two components: Serial_LDD which is part of CodeWarrior and RingBufferUint8 which is available here. If you do not have loaded the RingBufferUint8, this tutorial shows how to load additional components.
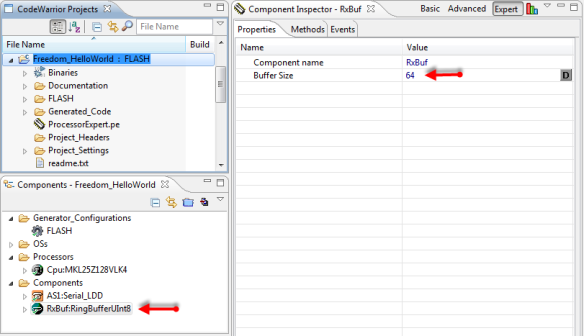
After adding the RingBufferUInt8 component, I have renamed it to ‘RxBuf’.
💡 In order to be able to rename the component (change the component name), the Inspector needs to be in ‘Expert’ mode. See this post about how to switch to the Processor Expert ‘Expert’ mode.
UART Configuration
As the FRDM-KL25Z board does not have a physical UART connector, I’m going to use the P&E OpenSDA virtual USB CDC port on UART0. This means my target device will use an UART which is connected to the OpenSDA debugging device, which implements an USB CDC (Communication Device Class) on the host, enumerating as virtual COM port.
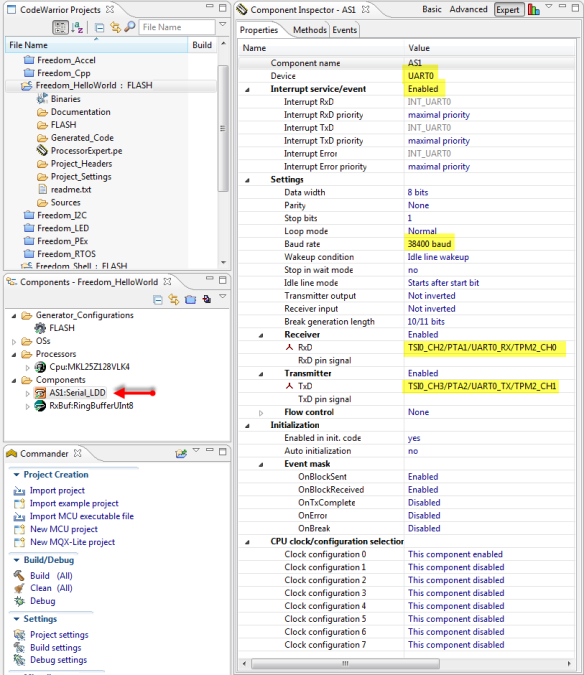
I configure the Serial_LDD for UART0, with Interrupts enabled, 38400 baud and using the TPM2_CH0 and TPM2_CH1 pins:
RingBuffer Configuration
I need a buffer for my incoming characters, so I’m using a circular ring buffer. All what I need here is the size of the buffer:
Generating Code
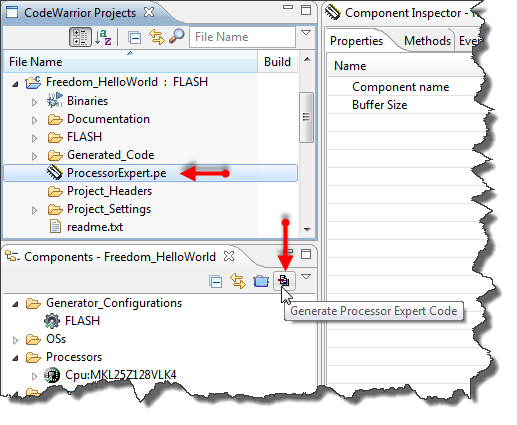
That’s it from the configuration side: time to generate the driver code: I select the project/.pe file and use the button to generate the code:
Adding Application Code
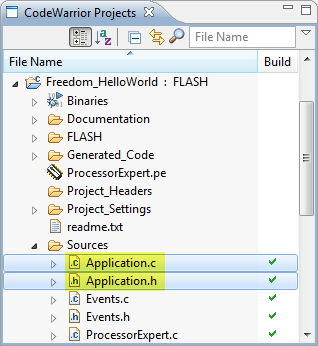
I’m adding my application files (Application.h and Application.c) with File > New Source File and Header File to the project:
Application.h Header File
In Application.h I define the following interface:
#ifndef APPLICATION_H_ #define APPLICATION_H_ #include "PE_Types.h" #include "PE_LDD.h" typedef struct { LDD_TDeviceData *handle; /* LDD device handle */ volatile uint8_t isSent; /* this will be set to 1 once the block has been sent */ uint8_t rxChar; /* single character buffer for receiving chars */ uint8_t (*rxPutFct)(uint8_t); /* callback to put received character into buffer */ } UART_Desc; void APP_Run(void); #endif /* APPLICATION_H_ */
APP_Run()is my application main routine (called later frommain()). With UART_Desc I declare a structure which I will use for accessing the UART. It has a device handle, a flag which is reset in the send interrupt routine, a single character buffer for receiving characters and a callback function pointer which stores the incoming characters into the ring buffer.Application.c Implementation File
The Application.c file looks like this:
#include "Application.h" #include "RxBuf.h" #include "AS1.h" static UART_Desc deviceData; static void SendChar(unsigned char ch, UART_Desc *desc) { desc->isSent = FALSE; /* this will be set to 1 once the block has been sent */ while(AS1_SendBlock(desc->handle, (LDD_TData*)&ch, 1)!=ERR_OK) {} /* Send char */ while(!desc->isSent) {} /* wait until we get the green flag from the TX interrupt */ } static void SendString(const unsigned char *str, UART_Desc *desc) { while(*str!='\0') { SendChar(*str++, desc); } } static void Init(void) { /* initialize struct fields */ deviceData.handle = AS1_Init(&deviceData); deviceData.isSent = FALSE; deviceData.rxChar = '\0'; deviceData.rxPutFct = RxBuf_Put; /* set up to receive RX into input buffer */ RxBuf_Init(); /* initialize RX buffer */ /* Set up ReceiveBlock() with a single byte buffer. We will be called in OnBlockReceived() event. */ while(AS1_ReceiveBlock(deviceData.handle, (LDD_TData *)&deviceData.rxChar, sizeof(deviceData.rxChar))!=ERR_OK) {} /* initial kick off for receiving data */ } void APP_Run(void) { Init(); SendString((unsigned char*)"Hello World\r\n", &deviceData); for(;;) { if (RxBuf_NofElements()!=0) { SendString((unsigned char*)"echo: ", &deviceData); while (RxBuf_NofElements()!=0) { unsigned char ch; (void)RxBuf_Get(&ch); SendChar(ch, &deviceData); } SendString((unsigned char*)"\r\n", &deviceData); } } }There are routines to send a character (
SendChar()) and a string (SendString()). In theInit()routine the device structure gets initialized, along with the ring buffer.
APP_Run()first calls the initialization, then puts a hello world message to the UART and then goes into an endless loop. In this loop it checks if there are any incoming characters. If so, then it echoes them to the UART.UART Interrupt Event Code
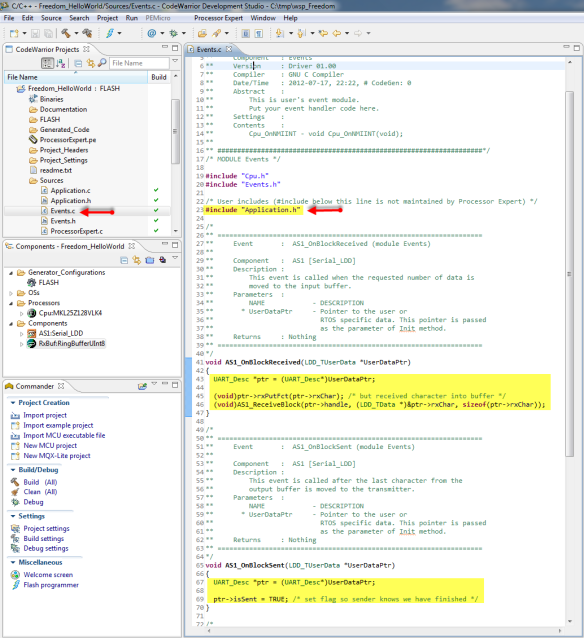
As I am are using interrupts, I need to fill out the event functions (
OnBlockReceived()andOnBlockSent()) in Events.c:As I’m using the UART descriptor, I need to include the header file with its declaration at the beginning of Events.c:
/* User includes (#include below this line is not maintained by Processor Expert) */ #include "Application.h"In the receiver interrupt callback routine I store the received character into my ring buffer and prepare for receiving the next character:
void AS1_OnBlockReceived(LDD_TUserData *UserDataPtr) { UART_Desc *ptr = (UART_Desc*)UserDataPtr; (void)ptr->rxPutFct(ptr->rxChar); /* but received character into buffer */ (void)AS1_ReceiveBlock(ptr->handle, (LDD_TData *)&ptr->rxChar, sizeof(ptr->rxChar)); }In the sender interrupt callback routine I reset my flag to indicate that the block has been sent successfully:
void AS1_OnBlockSent(LDD_TUserData *UserDataPtr) { UART_Desc *ptr = (UART_Desc*)UserDataPtr; ptr->isSent = TRUE; /* set flag so sender knows we have finished */ }Integrating Application Files
Last step is to call my routine from the main file (ProcessorExpert.c). For this I include my application header file and call the application:
/** ################################################################### ** Filename : ProcessorExpert.c ** Project : ProcessorExpert ** Processor : MKL25Z128VLK4 ** Version : Driver 01.01 ** Compiler : GNU C Compiler ** Date/Time : 2012-07-17, 22:22, # CodeGen: 0 ** Abstract : ** Main module. ** This module contains user's application code. ** Settings : ** Contents : ** No public methods ** ** ###################################################################*/ /* MODULE ProcessorExpert */ /* Including needed modules to compile this module/procedure */ #include "Cpu.h" #include "Events.h" #include "AS1.h" #include "RxBuf.h" /* Including shared modules, which are used for whole project */ #include "PE_Types.h" #include "PE_Error.h" #include "PE_Const.h" #include "IO_Map.h" /* User includes (#include below this line is not maintained by Processor Expert) */ #include "Application.h" int main(void) { /* Write your local variable definition here */ /*** Processor Expert internal initialization. DON'T REMOVE THIS CODE!!! ***/ PE_low_level_init(); /*** End of Processor Expert internal initialization. ***/ APP_Run(); /*** Don't write any code pass this line, or it will be deleted during code generation. ***/ /*** RTOS startup code. Macro PEX_RTOS_START is defined by the RTOS component. DON'T MODIFY THIS CODE!!! ***/ #ifdef PEX_RTOS_START PEX_RTOS_START(); /* Startup of the selected RTOS. Macro is defined by the RTOS component. */ #endif /*** End of RTOS startup code. ***/ /*** Processor Expert end of main routine. DON'T MODIFY THIS CODE!!! ***/ for(;;){} /*** Processor Expert end of main routine. DON'T WRITE CODE BELOW!!! ***/ return 0; } /*** End of main routine. DO NOT MODIFY THIS TEXT!!! ***/ /* END ProcessorExpert */ /* ** ################################################################### ** ** This file was created by Processor Expert 5.4 [05.02] ** for the Freescale Kinetis series of microcontrollers. ** ** ################################################################### */Running the Application
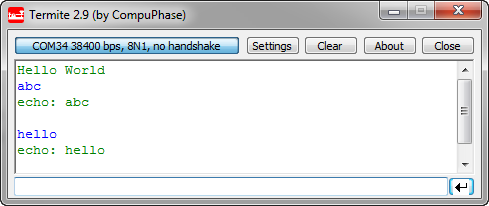
Time to compile/build the application. Running it on the board prints a ‘hello world’, and the sends back the incoming strings and characters:
Summary and Sources
Using the UART is not that difficult: With the drivers and around 50 lines of source code things are not that difficult. The above application compiled with gcc and -Os (optimize for size) is only around 4 KByte of code:
'Invoking: ARM Ltd Windows GNU Print Size' "C:/Freescale/CW MCU v10.3/Cross_Tools/arm-none-eabi-gcc-4_6_2/bin/arm-none-eabi-size" --format=berkeley Freedom_HelloWorld.elf text data bss dec hex filename 4176 40 1172 5388 150c Freedom_HelloWorld.elfThe project with the sources at the time of writing this article is available here.
The latest and greates project maintained by me is available on GitHub here.
Happy Printing 🙂

