The Kinetis-L is a 32bit microprocessor family, based on ARM Cortex M0+. It comes with ARM gcc in CodeWarrior. Although the Kinetis-L does not have much RAM, it is very possible to use gcc with C++, especially as a programmer I keep the limited RAM amount in mind. So I thought I try C++ and Processor Expert for my Kinetis-L KL25Z Freedom board.
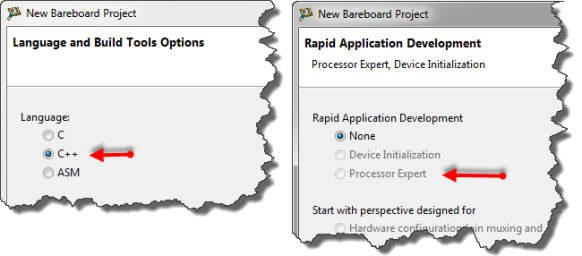
If I select C++ as language in the New Bareboard Project Wizard of CodeWarrior, then I cannot select Processor Expert or Device Initialization:
That makes somewhat sense, as Processor Expert creates normal C code and C files, but no C++. Still, what if I need C++? This is doable, but with anything advanced, I need to know exactly what I want and what I do. Here is the ‘How to use C++ with Processor Expert’.
Step 1: Processor Expert Project in C
The idea is to start with a normal Processor Expert project, which of course does not support C++. Then adding the required settings to have a ‘mixed’ project which has the Processor Expert C files plus my other C++ files.
💡 Hint: If you are unsure about the settings, simply create first a project for C++, but *without* Processor Expert. That gives something to compare with.
I’m using here CodeWarrior for MCU10.3 with gcc and the Freedom KL25Z Board. But as gcc is provided for the Kinetis-K family, this applies for the Kinetis/ARM family.
So step one is to have a normal Processor Expert project (in C), plus optionally a normal C++ project as reference.
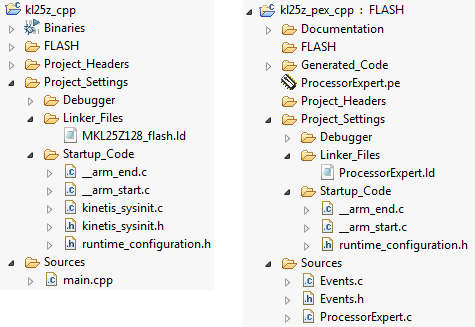
So what I have here are two projects: the kl25z C++ (non-Processor Expert) and the Processor Expert kl25z_pex_cpp project:
Step 2: C++ Nature
Eclipse stores project tool information in the .project XML file which resides in the project root directory. For gcc the toolchain is defined with <nature>...</nature>entries. The difference between a gcc C and a gcc C++ project is best shown if I compare two .project files:
For step two it is best to hack that .project file outside of eclipse: I close the project to prevent Eclipse to change the file while I’m doing modifications externally. Best if the .project file is edited by a normal text editor, e.g. Notepad. An easy way is to copy the line with cnature, then past it and change it to ccnature:
Note: there are two ‘tabs’ at the beginning of the line!
After the .project file modification, I can open my project again in the Eclipse workspace. The C++ nature has now gcc for C++. I have GCC C++ panels available in the project properties:
The bad news is that C++ panels only have the default entries set up :-(. Which means that I need to make sure the options are set up correctly for my project.
❓ Note: I experimented to change the XML information in the .cproject file which contains the build tool options. But I failed to find an easy way. There is as well a (hidden) conversion wizard in Eclipse which in theory is able to convert a gcc C project into a C++ one, but this did not work me. So that’s why I’m using the ‘manual’ way. And this works for me. If someone has a better way: post a comment!
Step 4: GCC C++ Compiler Options
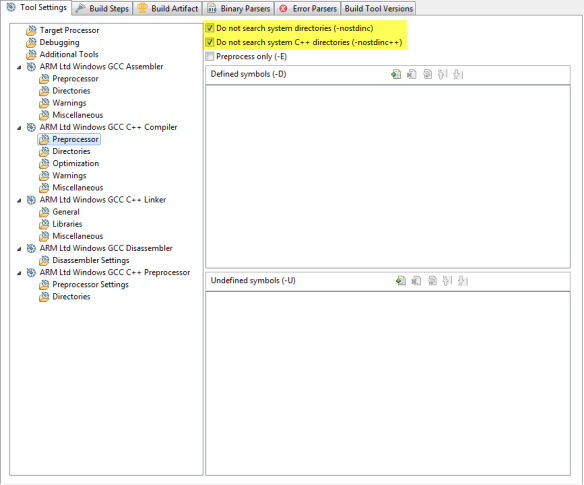
So I need to go through the GCC C++ panels and set the options. I use here the option settings from my ‘reference’ C++ project I have created in step 1.
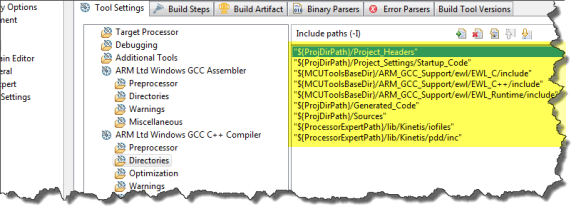
The next panel defines the include paths for the compiler.
:idea:Tip: Instead of typing in all the paths manually, it there is a hidden feature that you can copy-paste multiple paths in a single step :-). Simply select multiple lines in another panel, copy (CTRL-C) and paste it (CTRL-V). Or copy the lines from the text below.
❗ Tip: Depending on your browser, copy-paste from the text below might not be straight forward 😦 What works for me (using FireFox) is to hover over the text, then select the ‘View Source’ button and copy it from there.
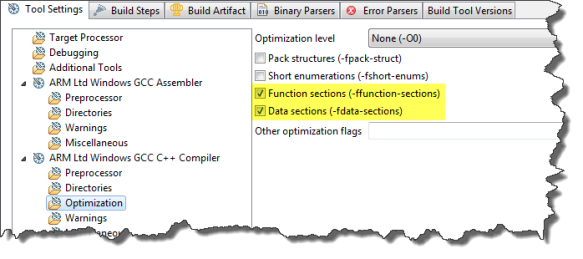
"${ProjDirPath}/Project_Headers" "${ProjDirPath}/Project_Settings/Startup_Code" "${MCUToolsBaseDir}/ARM_GCC_Support/ewl/EWL_C/include" "${MCUToolsBaseDir}/ARM_GCC_Support/ewl/EWL_C++/include" "${MCUToolsBaseDir}/ARM_GCC_Support/ewl/EWL_Runtime/include" "${ProjDirPath}/Generated_Code" "${ProjDirPath}/Sources" "${ProcessorExpertPath}/lib/Kinetis/iofiles" "${ProcessorExpertPath}/lib/Kinetis/pdd/inc"The next panel is about compiler optimizations: here I enable two options allowing the compiler/linker to remove unreferenced code and data:
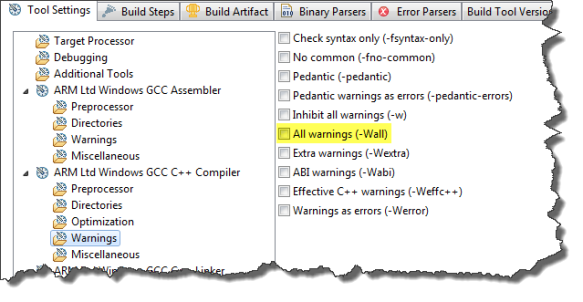
The next panel is about the Compiler warnings. Here I’m free what I want and need, but usually I do have the ‘-Wall‘ warning option disabled, as otherwise I get warnings for the Processor Expert code (this is a different topic):
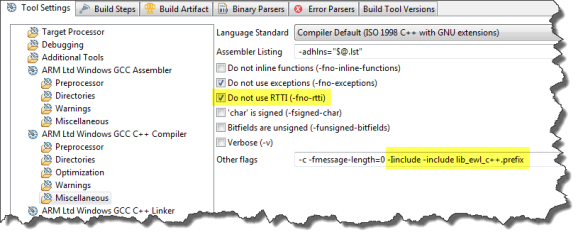
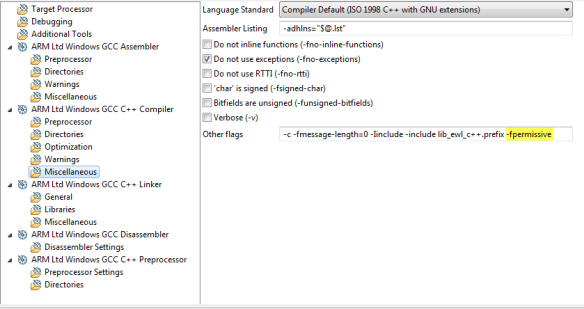
The last compiler panel is Miscellaneous. Disabling RTTI is optional but good for code/data density. Important is to have this in the ‘Other flags’:
-c -fmessage-length=0 -Iinclude -include lib_ewl_c++.prefixStep 5: GCC C++ Linker Options
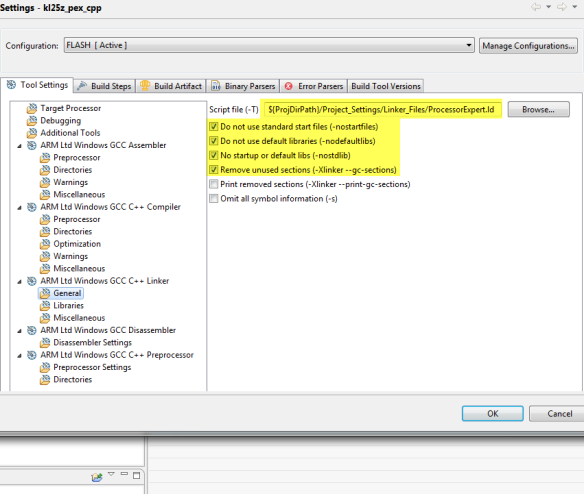
In the linker General settings we need to specify the linker script file:
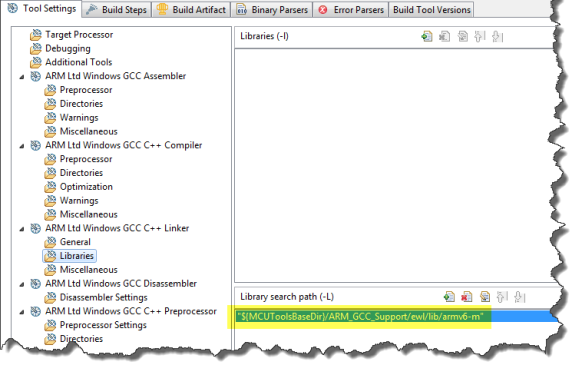
${ProjDirPath}/Project_Settings/Linker_Files/ProcessorExpert.ldIn the next panel we need to tell the linker to link with the following library:
"${MCUToolsBaseDir}/ARM_GCC_Support/ewl/lib/armv6-m"In the Linker Miscellaneous page we have to add a list of linker flags. Again we can copy-paste the lines:
--undefined=__pformatter_ --defsym=__pformatter=__pformatter_ --start-group -lc++ -lrt -lsupc++ -lc -lgcc -luart --end-groupStep 6: GCC C++ Preprocessor Options
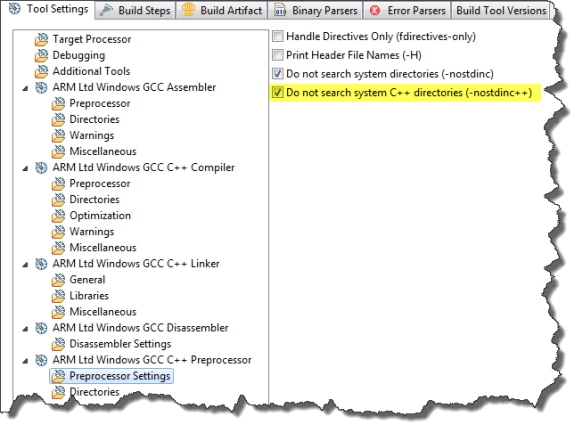
What is missing are the setting for the preprocessor.
The Preprocessor Directories worked just fine for me with the default settings:
Step 7: Compiling, Linking and “C” Linkage
If I build now my application, I will run into this:
The reason is \Project_Settings\Startup_Code\__arm_start.c defines
__thumb_startup()with C calling convention. This is because that file has a_EWL_BEGIN_EXTERN_C..._EWL_END_EXTERN_Cblock around the declaration and definition of__thumb_startup():... _EWL_BEGIN_EXTERN_C ... void __thumb_startup(void); ... void __thumb_startup(void) { ... } _EWL_END_EXTERN_CAnd in Generated_Code\Vectors.c it is used as this:
/* ISR prototype */ extern uint32_t __SP_INIT; extern void __thumb_startup( void );One solution would be to change it using
extern "C":/* ISR prototype */ extern uint32_t __SP_INIT; extern "C" void __thumb_startup( void );However, that would mean that when the Vectors.c file is re-generated, I would have to do again that change. Or I need to tell Processor Expert *not* to create the Vectors.c file.
As painful, I’m using another approach: I’m compiling
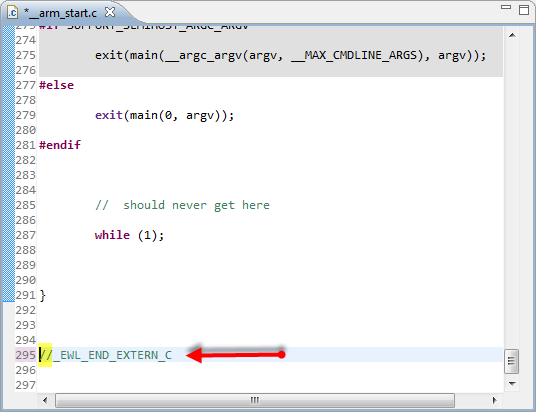
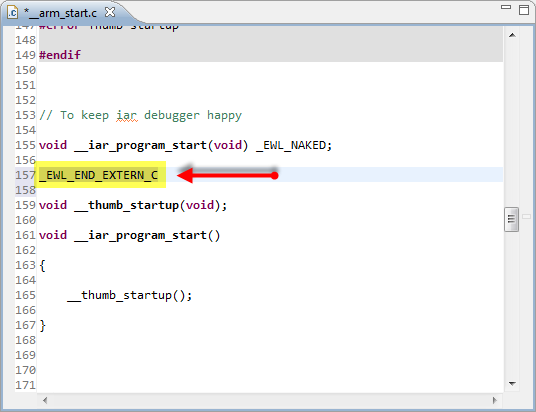
__thumb_startup()with C++ naming convention :-). For this I change __arm_start.c. At the end of the file I comment out the _EWL_END_EXTERN_C macro:Instead, I have that macro placed above the declaration (and definition) of __thumb_startup():
Now I’m able to compile and link 🙂
Step 8: Linker Warning
There is still a warning:
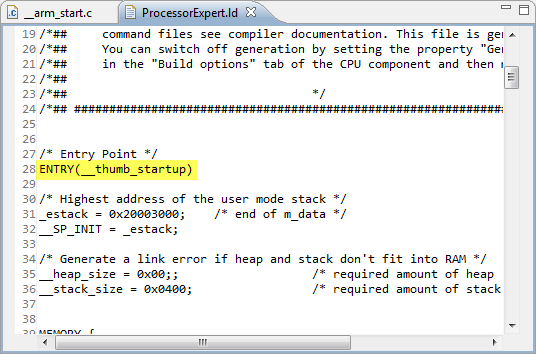
This is caused by the fact that we compile that function with C++ convention, but in the Processor Expert generated linker file it the symbol name is used with normal C calling convention:
To match the C++ symbol name, it should be changed to
ENTRY(__thumb_startupv)Notice the ‘v’ at the end which indicates that the function has
voidparameter in C++. But as this linker file is generated, I would have to switch off generation of it in the Processor Expert CPU component, or making that change all the time. Usually I’m a fanatic fighter against warnings, but today I’m lacy :twisted:.Step 9: Adding C++ Code
The last step is to add the C++ code and enjoy it working. The project created above is available here. That way you can start with this project your own experiments with C++, Processor Expert and GNU gcc.
Adding MQXLite Processor Expert Components
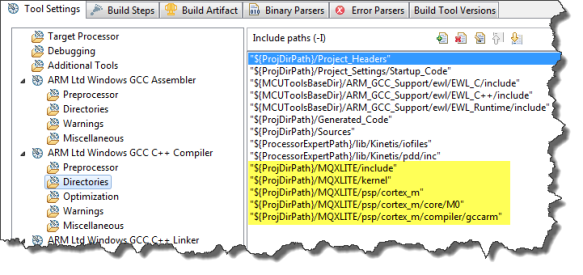
The above approach works for me so far. I only have found a smaller annoyance: Some Processor Expert components (e.g. MQXLite) add extra compiler search paths to the compiler settings. As the compiler panels are now for C++, it looks they are not added properly. As a solution for MQXLite I had to add the other paths to the project:
"${ProjDirPath}/MQXLITE/include" "${ProjDirPath}/MQXLITE/kernel" "${ProjDirPath}/MQXLITE/psp/cortex_m" "${ProjDirPath}/MQXLITE/psp/cortex_m/core/M0" "${ProjDirPath}/MQXLITE/psp/cortex_m/compiler/gccarm"The other thing is that compiling MQXLite will cause many gcc errors. The command line option -fpermissive fixes this until MQXLite fixes these problems:
The next problem is again the C linkage: MQXlite does not declare
__boot()with C linkage. For this I need to mark it withextern "C"in the generated MQX1.h:/* MQX Lite entrypoint */ extern "C" void __boot(void);With this, only one problem remains: the MQXLite boot.S is calling for __thumb_startup:
ASM_EXTERN(__thumb_startupv) bl ASM_PREFIX(__thumb_startupv)Well, this does not work that way, as C++ has mangled the name, see this link. Instead, I need to write it as
ASM_EXTERN(_Z15__thumb_startupv) bl ASM_PREFIX(_Z15__thumb_startupv)and now it works :-).
The downside of this with MQXLite is: I need to repeat this when Processor Expert overwrites that code. To prevent Processor Expert doing this, see this post.
Summary
I’m using C++ with Processor Expert in another project using ColdFire V1. I have found that with the Freescale compiler it is much easier to add C++, mainly because the build tool options pages in CDT/Eclipse are not different between C and C++. But apart of that: it is very well doable with gcc and Kinetis.
I have not tried much of my own components with C++, but I’m confident they will work, or I can quickly make an update if there is interest. For MQXlite I probably have to wait for better C++ support, but with the above tips things are working out good. Not perfect, but good enough.
Happy PlusPlus 🙂








Thanks. This turned out to be extremely helpful. I had figured out things up to the link error of “__start_thumb()”. You saved me a great deal of time. You are a wizard!
LikeLike
You are welcome. Good to hear that things are useful for other engineers out there.
LikeLike
Do you happen to know what limits are imposed by the evaluation or basic version of codewarrior on the processor expert components? Looking at a table from freescale I noticed that all versions of codewarrior include basic processor expert components but the professional version includes advanced and basic components. What are the advanced components that it talks about?
LikeLike
Hi Arturo,
I believe that table is outdated, as I think starting with MCU10.2 the ‘advanced’ components are included in all editions. In the past, the ‘advanced’ components like ‘Term’ (Terminal emulation) were only available in the professional edition. Now they all are covered by the free edition too. In doubt, you can check if they are available or not: rename your license.dat inside the MCU folder (so that CodeWarrior does not find the license), then start Eclipse. Now you should be in the code size limited free special edition mode. In the Component Library view, you should now see all icons in full color (not grayed out).
LikeLike
Pingback: Compiling C Files with GNU ARM G++ | MCU on Eclipse
Pingback: Review of CodeWarrior for MCU10.4 | MCU on Eclipse
looks like CW10.4 is supposed to fix those “extern C’ issues…
But I ran into another odd problem. In doing this switch to C++ (CW 10.4 or 10.3 same issue) I get an error in FATM1.c (which doesn’t happen with the C compiled version):
Description Resource Path Location Type
ff.h: No such file or directory FATM1.c /test/Generated_Code line 51 C/C++ Problem
It can’t find ff.h even though it’s right where it’s supposed to be…
LikeLike
Hi Marc,
yes, CW10.4 is better, but still not perfect. I have filed bug reports for example for AsynchroSerial component which fails to be compiled in C++ mode (missing casts). So next version (10.5?) will be even better.
As for FatFS: I tried on my side(test project in https://github.com/ErichStyger/mcuoneclipse/tree/master/Examples), and fixed some cast errors in the FatFs source base too. I have committed those to GitHub, but I have not seen the error you report. Which device are you using? I did not use SDHC.
LikeLike
Hi Erich,
Yeah I ran into a casting bug in Serial_LDD. You’d think that when claiming to add C++ support to PE they would at least compile each component in a C++ project…
I just updated from your github last night so I’ve loaded my project again. I’m using the FatFsMemSDHC component.
So, starting up I get some unrelated errors:
Jul 16, 2013 12:46:52 PM Starting Processor Expert service
System directory = C:\Freescale\CW MCU v10.4\MCU\ProcessorExpert
User working directory = C:\Documents and Settings\All Users\Application Data\Processor Expert\CWMCU_PE5_00
Internal cache directory = C:\Documents and Settings\All Users\Application Data\Processor Expert\PECache\68d7b994
Processor Expert CodeWarrior license file = C:\Freescale\CW MCU v10.4\eclipse\..\MCU\license.dat
Jul 16, 2013 12:49:17 PM Successfully started Processor Expert service
BeanLoader.loadTemplate: error loading template Templts\FSL_USB_CDC_Device.dev
Cannot open Beans\Init_RVA_HCS12\Init_RVA_HCS12.tps – null
Type Specification file not found: “Init_RVA_HCS12\Init_RVA_HCS12” (ADC)
Type specification was not found “typeFHCS12RVAEnableRVA” symbol: RVAEnableRVA
BeanLoader.loadTemplate: error loading template Templts\FLASH_LDD.dev
Error: Unknown type info: typeFHCS12RVAEnableRVA in item “Enable RVA”/RVAEnableRVA from component AD1/ADC
Building (fixed the Serial_LDD bug) I get (verbose):
Thread model: single
gcc version 4.7.3 20121207 (FSL release r785) [ARM/embedded-4_7-branch revision 194305] (GNU Tools for ARM Embedded Processors)
COLLECT_GCC_OPTIONS=’-mcpu=cortex-m4′ ‘-mthumb’ ‘-mfloat-abi=hard’ ‘-mfpu=fpv4-sp-d16’ ‘-g3’ ‘-gdwarf-2’ ‘-gstrict-dwarf’ ‘-nostdinc’ ‘-nostdinc++’ ‘-I’ ‘Y:/BEA/ioti/software/SVN/trunk/firmware/ioti-k20/Project_Headers’ ‘-I’ ‘Y:/BEA/ioti/software/SVN/trunk/firmware/ioti-k20/Project_Settings/Startup_Code’ ‘-I’ ‘C:/Freescale/CW MCU v10.4/MCU/ARM_GCC_Support/ewl/EWL_C/include’ ‘-I’ ‘C:/Freescale/CW MCU v10.4/MCU/ARM_GCC_Support/ewl/EWL_C++/include’ ‘-I’ ‘C:/Freescale/CW MCU v10.4/MCU/ARM_GCC_Support/ewl/EWL_Runtime/include’ ‘-I’ ‘Y:/BEA/ioti/software/SVN/trunk/firmware/ioti-k20/Generated_Code’ ‘-I’ ‘Y:/BEA/ioti/software/SVN/trunk/firmware/ioti-k20/Sources’ ‘-I’ ‘C:/Freescale/CW MCU v10.4/MCU/ProcessorExpert/lib/Kinetis/iofiles’ ‘-I’ ‘C:/Freescale/CW MCU v10.4/MCU/ProcessorExpert/lib/Kinetis/pdd/inc’ ‘-O0’ ‘-ffunction-sections’ ‘-fdata-sections’ ‘-fno-exceptions’ ‘-fno-rtti’ ‘-v’ ‘-c’ ‘-fmessage-length=0’ ‘-I’ ‘include’ ‘-include’ ‘lib_ewl_c++.prefix’ ‘-MMD’ ‘-MP’ ‘-MF’ ‘Generated_Code/FATM1.d’ ‘-o’ ‘Generated_Code/FATM1.o’
c:/freescale/cw mcu v10.4/cross_tools/arm-none-eabi-gcc-4_7_3/bin/../lib/gcc/arm-none-eabi/4.7.3/cc1plus.exe -quiet -nostdinc -nostdinc++ -v -I Y:/BEA/ioti/software/SVN/trunk/firmware/ioti-k20/Project_Headers -I Y:/BEA/ioti/software/SVN/trunk/firmware/ioti-k20/Project_Settings/Startup_Code -I C:/Freescale/CW MCU v10.4/MCU/ARM_GCC_Support/ewl/EWL_C/include -I C:/Freescale/CW MCU v10.4/MCU/ARM_GCC_Support/ewl/EWL_C++/include -I C:/Freescale/CW MCU v10.4/MCU/ARM_GCC_Support/ewl/EWL_Runtime/include -I Y:/BEA/ioti/software/SVN/trunk/firmware/ioti-k20/Generated_Code -I Y:/BEA/ioti/software/SVN/trunk/firmware/ioti-k20/Sources -I C:/Freescale/CW MCU v10.4/MCU/ProcessorExpert/lib/Kinetis/iofiles -I C:/Freescale/CW MCU v10.4/MCU/ProcessorExpert/lib/Kinetis/pdd/inc -I include -imultilib armv7e-m/fpu -iprefix c:\freescale\cw mcu v10.4\cross_tools\arm-none-eabi-gcc-4_7_3\bin\../lib/gcc/arm-none-eabi/4.7.3/ -isysroot c:\freescale\cw mcu v10.4\cross_tools\arm-none-eabi-gcc-4_7_3\bin\../arm-none-eabi -MMD Generated_Code/FATM1.d -MF Generated_Code/FATM1.d -MP -MQ Generated_Code/FATM1.o -dD -D__USES_INITFINI__ -include lib_ewl_c++.prefix ../Generated_Code/FATM1.c -quiet -dumpbase FATM1.c -mcpu=cortex-m4 -mthumb -mfloat-abi=hard -mfpu=fpv4-sp-d16 -auxbase-strip Generated_Code/FATM1.o -g3 -gdwarf-2 -gstrict-dwarf -O0 -version -ffunction-sections -fdata-sections -fno-exceptions -fno-rtti -fmessage-length=0 -o C:\DOCUME~1\ADMINI~1\LOCALS~1\Temp\cctKvd0Z.s
GNU C++ (GNU Tools for ARM Embedded Processors) version 4.7.3 20121207 (FSL release r785) [ARM/embedded-4_7-branch revision 194305] (arm-none-eabi)
compiled by GNU C version 4.5.0 20100414 (Fedora MinGW 4.5.0-1.fc14), GMP version 4.3.2, MPFR version 2.4.2, MPC version 0.8.1
GGC heuristics: –param ggc-min-expand=99 –param ggc-min-heapsize=131005
ignoring nonexistent directory “include”
#include “…” search starts here:
#include search starts here:
Y:/BEA/ioti/software/SVN/trunk/firmware/ioti-k20/Project_Headers
Y:/BEA/ioti/software/SVN/trunk/firmware/ioti-k20/Project_Settings/Startup_Code
C:/Freescale/CW MCU v10.4/MCU/ARM_GCC_Support/ewl/EWL_C/include
C:/Freescale/CW MCU v10.4/MCU/ARM_GCC_Support/ewl/EWL_C++/include
C:/Freescale/CW MCU v10.4/MCU/ARM_GCC_Support/ewl/EWL_Runtime/include
Y:/BEA/ioti/software/SVN/trunk/firmware/ioti-k20/Generated_Code
Y:/BEA/ioti/software/SVN/trunk/firmware/ioti-k20/Sources
C:/Freescale/CW MCU v10.4/MCU/ProcessorExpert/lib/Kinetis/iofiles
C:/Freescale/CW MCU v10.4/MCU/ProcessorExpert/lib/Kinetis/pdd/inc
End of search list.
GNU C++ (GNU Tools for ARM Embedded Processors) version 4.7.3 20121207 (FSL release r785) [ARM/embedded-4_7-branch revision 194305] (arm-none-eabi)
compiled by GNU C version 4.5.0 20100414 (Fedora MinGW 4.5.0-1.fc14), GMP version 4.3.2, MPFR version 2.4.2, MPC version 0.8.1
GGC heuristics: –param ggc-min-expand=99 –param ggc-min-heapsize=131005
Compiler executable checksum: 422bbe97c09c85a8608796b686ff4fdd
../Generated_Code/FATM1.c:51:16: fatal error: ff.h: No such file or directory
mingw32-make: *** [Generated_Code/FATM1.o] Error 1
LikeLike
Hi Marc,
these BeanLoader.loadTemplate errors I have reported to Freescale, and I have received feedback that the next version should have it fixed.
I’ll need to check the other files. Honestly, apart of some small projects, I have not used C++ much. So very likely there could be many gaps, even in my components too. That’s why I have added several components to the Freedom_Cpp project just to see if they compile. I need to check as well the FreeRTOS files: altough they should be ready for C++ compilation, I had errors too. Working on it.
LikeLike
Hi Erich,
I was able to compile your Freedom_Cpp project successfullly. But when I look in the generated code folder, I don’t see FATM1.c or FATM1.h. Realized there’s no FAT components in the project! So I re-checked git, and realized you’d updated it after the last time I’d downloaded it yesterday! OK… updating everything…
Still get the same errors when launching CW which opens PE…
Compiling your new Freedom_Cpp it compiles fine and I see FATM1.c/h and ff.c/h in generated code.
But my project, same compilation error. I have the FatFsMemSDHC component but I don’t have the FAT_Filesystem component.
So I tried adding the FAT_Filesystem and in doing so I realized, that I should add the FAT_Filesystem FIRST and let it instantiate a FatFsMemSDHC component, right? Or maybe either way is the same? Somehow I’ve managed to totally miss that.
After configuring it to use FreeRTOS (I’m using it in the project) and enabling Command shell support I got these new errors:
———————————–
../Generated_Code/FAT1.c: In function ‘byte PrintDir(const byte*, const CLS1_StdIOType*)’:
../Generated_Code/FAT1.c:176:3: error: invalid conversion from ‘void*’ to ‘byte* {aka unsigned char*}’ [-fpermissive]
../Generated_Code/FAT1.c: In function ‘byte DirCmd(const unsigned char*, CLS1_ConstStdIOType*)’:
../Generated_Code/FAT1.c:287:3: error: invalid conversion from ‘void*’ to ‘byte* {aka unsigned char*}’ [-fpermissive]
../Generated_Code/FAT1.c: In function ‘byte CopyCmd(const unsigned char*, CLS1_ConstStdIOType*)’:
../Generated_Code/FAT1.c:326:3: error: invalid conversion from ‘void*’ to ‘byte* {aka unsigned char*}’ [-fpermissive]
../Generated_Code/FAT1.c:327:3: error: invalid conversion from ‘void*’ to ‘byte* {aka unsigned char*}’ [-fpermissive]
../Generated_Code/FAT1.c: In function ‘byte DeleteCmd(const unsigned char*, CLS1_ConstStdIOType*)’:
../Generated_Code/FAT1.c:350:3: error: invalid conversion from ‘void*’ to ‘byte* {aka unsigned char*}’ [-fpermissive]
../Generated_Code/FAT1.c: In function ‘byte MkdirCmd(const unsigned char*, CLS1_ConstStdIOType*)’:
../Generated_Code/FAT1.c:369:3: error: invalid conversion from ‘void*’ to ‘byte* {aka unsigned char*}’ [-fpermissive]
../Generated_Code/FAT1.c: In function ‘byte RenameCmd(const unsigned char*, CLS1_ConstStdIOType*)’:
../Generated_Code/FAT1.c:390:3: error: invalid conversion from ‘void*’ to ‘byte* {aka unsigned char*}’ [-fpermissive]
../Generated_Code/FAT1.c:391:3: error: invalid conversion from ‘void*’ to ‘byte* {aka unsigned char*}’ [-fpermissive]
../Generated_Code/FAT1.c: In function ‘byte PrintCmd(const unsigned char*, CLS1_ConstStdIOType*)’:
../Generated_Code/FAT1.c:415:3: error: invalid conversion from ‘void*’ to ‘byte* {aka unsigned char*}’ [-fpermissive]
../Generated_Code/FAT1.c: In function ‘byte CdCmd(const unsigned char*, CLS1_ConstStdIOType*)’:
../Generated_Code/FAT1.c:435:3: error: invalid conversion from ‘void*’ to ‘byte* {aka unsigned char*}’ [-fpermissive]
mingw32-make: *** [Generated_Code/FAT1.o] Error 1
———————————–
Disabling command shell support in FAT_Filesystem got rid of them (and the associated functionality, obviously) for now. Then it moves on to other errors:
————————————
../Generated_Code/FATM1.c: In function ‘LDD_TDeviceData* FATM1_Init(LDD_TUserData*)’:
../Generated_Code/FATM1.c:215:72: error: invalid conversion from ‘int’ to ‘SDHC1_TBusClock’ [-fpermissive]
../Generated_Code/SDHC1.h:507:12: error: initializing argument 2 of ‘LDD_TError SDHC1_SelectBusClock(LDD_TDeviceData*, SDHC1_TBusClock)’ [-fpermissive]
../Generated_Code/FATM1.c:219:70: error: invalid conversion from ‘int’ to ‘SDHC1_TBusClock’ [-fpermissive]
../Generated_Code/SDHC1.h:507:12: error: initializing argument 2 of ‘LDD_TError SDHC1_SelectBusClock(LDD_TDeviceData*, SDHC1_TBusClock)’ [-fpermissive]
../Generated_Code/FATM1.c: In function ‘DRESULT disk_ioctl(std::uint8_t, std::uint8_t, void*)’:
../Generated_Code/FATM1.c:446:17: error: invalid conversion from ‘unsigned int’ to ‘DRESULT’ [-fpermissive]
../Generated_Code/FATM1.c:447:18: error: invalid conversion from ‘void*’ to ‘std::uint8_t* {aka unsigned char*}’ [-fpermissive]
mingw32-make: *** [Generated_Code/FATM1.o] Error 1
——————————-
Looks like these, I need to fix….
LikeLike
Hi Marc,
I have not used the SHDC with C++ yet. Would you mind to send me your project so I can have a look?
And yes: the ‘memory device’ is a ‘referenced’ sub component of Fat_FileSystem component. Unfortunately there is no way in Processor Expert to filter/hide it. The ‘memory’ component only makes sense in context of the ‘above’ FatFs component.
LikeLike
Hi Erich,
OK I’ll send the project, as it stands (still compiler errors). So many casting errors due to the common C pattern of assigning to void*, which for C is actually allowed. Made me start digging to see if there was a way to get G++ to compile C files with straight C rules rather than the stricter C++. So far I can’t come up with anything maybe you have some ideas. Seems like that would be a better solution than editing all these C files.
The G++ documentation seems to say that C files are recognized and compiled as such due to the “.c” postfix but that doesn’t seem to actually be the case….
LikeLike
Hi Marc,
have a look here: https://mcuoneclipse.com/2013/03/23/compiling-c-files-with-gnu-arm-g/
And I made some progress: I’m able now to compile the FreeRTOS in C++ mode 🙂
LikeLike
Hi Marc,
I pushed now additional changes with casts for C++ to GitHub. There were two casts missing in the SHDC component, and now I can compile it properly with the shell and FreeRTOS.
LikeLike
Hi Erich,
I’m still playing with adding the -x none flag… I wonder if that isn’t a better solution, as the casting to void* is so common in C….? Anyhow thanks, I’ll check out the new drop!
LikeLike
Hi Marc,
yes, -x none is a better way in my view. Still, I think to have the code ‘C++ ready’ is a plus in any case. So I have made that extra effort to be ready for the future 🙂
LikeLike
ran into a weird error trying to compile with fstream (ifstream) …. see post in FSL forum. any ideas?
LikeLike
Hi Marc,
not sure what is causing this. I think it could be that some additional includes are missing? Can you try to check the preprocessor listing? Maybe there is a define or something else causing this?
LikeLike
check the preprocessor listing? not sure how to do that…
i’ve checked the include paths, and you can right-click on std::ifstream and see it’s (eventually) defined…
fstream should be the only include needed for this according to everything I’ve read… including the ewl C and ewl C++ user manuals…
stumped!
LikeLike
You can get the preprocessor listing that way: right click on the source file and select the ‘Preprocess’ menu.
LikeLike
In you github repo, I can only find one example FRDM-KL25Z_Blink is built with makefile and arm-gcc-none-eabi. Now I am trying to change the project with CPP support.
LikeLike
Pingback: New CodeWarrior for MCU10.5 | MCU on Eclipse
Thank you, the article was quite helpful in getting me started, but I still wasted way too much time to get it to work 😦
What I learned with 10.5:
– having parallel build enabled for a C++ project prevents you from loading it. Make sure this option is disabled in the project.
– the -x none option ensures that the C files compile as C, and mean that you do not need to change any generated files.
– to have easy access to the include paths, set your components up before switching to C++
– in 10.5 you need to change the library used in the Librarian (c/c++ build->Settings->Tool Settings) to use a C++ one
– in 10.5 you only need to update the library search path, the rest of the changes to the linker are no longer needed thanks to the Librarian
– in c/c++ General, Language Mappings, map C source files to C++. Otherwise Eclipse would not properly parse the files for indexing.
LikeLike
Thanks for sharing these additional tips!
LikeLike
Hi Erich,
I’ve given this a try and i keep encountering an error when trying to run the program. “Error launching filename_FLASH_OpenSDA” Could not open memory configuration file. Did you ever come across this error ?
Many Thanks
LikeLike
Hi Dean,
Yes, I had this if I specified a memory configuration file in the launch configuration, but this file is missing or file name is wrong.
Have you checked that setting?
Erich
LikeLike
Hi so this is what happened, I create a bare project in C, then I use expert components. I build the project and then run it, everything is fine. I close the project, then add the org.eclipse.cdt.core.ccnature to the project file. Open the project try running it and i get the launch error. If i follow all the steps you’ve provided above same problem.
If i take your Freedom.cpp file from repository i get the thumb_up error even straight from opening it up with _EWL_END_EXTERN_C changed.
I’m simply trying to add a c++ class to my c project but it doesn’t seem so easy.
Cheers
LikeLike
Hi Dean,
Can you try my Freedom_cpp project (not just the file), because this is my test projects (with many other compents), and I can compile this one?
Erich
LikeLike
Pingback: First NXP Kinetis SDK Release: SDK V2.0 with Online On-Demand Package Builder | MCU on Eclipse
Hi Erich.
I have just downloaded your example project and clicked on build, and i get an error in the file “IO_Map.h” at the line with #include “MKL25Z4.h” that says that : no such file or directory “MKL25Z4.h”. Can you please help me?
Thanks for your great website!
Alex
LikeLike
Hi Alexandru, have you already generated Processor Expert code?
Erich
LikeLike
“these BeanLoader.loadTemplate errors I have reported to Freescale, and I have received feedback that the next version should have it fixed.”
Hah! That was over 4 years ago and I just stumbled across this because I got exactly the same error with a fresh install of the latest versions.
I’m having one of those days where everything breaks. I’m unable to open PEx in MCUX after reinstalling – it says there’s no project selected. If I hit refresh I can briefly see my components before it gives me those type specification file errors and then clears the view again. I’ll keep working on it but if you’ve got any ideas, let me know!
LikeLike
Hi Scott,
I’m on a big crunch right now, so probably won’t be able to look at it before the weekend. One thing is that The IDE still stores some settings which are not removed by an uinstall.
Check some folders here:
C:\Users\\.nxp
C:\Users\\mcuxpresso
c:\Users\\.eclipse
You might find some old workspace information there too (in the c:\users\ folder.
I hope this helps,
Erich
Erich
LikeLike
Thanks Erich. I think I hit all of those. Is there anywhere I can look for more verbose logging information?
LikeLike
Have you checked the .log file in the .metadata folder of your workspace already?
LikeLike
something else: have you updated the Java on your machine? Maybe the error is because of the Java version used?
LikeLike
Something else: MCUXpresso IDE 10.1.0 is out for a few days. Can you try that one instead (I have PEx installed in it too).
LikeLike
Hi Erich,
It’s 10.1.10 that I’m using. I saw there was a Java update pending (151) so I installed that with no change. (Why does the Java installer still look like a CDE app from 1995? It’s making me nostalgic for my AlphaStation 200…)
I’m up and running now, though. I went up further in the Eclipse .log file and saw conflict messages like this:
!ENTRY org.eclipse.core.variables 4 120 2017-11-22 08:56:12.511
!MESSAGE Dynamic variable extension from bundle ‘com.freescale.processorexpert.configuration’ overrides existing extension variable ‘ProcessorExpertPath’ from bundle ‘com.nxp.swtools.configuration’
I uninstalled the NXP configuration tools plugin (it wasn’t very useful last time I checked) and now PEx starts and I’m able to generate code and my project builds successfully.
Did NXP change something with that component in the new release? Perhaps the new additions to the configuration plugin are rebranded pieces of PEx?
Thanks,
Scott
LikeLike
Hi Scott,
hmm, I see now your problem too with MCUXpresso IDE 10.1 and with creating/opening a PEx project :-(. I did not update the Java on my end.
So what it looks like is that the configuration tools plugin conflicts with the Processor Expert plugin, causing the PEx plugin to crash somehow.
I see if I can find a workaround, but it seems that MCUXpresso IDE 10.1 does not allow the combination of configuration tools and PEx. Maybe the Configuration tools have been created out of the PEx plugins and creating now such a conflict.
Erich
LikeLike
Yeah, that’s my guess as well. Not going to worry about it for now, but I’ll keep an eye out here for any updates. Thanks!
LikeLike
Bummer. I hope this will get fixed some day, that would be great.
LikeLike
Pingback: From C to C++: Converting Eclipse C Projekts | MCU on Eclipse