
This is the first part of a multi-part tutorial on setting up a free and functional GNU gcc + Eclipse + debugger environment for use with the Freescale FRDM-KL25Z board.
List of Tutorials
- Part 1: Setting up ARM GNU tool chain
- Part 2: Setting up Eclipse IDE
- Part 3: Setting up the debugger (P&E and Segger)
- Part 4: Setting up Processor Expert
- Part 5: Setting up FreeRTOS Kernel Awareness
- Part 6: Linux Host Support with OpenOCD and CMSIS-DAP
- Part 7: GNU ARM Eclipse Plugins
- Part 8: Processor Expert with GNU ARM Eclipse Plugins
- Part 9: DIY Free Toolchain for Kinetis: Part 9 – Express Setup in 8 Steps
- Part 10 – Project Creation with GNU ARM Eclipse 2.1.1
In this first part, I’m showing how to install the GNU ARM tool chain to build a ‘blinking LED’ application for the FRDM-KL25Z. With 100% free tools 😉

Blinking Red RGB LED made with free tools
DIY: Do-It-Yourself
There are many tool chains available for ARM cores, where the Freescale Kinetis is just one in the growing ARM ecosystem. Each ARM licensee as STMicrolectronics, NXP and others are providing Eclipse based development tool chains, and Freescale is no exception with CodeWarrior. And beside of this, there are vendors which give either non-Eclipse tool chains (IAR, Keil) or Eclipse based ones (CodeRed (recently acquired by NXP, CodeSourcery (aquired by Mentor Graphics)) and many more. As you see with the acquisitions, there is a lot of movement in the tools market. Acquisitions typically mean that the tool chain will only support the owners processors (see NXP with CodeRed), or that with the acquisition the tool chain greatness slowly fades away?
What CodeRed basically did (and still does) is to grab a standard Eclipse version, adds in GNU build tools and adds their own extensions plus limitations (e.g. debugger code size limits) to sell their package. There is nothing wrong with charging for something like this (even if it has open source tools), because it is a service to pull everything together, test it and make it easy to use. But there is no magic behind this to do this yourself: combine together what is available as open source tools and build up your own ‘do-it-yourself-toolchain’. It does not come for free: it needs time to set it up. And to do this you need some knowledge, and this is maybe that this kind of ‘do-it-yourself’ tool chain is more of a ‘geeky’ thing?
But if you are willing to read this tutorial, and to spend some time with learning and doing your own reasearch, then you have your free open source based tool chain 🙂
The other thing is: I can get access to the latest and greatest Eclipse, compiler and debugger versions, and do not have to wait for the silicon vendor to release his customized version.
I’m using a Windows 7 64bit machine with the FRDM-KL25Z board. I hope this tutorial is generic enough so it works for other host platforms.
💡 See the comment from Georg in the comments section below how to do things for Linux/Ubuntu.
ARM Build Tools
To compiler and link my sources, I need a tool chain. I’m using the following:
GNU Tools for ARM Embedded Processors
- Go to https://launchpad.net/gcc-arm-embedded and download the installer. At the time writing this, the latest version is gcc-arm-none-eabi-4_7-2013q2-20130614-win32.exe
- Run the setup/installer. Things are very intuitive. But one important thing: at the end make sure you add the path to the environment variable:
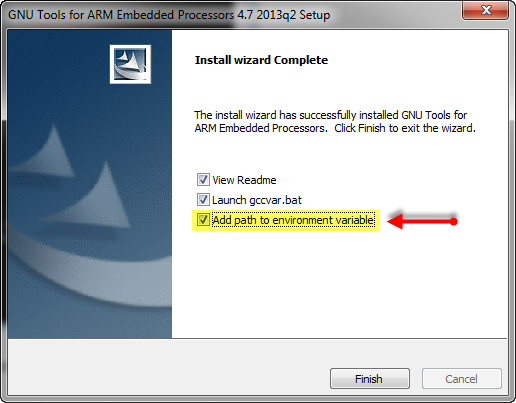
ARM GNU Tools Setup to add environment variables

❗ Adding the path to the GNU tools to the environment variable simplifies things a lot. BUT: if you are using multiple GNU based tool chains, this might cause confusion or problems. If so, you still can go into your Windows system settings and change the PATH settings.
To verify proper operation, open a command prompt (Windows+R, then type ‘cmd’) and run the following command
arm-none-eabi-gcc -v
This should report this:

arm-none-eabi-gcc -v executed
This means that gcc is working properly 🙂
The option -v shows the version information. Because I have added the path to the GNU tools in my PATH environment variables, I can execute it from everywhere. It is now a good time to check the PATH variable. For this I enter this in my command prompt
set PATH
Which shows me what I have in the PATH variable:

PATH variable with GNU gcc
❗ You might need to clean up your PATH variable. Be careful with this as this might have an impact on other tools installed.
GNU Make
The next step is to install ‘make’. With make I can run make files to build my application. Make is used as well in Eclipse (see this post) which is subject of another part of this tutorial.
- Go http://gnuwin32.sourceforge.net/packages/make.htm
- We download *not* the setup, but the zip file. Because of this, we need two parts: the ‘Binaries‘ and the ‘Dependencies‘. They are located in the Download section if you scroll down on above page:
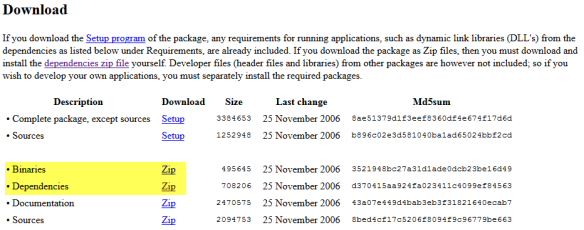
GNU make download
- In the make-xxx-bin.zip, locate the make.exe in the bin folder. Copy that file into the same directory where you have installed the GNU gcc binaries (which is “C:\Program Files (x86)\GNU Tools ARM Embedded\4.7 2013q2\bin” for me). Copying the make to that folder ensure that we can call it from everywhere, as this path is part of the PATH environment variable.
- Do the same for the libiconv2.dll and libintl3.dll inside the make-xxx-dep.zip. These DLL’s are required by the make.exe. Place them as the make.exe into the bin folder of the ARM gcc tools.


Make binaries inside ARM GNU bin folder
To test if make is properly installed, run
make -v
on the command prompt. This should report the make version number:

Make -v command executed
This means that the make utility is working too 🙂
Building with Make
The next step is make and build a simple application which toggles the red LED on the FRDM-KL25Z board.
The first step is to create a ‘workspace’ for a project, e.g. in “c:\projects\workspace”. I have prepared a simple project for the KL25Z toggling an LED here.
💡 That project is on GitHub here.
Download the .zip file and extract it into your workspace folder.
Open a command prompt and CD to the workspace directory you have created, into the project folder so you are on the same level than the makefile.
Here I execute the
make
command. This will build the application:

Making the demo project
Downloading the Application
Debugging is subject of further tutorials. The .elf file is the application file with the debugging information. I can download it with a debugger like CodeWarrior (see this post or this post).
Another way to try the application: I can use the MSD Bootloader (see this post). To load the MSD bootloader:
- Press the Reset button on the board while powering it up
- Copy the MSD-FRDM-KL25Z_Pemicro_v10.9.SDA to the device
- Re-Power the board
Then you can copy the generated .hex (S19) file to the device. Reset the board, and you should see the red RGB LED blinking. 🙂
Make Clean Command
To clean up the generated files, use the
make clean
command:

Make clean executed
Summary
Congratulations! You just built your first program for the FRDM-KL25Z with open source build tools :-).
Using the ARM GNU gcc tool chain is not hard at all. All what I need is the ARM tool chain plus the make utility. Then I can build my application using make files. Writing make files is not subject of this tutorial: you can find plenty of tutorials and examples if you search the web. As a starting point you can use the make file used in this tutorial.
To edit the source files, you can use any editor, including Notepad. In the next tutorial I’ll show how to use a standard version of Eclipse: Part 2: Setting up Eclipse IDE
Happy Making it Do-It-Yourself 🙂

Erich, good info, as always. I’m looking forward to the ProcessorExpert add-in.
I like this toolchain. It compiles quicker than some of the others out there.
http://www.freddiechopin.info/en/articles/35-arm/87-bleeding-edge-toolchain-o-co-chodzi
Note: there is a bug in Eclipse CDT that goofs up its projects and internal builder if you change a toolchain after the initial project is created. I ran into that myself, and Google’d for info and found it’s a long standing problem. I had a devil of a time fixing up afterwards. Keep your eyes open for that problem and let us know how you get past it if it does happen to you.
Bill
LikeLike
Hi Bill,
interesting link with a lot good information around Codesourcery break-down, and ARM Inc recovering the situation. To my point that if tool companies get acquired, this does not mean things get better for the customers :-(. Thanks for the hint about CDT problem. I have not run into it, and have not seen that problem at least with CodeWarrior. It is using a different GNU gcc in 10.4 compared to 10.3, and my 10.3 gcc projects worked well in 10.4. There was indeed a problem in the early 10.4 beta, and here the workaround was to clear the ‘Discovery’ in C/C++ Build > Discovery Options both for the compiler and assembler, and then things worked. Maybe same thing for the problem you have seen?
Erich
LikeLike
I meant to write: “looking forward” to the ProcessorExpert write-up.
This is the bug I ran into:
http://sourceforge.net/p/gnuarmeclipse/bugs/31/
LikeLike
Hi Bill,
ok, so this one is different then.
LikeLike
Hello Erich, first thank you for your tutorial.
What I see as a big drawback at this solution, that no step-by-step debugging is available. Can you please cover how to do a reasonable debugging with this solution?
LikeLike
Hi Michael,
yes, this is subject of part three of this series.
LikeLike
Thanks! I am courious and will stay tuned.
LikeLike
Hi Erich
I did a setup based on your instructions in part 1 for linux running ubuntu 12.04.2 LTS.
For those who are interested in running the toolchain in linux, please follow the instructions below. It worked fine for me. Please make sure to have make installed as well.
This can be done by using the sudo apt-get install make command if needed.
Go to https://launchpad.net/gcc-arm-embedded and download the file gcc-arm-none-eabi-4_7-2013q2-20130614-src.tar.bz2.
Untar it your home directory using tar -xvf gcc-arm-none-eabi-4_7-2013q2-20130614-src.tar.bz2.
create a symbolic link in your home directory using ln -s gcc-arm-none-eabi-4_7-2013q2 gcc-arm.
The makefile had to be tweaked as well. Copy and replace the contents of the current Makefile below. Use make to build, and make clean to clean the build.
#
# !!!! Do NOT edit this makefile with an editor which replace tabs by spaces !!!!
#
##############################################################################################
#
# On command line:
#
# make all = Create project
#
# make clean = Clean project files.
#
# To rebuild project do “make clean” and “make all”.
#
# Provided originally by Hussam Al-Hertani
# Modified by Erich Styger
# Use at your own risk!!!!!
##############################################################################################
# Start of default section
#
TRGT = ~/gcc-arm/bin/arm-none-eabi-
CC = $(TRGT)gcc
CP = $(TRGT)objcopy
AS = $(TRGT)gcc -x assembler-with-cpp
HEX = $(CP) -O ihex
BIN = $(CP) -O binary -S
MCU = cortex-m0
# List all default C defines here, like -D_DEBUG=1
DDEFS =
# List all default ASM defines here, like -D_DEBUG=1
DADEFS =
# List all default directories to look for include files here
DINCDIR =
# List the default directory to look for the libraries here
DLIBDIR =
# List all default libraries here
DLIBS =
#
# End of default section
##############################################################################################
##############################################################################################
# Start of user section
#
#
# Define project name
PROJECT = LED_Toggle
# List all user C define here, like -D_DEBUG=1
UDEFS =
# Define ASM defines here
UADEFS =
LIBSDIR =
LINKER = ./Project_Settings/Linker_Files
# List C source files here
SRC = ./Sources/main.c
SRC += ./Sources/sa_mtb.c
SRC += ./Project_Settings/Startup_Code/kinetis_sysinit.c
# List ASM source files here
ASRC = Project_Settings/Startup_Code/startup.s
# List all user directories here
UINCDIR = \
./Project_Headers \
./Project_Settings/Startup_code
# List the user directory to look for the libraries here
ULIBDIR =
# List all user libraries here
ULIBS =
# Define optimisation level here
OPT = -O0
#
# End of user defines
##############################################################################################
#
# Define linker script file here
#
LDSCRIPT = $(LINKER)/MKL25Z128_flash.ld
FULL_PRJ = $(PROJECT)_flash
INCDIR = $(patsubst %,-I%,$(DINCDIR) $(UINCDIR))
LIBDIR = $(patsubst %,-L%,$(DLIBDIR) $(ULIBDIR))
DEFS = $(DDEFS) $(UDEFS)
ADEFS = $(DADEFS) $(UADEFS)
OBJS = $(ASRC:.s=.o) $(SRC:.c=.o)
LIBS = $(DLIBS) $(ULIBS)
MCFLAGS = -mcpu=$(MCU)
ASFLAGS = $(MCFLAGS) -g -gdwarf-2 -mthumb -Wa,-amhls=$(<:.s=.lst) $(ADEFS)
CPFLAGS = $(MCFLAGS) $(OPT) -gdwarf-2 -mthumb -fomit-frame-pointer -Wall -Wstrict-prototypes -fverbose-asm -Wa,-ahlms=$(<:.c=.lst) $(DEFS)
LDFLAGS = $(MCFLAGS) -mthumb -nostartfiles -T$(LDSCRIPT) -Wl,-Map=$(FULL_PRJ).map,–cref,–no-warn-mismatch $(LIBDIR)
# Generate dependency information
CPFLAGS += -MD -MP -MF .dep/$(@F).d
#
# makefile rules
#
all: $(OBJS) $(FULL_PRJ).elf $(FULL_PRJ).hex $(FULL_PRJ).bin
$(TRGT)size $(PROJECT)_flash.elf
%o: %c
$(CC) -c $(CPFLAGS) -I . $(INCDIR) $< -o $@
%o: %s
$(AS) -c $(ASFLAGS) $< -o $@
%elf: $(OBJS)
$(CC) $(OBJS) $(LDFLAGS) $(LIBS) -o $@
%hex: %elf
$(HEX) $< $@
%bin: %elf
$(BIN) $/dev/null) $(wildcard .dep/*)
#23-July-2012 /dev/null gives an error on Win 7 64-bit : Hussam
-include $(shell mkdir .dep) $(wildcard .dep/*)
# *** EOF ***
LikeLike
Hi Georg,
many thanks for your comment and contribution! With your modified make file I realized that mine was too much Windows file system oriented :-(. I changed mine to use the Linus slashes instead of backslashes. Still there is the whole ‘del’ and ‘rmdir’ thing which is not that portable unless I would use GNU rm.
The only issue I see with your make file you posted is that WordPress has changed spaces and double quotes. It would be better if you could provide your make file as a file instead? I have updated mine on GitHub (https://github.com/ErichStyger/mcuoneclipse/tree/master/Examples). Maybe you could post your make file there (or send it to me and I’ll do). Would be great if we could come up with a make file which works on multiple platforms.
LikeLike
Hi I forked the project, and placed the makefile.linux here. Was unable to add to your repo.
https://github.com/gflerm/mcuoneclipse/blob/master/Examples/FRDM-KL25Z/FRDM-KL25Z_Blink/Makefile.linux
LikeLike
The usual process would be to create a “pull request”. See https://help.github.com/articles/using-pull-requests.
Let me know if this does not work for you. Then I simply will take your file and integrate it.
LikeLike
Cool, for now, please use the file i posted the link to please. Will do that in future. Will look into a more user friendly way of doing the Makefile for both OS’. I recall a few years ago the author of AVR-GCC had a makefile file creator that worked in both Windows and Linux. Going to see if it can be adpated. Was written in Tk/Tcl.
LikeLike
http://www.sax.de/~joerg/mfile/ was what I used to generate the Makefiles for the AVR’s.
LikeLike
thanks for the link, that sounds like an interesting way to have make files for multiple platforms.
LikeLike
Ok, I pulled it and pushed to the master branch. Thanks!
LikeLike
I tryied it out now for 3 hours playing with it.
Basically it works, but not yet reliable. Sometimes USB Flashing “just” doesn’t work and require a reconnect. But for the first try and the feeling “I did it with open tools” it’s great! So far thank you for your work.
Another thing i would like to know, where did you get the header files from? Do you know a source, in case one wants to use another processor?
LikeLike
Hi Michael,
Congratulations!
You mean programming with the MSD USB bootloader did not work all the time? Strange. Which operating sytem are you using? Know that depending on the bootloader firmware there can be issues with Mac and Linux machines. There are known issues as well with explorer extensions like ‘FileCommander’. But copy with the DOS copy command shall always work.
The header files I took from a CodeWarrior project, the assembly startup I rewrite from a version for a STMicroelectonics microcontroller.
LikeLike
Pingback: DIY Free Toolchain for Kinetis: Part 2 – Eclipse IDE | MCU on Eclipse
Pingback: DIY Free Toolchain for Kinetis: Part 3 – Debugger (GDB Server with P&E and Segger) | MCU on Eclipse
Hi Erich,
Thank you for these serie of tutorials, it very informative!
Also thanks for your comment on my blog.
Currently I’m not developing at bare metal since I ported NuttX RTOS for Freedom Board.
I hope you try NuttX soon and post about it here!
LikeLike
I had a quick lookk at NuttX, and this indeed looks interesting. Have you ported all parts and aspects of NuttX? I have not found the KL25Z port?
LikeLike
Hi Erich,
It is a WIP yet. But the main parts are already working, it means you will get NuttX with NSH terminal, GPIO, TSI and SPI working.
Now we need to add support to I2C, write access to internal Flash from userspace and USB.
The KL25Z port is inside arch/arm/kl directory and the board is config/freedom-kl25z.
I’m using NuttX on this prototype board I developed:
LikeLike
Pingback: DIY Free Toolchain for Kinetis: Part 4 – Processor Expert for Eclipse | MCU on Eclipse
Pingback: DIY Free Toolchain for Kinetis: Part 5 – FreeRTOS Eclipse Kernel Awareness with GDB | MCU on Eclipse
Pingback: DIY Free Toolchain for Kinetis: Part 6 – Linux Host with OpenOCD and CMSIS-DAP | MCU on Eclipse
Pingback: A new Freedom Board: FRDM-KL46Z | MCU on Eclipse
Hi, thanks for your dyi free toolchain !
I have a litlle problem with make !
when I do make where the blink file folder is ! the cmd give me that :
arm-none-eabi-gcc -x assembler-with-cpp -c -mcpu=cortex-m0 -g -gdwarf-2 -mthumb
Code/startup;S -o project_Settings/Starup_Code/startup.o
arm-none-eabi-gcc: error: CreateProcess : No such File or directory
make: *** [Project_settings/Startup_Code/starup.o] Error 1
looks like a stupid probleme but .. i cannot find the issue !
LikeLike
It looks like the GNU tools are not present in your PATH settings, as outlined in section “GNU Tools for ARM Embedded Processors”?
LikeLike
I found the problem ! eabi was also use in cocoox and that make a conflict ! 🙂
LikeLike
Pingback: DIY Free Toolchain for Kinetis: Part 7 – GNU ARM Eclipse Plugins | MCU on Eclipse
Hi Erich,
Did you ever make a DIY toolchain with Eclipse for ColdFire or know of a link to one?
I’m still using CW10.2 because that is the last version that supported Linux, and I also use the CW classic IDE’s in a virtual machine. I’ve just installed CW10.5 in a VM to give it a go, but it would be nice to have a native Linux version. I might follow your ARM articles as a guide and try to do this. Any tips?
LikeLike
I have not used the same with ColdFire, but you should be able to use most of the steps. Maybe have a look at CodeSourcery as they have a GNU based tool chain (but I have not used it). The critical point (as always) is how debug hardware. Here you need to have something like GDB or P&E GDB server. But again: I have not used it for ColdFire that way.
LikeLike
Pingback: DIY Free Toolchain for Kinetis: Part 8 – Processor Expert, Eclipse and GNU ARM Eclipse Plugins | MCU on Eclipse
Hi Erich,
Great series of articles. I have myself a TWR-K60F120M and I was hoping to go ahead with the DIY toolchain approach. I managed to follow your simple instructions to build the binary my assumption is the binary would not work on the board. Being a noob I was wondering if you could point me in the direction of getting a hello world like blink program up and running on the TWR-K60F120M. Would it require simple manipulation of the Makefile for the appropriate processor achitecture? Or more detail changes?
LikeLike
Hi Mat,
thanks :-). What is not running (specifics?). To run it properly on the K60, you need to have a look at the startup code and vector table. I used the KL25Z. And of course you need to change the compiler option for the processor.
I recommend that you have a look at my latest part of this tutorial (https://mcuoneclipse.com/2014/01/19/diy-free-toolchain-for-kinetis-part-8-processor-expert-eclipse-and-gnu-arm-eclipse-plugins/) which uses Processor Expert: this tool creates all the needed files. Even if you are not going to use Processor Expert at the end, you can use the files it generates. At least it gets you something working and something you could look at.
LikeLike
Many thanks Erich. After more completely reading your 8 part series it was becoming more evident to me that I should perhaps go down the Processor Expert Eclipse GNU arm Eclipse plugin path. I will head down that path and cross my fingers.
LikeLike
Pingback: DIY Free Toolchain for Kinetis: Part 9 – Express Setup in 8 Steps | MCU on Eclipse
Pingback: DIY Free Toolchain for Kinetis: Part 10 – Project Creation with GNU ARM Eclipse 2.1.1 | MCU on Eclipse
On linux systems, If the make file acts weird , then please change the lines
%o: %c to %.o: %.c
and
%o: %s to %.o: %.s
( put dots )
🙂
LikeLike
Thank you so much for the tip, I was going crazy with that makefile…
LikeLike
You are welcome 🙂
LikeLike
Pingback: Developing for FRDM-KL25Z platform in Linux – Introduction | CoolParadox Blog
Pingback: Constructing a Classroom IDE with Eclipse for ARM | MCU on Eclipse
Pingback: Tutorial: DIY Kinetis SDK Project with Eclipse – Startup | MCU on Eclipse
Pingback: Overwriting Symbols in the GNU Linker File | MCU on Eclipse
Hi Erich,
I recently ordered a FRDM-KL25Z board for playing around a little. As mentioned in an earlier I am using make to compile and link my projects. I used the linker command file which comes with CodeWarrior and adopted it to my needs. With this template I found an issue. When looking at the *.map file after linking I found that there is a load address in section .bss:
.bss 0x1fff0004 0x4 load address 0x00001738
Since .bss contains only uninitialized data, why should there be a load address?
It seems that using “.data : AT(__data_rom_start)” causes this problem. So I changed section data to:
.data :
{
. = ALIGN(4);
_sdata = .;
*(.data)
*(.data*)
. = ALIGN(4);
_edata = .;
} > SRAM AT > FLASH
Running make again and looking at the *.map file section .bss shows the following:
.bss 0x1fff0004 0x4
No load address. Looks correct!
According to the linker manual using > SRAM AT > FLASH is a valid alternative for specifying VMA and LMA.
Best regards,
Philipp
LikeLike
Unfortunately this workaround seems to be valid only if the section after .data does not go to the same memory region as data does.
Here is an example:
.data :
{
. = ALIGN(4);
_sdata_ram = .;
*(.data)
*(.data*)
. = ALIGN(4);
_edata_ram = .;
} > SRAM AT > FLASH
_stmp_rom = _sdata_rom + SIZEOF(.data);
.tmp :
{
. = ALIGN(4);
_stmp_ram = .;
*(.tmp)
. = ALIGN(4);
_etmp_ram = .;
} > MYREGION AT > FLASH
.bss :
{
. = ALIGN(4);
_sbss_ram = .;
PROVIDE ( __bss_start__ = _sbss_ram );
*(.bss)
*(.bss*)
*(COMMON)
. = ALIGN(4);
_ebss_ram = .;
PROVIDE ( __bss_end__ = _ebss_ram );
} > SRAM
Running arm-none-eabi-objdump -h output.elf gives this:
2 .text 00000a50 00000800 00000800 00008800 2**2
CONTENTS, ALLOC, LOAD, READONLY, CODE
3 .data 00000004 1ffff000 00001250 0000f000 2**2
CONTENTS, ALLOC, LOAD, DATA
4 .tmp 00000004 20001000 00001254 00011000 2**2
CONTENTS, ALLOC, LOAD, DATA
5 .bss 00000004 1ffff004 1ffff004 00017004 2**0
ALLOC
6 ._user_heap_stack 00000800 1ffff008 1ffff008 00017004 2**0
Looks good so far. But when I delete section .tmp, objdump gives:
2 .text 00000a50 00000800 00000800 00008800 2**2
CONTENTS, ALLOC, LOAD, READONLY, CODE
3 .data 00000004 1ffff000 00001250 0000f000 2**2
CONTENTS, ALLOC, LOAD, DATA
4 .tmp 00000004 1ffff004 00001254 0000f004 2**2
CONTENTS, ALLOC, LOAD, DATA
5 .bss 00000004 1ffff008 00001258 0000f008 2**0
ALLOC
6 ._user_heap_stack 00000800 1ffff00c 00001258 0000f00c 2**0
ALLOC
In this case LMA address in .bss and _user_heap_stack sections is located in ROM, and this seems to be wrong.
To fix this, simply replace > SRAM by > SRAM AT > SRAM at the end of section .bss.
The output of objdump:
2 .text 00000a50 00000800 00000800 00008800 2**2
CONTENTS, ALLOC, LOAD, READONLY, CODE
3 .data 00000004 1ffff000 00001250 0000f000 2**2
CONTENTS, ALLOC, LOAD, DATA
4 .bss 00000004 1ffff004 1ffff004 0000f004 2**0
ALLOC
5 ._user_heap_stack 00000800 1ffff008 1ffff008 0000f004 2**0
ALLOC
Well the problem is fixed, but it is not an elegant solution for me.
So if there are any other suggestions to solve this, I would be pleased.
P.S. using the linker flag –gc-sections solves this issue to, but in fact I do not want to use garbage collection while linking, since this guy may just deletes some of my code.
LikeLike
Pingback: Comparing CodeWarrior with Kinetis Design Studio | MCU on Eclipse
Pingback: Solving the 8192 Character Command Line Limit on Windows | MCU on Eclipse
Pingback: Going to Mars: Building a DIY Eclipse IDE for ARM Embedded Microcontrollers | MCU on Eclipse
Hi Erich
I can’t find anymore de blink.example. when click on the linke git-hub give me an 404 error.
Enrico
LikeLike
Hi Enrico,
I’m sorry, I have moved some examples so they are easier to find. The stock Eclipse examples are no in https://github.com/ErichStyger/mcuoneclipse/tree/master/Examples/Eclipse. I have updated the link in the post.
Thanks for reporting!
Erich
LikeLike
Pingback: Tutorial: Makefile Projects with Eclipse | MCU on Eclipse
clean make
Maybe “make clean”?
LikeLiked by 1 person
correct, as shown in the screenshot. I have fixed the text in the article, thank you!
LikeLike